Posts with «arduino» label

New Project: Build a Reddit Shower Thoughts Printer

Use some simple electronics to build an IoT printer, like this "Thinking Man" who prints titles from Reddit's Shower Thoughts subreddit.

Read more on MAKE

The post Build a Reddit Shower Thoughts Printer appeared first on Make: DIY Projects, How-Tos, Electronics, Crafts and Ideas for Makers.

“I am a maker in the making”

Moushira Elamrawy is an Egyptian multidisciplinary designer and technologist based in the city of Cairo and founder of Rishalaser, a new concept for laser cutters that is opensource, portable, DIY, and easy to use. She wrote a piece on iAfrikan about becoming a maker and discovering Arduino. It’s an inspiring text and we want to share it on this blog.

——–

Confession: I used to be an architect (possibly still am!), and then I started tinkering with things.
The architecture engineering school I graduated from did not have a workshop space. The first time I met a CNC router in real life was three years after i graduated.

It is hard to discover what you don’t know even exists. Which is somehow, why I had zero imagination of how those awesome Theo Watson installations could possibly work.

I had no business fiddling with electronics whatsoever. My coding and programming skills were limited to some knowledge of ActionScript, some C, and that was about it.

I read about Openframeworks, installed it, went through examples, tutorials and thought “Nice, I can change parameters that in return would change behavior, fantastic..but ..then..what?!”

By that time, I was an architect working in Morocco, between an office that was based in Fez and a construction site based in a beautiful small southern village close to the Algerian borders, called Mhamid ElGhizlane. It normally took me a little over a day and a half to travel from Fez to the construction site.

I had a radio, which I considered my companion in those interesting border areas. Before Morocco, I was living in Sinai mountains, working on a similar desert development project, where the radio would normally catch signals of Saudi Arabia, Israel, and Jordan. The Moroccan Sahara, on the other hand, got me signals from Algeria, with lots of different dialects. Radio feels like travelling within time within places. It makes you really feel the distance you crossed.

[...]

In May 2012, I attended a beginners workshop for Arduino, lead by Bilal, who was visiting Egypt. During the workshop, I controlled an LED via Arduino.

It was magical.

I never used the board before, I barely understood any syntax, yet in 15 min, I did something cool . . that actually works. Arduino: I am in Love, I thought.

It is easy. It is just that starting alone isn’t easy. Going back home, I went through some examples and I felt oh..I can do stuff. I can do all these stuff actually. Oh, wait, there is also: Processing!

By September 2012, I moved to Barcelona for my masters, which started by a fabrication course in Fablab. I was Alice in wonderland. Then physical computing course started, and Alice’s wonderland was getting more vast.

Everything was awesome. The exact skill set that I wanted to learn. But I needed more, a lot more, time to absorb this whole new world. I thought of taking a gap year, but then, week after week, it turned out that once the ball gets rolling everything is accelerated.

Thanks actually to my sister for pushing me to trust that the ball will get rolling. She herself was moving from translation to graphics design one year before me. It is a family thing.

Arduino was THE treasure.

At the end of the day, all those fantastic surreal systems that I was fascinated by could be done with some components and an Arduino. The amount of associated open source resources is tremendous. The forum is awesome and people actually respond.

Through Arduino, I learned more about microcontrollers, I could program standalone circuits. Then the ball kept rolling, I learned eagle, I can mill some boards, I can solder (err, that was troublesome!), I can interface stuff, I can build sensors, I can work with data, I can build RF sensors, then I became obsessed with antennas, signal processing, and RFID.

I am still learning and learning, but it is much easier now.

Coming from this background, I always go back with time 4 or 5 years ago and recall how I used to react to a “closed box” new technology?

How life would have changed if machine interaction have been made easier, or basically how my life would have changed if machines had the opportunity to step out of their labs and talk to more people.

Making technology more portable and more accessible, is one reason why I started the mobile operated laser cutter project last year, of course, the project would have never been realized without the team that continued with enthusiasm.

Another wonderful project that I just co-started is Jebaleya Talks, with the hope of giving voice to women of Saint Katherine village in Sinai, by introducing them to smart textiles! Well, lets see how this will evolve..

While working in the desert in Sinai, the project foreman was my mentor, his words of wisdom still echo in my ears

“Everything comes along..with patience. If you could just wait”.

Apparently, he had a point!

E-mails are a distraction.

Meetings are boring.

Regular jobs suck your inner clock.

Take a sabbatical and learn what you want to learn and start anew.

At least try.

Oh, and during your sabbatical, give Arduino a try, it might change your life as well.

Let’s just hope that Arduino founders will keep embracing the same energy they started the project with, and that the big whales leave Arduino alone, so that it stays, open and libre just as how it helped liberate many creative energies and minds.

Keep reading on iAfrikan

Stenography (Yes, with Arduinos)

What’s the fastest keyboard? Few subjects are as divisive in the geek community. Clicky or squishy? QWERTY or Dvorak? Old-school IBM or Microsoft Natural? The answer: none of the above.

The fastest normal-keyboard typists (Dvorak or Qwerty) can get around 220 words per minute (wpm) in bursts. That sounds fast, and it’s a lot faster than we type, but that’s still below the minimum speed allowable for certified court reporters or closed captioners. The fastest court reporters clock in around 350 to 375 wpm for testimony. But they do this by cheating — using a stenotype machine. We’ll talk more about stenography in a minute, but first a hack.

The Hack

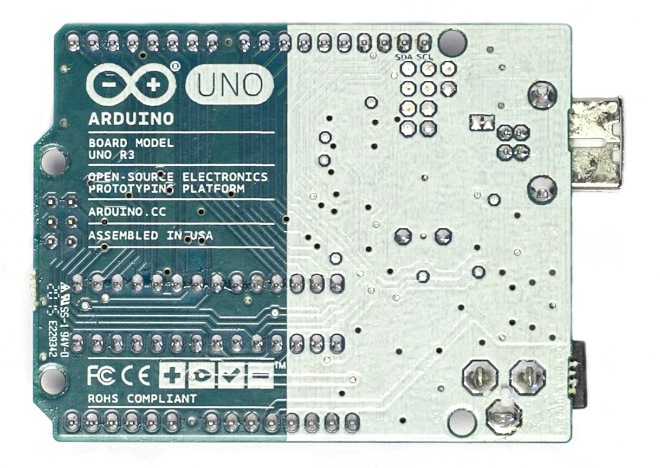
[Kevin Nygaard] bought a used Stentura 200 stenotype machine off Ebay and it wasn’t working right, so naturally he opened it up to see if he could fix it. A normal stenotype operates stand-alone and prints out on paper tape, but many can also be connected to an external computer. [Kevin]’s machine had a serial output board installed, but it wasn’t outputting serial, so naturally he opened it up to see if he could fix it. In the end, he bypassed the serial output by soldering on an Arduino and writing a few lines of code.

The serial interface board in [Kevin]’s machine was basically a set of switches that made contact with the keys as they get pressed, and a few shift registers to read the state of these switches out over a serial connection. [Kevin] tapped into this line, read the switch state out into his Arduino, and then transmitted the correct characters to his computer via the Arduino’s serial over USB. (Video demo) As hardware types like to say, the rest is a simple matter of software.

Stenography 101

We’re big keyboard lovers. Maybe one third of Hackaday’s content is typed out on one or another vintage IBM Model M. No self-respecting geek who types for a living doesn’t have a near-religious keyboard preference. [Kevin]’s simple hack brought to our attention that we’ve never covered stenography. (Not steganography.) Frankly, we’re ashamed, and we’re fixing that right now.

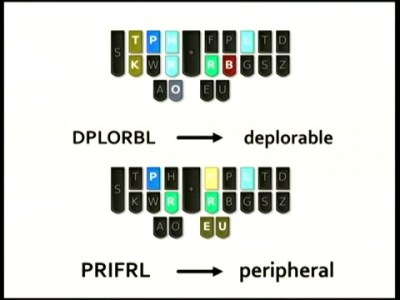
The secret to the speed of steno is the use of a chorded, anatomically designed keyboard with an accompanying phonetic mnemonic shorthand system. Basically, one mashes down keys that correspond to sound of the word, and they’re interpreted according to a mnemonic system with a user-extensible dictionary. In short, it’s machine-assisted typing.

Many words are a single chord, and there are millions of possible chords, so there’s plenty of open space to add one’s own key combinations as the need arises.

But because stenography is a niche market, and because steno machines are designed to be used professionally by closed-captioners and court reporters, stenotype machines cost thousands of dollars. The software that runs them isn’t cheap either and is written for a very specific purpose, and is of course proprietary. In short, the market caters only to professionals, and there’s not much room for the steno enthusiast, until recently.

Plover: Open Software

Plover is free and open-source stenography software (Github), and is aiming to be the steno gateway drug. Specifically, Plover can turn a normal keyboard (with n-key rollover to support chording) into an emulated steno keyboard through software, allowing entry into the world of stenography for a hundred bucks instead of a few thousand.

Plover will also work with professional stenotypes that support serial output, like the one that [Kevin] modified that sent us down this rabbit hole in the first place. So once you’re hooked on steno, you can use your hard-earned dictionary with improved hardware if you want.

Note that the n-key rollover requirement is binding, and that’s where the $100 comes from. You can easily chord 20 keys on a stenotype machine because each finger has two buttons underneath it, and the chording systems are designed to take extensive use of hitting them two at a time. Some gaming keyboards have sufficient rollover capability, but it’s not a feature that’s demanded by the unwashed masses. In short, n-key rollover is going to cost you a little bit, or you can DIY. (Hint, hint.)

If you’ve played around with alternative keyboards (or just keyboard mappings) before, you’ll know that the Achilles’ Heel is how they handle the command and control characters that your favorite editor or IDE requires you to use. We had this hand-held device that made it nearly impossible to type control-x control-s, so it was goodbye keyboard or goodbye Emacs.

This is not a problem with a steno device, because you can define your own chord mappings. But you don’t have to stop with control characters or even Unicode. Map chords to commonly-used variable names. Map chords to entire flow-control structure skeletons (if-then-else). Think of steno strokes as being typing macros and you’ll get the idea.

The lead behind Plover, [Mirabai Knight], has a ton of info on getting started, including a live browser demo (a must-try!) and a video demonstrating Python (among other things) where you can see how chording works with coding. If you want to see how [Mirabai] transcribes live for clients using Plover and Vim, this video and its side pane are a great peek behind the curtains.

Open Steno Project: The Hardware

The Open Steno Project is an umbrella project on top of Plover to reduce the hardware and theory-learning hurdles. They list three keyboard options.

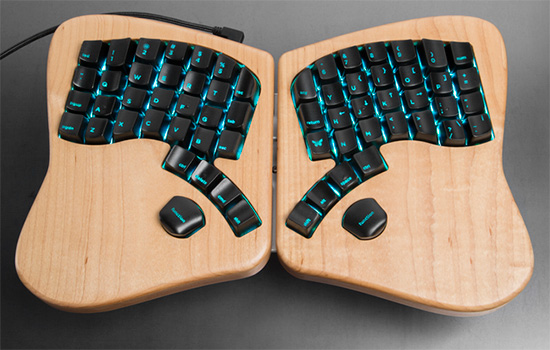
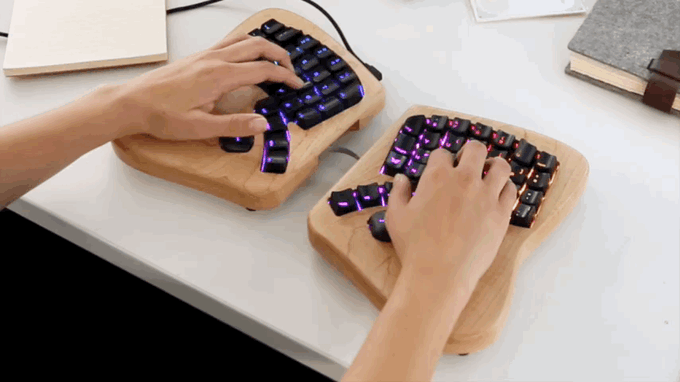
The Ergodox seems just to be a fancy ergonomic split keyboard, but one that would be particularly suited to stenography.

The Stenosaurus (Silicon-Valley-style empty sign-up page alert) looks sexy. That Stenosaurus is run by [Josh Lifton], the original coder heavyweight behind Plover who recently crowdfunded a batch of lightweight and quiet keyswitches, gives us hope. But hope and $4.35 will buy you a double-pump soy vanilla-whip latte; we like to see work in progress.

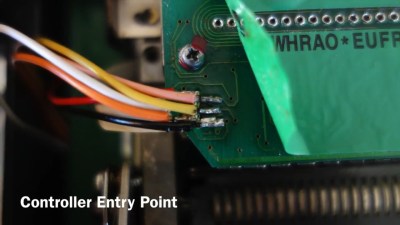
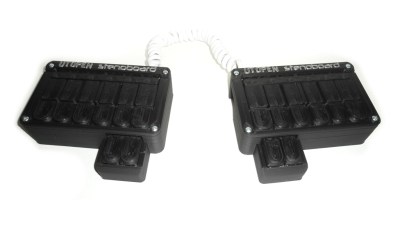
In contrast, the Stenoboard is an open project with actual designs, a 3D-printed case, code, and project examples. The firmware runs on an Arduino. StenoSpeak, an application based on the Stenoboard just won the second prize at the AT&T Connect Ability Hackathon, demonstrating that there’s other reasons to learn steno besides transcription. If you’re looking for some prior art for your own implementation, or a place to jump in and contribute, Stenoboard is a good bet.

Conclusion

We’re surprised that we found so few DIY projects on the steno front. The hardware is fundamentally simple, with obvious directions for improvements and personalizations. A stenotype is extremely costly to purchase, but cheap to DIY. The software side is well-established and open source. In short, the ball is set up for a quick hardware field goal.

On Hackaday.io and the blog, there are tons of projects for making improved keyboards — many of them are chorded. But so far all of them ignore the stenotype, the current state of the art in high speed typing that’s been around since the late 1800s. We want to see this change, and we think the tide is high and the planets aligned and so on. Fly, winged monkeys, fly!


Filed under: Arduino Hacks, Featured, peripherals hacks

Control an Arduino with Your Smartphone via Blynk

Blynk is a new platform that allows you to build interfaces for controlling and monitoring your projects from your iOS and Android device.

Read more on MAKE

The post Control an Arduino with Your Smartphone via Blynk appeared first on Make: DIY Projects, How-Tos, Electronics, Crafts and Ideas for Makers.

Hackaday Links: July 5, 2015

It’s the fifth of July. What should that mean? Videos on YouTube of quadcopters flying into fireworks displays. Surprisingly, there are none. If you find one, put it up in the comments.

The original PlayStation was a Nintendo/Sony collaboration. This week, some random dude found a prototype in his attic. People were offering him tens of thousands of dollars on the reddit thread, while smarter people said he should lend it to MAME and homebrewer/reverse engineer groups. This was called out as a fake by [Vadu Amka], one of the Internet’s highly skilled console modders. This statement was sort of semi retracted. There’s a lot of bromide staining on that Nintendo PlayStation, though, and if it’s a fake, the faker deserves thousands of dollars. Now just dump the ROMs and reverse engineer the thing.

Remember BattleBots? It’s back. These are my impressions of the first two episodes: Flamethrowers are relatively common now, ‘parasitic bots’ – small, auxilliary bots fighting alongside the ‘main’ bot are now allowed. KOs only count for the ‘main’ bot. Give it a few more seasons and every bot will be a wedge. One of the hosts is an UFC fighter, which is weird, but not as weird as actually knowing some of the people competing.

Ceci n’est pas un Arduino, which means it’s from the SRL camp. No, wait. It’s a crowdfunding campaign for AS200 Industries in Providence, RI.

Wanna look incredibly sketchy? Weld (or braze, or solder) your keys to a screwdriver.

The UK’s National Museum of Computing  is looking for some people to help maintain 80 BBC Micros. The museum has a ‘classroom’ of BBC micro computers still in operation. Caps dry out, switching power supplies fail, and over the years these computers start to die. If you have the skills and want to volunteer, give it a shot.

USA-made Arduinos are now shipping. That’s the Massimo Arduino, by the way.

Win $1000 for pressing a buttonWe’re gauranteed to give away a thousand dollar gift card for the Hackaday store next Wednesday to someone who has participated in the latest round of community voting for the Hackaday Prize.


Filed under: Hackaday Columns, Hackaday links

Arduino Uno assembled in US now available in the Store

We are proud to share with you the link to purchase the first batch of Arduino Uno ($24.95) assembled in US by Adafruit and created by #TeamArduinoCC.

The partnership started last May when Massimo announced it during Maker Faire San Mateo. Right after our team at Arduino and Adafruit team did all the best they could the make it happen on July the 4th, Independence Day! Now, it’s real! Arduino Uno can be back in your hands allowing you to create amazing interactive projects and, at the same time, supporting the open source community!

The partnership started last May when Massimo announced it during Maker Faire San Mateo. Right after that day, our team at Arduino and Adafruit team did all the best they could the make it happen on July the 4th, Independence Day! Now, it’s real! Arduino Uno can be back in your hands allowing you to create amazing interactive projects and, at the same time, supporting the open source community!

If you take a close look at the back of the board, you’ll find the “Assembled in USA” tag and also the new Genuino logo, Arduino sister-brand. We are adding the Genuino logo to make it easier for the Arduino community to spot original boards and we are going to include this logo to all genuine Arduino boards from now on (like we did for the recently-released Arduino Zero).

Rotary Indexer gives Mill a 4th axis (sort of)

Rotary indexer’s are standard issue in most machine shops. These allow you to hold or chuck a work piece, and then a graduated handle lets you to rotate the workpiece. Useful when you want to drill or tap axial or radial features. A rack and pinion drive ensures that the workpiece does not move under machining load. Quite often, these indexers also have a manual lock to take care of gear backlash and play. Automating them is not too difficult either. You could use just a stepper motor (open loop) or servo+encoder (closed loop) to drive the turntable.

[smashedagainst] needed to drill six radial holes on a part. And he had to do it on 500 pieces for a total of 3000 holes. That was just for the first initial run, with more drilling likely in the future. The part in question was small and light weight. So instead of using a heavy duty, industrial grade unit, he built an all-electric rotary indexing jig using a stepper motor and an Arduino, giving him a sort of rotary 4th axis. His idea was to directly use the stepper motor to rotate the workpiece without any gearing, but he needed to build his own rig to do so.

His initial prototype used an Arduino Uno, which he swapped for a Pro Mini in the final version to save some space. The Arduino was connected to a Rugged Circuits motor driver. This was the only driver, out of the several that he tried that managed to hold the stepper motor with enough torque to prevent the workpiece from moving while drilling. The number of holes to be drilled is hard-coded in the Arduino, so all he needed was a single button. Each press of the button advanced the stepper motor through 60 degrees, giving him six, equally spaced holes. He used a NEMA-34 stepper motor, and that meant a beefy power supply. He scavenged a power supply from an old laser printer which conveniently had 24V DC as well as 5V outputs.

The next step was to work on the mechanical assembly. He machined an arbor that is attached to the shaft of the stepper motor. The face of the arbor is hexagonal and the workpiece wedges/locates over this. The motor assembly is fixed on one end of a base plate. The other end of the base plate has a clamping mechanism activated by a toggle clamp. It is also able to rotate (much like a live centre on a lathe). The workpiece is mated to the arbor, and the toggle clamp then locks the piece in place. During initial trials, some of the assembly fasteners worked loose, and there was some amount of chatter from the drill bit. He fixed these issues, and found it performed best when he set the spindle speed at 2400 rpm. Once he got it working, he was able to finish a hundred parts in under 2 hours. Drilling six holes in quick succession causes the part to get quite hot, so he first used some  pressurised air cooling. Later, he switched to a spray can based multi purpose penetrant lubricant. Watch his video of the indexing jig in action below.


Filed under: cnc hacks, tool hacks

Instrument Cluster Clock Gets The Show On The Road

While driving around one day, [Esko] noticed that the numbers and dials on a speedometer would be a pretty great medium for a clock build. This was his first project using a microcontroller, and with no time to lose he got his hands on the instrument cluster from a Fiat and used it to make a very unique timepiece.

The instrument cluster he chose was from a diesel Fiat Stilo, which [Esko] chose because the tachometer on the diesel version suited his timekeeping needs almost exactly. The speedometer measures almost all the way to 240 kph which works well for a 24-hour clock too. With the major part sourced, he found an Arduino clone and hit the road (figuratively speaking). A major focus of this project was getting the CAN bus signals sorted out. It helped that the Arduino clone he found had this functionality built-in (and ended up being cheaper than a real Arduino and shield) but he still had quite a bit of difficulty figuring out all of the signals.

In the end he got everything working, using a built-in servo motor in the cluster to make a “ticking” sound for seconds, and using the fuel gauge to keep track of the minutes. [Esko] also donated it to a local car museum when he finished so that others can enjoy this unique timepiece. Be sure to check out the video below to see this clock in action, and if you’re looking for other uses for instrument clusters that you might have lying around, be sure to check out this cluster used for video games.

The mechanics in dashboards are awesome, and produced at scale. That’s why our own [Adam Fabio] is able to get a hold of that type of hardware for his Analog Gauge Stepper kit. He simply adds a 3D printed needle, and a PCB to make interfacing easy.


Filed under: car hacks, clock hacks

Arduinos (and other AVRs) Write To Own Flash

In this post on the Arduino.cc forums and this blog post, [Majek] announced that he had fooled the AVR microcontroller inside and Arduino into writing user data into its own flash memory during runtime. Wow!

[Majek] has pulled off a very neat hack here. Normally, an AVR microcontroller can’t write to its own flash memory except when it’s in bootloader mode, and you’re stuck using EEPROM when you want to save non-volatile data. But EEPROM is scarce, relative to flash.

Now, under normal circumstances, writing into the flash program memory can get you into trouble. Indeed, the AVR has protections to prevent code that’s not hosted in the bootloader memory block from writing to flash. But of course, the bootloader has to be able to program the chip, so there’s got to be a way in.

The trick is that [Majek] has carefully modified the Arduino’s Optiboot bootloader so that it exposes a flash-write (SPM) command at a known location, so that he can then use this function from outside the bootloader. The AVR doesn’t prevent the SPM from proceeding, because it’s being called from within the bootloader memory, and all is well.

The modified version of the Optiboot bootloader is available on [Majek]’s Github.  If you want to see how he did it, here are the diffs. A particularly nice touch is that this is all wrapped up in easy-to-write code with a working demo. So next time you’ve filled up the EEPROM, you can reach for this hack and log your data into flash program memory.

Thanks [Koepel] for the tip!


Filed under: Arduino Hacks

Keyboardio joins Arduino At Heart Program

After two and a half years of work and dozens of prototypes, Kaia Dekker and Jesse Vincent have launched Keyboardio Model 01 on Kickstarter: an heirloom-grade mechanical keyboard designed for serious typists.

As you’ll see from the video presentation below, the Model 01 is not just a keyboard. Kaia and Jesse actually re-envisioned the way we type to make it feel great. On top of that it has a beautiful hardwood enclosure and it ships with source code and a screwdriver. The Model 01’s firmware is a regular Arduino sketch you can explore and change yourself.

The project reached its target in the first few hours and you have a few more days to get one!

In the meantime they also joined the Arduino at Heart Program to make it fully customizable with the Arduino IDE:

We’ve built the Model 01 around the same ATmega32U4 microcontroller that Arduino uses in the Arduino Leonardo. Early on, we figured we’d eventually switch away to a cheaper ARM microcontroller, but then we fell in love with just how easy Arduino makes it for a new programmer to get up to speed. For all intents and purposes, the Model 01’s brain is a regular Arduino. You can update your keyboard from the Arduino IDE. If you want to make your keyboard do something special, there are thousands of Arduino resources online to help you out.


Learn more about Keyboardio on Kickstarter, where you can pre-order it and support Jesse & Kaia, who made it with love (and just a bit of obsession).