Posts with «arduino hacks» label

DIY Arduino Cases You Never Knew Existed


There are sure a lot of varieties of Arduinos out there but there may even be more of a variety when it comes to Arduino Cases. Let’s take the most popular Arduino form factor, the Uno. Below are a handful of unique cases for the Uno-sized boards.


by [Megaduty], Arduino Protection Box 

We’ll call this one robust. Although it is 3D printed, its intent is to be extremely protective of the inhabitant. Some extra thought went into this case, no tools are needed! After the Arduino snaps into place, so does the cover. There is an access door to get the input/output wires to the free world. [Megaduty] suggests that this contains $0.10 of plastic. Not a bad deal.


by [Jason], Lexan Beauty

By looking at these photos you may think you’d need a laser cutter to make this stylish case. Not so! [Jason] sketched out the design on lexan, cut it out with a jig saw and then heated the material to bend it around a wooden form.  It’s worth noting that the top of this case has openings so that a shield can fit onto the Arduino while it is still in the case.


by [Gurt],  Bezel for LCD Screen Shield  

If your Arduino project is using a SainSmart LCD keypad shield for the user interface then this case will surely put a smile on your face. The holes line up with the buttons on the SainSmart shield. In addition to the case, the buttons are also available for download and printing. Screw holes are provided to allow secure attachment between the shield and case. All you need is a 3D printer to get going with this project. It comes in any color as long as it’s pink!


by [jwags55],  LCD Electrical Box Topper

This one is similar to above, it is 3D printed and designed for an LCD/Button Shield, but this time for another shield configuration. As you can see it has integrated flexible tabs that allow access to the shield buttons. What you can’t see from this photo is that it is mounted to a standard 4×4″ electrical box available from any hardware store. A standard electrical box is deep enough for the shield and an Arduino. Extra-deep boxes are available in case you need more room.


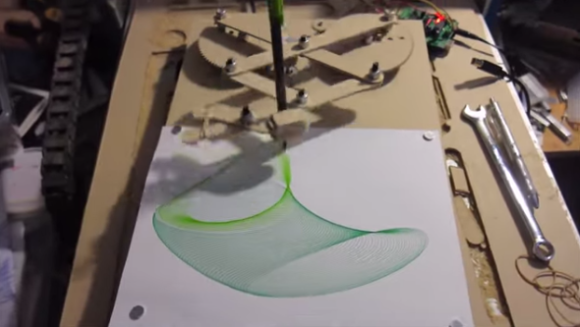
by [Daniel],  CNC Routed Wood 

What came first, the Arduino Case or the CNC Router? A pretty cool DIY CNC Router was responsible for making this case. An Arduino running GRBL controls the CNC Machine, which moves a spindle that, in turn, cuts pieces out of wood, and those pieces of wood are assembled to form a case that holds the Arduino that runs GRBL…… your mind was just blown.


by [Jason], Folding Arduino Lab

Are the above cases not good enough for ya? Maybe they don’t have enough features, or are only good for finished projects. If you are interested in taking your perpetual Arduino project on the road then pay attention. This case not only holds an Arduino and breadboard, it has two drawers for your components. If the breadboard and one of the drawers are removed, the closed case will even fit an installed shield. Download the STL files here.


by [ninjaprawn],  Lego Case

This list wouldn’t be complete without at least one (or two) extremely inexpensive case options. Here we have a Lego-based enclosure. What it lacks in style is made up by its zero-cost and minimal effort required. It does what it was made to do.


by [Allan],  Cardboard Insulator 

I’m not sure we can call this a ‘case’ per se, it’s just a piece of cardboard tied on to an Arduino through the mount holes. [Allan] had to do this to prevent the contacts on the underside of the board from shorting by way of typical workbench clutter.


If there’s a sweet case out there that we’ve missed, let the other readers know in the comments. Or, maybe you’ve made your own specialized case, document it somewhere on the ‘web and let us know.


Filed under: Arduino Hacks
Hack a Day 09 May 18:00

The Smallest ATtiny85 Based USB Board

“Possibly the smallest ATtiny85 based ‘duino derivative”. Indeed! When Olimex announced the Olimexino 85s as the smallest Arduino ever, [Tim] took that as a challenge. His very small Arduino based USB devboard is quite a bit smaller than the Olimexino!

The Nanite 85 was carefully designed to be both small and functional. Not only is it 20% smaller than the Olimexino, but also sports a reset button! One of the coolest aspects of this design is that it has the same pinout and size as a DIP ATtiny85. This means that you can use the Nanite 85 for developing your code with the USB bootloader, and then you can directly replace it with a standard (pre-programmed) ATtiny85. The major downside to using this device over the aforementioned devices, is that it does not include a voltage regulator for powering the device via USB (or battery), the device is simply hooked directly to the 5V rail from the USB connector.

We can’t help but be impressed with this well-thought-out design. It is also easy to assemble since it uses larger surface mount components. If smaller components were used, even more features (such as a regulator) could be included. Do you have an even smaller USB Arduino? The race is on for the smallest Arduino ever!


Filed under: Arduino Hacks

Tell Time and Blink an LED on Your Wrist with WatchDuino

Is your hipster wrist having a hard time waiting for the debut of the iWatch? There’s a new open hardware/software project out that could help calm your nerves. The WatchDuino is exactly what it sounds like, an Arduino-based wrist watch.

The component list is short and inexpensive. The meat and potatoes consist of an ATMega328, crystal, Nokia LCD screen and LiPo battery. The USB-rechargeable battery lasts about a week before needing to be such. Besides presenting the Time and Date in both analog or digital formats (as you would expect) there is an alarm and timer. Additionally, there are 2 games, Pong and Snake. Any lack of features is made up for the fact that the software is open and can be modified and added to by the community. We’re sure the development of this watch will be quick and significant.

Confirming the coolness of this project is the fact that it won 1st place in the 2014 BIICODE  Programming Competition. If the WatchDuino is right up your alley, the documentation can be found here. Go make one!

Thanks [Javier]


Filed under: Arduino Hacks

The Zorkduino

Zork, the famous Infocom text-based adventure game, is actually quite the technical achievement in software engineering. It’s an amazingly large world to explore, albeit in text form only, running on an interpreter that allows paging, loading, and saving the complete state. All this, built to run on computers with meager amounts of RAM in the late 70s. You might think it would be easy to play Zork on an Arduino, but as [rossum] found out, that’s easier said than done (alternate blog link)

While most computers that were capable of running Zork had at least 8k of RAM, if not more, the ATMega328 in the Arduino only has 2k of RAM. Those fancy home computers of yore also had built-in video, a keyboard, and most of the time, a disk drive. The Arduino has none of that.

[Rossum] faced this challenge head on, capitalizing on the onboard hardware of the Arduino. Video is generated by using SPI mode on a UART at top speed – 8 MHz. This just shifts out pixels from the video buffer on an SD card. The keyboard is handled like any other PS/2 keyboard project on the Arduino, and audio is generated by toggling a pin at 1000Hz for a keypress, and 3600Hz for SD card access.

The finished product includes a bunch of other Infocom games on the SD card, including Leather Goddesses of Phobos, and the ability to run Hitchhiker’s Guide to the Galaxy, the game regarded by many as being better than the book. Video below.


Filed under: Arduino Hacks
Hack a Day 01 May 00:00

A Simple Programmable Electronic Load Using the Arduino

Some projects are both educational and useful. We believe that [Jasper's] Arduino based electronic load is one of those project.

[Jasper's] electronic load can not only act as a constant current load, but also as a constant power and constant resistive load as well. The versatile device has been designed for up to 30V, 5A, and 15W. It was based on a constant current source that is controlled by a DAC hooked up to the Arduino. By measuring both the resulting voltage and current of the load, the system can dynamically adapt to achieve constancy. While we have seen other Arduino based constant loads before, [Jasper's] is very simple and straight forward compartively. [Jasper] also includes both the schematic and Arduino code, making it very easy to reproduce.

There are tons of uses for a voltage controlled current source, and this project is a great way to get started with building one. It is an especially great project for putting together your knowledge of MOSFET theory and opamp theory!


Filed under: Arduino Hacks

Profiling An Arduino

In proper, high-dollar embedded development environments – and quite a few free and open source ones, as well – you get really cool features like debugging, emulation, and profiling. The Arduino IDE doesn’t feature any of these bells a whistles, so figuring out how much time is spent in one section of code is nigh impossible. [William] came up with a clever solution to this problem, and while it doesn’t tell you exactly how much time is spent on a specific line of code, it’s still a good enough tool to be a great help in optimization.

[William]‘s solution is to create a ‘bin’ for arbitrary chunks of code – one for each subroutine or deeply nested loop. When the profiler run, you end up with a histogram of how much time is spent per block of code. This is done with an interrupt that runs at about 1 kHz, with macros sprinkled around the code. Each time the interrupt ticks, the macro runs and increases a counter by one. Let the sketch run for a minute or so, and you get an idea of how much time is spent in a specific area of code.

It’s a bit of a kludge, but when you’re dealing with extremely minimal tools, any sort of help in debugging is sorely needed and greatly appreciated.


Filed under: Arduino Hacks
Hack a Day 29 Apr 03:00

DIY Multimeter, Arduino Sold Seperately

You can’t argue that Arduinos are extremely popular with the maker/hacker community. Some would say that there is certainly no shortage of projects to make using them. [Milen] thought otherwise and felt it was time to create an Arduino-based multimeter.

At the heart of this project  is a common Arduino Uno. The additional parts were kept to a minimum in order to keep down the overall cost and project complexity. The finished product can measure voltage from 0-100v, amperage up to 500mA and resistance between 0-250 kohm. If you need to check for continuity, it can do that too.

All of the parts required to make the multimeter fit on a shield that plugs directly into the Arduino. Banana plugs allow for attaching test leads. The measurement values are displayed on an LCD screen and/or (if connected) to the Arduino IDE Serial Monitor. If only using the serial monitor, the LCD screen can be omitted to save a few bucks.

If you would like to build one for yourself, the above link has detailed instructions, schematics and a bill of material. The best bang-for-the-buck multimeter available is still the Harbor Freight Special that you can usually get for free with purchase.

[Thanks Karl]


Filed under: Arduino Hacks

Building a Final Key


Remembering passwords is a pain, and there’s a number of devices out there to make it easier. If you’re looking to roll your own, this guide to building a Final Key will walk you through the process.

We talked about the Final Key before. It’s a one button password manager that encrypts and stores your password. It acts as a virtual serial port for configuration. When you hit the button, it becomes a keyboard and types in the correct password.

The creator has no intentions of making this a commercial project for a number of reasons. Instead, easy build instructions are provided based on the Arduino Pro Micro. The 24LC512 EEPROM can be soldered directly to the Arduino by bending out the DIP legs. A few resistors, a button, and an LED finish off the project. The last step is to fill it with hot glue to prevent tampering.

The Final Key firmware is available on Github, and the case can be ordered from Shapeways. If you’re interested in hardware password management, you can also check out the Mooltipass which is being developed on Hackaday.

[Thanks to Lars for the tip!]


Filed under: Arduino Hacks, security hacks

Sublime Text as an Arduino IDE

If you’ve played with an Arduino, you’ve probably been frustrated by the IDE. It works, but it’s not the best editor. It’s especially painful for bigger files and larger projects. The Stino plugin for Sublime Text aims to solve this issue by bringing the full functionality of the Arduino IDE to the Sublime Text editor.

Sublime Text is a powerful text editor with support for most programming languages. What it’s missing is support for compiling and uploading code to an Arduino. Stino bridges that gap. Sublime is a commercial product, and retails for $70 USD. However Sublime does have an indefinite trial period, so Stino can be evaluated for free. Stino itself is an open source plugin written in Python, and you can contribute to the project on Github.

After installing Sublime and Stino, you point the plugin at an Arduino install folder. It then allows you to build and flash directly from the editor. For anyone who’s been frustrated with the Arduino IDE, this looks like a slick solution.

[Thanks to Matt for the tip!]


Filed under: Arduino Hacks
Hack a Day 21 Apr 06:00

Flexible Arduino Sure to Be A Hit


Wearable, lightweight hacks have long been dominated by the Lilypad. This will probably change with the introduction of the Printoo. Using printable circuit technology, the Printoo takes a modular approach to enable hackers, makers, and engineers alike to construct flexible circuits that can be put on almost anything, including paper!

Powered by the all too familiar ATmega328, the Printoo core module is fully compatible with the Ardunio IDE. The modular design enables functionality with several other printed devices including displays, batteries, sensors and even LED strips to make many different projects possible. One of the most interesting modules is the 1.5 volt, 500 micron thick electrochromic display.

Be sure to check out their Kickstarter, which has a nice video that demonstrates the project. If funded, they will be available in October in case you want to get your hands on one. Or feel free to make your own. Just be sure to let us know if you do!


Filed under: Arduino Hacks, wearable hacks