Posts with «accelerometer» label

Cheating the Perfect Wheelie With Sensors And Servos

Everyone remembers popping their first wheelie on a bike. It’s an exhilarating moment when you figure out just the right mechanics to get balanced over the rear axle for a few glorious seconds of being the coolest kid on the block. Then gravity takes over, and you either learn how to dismount the bike over the rear wheel, or more likely end up looking at the sky wondering how you got on the ground.

Had only this wheelie cheating device been available way back when, many of us could have avoided that ignominious fate. [Tom Stanton]’s quest for the perfect wheelie led him to the design, which is actually pretty simple. The basic idea is to apply the brakes automatically when the bike reaches the critical angle beyond which one dares not go. The brakes slow the bike, the front wheel comes down, and the brakes release to allow you to continue pumping along with the wheelie. The angle is read by an accelerometer hooked to an Arduino, and the rear brake lever is pulled by a hobby servo. We honestly thought the servo would have nowhere near the torque needed, but in fact it did a fine job. As with most of [Tom]’s build his design process had a lot of fits and starts, but that’s all part of the learning. Was it worth it? We’ll let [Tom] discuss that in the video, but suffice it to say that he never hit the pavement in his field testing, although he appeared to be wheelie-proficient going into the project.

Still, it was an interesting build, and begs the question of how the system could be improved. Might there be some clues in this self-balancing motorized unicycle?

DIY Dungeon Crawler Game Plays on Single LED Strip

A delightful version of a clever one-dimensional game has been made by [Critters] which he calls TWANG! because the joystick is made from a spring doorstop with an accelerometer in the tip. The game itself is played out on an RGB LED strip. As a result, the game world, the player, goal, and enemies are all represented on a single line of LEDs.

How can a dungeon crawler game be represented in 1D, and how is this unusual game played? The goal is for the player (a green dot) to reach the goal (a blue dot) to advance to the next level. Making this more difficult are enemies (red dots) which move in different ways. The joystick is moved left or right to advance the player’s blue dot left or right, and the player can attack with a “twang” motion of the joystick, which eliminates nearby enemies. By playing with brightness and color, a surprising amount of gameplay can be jammed into a one-dimensional display!

Code for TWANG! is on github and models for 3D printing the physical pieces are on Thingiverse. The video (embedded below) focuses mainly on the development process, but does have the gameplay elements explained as well and demonstrates some slick animations and sharp feedback.

Using a spring doorstop as a controller is neat as heck as well as intuitive, but possibly not quite as intuitive as using an actual car as a video game controller.

Stop Motion with the Time Glove

What do you get when you put an ultra-bright LED in the palm of a glove, and strobe it controlled by an accelerometer? A Time Control Glove! In creator [MadGyver]’s own words, it’s “just a stroboscope with frequency adjustment” but the effect is where all the fun is.

The Time Control Glove uses the stroboscopic effect, which many of us have seen used in timeless water drop fountains where the strobe rate makes drops appear to change speed, freeze in place, and even change direction. [MadGyver] made the entire assembly portable by putting it into a glove. An on-board accelerometer toggles the strobe in response to a shake, and the frequency is changed by twisting the glove left or right. The immediate visual feedback to the physical motions is great. The whole effect is really striking on the video, which is embedded below.

Schematics and bill of materials are available on GitHub. Brilliant work! And while we’re discussing the stroboscopic effect, find out how it can be used to tune guitar strings.

[via Arduino Blog]


Filed under: Arduino Hacks, how-to, led hacks

Be the Firebender You Want to See in the World

Always wanted to be a citizen of Fire Nation? Here’s one way to ace the citizenship exam: punch-activated flaming kung fu gauntlets of doom.

As with all the many, many, many flamethrower projects we’ve featured before, we’ve got to say this is just as bad an idea as they are and that you should not build any of them. That said, [Sufficiently Advanced]’s wrist-mounted, dual-wielding flamethrowers are pretty cool. Fueled by butane and containing enough of the right parts for even a minimally talented prosecutor to make federal bomb-making charges stick, the gauntlets each have an Arduino and accelerometer to analyze your punches. Wimpy punch, no flame — only awesome kung fu moves are rewarded with a puff of butane ignited by an arc lighter. The video below shows a few close calls that should scare off the hairy-knuckled among us; adding a simple metal heat shield might help mitigate potential singeing.

Firebending gloves not enough to satisfy your inner pyromaniac? We understand completely.

Thanks to [Nils Hitze] for the hot tip. Yep.


Filed under: misc hacks, wearable hacks

Scratch-built Camera Gimbal for Photographer with Cerebral Palsy

We so often hack for hacking’s sake, undertaking projects as a solitary pursuit simply for the challenge. So it’s nice to see hacking skills going to good use and helping someone out. Such was the case with this low-cost two-axis handheld camera gimbal intended to help a budding photographer with a motion disorder.

When [Tadej Strah] joined his school photography club, a fellow member who happens to have cerebral palsy needed help steadying cameras for clean shots. So rather than shell out a lot of money for a commercial gimbal, [Tadej] decided to build one for his friend. A few scraps of aluminum bar stock were bent into the gimbal frames and camera mount. Two hobby servos take care of the pitch and roll axes, controlled by an Arduino talking to an MPU-6050. Mounted to a handle from an angle grinder with the battery and electronics mounted below, the gimbal looks well-balanced and does a good job of keeping the camera level.

Hats off to [Tadej] for pitching in and solving a real world problem with his skills. We like to see people helping others directly, whether it’s building a gyroscopic spoon for Parkinson’s sufferers or vision enhancement for a nearly blind adventurer.

[via r/arduino]


Filed under: Medical hacks, misc hacks

Interfacing accelerometer with arduino uno

Interfacing accelerometer with arduino uno


Introduction:

In this post, we are going to interface accelerometer with arduino. Accelerometer is a sensor used for detecting motion or change in coordinates. We have three coordinates i.e X, Y and Z axis. It's a five-pin device out of which are for power supply Vcc and Ground. The output of the sensor is in analog.
This sensor required three analog pins. We can provide Vcc and ground directly from the analog pins.
So, we are using five analog pins. Three for axis and two for providing power to the module.

Components required:

  1. Arduino Uno
  2. ADXL335 (accelerometer)
  3. USB type B cable for interfacing with computer.
Connections:

Make connections as follows:

ADXL335                                    Arduino
Vcc                                               A0
X                                                  A1
Y                                                  A2
Z                                                  A3
Gnd                                              A4

The program is quite simple. We are using adc for reading the values of X, Y and Z axes. 
Also, the adc value  is in raw format means its value ranges from 0 to 1023.
No need to manipulate the raw adc value.


Once, we get the raw values of adc, we will fed it to serialprint function to check its output through serial monitor.

Application of accelerometer:

Used in smartphones for motion detection and orientation sensor. It found enormous application in
motion sensing game consoles. In case of robotics, we can use it for hand gesture based robot or to synthesize the hand gesture into voice.

Source code:

// these constants describe the pins. They won't change:
const int groundpin = A4;             // analog input pin 4 -- ground
const int powerpin = A0;              // analog input pin 5 -- voltage
const int xpin = A1;                  // x-axis of the accelerometer
const int ypin = A2;                  // y-axis
const int zpin = A3;                  // z-axis (only on 3-axis models)


void setup() {

  Serial.begin(9600);

  pinMode(groundpin, OUTPUT);
  pinMode(powerpin, OUTPUT);
  digitalWrite(groundpin, LOW);
  digitalWrite(powerpin, HIGH);
}

void loop() {
  Serial.print(analogRead(xpin));
  Serial.print("\t");
  Serial.print(analogRead(ypin));
  Serial.print("\t");
  Serial.print(analogRead(zpin));
  Serial.println();
  delay(100);
}


Output from serial monitor of arduino

Thanks for viewing this post.


Hand Waving Unlocks Door

Who doesn’t like the user interface in the movie Minority Report where [Tom Cruise] manipulates a giant computer screen by just waving his hands in front of it? [AdhamN] wanted to unlock his door with hand gestures. While it isn’t as seamless as [Tom’s] Hollywood interface, it manages to do the job. You just have to hold on to your smartphone while you gesture.

The project uses an Arduino and a servo motor to move a bolt back and forth. The gesture part requires a 1sheeld board. This is a board that interfaces to a phone and allows you to use its capabilities (in this case, the accelerometer) from your Arduino program.

The rest should be obvious. The 1sheeld reads the accelerometer data and when it sees the right gesture, it operates the servo. It would be interesting to do this with a smart watch, which would perhaps look a little less obvious.

We covered the 1sheeld board awhile back. Of course, you could also use NFC or some other sensor technology to trigger the mechanism. You can find a video that describes the 1sheeld below.


Filed under: Arduino Hacks

Hackaday Prize Entry: Open Source FFT Spectrum Analyzer

Every machine has its own way of communicating with its operator. Some send status emails, some illuminate, but most of them vibrate and make noise. If it hums happily, that’s usually a good sign, but if it complains loudly, maintenance is overdue. [Ariel Quezada] wants to make sense of machine vibrations and draw conclusions about their overall mechanical condition from them. With his project, a 3-axis Open Source FFT Spectrum Analyzer he is not only entering the Hackaday Prize 2016 but also the highly contested field of acoustic defect recognition.

For the hardware side of the spectrum analyzer, [Ariel] equipped an Arduino Nano with an ADXL335 accelerometer, which is able to pick up vibrations within a frequency range of 0 to 1600 Hz on the X and Y axis. A film container, equipped with a strong magnet for easy installation, serves as an enclosure for the sensor. The firmware [Ariel] wrote is an efficient piece of code that samples the analog signals from the accelerometer in a free running loop at about 5000 Hz. It streams the digitized waveforms to a host computer over the serial port, where they are captured and stored by a Python script for further processing.

From there, another Python script filters the captured waveform, applies a window function, calculates the Fourier transform and plots the spectrum into a graph. With the analyzer up and running, [Ariel] went on testing the device on a large bearing of an arbitrary rotating machine he had access to. A series of tests that involved adding eccentric weights to the rotating shaft shows that the analyzer already makes it possible to discriminate between different grades of imbalance.

The HackadayPrize2016 is Sponsored by:

Filed under: The Hackaday Prize

Taming Robot Arm Jump with Accelerometers

Last fall, I grabbed a robot arm from Robot Geeks when they were on sale at Thanksgiving. The arm uses servos to rotate the base and move the joints and gripper. These work well enough but I found one aspect of the arm frustrating. When you apply power, the software commands the servos to move to home position. The movement is sufficiently violent it can cause the entire arm to jump.

This jump occurs because there is no position feedback to the Arduino controller leaving it unable to know the positions of the arm’s servos and move them slowly to home. I pondered how to add this feedback using sensors, imposing the limitation that they couldn’t be large or require replacing existing parts. I decided to try adding accelerometers on each arm section.

Accelerometers, being affected by gravity when on a planet, provide an absolute reference because they always report the direction of down. With an accelerometer I can calculate the angle of an arm section with respect to the direction of gravitational acceleration.

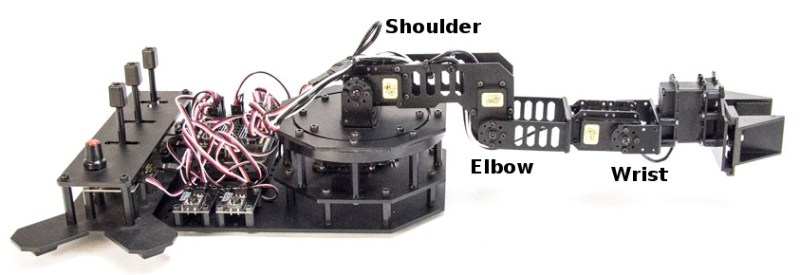
Before discussing the accelerometers, take a look at the picture of the arm. An accelerometer would be added to each section of the arm between the controlling servos.

Accelerometers

Gravity tugs everything toward the center of the mass of the Earth. It is a force that creates an acceleration exactly just like what you feel when a vehicle begins to move or stop. The force of gravity creates an acceleration of 1 g which is 9.8 m/s2 or 32.15 ft/s2. An accelerometer measures this force.

Integrated circuit accelerometers are inexpensive and small devices readily usable by hackers. One reason they are inexpensive is the high demand for them in smart phones. These small devices are based on etching mechanical structures within the integrated circuit using a technology called MEMS (Microelectromechanical systems).

One design for a MEMS accelerometer is basically a variable capacitor. One plate is fixed and the other mounted some distance away on a spring suspension. When the device is accelerated the suspended plate moves closer or further away from the fixed plate, changing the capacitance. Another uses piezo-resistive material to measure the stress on an arm caused by acceleration.

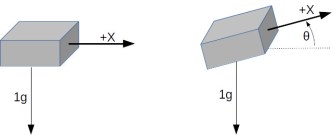
A single axis accelerometer measures acceleration in only one direction. If positioned so the direction is up and down it will measure the force of gravity but will not detect horizontal acceleration. When the device is tilted between horizontal and vertical the force of gravity is only partially affecting the measurement. This provides the ability to measure the angle of the device with the direction of gravity. The acceleration felt along the tilted axis, for a tilt angle can be calculated by:

Knowing the output of the accelerometer we can determine the angle by taking the inverse sine, the arc sine, of the output:

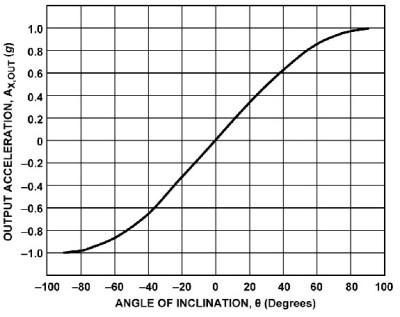
If you rotate a single axis device through 360° the output is a sine wave. Start with the device outputting zero and consider that 0°. As it rotates, the output is 1 when the angle is 90° and back to zero at 180°. Continuing the rotation, the output becomes -1 at 270°, or -90°, degrees and back to zero at 360°, or 0°.

Notice on the chart that between -60° and 60° the output is nearly linear. This is the best orientation for measuring inclination. Increases in inclination are not as accurate on the other portions of the curve. Also notice that the same output is generated for 45° and 135° (90° + 45°) creating an ambiguity. With a single axis you cannot determine which of those angles is measured.

Putting two accelerometers at a right angle to one another creates a 2-axis device which solves the ambiguity problem. As the device is rotated through 360° the outputs are 90° out of phase, the same relationship as the sine and cosine. By combining the measurements there is a unique solution for every angle throughout 360°. The acceleration due to gravity at each angle is given by:

which leads to calculating the angle by:

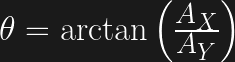
Actually, one more step is needed to determine the sign of the angle. This requires examining the sign of the values for the X and Y axis. It isn’t necessary to go into this here because a standard programming function handles this automatically.

The orientation of a quadcopter requires a 3-axis accelerometer. The calculations for the three spherical angles combine all three inputs for their results. You’ll need to study this carefully because the standard trigonometric equations can cause anomalies when the quadcopter flips.

First Pass Solution

Accelerometers are easily obtained and relatively cheap. You can find them mounted on breakout boards with voltage regulators and all the supporting circuits from the usual vendors. They are available for 1 to 3 axis, various amounts of g force, and providing either analog or digital outputs. Analog devices need an analog input for each axis being measured. Digital outputs use I2C or SPI buses for communications. I decided to use analog devices because digital units typically only allow two addresses and the arm needs three devices, one for each section.

The robot arm uses an Arduino board so there are at least 6 analog inputs. The original board was a Robot Geek Geekduino, their version of the Arduino Duemilanove, with 8 analog inputs. Unfortunately, when working with the arm I broke the USB connector so switched to a Uno equivalent having only 6 inputs.

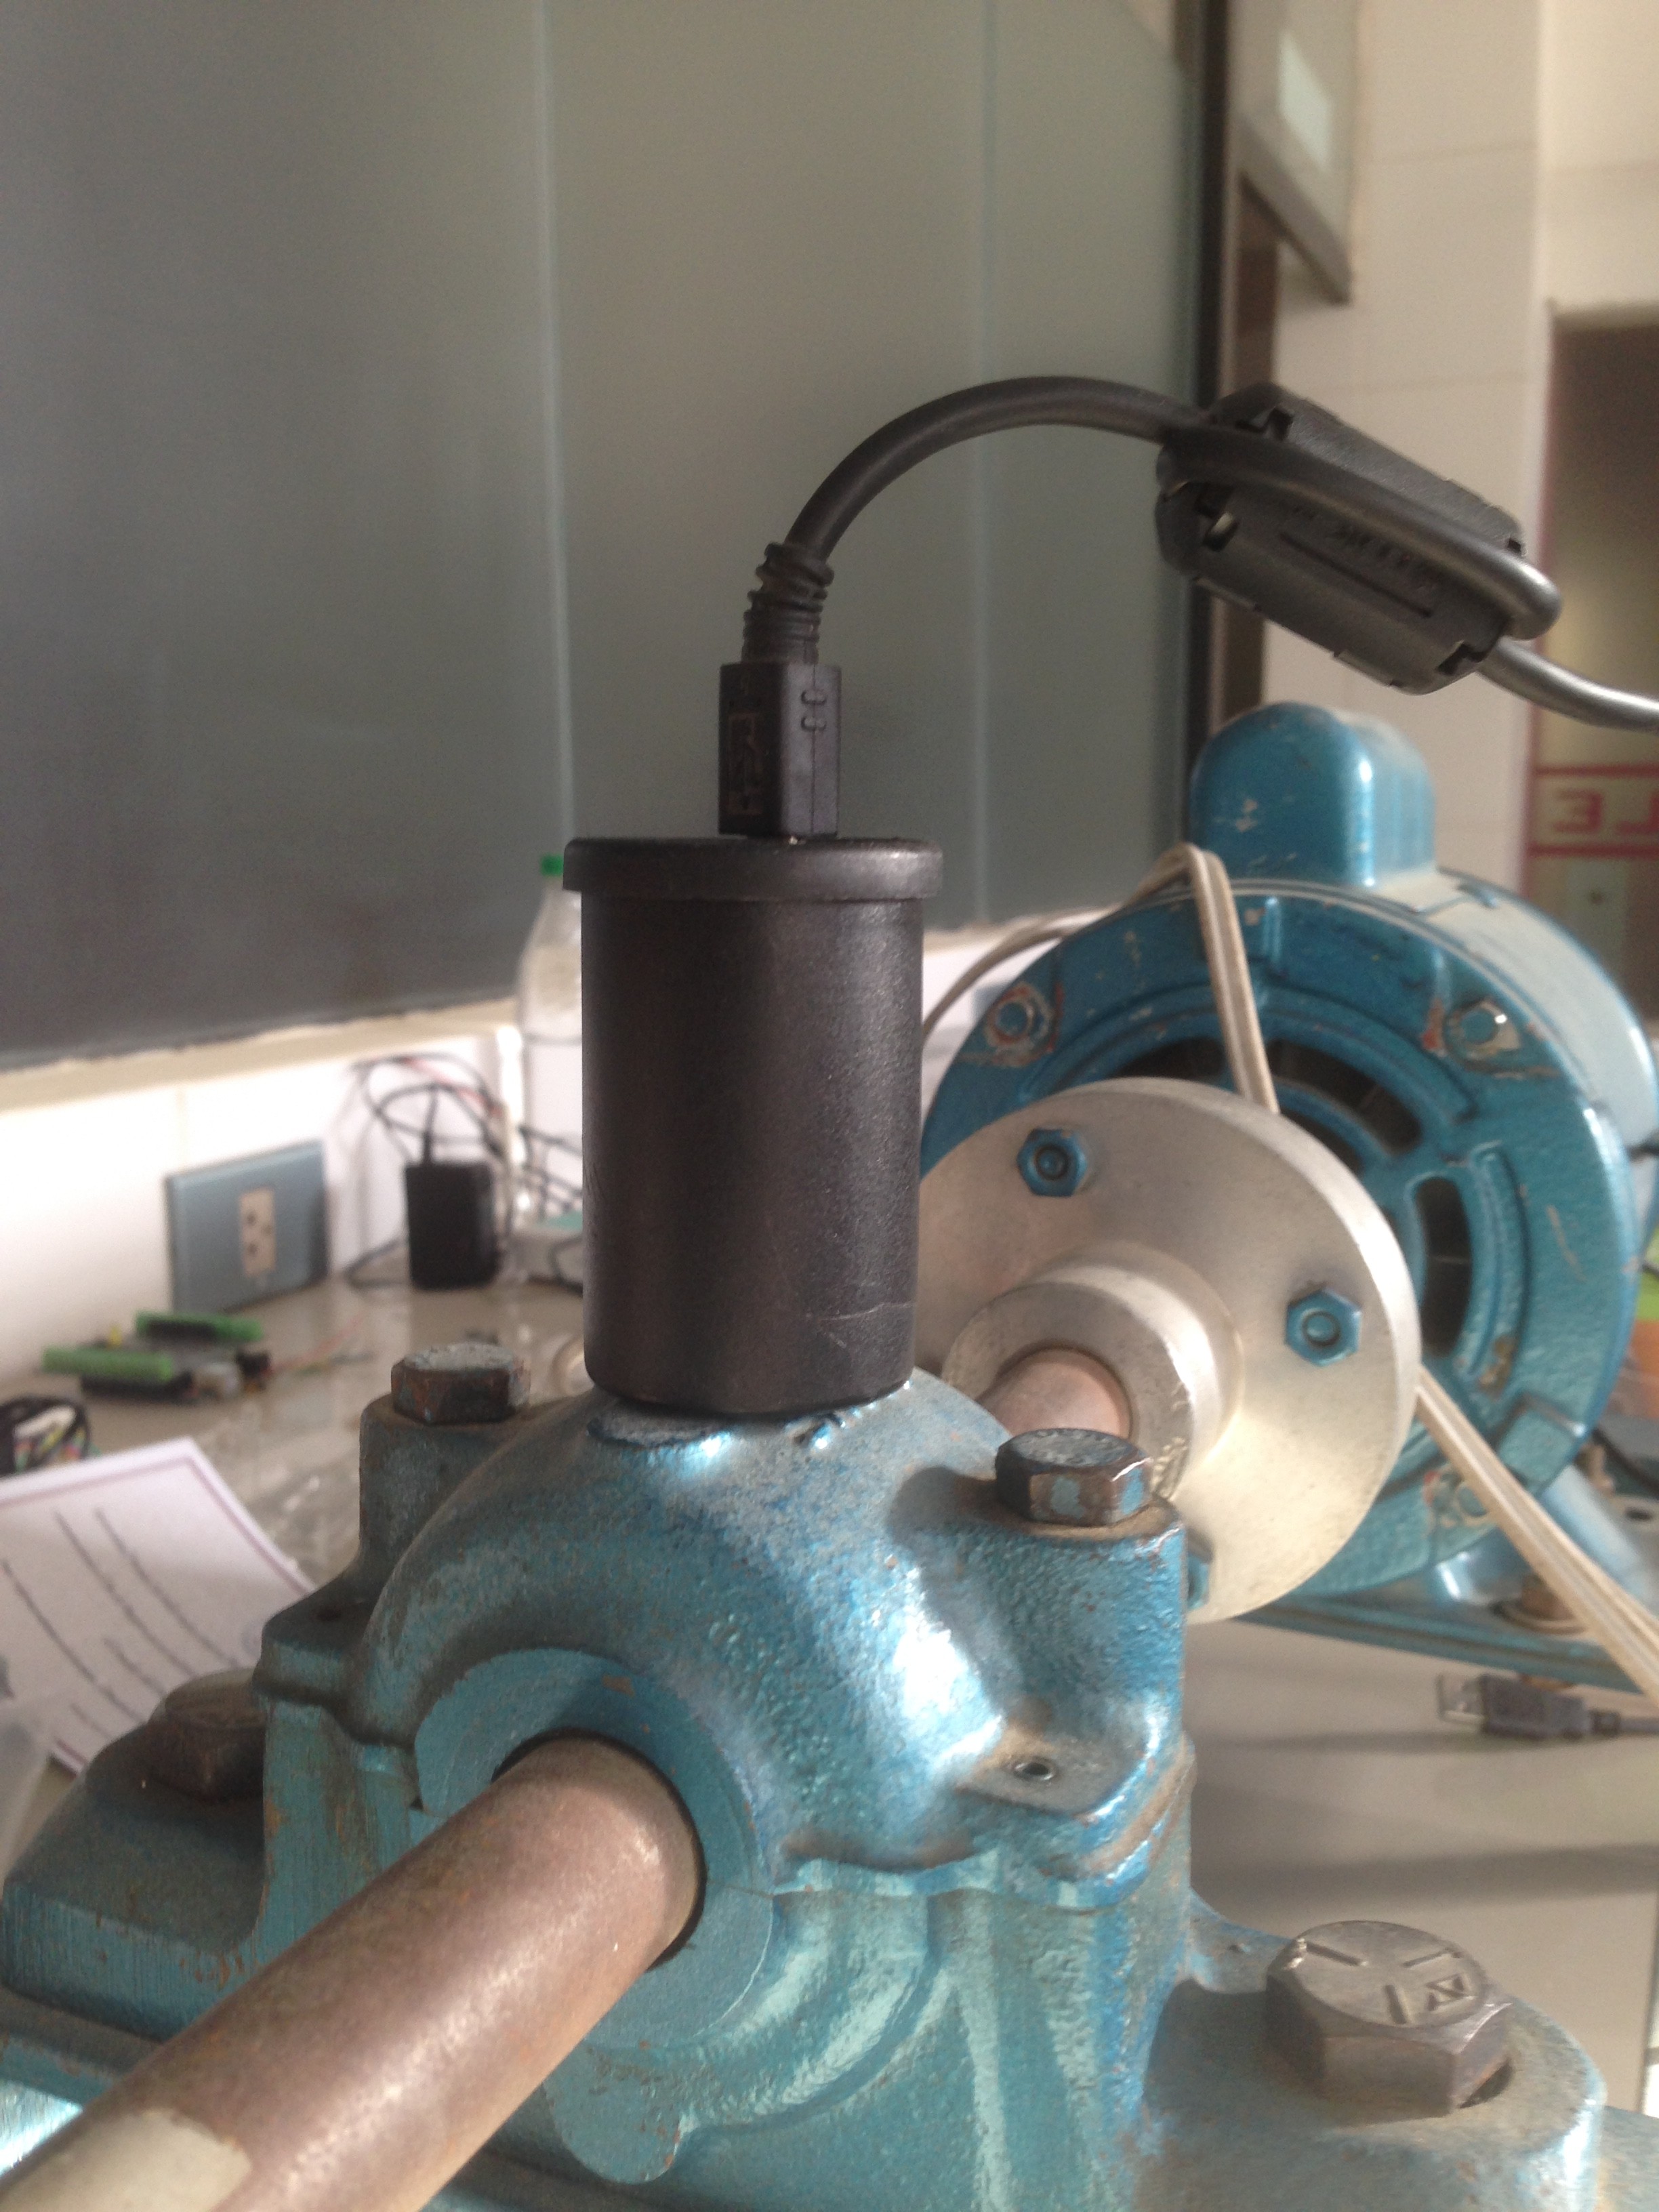
My choice for accelerometer is a 3-axis, ±3 g accelerometer breakout from Adafruit, their ADXL335. It has one analog output for each axis. Since I’m measuring three joints that means three boards which adds up to 9 analog outputs.

Because of the geometry of the arm, however, I only need 5 inputs for these three joints. The shoulder joint only moves from 0° to 180°. This can be handled by a single axis accelerometer by mounting it to read acceleration of 1 g for 0° and -1g for 180°. That provides a unique output for the necessary angles. The elbow and wrist joints each require two inputs. The third input is not needed because their motion is constrained to moving within the vertical plane of the arm.

Frame of Reference

The next issue is the frame of reference. This is a standard problem in robotics work. Early in a project, a global frame of reference is decided upon. This sets the origin for the coordinate system that the robot will follow and the direction of the three axes, usually specified as X, Y, and Z. For the arm, X is straight forward, Y is to the left, and Z is straight up. The zero point is the base of the shoulder. This also defines a global frame for rotation of the arms limbs with zero degrees also toward the front.

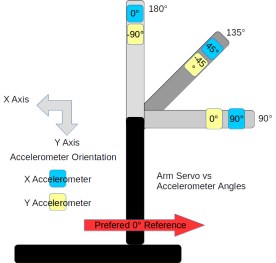
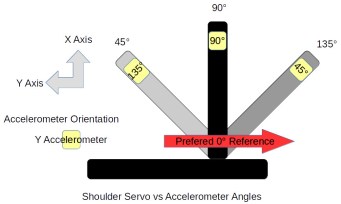
Sensors and controllers each have their own frame of reference. Any differences among these devices and the global frame need to be resolved in software. The shoulder servo’s frame of reference is 0° at the back of the arm and 180° at the front, a clockwise rotation. This is the reverse of the global frame. The elbow servo worked the opposite with a counter-clockwise rotation putting 180° straight up and 90° straight out when the shoulder was vertical. It is 90° off from the global frame of reference.

Sensors also have their own frame of reference. The Y-axis accelerometer measuring the shoulder orientation worked counter-clockwise. Both axis on the accelerometers measuring the elbow worked in the clock-wise direction. This may seem strange but it’s because of the different mounting orientations of the sensors.

Software

The actual code is straightforward once the frame of references are sorted out. A single axis is read from the analog input and its angle calculated with:

const int shouldery = shoulderAnalogY.read();
float shoulder_angle = degrees(asin(shouldery_value / 100.0));

The read() method scales the raw analog input values so ±1g is represented as ±100. The input to asin() is divided by 100.0 to convert to the actual g value. That suffices for the shoulder angle.

The elbow and wrist angles use values from two axis and the calculation is:

const int elbowx = elbowAnalogX.read();
const int elbowy = elbowAnalogY.read();
float elbow_angle = degrees(atan2(-elbowy, elbowx));

The atan2() function is a special version of the arc tangent calculation. It examines the signs of the input value to determine the quadrant of the angle to set the appropriate sign on its result. The negative sign on the elbowy is needed to set the appropriate quadrant. There’s the frame of reference issue, again.

Wrap Up

Adding the accelerometers solved the startup lurching problem well enough. Whether the accelerometers can be used for other purposes remains to be seen.

The accuracy of the angle measurements is not good. In part this is due to using a device that with a +/- 3 g range to measure 1/3 of the devices range, 1 g. The device outputs 0 to 3.3 volts while the Arduino is sampling for 5 volts, again losing accuracy. This might be improved by using an Arduino based on 3.3 volts. I have a couple Dues on hand so might try them. The Uno also provides for adjusting the reference voltage for analog inputs so setting it to 3.3 volts might help.

The analog values need to be calibrated with some care. Each accelerometer outputs slightly different values. Calibration requires measuring the outputs for 1 and -1 g for each axis, recording the values, and using them to scale the voltage input to acceleration. This calibration is not accurate given the other problems with the analog inputs.

Another problem is the mounting of the accelerometers on the arm’s sections. The alignment of the boards with the sections of the arm is not perfect. When the servo is positioned at 90° the accelerometer doesn’t necessarily sit at 90° with respect to the center of the earth. Of course, the servos are not that precise, either. They do not always arrive at the same position, especially when approaching from different directions. Another goal for this project was to use the accelerometer information to more precisely position the servos.

I guess I have to think about this project a bit more, including deciding what I actually want to accomplish with the arm. But then, just saying you have a robotic arm is a terrific hacking cred.


Filed under: Arduino Hacks, robots hacks

Teach your drone what is up and down with an Arduino

Gyroscopes and accelerometers are the primary sensors at the heart of an IMU, also known as an internal measurement unit — an electronic sensor device that measures the orientation, gravitational forces and velocity of a multicopter, and help you keep it in the air using Arduino.

Two videos made by Joop Brokking, a Maker with passion for RC model ‘copters, clearly explain how to program your own IMU so that it can be used for self-balancing your drone without Kalman filters,  libraries, or complex calculations.

Auto leveling a multicopter is pretty challenging. It means that when you release the pitch and roll controls on your transmitter the multicopter levels itself. To get this to work the flight controller of the multicopter needs to know exactly which way is down. Like a spirit level that is on top of the multicopter for the pitch and roll axis.

Very often people ask me how to make an auto level feature for their multicopter. The answer to a question like this is pretty involved and cannot be explained in one email. And that is why I made this video series.

You can find the bill of materials and code here.