Posts with «robots hacks» label

Wiping Robots and Floors: STM32duino Cleans up

Ever find yourself with nineteen nameless robot vacuums lying around? No? Well, [Aaron Christophel] likes to live a different life, filled with zebra print robots (translated). After tearing a couple down, only ten vacuums remain — casualties are to be expected. Through their sacrifice, he found a STM32F101VBT6 processor acting as the brains for the survivors. Coincidentally, there’s a project called STM32duino designed to get those processors working with the Arduino IDE we either love or hate. [Aaron Christophel] quickly added a variant board through the project and buckled down.

Of course, he simply had to get BLINK up and running, using the back-light of the LCD screen on top of the robots. From there, the STM32 processors gave him a whole 80 GPIO pins to play with. With a considerable amount of tinkering, he had every sensor, motor, and light under his control. Considering how each of them came with a remote control, several infra-red sensors, and wheels, [Aaron Christophel] now has a small robotic fleet at his beck and call. His workshop must be immaculate by now. Maybe he’ll add a way for the vacuums to communicate with each other next. One robot gets the job done, but a whole team gets the job done in style, especially with a zebra print cleaner at the forefront.

If you want to see more of his work, he has quite a few videos on his website demonstrating the before and after of the project — just make sure to bring a translator. He even has a handy pinout for those looking to replicate his work. If you want to dive right in to STM32 programming, we have a nice article on how to get it up and debugged. Otherwise, enjoy [Aaron Christophel]’s demonstration of the eight infra-red range sensors and the custom firmware running them.

A HID For Robots

Whether with projects featured here or out in the real world, we have a tendency to focus most upon the end product. The car, solar panel, or even robot. But there’s a lot more going on behind the scenes that needs to be taken care of as well, whether it’s fuel infrastructure to keep the car running, a semiconductor manufacturer to create silicon wafers, or a control system for the robot. This project is one of the latter: a human interface device for a robot arm that is completely DIY.

While robots are often automated, some still need human input. The human input can be required all the time, or can be used to teach the robot initially how to perform a task which will then be automated. This “keyboard” of sorts built by [Ahmed] comes with a joystick, potentiometer, and four switch inputs that are all fully programmable via an Arduino Due. With that, you can perform virtually any action with whatever type of robot you need, and since it’s based on an Arduino it would also be easy to expand.

The video below and project page have all the instructions and bill of materials if you want to roll out your own. It’s a pretty straightforward project but one that might be worth checking out since we don’t often feature controllers for other things, although we do see them sometimes for controlling telescopes rather than robots.


Hack a Day 02 Jun 06:00

A Well-Chronicled Adventure in Tiny Robotics

Some of us get into robotics dreaming of big heavy metal, some of us go in the opposite direction to build tiny robots scurrying around our tabletops. Our Hackaday.io community has no shortage of robots both big and small, each an expression of its maker’s ideals. For 2018 Hackaday Prize, [Bill Weiler] entered his vision in the form of Project Johnson Tiny Robot.

[Bill] is well aware of the challenges presented by working at a scale this small. (If he wasn’t before, he certainly is now…) Forging ahead with his ideas on how to build a tiny robot, and it’ll be interesting to see how they pan out. Though no matter the results, he has already earned our praise for setting aside the time to document his progress in detail and share his experience with the community. We can all follow along with his discoveries, disappointments, and triumphs. Learning about durometer scale in the context of rubber-band tires. Exploring features and limitations of Bluetooth hardware and writing code for said hardware. Debugging problems in the circuit board. And of course the best part – seeing prototypes assembled and running around!

As of this writing, [Bill] had just completed assembly of his V2 prototype which highlighted some issues for further development. Given his trend of documenting and sharing, soon we’ll be able to read about diagnosing the problems and how they’ll be addressed. It’s great to have a thoroughly documented project and we warmly welcome his robot to the ranks of cool tiny robots of Hackaday.io.

Arduino Clock Jots Down The Time, In UV

We’re big fans of the impractical around here at Hackaday. Sure there’s a certain appeal to coming up with the most efficient method to accomplish your goal, the method that does exactly what it needs to do without any superfluous elements. But it’s just not as much fun. If at least one person doesn’t ask “But why?”, then you probably left something on the table, design wise.

So when we saw this delightfully complex clock designed by [Tucker Shannon], we instantly fell in love. Powered by an Arduino, the clock uses an articulated arm with a UV LED to write out the current time on a piece of glow-in-the-dark material. The time doesn’t stay up for long depending on the lighting in the room, but at least it only takes a second or two to write out once you press the button.

Things are pretty straightforward inside the 3D printed case. There’s an Arduino coupled with an RTC module to keep the time, which is connected to the two standard hobby servos mounted in the front panel. A UV LED and simple push button round out the rest of the Bill of Materials. The source code is provided, so you won’t have to figure out the kinematics involved in getting the two servos to play nicely together if you want to try this one at home.

We’ve seen many clocks powered by Arduinos over the years, occasionally they even have hands. But few can boast their own robotic arm.

Balloons and Bubbles Make for Kid-Friendly Robot Deathmatch

Because nothing says “fun for kids” like barbed wire and hypodermic needles, here’s an interactive real-world game that everyone can enjoy. Think of it as a kinder, gentler version of Robot Wars, where the object of the game is to pop the balloon on the other player’s robot before yours get popped. Sounds simple, but the simple games are often the most engaging, and that sure seems to be the case here.

The current incarnation of “Bubble Blast” stems from a project [Niklas Roy] undertook for a festival in Tunisia in 2017. That first version used heavily hacked toy RC cars controlled with arcade joysticks. It was a big hit with the crowd, so [Niklas] built a second version for another festival, and incorporated lessons learned from version 1.0. The new robots are built from scratch from 3D-printed parts. Two motors drive each bot, with remote control provided by a 433-MHz transceiver module. The UI was greatly improved with big trackballs, also scratch built. The game field was expanded and extra obstacles were added, including a barbed wire border as a hazard to the festooned bots. And just for fun, [Niklas] added a bubble machine, also built from scratch.

The game looks like a ton of fun, and seems like one of those things you’ve got to shoo the adults away from so the kids can enjoy it too. But if you need more gore from your robot deathmatch than a limp balloon, here’s a tabletop robot war that’s sure to please.

Glorious Body of Tracked ‘Mad Mech’ Started as Cardboard

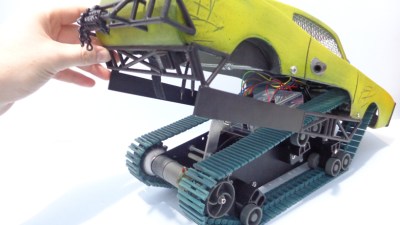
[Dickel] always liked tracked vehicles. Taking inspiration from the ‘Peacemaker’ tracked vehicle in Mad Max: Fury Road, he replicated it as the Mad Mech. The vehicle is remote-controlled and the tank treads are partly from a VEX robotics tank tread kit. Control is via a DIY wireless controller using an Arduino and NRF24L01 modules. The vehicle itself uses an Arduino UNO with an L298N motor driver. Power is from three Li-Po cells.

The real artistic work is in the body. [Dickel] used a papercraft tool called Pepakura (non-free software, but this Blender plugin is an alternative free approach) for the design to make the body out of thin cardboard. The cardboard design was then modified to make it match the body of the Peacemaker as much as possible. It was coated in fiberglass for strength, then the rest of the work was done with body filler and sanding for a smooth finish. After a few more details and a good paint job, it was ready to roll.

There’s a lot of great effort that went into this build, and [Dickel] shows his work and process on his project page and in the videos embedded below. The first video shows the finished Mad Mech being taken for some test drives. The second is a montage showing key parts of the build process.

Paper and cardboard are very versatile and accessible materials for making things. It’s what was used to do some target practice with this working paper and cardboard gun. With the right techniques foam core can be worked into an astonishing variety of shapes, and we also made a case for the value of a desktop vinyl cutter on any well-equipped hacker’s workbench.

The Sensor Array That Grew Into a Robot Cat

Human brains evolved to pay extra attention to anything that resembles a face. (Scientific term: “facial pareidolia”) [Rongzhong Li] built a robot sensor array with multiple emitters and receivers augmenting a Raspberry Pi camera in the center. When he looked at his sensor array, he saw the face of a cat looking back at him. This started his years-long Petoi OpenCat project to build a feline-inspired body to go with the face.

While the name of the project signals [Rhongzhong]’s eventual intention, he has yet to release project details to the open-source community. But by reading his project page and scrutinizing his YouTube videos (a recent one is embedded below) we can decipher some details. Motion comes via hobby remote-control servos orchestrated by an Arduino. Higher-level functions such as awareness of environment and Alexa integration are handled by a Raspberry Pi 3.

The secret (for now) sauce are the mechanical parts that tie them all together. From impact-absorption spring integrated into the upper leg to how its wrists/ankles articulate. [Rongzhong] believes the current iteration is far too difficult to build and he wants to simplify construction before release. And while we don’t have much information on the software, the sensor array that started it all implies some level of sensor fusion capabilities.

We’ve seen lots of robotic pets, and for some reason there have been far more robotic dogs than cats. Inspiration can come from Boston Dynamics, from Dr. Who, or from… Halloween? We think the lack of cat representation is a missed opportunity for robotic pets. After all, if a robot cat’s voice recognition module fails and a command is ignored… that’s not a bug, it’s a feature of being a cat.

[via TheNextWeb]

This 3D-Printed Robotic Vacuum Sucks

After you’ve taken a moment to ponder the turn of phrase used in the title, take a look at this scratch-built robotic vacuum created by [theking3737]. The entire body of the vacuum was 3D printed, and all of the internal electronics are off-the-shelf modular components. We can’t say how well it stacks up against the commercial equivalents from iRobot and the like, but it doesn’t look like it would be too hard to build one yourself to find out.

The body of this rather concerned-looking robot was printed on a DMS DP5 printer, which is a neat trick as it only has a build platform of 200 mm x 200 mm. Once all the pieces were printed, a 3D pen was used to “weld” the sections together. The final result looks a bit rough, but should give a bond that’s just as strong as the printed parts themselves.

The robot has four sets of ultrasonic range finders to detect walls and obstacles, though probably not in the positions you would expect. The right side of the robot has two sets of sensors, while the left side only gets one. We aren’t sure the reasoning behind the asymmetrical layout, but presumably the machine prefers making right turns.

Control is provided by an Arduino Mega and the ever-reliable HC-05 Bluetooth module. A companion Android application was written which allows configuring the robot without having to plug into the Arduino every time you want to tweak a setting.

We can’t say we’ve seen that many DIY robotic vacuums here at Hackaday, but we’ve certainly featured our fair share of hacks for the commercially available models.

SimpleSumo Bots Teach More than Fighting

[MechEngineerMike] wrote in to share the enthusiasm over SimpleSumo, a series of open source, customizable robots he designed for mini-sumo battling and much more. For the unfamiliar, mini-sumo is a sport where two robots try to push each other out of a ring. [Mike]’s bots are simplified versions designed for education.

[Mike] was inspired by a video of some kids building mini-sumo bots who were doing anything and everything to personalize them. He vowed to make his own affordable, easy-to-build bots with education firmly in mind. His other major requirement? They had to be as easily customizable as that one potato-based toy that eventually came with a bucket of parts. As of this writing, there are 34 interchangeable accessories.

[Mike]’s first idea was to build the bots out of custom 3D-printed building blocks. He soon found it was too much work to print consistent blocks and switched to a modular cube-like design instead. SimpleSumo bots can do much more than just fight each other. [Mike] has written programs to make them flee from objects, follow lines, find objects and push them out of the ring, and beep with increasing frequency when an object is detected.

The bots are completely open source, but [Mike] sells kits for people who can’t print the parts themselves. He’s made a wealth of information available on his website including links to outside resources about mini-sumo, Arduino, programming, and 3D design. How about a complete series of assembly videos? First one is after the break.  Don’t know how to build a battle ring? He’s got that covered, too.

For a sumo bot that’s more brains than brawn, check out Zumo Red, the smart sumo.


Filed under: how-to, robots hacks

“The Cow Jumped Over The Moon”

[Ash] built Moo-Bot, a robot cow scarecrow to enter the competition at a local scarecrow festival. We’re not sure if Moo-bot will win the competition, but it sure is a winning hack for us. [Ash]’s blog is peppered with delightful prose and tons of pictures, making this an easy to build project for anyone with access to basic carpentry and electronics tools. One of the festival’s theme was “Out of this World” for space and sci-fi scarecrows. When [Ash] heard his 3-year old son sing “hey diddle diddle, the cat and the fiddle…”, he immediately thought of building a cow jumping over the moon scarecrow. And since he had not seen any interactive scarecrows at earlier festivals, he decided to give his jumping cow a lively character.

Construction of the Moo-Bot is broken up in to three parts. The skeleton is built from lumber slabs and planks. The insides are then gutted with all of the electronics. Finally, the whole cow is skinned using sheet metal and finished off with greebles to add detailing such as ears, legs, spots and nostrils. And since it is installed in the open, its skin also doubles up to help Moo-bot stay dry on the insides when it rains. To make Moo-Bot easy to transport from barn to launchpad, it’s broken up in to three modules — the body, the head and the mounting post with the moon.

Moo-Bot has an Arduino brain which wakes up when the push button on its mouth is pressed. Its two OLED screen eyes open up, and the MP3 player sends bovine sounding audio clips to a large sound box. The Arduino also triggers some lights around the Moon. Juice for running the whole show comes from a bank of eight, large type “D” cells wired to provide 6 V — enough to keep Moo-Bot fed for at least a couple of months.

Check out the video after the break to hear Moo-bot tell some cow jokes – it’s pretty funny. We’re rooting for it to win the competition — Go Moo-bot.

If you’re hungry for more scarecrows, this isn’t the first we’ve seen.


Filed under: Arduino Hacks, robots hacks