Posts with «robots hacks» label

Educational Robot for Under $100

While schools have been using robots to educate students in the art of science and engineering for decades now, not every school or teacher can afford to put one of these robots in the hands of their students. For that reason, it’s important to not only improve the robots themselves, but to help drive the costs down to make them more accessible. The CodiBot does this well, and comes in with a price tag well under $100.

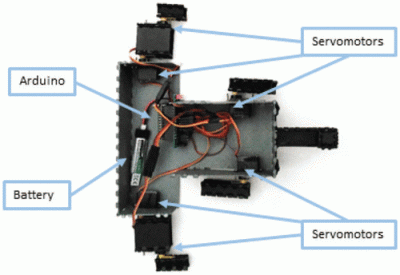
The robot itself comes pre-assembled, and while it might seem like students would miss out on actually building the robot, the goal of the robot is to teach coding skills primarily. Some things do need to be connected though, such as the Arduino and other wires, but from there its easy to program the robot to do any number of tasks such as obstacle avoidance and maze navigation. The robot can be programmed using drag-and-drop block programming (similar to Scratch) but can also be programmed the same way any other Arduino can be.

With such a high feature count and low price tag, this might be the key to getting more students exposed to programming in a more exciting and accessible way than is currently available. Of course, if you have a little bit more cash lying around your school, there are some other options available to you as well.


Filed under: robots hacks

Design and 3D Print Robots with Interactive Robogami

Internals of 3D printed “print and fold” robot. [Image source: MIT CSAIL]
Robot design traditionally separates the body geometry from the mechanics of the gait, but they both have a profound effect upon one another. What if you could play with both at once, and crank out useful prototypes cheaply using just about any old 3D printer? That’s where Interactive Robogami comes in. It’s a tool from MIT’s Computer Science and Artificial Intelligence Laboratory (CSAIL) that aims to let people design, simulate, and then build simple robots with a “3D print, then fold” approach. The idea behind the system is partly to take advantage of the rapid prototyping afforded by 3D printers, but mainly it’s to change how the design work is done.

To make a robot, the body geometry and limb design are all done and simulated in the Robogami tool, where different combinations can have a wild effect on locomotion. Once a design is chosen, the end result is a 3D printable flat pack which is then assembled into the final form with a power supply, Arduino, and servo motors.

A white paper is available online and a demonstration video is embedded below. It’s debatable whether these devices on their own qualify as “robots” since they have no sensors, but as a tool to quickly prototype robot body geometries and gaits it’s an excitingly clever idea.

Perhaps there’s an opportunity to enhance the “3D print, then fold” approach Robogami uses with this concept for making flexible prints out of non-flexible material, or incorporating simple 3D printed circuitry.

Thanks to [Adam] for the tip!


Filed under: robots hacks

Hackaday Prize Entry: E.R.N.I.E. Teaches Robotics and Programming

[Sebastian Goscik]’s entry in the 2017 Hackaday Prize is a line following robot. Well, not really; the end result is a line following robot, but the actual project is about a simple, cheap robot chassis to be used in schools, clubs, and other educational, STEAM education events. Along with the chassis design comes a lesson plan allowing teachers to have a head start when presenting the kit to their students.

The lesson plan is for a line-following robot, but in design is a second lesson – traffic lights which connect to a main base through a bus and work in sync. The idea of these lessons is to be fairly simple and straightforward for both the teachers and the students in order to get them more interested in STEM subjects.

What [Sebastian] noticed about other robot kits was that they were expensive or complicated or lacked tutorials. Some either came pre-assembled or took a long time to assemble. [Sebastian] simplified things – The only things required after the initial assembly of the chassis are: Zip-ties, electrical tape and a few screws. The PCB can’t be disassembled, but the assembled PCB can be reused.

The hardware [Sebastian] came up with consists of some 3mm material that can be laser cut (acrylic or wood) and a sensor board that has 5 IR LEDs and corresponding IR sensors. The chassis can be put together using nothing more than a Phillips screwdriver, and the sensor PCBs are well documented so that soldering them is as easy as possible. An Arduino is used as the brains of the unit.

[Sebastian] has come up with a great project and the idea of a platform like this with a couple of lesson plans included is a great one. He’s released the hardware under an Open Hardware license as well so others can share and add-on. Of course, there are other line following robots, like this miniature one created with analog circuitry, and there are other open source robots for teaching, like this one. But [Sebastian]’s focus on the lesson plans is a really unique way of approaching the problem – one that will hopefully be very successful.


Filed under: robots hacks, The Hackaday Prize

GuitarBot Brings Together Art and Engineering

Not only does the GuitarBot project show off some great design, but the care given to the documentation and directions is wonderful to see. The GuitarBot is an initiative by three University of Delaware professors, [Dustyn Roberts], [Troy Richards], and [Ashley Pigford] to introduce their students to ‘Artgineering’, a beautiful portmanteau of ‘art’ and ‘engineering’.

The GuitarBot It is designed and documented in a way that the three major elements are compartmentalized: the strummer, the brains, and the chord mechanism are all independent modules wrapped up in a single device. Anyone is, of course, free to build the whole thing, but a lot of work has been done to ease the collaboration of smaller, team-based groups that can work on and bring together individual elements.

Some aspects of the GuitarBot are still works in progress, such as the solenoid-activated chord assembly. But everything else is ready to go with Bills of Materials and build directions. An early video of a strumming test proof of concept used on a ukelele is embedded below.

GuitarBot would fit right in to a band where only the instruments operate unplugged. Speaking of robot bands, don’t forget the LEGO-enabled Toa Mata, or the fully robotic group Compressorhead.


Filed under: musical hacks, robots hacks

PobDuino Makes the Most of Grove

The chassis of a toy robot serves as the base of a robot built by [Jean Noel]. Called #PobDuino, the robot features two Arduino-compatible boards under the hood.

First, a Seeeduino Lotus, a Arduino board peppered with a dozen Grove-compatible sockets. The board, which is the size of an UNO, is mounted so that the plugs project out of the front of the robot, allowing ad-hoc experimentation with the various Grove System modules. Meanwhile, a custom ATmega328 board (the PobDuino) interprets Flowcode instructions and sends commands to the various parts of the robot: servos are controlled by an Adafruit servo driver board and the DC motors are driven by a Grove I2C motor driver.

We love how easy it is to customize the robot, with both the Lotus and the Adafruit 16-channel servo driver on the exterior of the robot. Just plug and play!

Learn more about Grove-compatible plugs and a lot more in [Elliot]’s My Life in the Connector Zoo.


Filed under: robots hacks
Hack a Day 27 Jul 09:00

Robot Draws Using Robust CNC

While initially developed for use in large factory processes, computer numeric control (CNC) machines have slowly made their way out of the factory and into the hands of virtually anyone who wants one. The versatility that these machines have in automating and manipulating a wide range of tools while at the same time maintaining a high degree of accuracy and repeatability is invaluable in any setting. As an illustration of how accessible CNC has become, [Arnab]’s drawing robot uses widely available tools and a CNC implementation virtually anyone could build on their own.

Based on an Arudino UNO and a special CNC-oriented shield, the drawing robot is able to execute G code for its artistic creations. The robot is capable of drawing on most flat surfaces, and can use almost any writing implement that will fit on the arm, from pencils to pens to brushes. Since the software and hardware are both open source, this makes for an ideal platform on which to build any other CNC machines as well.

In fact, CNC is used extensively in almost everything now, and are so common that it’s not unheard of to see things like 3D printers converted to CNC machines or CNC machines turned into 3D printers. The standards used are very well-known and adopted, so there’s almost no reason not to have a CNC machine of some sort lying around in a shop or hackerspace. There are even some art-based machines like this one that go much further beyond CNC itself, too.


Filed under: robots hacks
Hack a Day 22 Jun 00:00
arduino  art  cnc  drawing  g-code  robot  robots hacks  

Balancing Robot Needs Innovative Controller and Motor

A self-balancing robot is a great way to get introduced to control theory and robotics in general. The ability for a robot to sense its position and its current set of circumstances and then to make a proportional response to accomplish its goal is key to all robotics. While hobby robots might use cheap servos or brushed motors, for any more advanced balancing robot you might want to reach for a brushless DC motor and a new fully open-source controller.

The main problem with brushless DC motors is that they don’t perform very well at low velocities. To combat this downside, there are a large number of specialized controllers on the market that can help mitigate their behavior. Until now, all of these controllers have been locked down and proprietary. SmoothControl is looking to create a fully open source design for these motors, and they look like they have a pretty good start. The controller is designed to run on the ubiquitous ATmega32U4 with an open source 3-phase driver board. They are currently using these boards with two specific motors but plan to also support more motors as the project grows.

We’ve seen projects before that detail why brushless motors are difficult to deal with, so an open source driver for brushless DC motors that does the work for us seems appealing. There are lots of applications for brushless DC motors outside of robots where a controller like this could be useful as well, such as driving an airplane’s propeller.


Filed under: robots hacks

Look at me with your Special Animatronic Eyes

Animatronics for movies is often about making something that works and is reliable in the short term. It doesn’t have to be pretty, it doesn’t have to last forever. [Corporate Sellout]  shows us the minimalist approach to building animatronics with this pair of special eyes.  These eyes move in both the pan and tilt. Usually, that means a gimbal style mount. Not in this case. The mechanical assembly consists of with popsicle sticks, ping-pong balls, film canisters and dental floss.

The frame for the eyes is made of simple popsicle sticks hot glued together. The eyes themselves are simple ping-pong balls. Arduino powered servos control the movement. The servos are connected to dental floss in a cable arrangement known as a pull-pull system. As each servo moves, one side of the arm pulls on a cable, while the other provides enough slack for the ping-pong ball to move.

Mounting the ping-pong balls is the genius part of this build. They simply sit in the open end of a couple of film canisters. the tension from the dental floss holds everything together. We’re sure it was a finicky setup to build, but once working, it’s reliable. Only a glue joint failure or stretch in the dental floss could cause issues.

There are plenty of approaches to Animatronic eyes. Check out the eyes in this Stargate Horus helmet, which just won our Sci-Fi contest. More recently we saw Gawkerbot, which uses a CD-ROM drive to provide motion for a creepy robot’s eyes.


Filed under: classic hacks, robots hacks