Posts with «clock hacks» label

Sunlight-Based Life Clock Predicts Your Darkest Hour

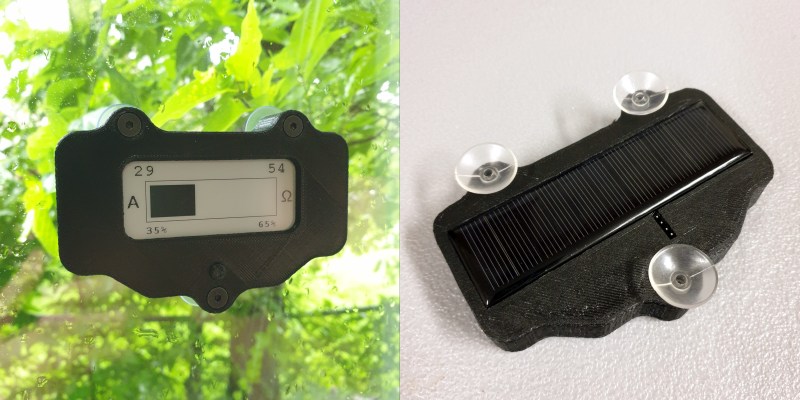
The past year has been quite a ride for everyone on Earth. But you never know which day is going to be your last, so you might as well live a little, eh? This clock doesn’t actually know when you’ll kick off, either. But just for fun, it predicts the number of years remaining until you go to that hackerspace in the sky by hazarding a guess that’s based on your current age and the latest life expectancy tables. Don’t like the outcome? It’s completely randomized, so just push the button and get a set of numbers: the age you might die, and the percentage of life elapsed and remaining.

We love the design of this calculated doom clock, and it’s quite simple inside — an Arduino Pro Mini outputs the graph on an 2.9″ e-paper display, and both are powered with a 5.5 V solar panel. Just suction cup that puppy to the window and you’ll get automatic updates about your impending demise on sunny days, and none on cloudy days.

Want a more realistic picture of your mortality? Here’s a clock that counts down to your 80th birthday.

The HackadayPrize2021 is Sponsored by:

Big Time Character LCD Clock

While the SSD1306 OLED has somewhat become the go-to display for up-to-date projects, the good old character displays with their Hitachi HD44780 controller don’t seem to be disappearing just yet either. And why would they, especially if you want to show just text, having a built-in font has certainly its perk compared to worrying about integrating your own characters — which you can still do on top as well. Or perhaps you can combine both worlds, which is what [oldmaninSC] did with his digital clock that takes an entire 16×2 LCD to show each single digit.

The whole clock uses 16 individual, upright rotated 16×2 LCDs that are arranged in two rows of eight LCDs each, turning the entire construct sort of into a giant 8×2 display itself. For some additional information such as the date, there’s also a smaller font available that uses only half the height, allowing up to four total rows of information. To communicate with each LCD via I2C, two TCA9548A I2C multiplexers are connected to an Arduino, along with an RTC to keep track of the time and date itself.

As the TCA9548A has three pins dedicated to define its own address, the entire clock could be scaled up to a total of 64 LCDs — so how about a 16×4 display made out of 16×4 displays? Sure, adding smooth scrolling might become a bit tricky at some point, but imagine playing Tetris on that one!

A Clock From An Electricity Meter

Electric utilities across the world have been transitioning their meters from the induction analog style with a distinctive spinning disc to digital “smart” meters which aren’t as aesthetically pleasing but do have a lot of benefits for utilities and customers alike. For one, meter readers don’t need to visit each meter every month because they are all networked together and can download usage data remotely. For another, it means a lot of analog meters are now available for projects such as this clock from [Monta].

The analog meters worked by passing any electricity used through a small induction motor which spun at a rate proportional to the amount of energy passing through it. This small motor spun a set of dials via gearing in order to keep track of the energy usage in the home or business. To run the clock, [Monta] connected a stepper motor with a custom transmission to those dials for the clock face because it wasn’t possible to spin the induction motor fast enough to drive the dials. An Arduino controls that stepper motor, but can’t simply drive the system in a linear fashion because it needs to skip a large portion of the “minutes” dials every hour. A similar problem arises for the “hours” dials, but a little bit of extra code solves this problem as well.

Once the actual clock is finished, [Monta] put some finishing touches on it such as backlighting in the glass cover and a second motor to spin the induction motor wheel to make the meter look like it’s running. It’s a well-polished build that makes excellent use of some antique hardware, much like one of his other builds we’ve seen which draws its power from a Stirling engine.

Hack a Day 29 Oct 21:00

A Linear Stencil Clock Built for Quiet Operation

We around the Hackaday shop never get tired of seeing new ways to mark the passage of time. Hackers come up with all manner of interesting timekeeping modalities using every imaginable material and method of moving the mechanism once per whatever minimum time unit the hacker chooses to mark.

But honestly, there are only so many ways to make a clock, and while we’re bound to see some repeats, it’s still nice to go over old ground with a fresh approach. Take this linear sliding stencil clock for instance. [Luuk Esselbrugge] has included some cool design elements that bear a closer look. The video below shows that the display is made up of four separate stepper motors, each driving a vertical stencil via a rack-and-pinion mechanism. There a simple microswitch for homing the display, and a Neopixel for lighting things up.

The video below shows that the stencils move very, very slowly; [Luuk] says that this is to keep the steppers as quiet as possible. Still, this means that some time changes take more than a minute to accomplish, which is a minor problem. The Neopixel also doesn’t quite light up just one digit, which should be a pretty easy fix for version 2. Still, even with these issues, we like the stately movements of this clock, and appreciate [Luuk]’s attempts to make it easier to live with.

Don’t let the number of clocks you see on these pages dissuade you from trying something new, or from putting your twist on an old design. Start with fridge magnets, an old oscilloscope, or even a bevy of steel balls, and let your imagination run wild. Just make sure to tell us all about it when you’re done.

[via r/Arduino]

Building This Mechanical Digital Clock Took Balls

In the neverending quest for unique ways to display the time, hackers will try just about anything. We’ve seen it all, or at least we thought we had, and then up popped this purely mechanical digital clock that uses nothing but steel balls to display the time. And we absolutely love it!

Click to embiggen (you’ll be glad you did)

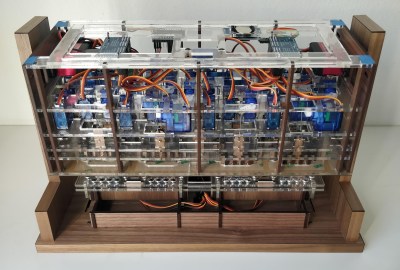
One glimpse at the still images or the brief video below shows you exactly how [Eric Nguyen] managed to pull this off. Each segment of the display is made up of four 0.25″ (6.35 mm) steel balls, picked up and held in place by magnets behind the plain wood face of the clock. But the electromechanical complexity needed to accomplish that is the impressive part of the build. Each segment requires two servos, for a whopping 28 units plus one for the colon. Add to that the two heavy-duty servos needed to tilt the head and the four needed to lift the tray holding the steel balls, and the level of complexity is way up there. And yet, [Eric] still managed to make the interior, which is packed with a laser-cut acrylic skeleton, neat and presentable, as well he might since watching the insides work is pretty satisfying.

We love the level of craftsmanship and creativity on this build, congratulations to [Eric] on making his first Arduino build so hard to top. We’ve seen other mechanical digital displays before, but this one is really a work of art.

Thanks to [Ruhan van der Berg] for the tip.

Hex Matrix Clock is Spellbinding

Just when we think we’ve seen all possible combinations of 3D printing, microcontrollers, and pretty blinkenlights coming together to form DIY clocks, [Mukesh_Sankhla] goes and builds this geometric beauty. It’s kaleidoscopic, it’s mosaic, and it sorta resembles stained glass, but is way cheaper and easier.

The crucial part of the print does two jobs — it combines a plate full of holes for a string of addressable RGB LEDs with the light-dividing walls that turn the LEDs into triangular pixels. [Mukesh] designed digits for a clock that each use ten triangles. You’d need an ESP8266 to run the clock code, or if you’d rather sit and admire the rainbow light show unabated by the passing of time, just use an Arduino Uno or something similar.

Most of the aesthetic magic here is in the printed pieces and the FastLED library. It has a bunch of really cool animations baked in that look great with this design. Check out the demo video after the break. The audio is really quiet until the very end of the video, so be warned. In our opinion, the audio isn’t necessary to follow along with the build.

The humble clock takes many lovely forms around here, including pop art.

Concentric Rings Keep this Calendar Perpetually Up to Date

The variety of ways that people find to show the passage of time never ceases to amaze us. Just when you think you’ve seen them all, someone comes up with something new and unusual, like the concentric rings of this automated perpetual calendar.

What we really like about the design that [tomatoskins] came up with is both its simplicity and its mystery. By hiding the mechanism, which is just a 3D-printed internal ring gear attached to the back of each ring, it invites people in to check it out closely and discover more. Doing so reveals that each ring is hanging from a pinion gear on a small stepper motor, which rotates it to the right point once a day or once a month. Most of the clock is made from wood, with the rings themselves made using the same technique that woodturners use to create blanks for turning bowls — or a Death Star. We love the look the method yields, although it could be even cooler with contrasting colors and grains for each segment. And there’s nothing stopping someone from reproducing this with laser-cut parts, or adding rings to display the time too.

Another nice tip in this write up is the trick [tomatoskins] used to label the rings, by transferring laser-printed characters from paper to wood using nothing but water-based polyurethane wood finish. That’s one to file away for another day.

It’s Time for Watch Clocks to Make a Comeback

Along with all the colorful, geometric influence of Memphis design everywhere, giant wristwatch clocks were one of our favorite things about the 80s. We always wanted one, and frankly, we still do. Evidently, so did [Kothe]. But instead of some splashy Swatch-esque style, [Kothe] went the nerdy route by building a giant Casio F-91W to hang on the wall.

Not only does it look fantastic, it has the full functionality of the original from the alarm to the stopwatch to the backlit screen. Well, everything but the water resistance. The case is 3D-printed, as are the buckle and the buttons. [Kothe] might have printed the straps, but they were too big for the bed. Instead, they are made of laser-cut foam and engraved with all the details.

Inside there’s a 7″ touch display, a real-time clock module, and an Arduino Mega to make everything tick. To make each of the printed buttons work, [Kothe] cleverly extended a touch sensor module’s input pad with some copper tape. We think this could only be more awesome if it were modeled after one of Casio’s calculator watches, but that might be asking too much. Take a few seconds to watch the demo after the break.

Prefer your clocks less clock-like? Get a handle on the inner workings of this slot machine-based stunner.

Measuring the Time is a Breeze With This Air Flow Clock

If you’ve ever had surgery, and you’re over a certain age, chances are good you’re familiar with the dreaded incentive spirometer. It’s a little plastic device with one or more columns, each of which has a plastic ball in it. The idea is to blow into the thing to float the balls, to endure that your lungs stay in good shape and reduce the chance of pneumonia. This unique air-powered clock reminds us a little of that device, without all the pain.

Like a spirometer, [Nir Tasher]’s clock has three calibrated tubes, each big enough to hold a foam ball loosely. At the bottom of each tube is a blower whose motor is under PWM control. A laser rangefinder sits below each ball and measures its height; the measurement is used by a PID loop to control the speed of each fan and thus the height of each ball. The video below shows that the balls are actually pretty steady, making the clock easy to read. It doesn’t, however, reveal what the clock sounds like; we’re going to go out on a limb here and guess that it’s pretty noisy. Still, we think it’s a fantastic way to keep time, and unique in the extreme.

[Nir]’s Air Flow clock is an early entry in the 2020 Hackaday Prize, the greatest hardware design contest on Earth. Everyone should enter something, or at least check out the cool things people are coming up with. It’s still early in the process, but there are so many neat projects already. What are you waiting for?

The HackadayPrize2020 is Sponsored by:

Passing The Time By Reading The Time

Binary clocks are a great way to confuse your non-technical peers when they ask the time from you — not that knowing about the binary system would magically give you quick reading skills of one yourself. In that case, they’re quite a nice little puzzle, and even a good alternative to the quarantine clocks we’ve come across a lot recently, since you can simply choose not to bother trying to figure out the exact time. But with enough training, you’ll eventually get the hang of it, and you might be in need for a new temporal challenge. Well, time to level up then, and the Cryptic Wall Clock built by [tomatoskins] will definitely keep you busy with that.

Diagram of the clock showing 08:44:47

If you happen to be familiar with the Mengenlehreuhr in Berlin, this one here uses the same concept, but is built in a circular shape, giving it more of a natural clock look. And if you’re not familiar with the Mengenlehreuhr (a word so nice, we had to write it twice), the way [tomatoskins]’ clock works is to construct the time in 24-hour format by lighting up several sections in the five LED rings surrounding a center dot.

Starting from the innermost ring, each section of the rings represent intervals of 5h, 1h, 5m, 1m, and 2s, with 4, 4, 11, 4, and 29 sections per ring respectively. The center dot simply adds an additional second. The idea is to multiply each lit up section by the interval it represents, and add the time together that way. So if each ring has exactly one section lit up, the time is 06:06:02 without the dot, and 06:06:03 with the dot — but you will find some more elaborate examples in his detailed write-up.

This straightforward and yet delightfully unintuitive concept will definitely keep you scratching your head a bit, though you can always go weirder with the Roman numerals palm tree clock for example. But don’t worry, [tomatoskins] has also a more classic, nonetheless fascinating approach in his repertoire.

Hack a Day 15 May 00:00