Bluetooth Android Processing 2
PART TWO
If you happened to land on this page and missed PART ONE, I would advise you go back and read that section first. You may get lost coming in half way through the story. This is what you'll find in part one.

ToastMaster - the master of all Toasts
I will now introduce you to Toast. What does "Toast" have to do with programming ? Toast is used by Android to quietly display little messages on the screen.
Have a look here for a a quick introduction to Toast, otherwise have a look at the Android Developers Toast information.
I will be creating my own method that relies on Toast to make the process of displaying messages easier. I have named this method: "ToastMaster".
A word of warning. Calling ToastMaster from within setup() will cause errorsin the DiscoverBluetooth sketch (further down this page).
This will not happen in every sketch, but the Discoverbluetooth sketch has subActivities which may cause some sort of conflict.. I did warn you.
Here is a quick look at my ToastMaster method (no need to compile this code):
Here is a breakdown of what this is doing:
Broadcast Receivers : Looking out for Bluetooth devices
To listen/look out for any Bluetooth devices that are within range, we need to create and register a Broadcast receiver.
When registering a BroadcastReceiver, you will need to tell the program what it is you are looking / listening out for. In our case we want to listen out for occasions whereby a Bluetooth device is FOUND. This is represented by:
Here are the relevant components:
Discovering Bluetooth devices: putting it all together
You will notice that in the following sketch, we have to import a whole lot more. Which is why I have tried to break it down into bite size chunks, to help you digest it all. Now we will put it all together into a sketch which will
Upgrading the Broadcast Receiver : More Device info
Ok, we have the device name. But what other information can we collect from the device? You can call
If you replace the old version of myOwnBroadcastReceiver with this one, you will know a little bit more about the devices discovered.
Connecting to the Bluetooth Device:
While we now have more information about the Bluetooth device, we don't really need it, and we will get rid of it by the end of the tutorial, however we will keep it here for the time being. In the next updated sketch we will be making a connection to the discovered device, and turning the background purple when the connection is made. In order to do this we will need to
Next we will create and register a new BroadcastReceiver, it is created using this:
action with the BroadcastReceiver in the following way
Now that we can be notified about the connection made to the Bluetooth Device, lets go through the code required to make the connection. We will only connect if we have actually discovered a device, so we will put this code within the FOUND section of myOwnBroadcastReceiver.
We use the discoveredDeviceName variable to specifically target the Bluetooth device we wish to connect to. We then unregister the myDiscoverer BroadcastReceiver because we are going to stop discovering before we connect to the Bluetooth Device, plus if you don't, it will generate an error. We then pass our discovered device to a new Thread to connect to that device in the background. The class used to handle the connection is the "ConnectToBluetooth" class as displayed below:
We will cancelDiscovery() on the bluetooth Adapter to prevent a slow connection.
Also we will need to use a specific UUID as per below:
Before you can connect to the Bluetooth shield you need to use the UUID to create a BluetoothSocket.
The major structure of this code was made possible using the following site:
http://jayxie.com/mirrors/android-sdk/guide/topics/wireless/bluetooth.html
And the following sites were also useful in getting some of the information I needed:
http://stackoverflow.com/questions/13238600/use-registerreceiver-for-non-activity-and-non-service-class
http://developer.android.com/guide/topics/connectivity/bluetooth.html
While I have described all the major components required to connect to the Bluetooth Device, I will now put it all together in a new and updated version of the "DiscoverBluetooth" Android/Processing sketch and call it "ConnectBluetooth". There is some additional code in this sketch which I did not specifically go through, for example, the code used to turn the background to purple in the draw() method. Look out for that one. Anyway, read through the following code, and make sure that you understand what each section is doing.
Android/Processing Sketch 5: ConnectBluetooth
The Arduino Sketch
Most of the Android/Processing code used so far has depended on a Bluetooth Device being discoverable. Our ultimate aim it to connect to a Bluetooth Shield on an Arduino UNO or compatible board such as the Freetronics Eleven. The following sketch was essentially taken from one of my previous posts (here), however, I have stripped it down to the bear essentials so that it will only be discoverable, and will not send or receive data. I will provide this functionality later. I just wanted to show you the essential bits to establish the connection to the Shield.
ARDUINO Sketch 1: Bluetooth Pair and Connect
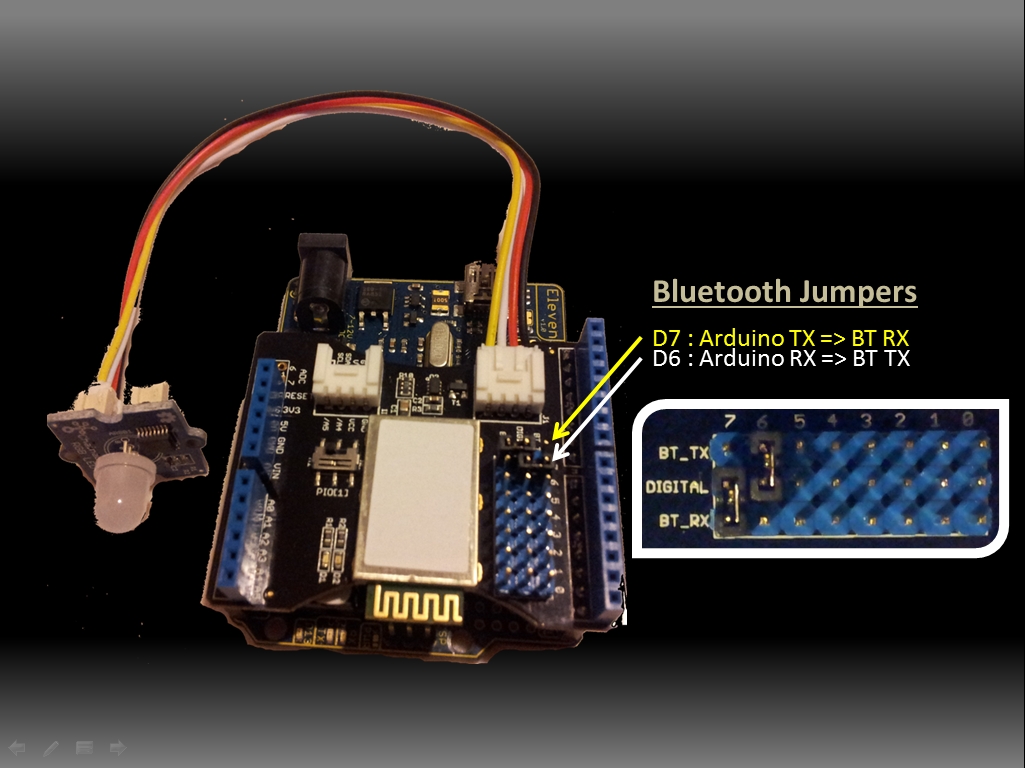
Please make sure to setup the Bluetooth jumpers as per the picture below, otherwise you will not have much luck with the sketch above.
Well that brings us to the end of part TWO.
PART THREE
In part three we will attempt to actually send some data from the Android phone to the Arduino via Bluetooth, and vice versa. This will be when the real fun starts.
or GO BACK
Click on the link if you missed PART ONE
If you happened to land on this page and missed PART ONE, I would advise you go back and read that section first. You may get lost coming in half way through the story. This is what you'll find in part one.
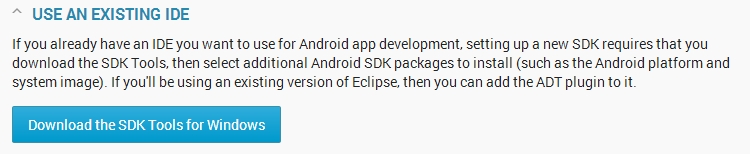
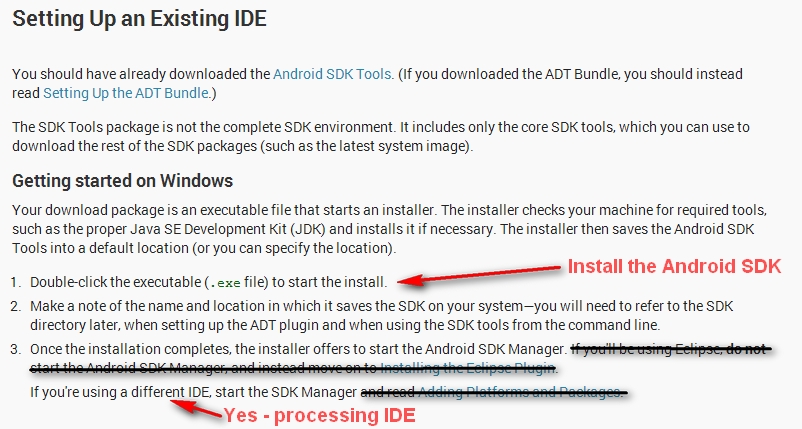
- Downloading and setting up the Android SDK
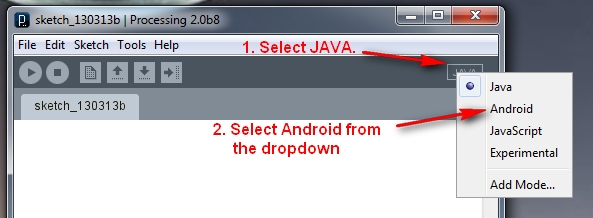
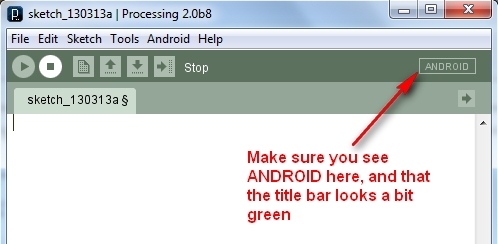
- Downloading the Processing IDE
- Setting up and preparing the Android device
- Running through a couple of Processing/Android sketches on an Andoid phone.
ToastMaster - the master of all Toasts
I will now introduce you to Toast. What does "Toast" have to do with programming ? Toast is used by Android to quietly display little messages on the screen.
Have a look here for a a quick introduction to Toast, otherwise have a look at the Android Developers Toast information.
I will be creating my own method that relies on Toast to make the process of displaying messages easier. I have named this method: "ToastMaster".
A word of warning. Calling ToastMaster from within setup() will cause errorsin the DiscoverBluetooth sketch (further down this page).
This will not happen in every sketch, but the Discoverbluetooth sketch has subActivities which may cause some sort of conflict.. I did warn you.
Here is a quick look at my ToastMaster method (no need to compile this code):
1 | /* My ToastMaster function to display a messageBox on the screen */ |
Here is a breakdown of what this is doing:
- Toast.makeText() - is used to construct the message to be displayed.
- getApplicationContext() - gets a handle on the Application
- textToDisplay - is obvious, this is the text you want to display.
- Toast.LENGTH_LONG - is how long you want the message to displayed for. (or LENGTH_SHORT)
- setGravity() - sets the message position on the screen, in this case I have chosen to center the text.
- show() - is used to actually show the message.
Broadcast Receivers : Looking out for Bluetooth devices
To listen/look out for any Bluetooth devices that are within range, we need to create and register a Broadcast receiver.
When registering a BroadcastReceiver, you will need to tell the program what it is you are looking / listening out for. In our case we want to listen out for occasions whereby a Bluetooth device is FOUND. This is represented by:
- BluetoothDevice.ACTION_FOUND - this is sent or broadcast when a Bluetooth device is found (when in discovery mode).
Here are the relevant components:
1 | BluetoothAdapter bluetooth = BluetoothAdapter.getDefaultAdapter(); |
Discovering Bluetooth devices: putting it all together
You will notice that in the following sketch, we have to import a whole lot more. Which is why I have tried to break it down into bite size chunks, to help you digest it all. Now we will put it all together into a sketch which will
- ask to turn Bluetooth ON if it happens to be disabled.
- If you don't turn on Bluetooth, it will tell you that you need to turn it on.
- If you turn on bluetooth (or if it was already on), it will try to discover any bluetooth devices in range. These devices need to be made "discoverable" before running this sketch.
- If the phone finds a bluetooth device, it will display the name of the device and will change the background screen colour to GREEN.
1 | /* DiscoverBluetooth: Written by ScottC on 18 March 2013 using |
Upgrading the Broadcast Receiver : More Device info
Ok, we have the device name. But what other information can we collect from the device? You can call
- intent.getParcelableExtra(BluetoothDevice.EXTRA_DEVICE);
- .getName() = Which is a different way of getting the name of the BluetoothDevice.
- .getAddress() = Returns the hardware address of the BluetoothDevice. eg. "00:11:22:AA:BB:CC"
- .getBondState() = Returns an integer which describes the BondState of the BluetoothDevice
- BOND_NONE = 10
- BOND_BONDING = 11
- BOND_BONDED = 12
1 | /* This BroadcastReceiver will display discovered Bluetooth devices */ |
If you replace the old version of myOwnBroadcastReceiver with this one, you will know a little bit more about the devices discovered.
Connecting to the Bluetooth Device:
While we now have more information about the Bluetooth device, we don't really need it, and we will get rid of it by the end of the tutorial, however we will keep it here for the time being. In the next updated sketch we will be making a connection to the discovered device, and turning the background purple when the connection is made. In order to do this we will need to
- Create a boolean variable to hold the connection status
- Create and register a new BroadcastReceiver to notify us when a connection broadcast action has been received.
- Create a new thread to handle the connection
- Change the background screen colour when a successful connection has been made
- boolean BTisConnected=false;
Next we will create and register a new BroadcastReceiver, it is created using this:
- BroadcastReceiver checkIsConnected = new myOwnBroadcastReceiver();
action with the BroadcastReceiver in the following way
- registerReceiver(checkIsConnected, new IntentFilter(BluetoothDevice.ACTION_ACL_CONNECTED));
- String action=intent.getAction();
1 | public class myOwnBroadcastReceiver extends BroadcastReceiver { |
Now that we can be notified about the connection made to the Bluetooth Device, lets go through the code required to make the connection. We will only connect if we have actually discovered a device, so we will put this code within the FOUND section of myOwnBroadcastReceiver.
1 | //Connect to the discovered bluetooth device (SeeedBTSlave) |
We use the discoveredDeviceName variable to specifically target the Bluetooth device we wish to connect to. We then unregister the myDiscoverer BroadcastReceiver because we are going to stop discovering before we connect to the Bluetooth Device, plus if you don't, it will generate an error. We then pass our discovered device to a new Thread to connect to that device in the background. The class used to handle the connection is the "ConnectToBluetooth" class as displayed below:
We will cancelDiscovery() on the bluetooth Adapter to prevent a slow connection.
Also we will need to use a specific UUID as per below:
- private UUID uuid = UUID.fromString("00001101-0000-1000-8000-00805F9B34FB");
Before you can connect to the Bluetooth shield you need to use the UUID to create a BluetoothSocket.
- mySocket = btShield.createRfcommSocketToServiceRecord(uuid);
- mySocket.connect();
1 | public class ConnectToBluetooth implements Runnable{ |
The major structure of this code was made possible using the following site:
http://jayxie.com/mirrors/android-sdk/guide/topics/wireless/bluetooth.html
And the following sites were also useful in getting some of the information I needed:
http://stackoverflow.com/questions/13238600/use-registerreceiver-for-non-activity-and-non-service-class
http://developer.android.com/guide/topics/connectivity/bluetooth.html
While I have described all the major components required to connect to the Bluetooth Device, I will now put it all together in a new and updated version of the "DiscoverBluetooth" Android/Processing sketch and call it "ConnectBluetooth". There is some additional code in this sketch which I did not specifically go through, for example, the code used to turn the background to purple in the draw() method. Look out for that one. Anyway, read through the following code, and make sure that you understand what each section is doing.
Android/Processing Sketch 5: ConnectBluetooth
1 | /* ConnectBluetooth: Written by ScottC on 18 March 2013 using |
The Arduino Sketch
Most of the Android/Processing code used so far has depended on a Bluetooth Device being discoverable. Our ultimate aim it to connect to a Bluetooth Shield on an Arduino UNO or compatible board such as the Freetronics Eleven. The following sketch was essentially taken from one of my previous posts (here), however, I have stripped it down to the bear essentials so that it will only be discoverable, and will not send or receive data. I will provide this functionality later. I just wanted to show you the essential bits to establish the connection to the Shield.
ARDUINO Sketch 1: Bluetooth Pair and Connect
1 | /* This project combines the code from a few different sources. |
Please make sure to setup the Bluetooth jumpers as per the picture below, otherwise you will not have much luck with the sketch above.
Well that brings us to the end of part TWO.
PART THREE
In part three we will attempt to actually send some data from the Android phone to the Arduino via Bluetooth, and vice versa. This will be when the real fun starts.
or GO BACK
Click on the link if you missed PART ONE