Posts with «decoration» label

Mechanical tulip is a glowing work of Valentine’s Day art

Tulips come in all shapes and sizes, but Jirí Praus has created a mechanical version like nothing you’ve ever seen. It’s masterfully crafted as a gift for his wife, using bent wire to form its six petals and stem. 

In order to make this present truly amazing, however, a servo-driven linkage system opens up the tulip when touched, exposing seven programmable LEDs in the center, along with 30 bright white SMD LEDs on the petals themselves.

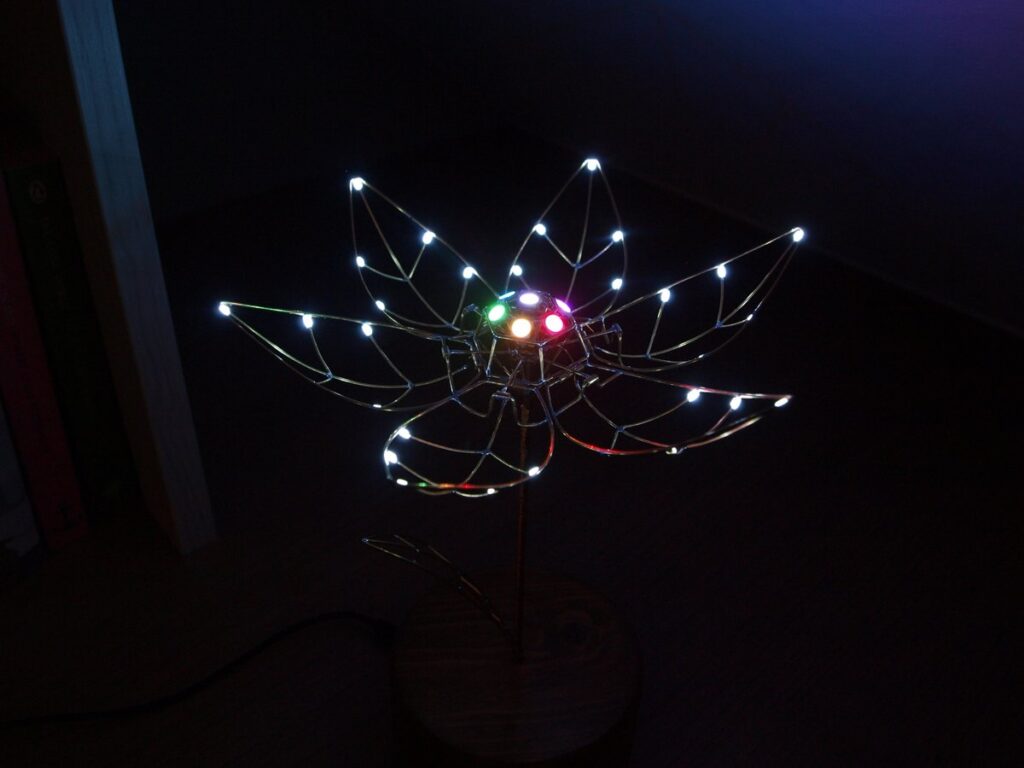
Control for the freeform flower is accomplished via an Arduino Nano, hidden inside its wooden base. It’s a truly spectacular build, shown below illuminating the surrounding area with a brilliant light and shadow pattern.

It’s done! Mechanical tulip as a present for my wife. When caressed it blooms into various colors. And will never fade. #freeform #jewelry #arduino pic.twitter.com/yDePeURXXd

— Ji?í Praus (@jipraus) February 12, 2019


Programmable 3d-printed decorations for your Xmas

We can’t miss the chance to play with some LEDs now that holidays are coming and mix some electronics with 3d printing on Materia 101.

In the tutorial of this Kristoffer is experimenting on Xmas decorations, Arduino Micro and some code to play around with.

The result is what you see in the picture below!

Do you want to make it too? Follow the steps on Scuola >>
Check the previous tutorials on 3d printing with Material 101

Interested in getting in touch and showing your experiments? Join Kristoffer on the Arduino forum dedicated to Materia 101 and give us your feedback.

Laser Projected Christmas Lights


It’s August, and of course that means that it’s time for retail stores to put up their Christmas decorations! But seriously, if you’re going to do better than the neighbors you need to start now. [Joey] already has his early start on the decorations, with a house-sized light show using LED strips and a laser projector that he built last Christmas.

What started off as a thought that it would be nice to hang a wreath over the garage soon turned into a laser projector that shows holiday-themed animations on the front of the house. The project also includes a few RGB LED strips which can match the colors displayed by the projector. The LEDs are powered from a custom-built supply that is controlled by a laptop, and the program that runs on the computer averages the colors from the video signal going to the projector which lights up the LED strips to match the projected image. This creates an interesting effect similar to some projects that feature home theater ambient lighting.

The only major problem [Joey] came across was having to account for the lasers’ motion in the projected patterns, which was causing the computer to read false values. This and a few other laser-related quirks were taken care of with a bit of programming to make sure the system was functioning properly. After that it was a simple matter of attaching the projector to the roof and zip-tying the LED strips to the eaves of the house.

The projector is weatherproof, has survived one harsh winter already, and can be up and running for any holiday. With Halloween right around the corner, this could be a great way to spice up some trick-or-treating. Check out the video after the break to see this setup in action.


Filed under: Holiday Hacks

An Arduino-controlled RGB lamp

On his blog, Miguel presents one of his latest projects:

This project shows the operation of an RGB lamp using a digital LED strip. After activating the bluetooth connection, the user can open the GUI on the PC to control the lamp. The program shows a hue palette divided into 30 rods, one for each LED of the strip.
By clicking & dragging the mouse cursor it is possible to make your own patterns,. To remove a color, the user can simply click on a rod while pressing the spacebar, which switches off the selected LED.

Part list: wooden support, RGB digitally-addressable LED strip, microcontroller (Arduino Pro Mini, for example), Bluetooth or USB wire.

More information on this project can be found on Miguel’s blog, while a brief video about its operation can be found here; the code of the project can be found on Github. The project’s page on Thingiverse can be found here.

[Via: Miguel's blog]


Arduino Blog 12 Jan 09:20

An Arduino-enhanced espresso machine: the “Naked Espresso”

Reborn is an australian digital creative agency whose mission is to design smart and innovative ideas.
Among their works, a very nice one regards a hack consisting in the re-engineering of a sofisticated espresso machine, to show its peculiar features in the process of coffee making.
By means of an Arduino board, the team can collect real-time information such as flow rate, temperature and pressure; then, a Processing sketch graphically presents this data to the user in an artistic fashion.
Finally, each cup of coffee made this way is decorated with an artwork summarizing this information in its own “personal identity”.
More information can be found here.

[Via: The Naked Espresso]

SpamPoetry (or how to recycle spam)

Everyday, a lot of spam inevitably arrives to our mailboxes, forcing us to lose time in discerning fake emails from good ones, so everyone agrees on saying that spam is frustrating and completely useless.

This is almost true, since Varvara Guljajeva and Mar Canet Sola have taken advantage of spam coming from the Internet (more specifically, those messages “donated” by Eindhoven people) to make a very creative art project: first, they have recycled spam to algoritmically create poetry and, then, they have sent the result to a properly Arduino-hacked knitting machine (Arduino has been used to emulate the typing of the commands required to load the pattern).

From the authors:

Concerning the concept, we are interested in bringing together digital culture and traditional handicraft. To be more specific, the idea is to experiment with the form and meaning of SPAM. We turn SPAM into a romantic, funny or even sarcastic poetry and present it in unusual tangible form as knitted garment. To be more specific, we call final result dysfunctional wearable, because it reminds a sweater but is not really a one. Like SPAM, our dysfunctional wearable does not have a purpose.

The result is really impressive and it has been presented at two exhibitions, at Eindhoven and Malmö. Several pictures of the events can be found here. More information about the project can be found at Mar and Varvara‘s homepages.

[Via: Mar's Homepage and Varvara's Homepage]

Text-Enabled Espresso Machine Prints Your Number on Foam

Get a personalized messages, order number or sponsor a coffee to the cute guy in the coffee shop with your number. Now the Arduino style!

We made the Textspresso machine to show off our cloud texting technology. It’s a robotic coffee machine. It utilized java script, 3 arduino microcontrollers, a couple servos, an ikea cupboard, and about 100 other pieces. We think it’s great. We’re open sourcing the plans in the coming weeks.

Created by Kelsey Klevenberg of the cloud texting service Zipwhip.

Via:[Make]

Arduino Blog 15 May 21:59

Display alphabets using bubbles

Coder Matt Bell is continuing to improve his exceedingly clever water-based display screen.

Inspired by a Jeep display that spelled out words with falling water, Bell’s design consists of a water tank connected to a grid of clear plastic tubes and an Arduino. Individual solenoid valves at the bottom of each tube can let in air, creating the effect of individual white pixels on a black screen, and preprogrammed sequences can spell out letters or numbers. His newest version adds an air reservoir to control the size of the bubbles, as well as completely separate vinyl tubes rather than one large tank with dividers.

More about the build-instructions and inspiration can be read here and here.

Via:[TheVerge]

Arduino Blog 13 May 22:56

High-tech geeky chocolate box

So you want to gift your Mother a box of chocolates for Mother’s day. Spice it up with Arduino. A hack by Dmitriy Abaimov which originally uses an ATTiny13, a very tiny microcontroller, along with 10 LEDS tucked into the heart-shaped Ferrero Rocher box to flash lights inside the plastic. It’s a nice touch that will stand out among the flowers, chocolates and cards.

Get making! The code and instructions can be found here.

Via:[walyou]

Arduino Blog 11 May 11:01