Posts with «arduino» label

Washing machine becomes ‘universal’ rotary tool
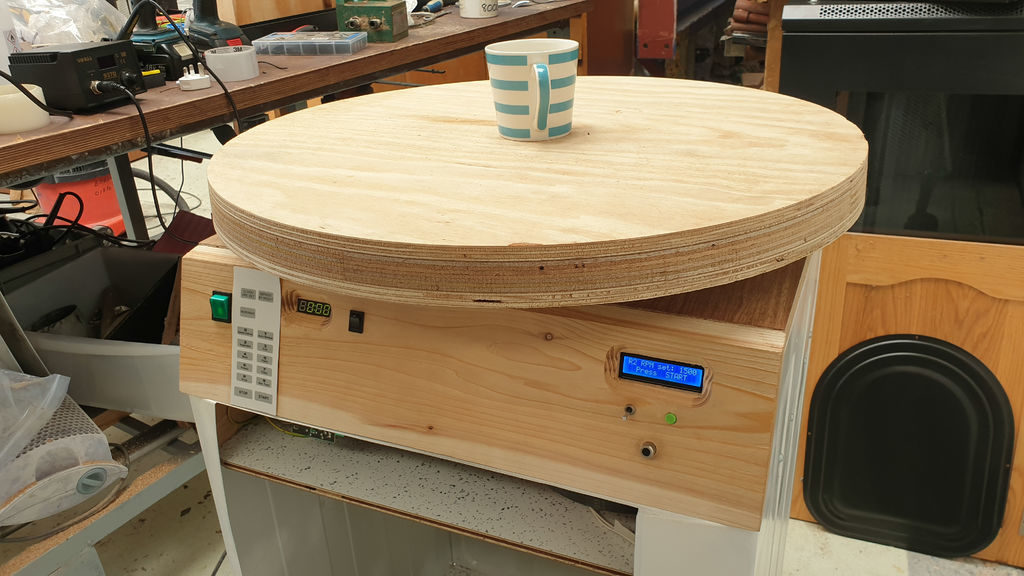
If you have a broken washing machine, you may want to think twice before disposing of it. As Stephen John Saville shows in this multi-use rotary table project, they can provide a wealth of parts, from the actual physical structure/table of the build, to a motor that’s able to run via AC or DC, and various other mechanical components. There’s even an electronic timer salvaged from an old microwave.
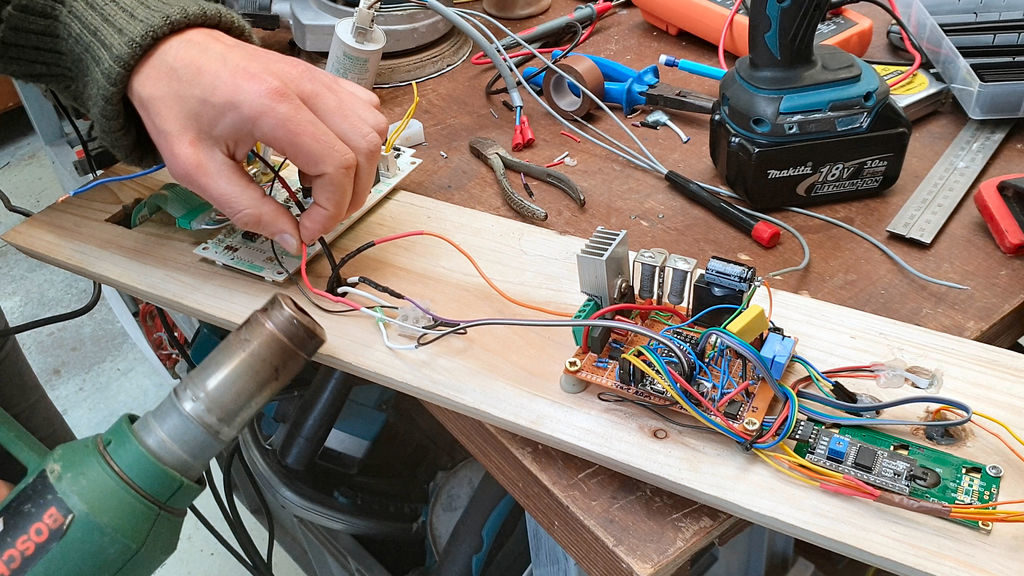
To keep the turntable running at the desired speed, he used an Arduino Nano connected to a triad circuit, along with an LM393 chip and optocoupler to implement closed-loop control. User feedback is shown on a 16×2 LCD screen, updated every two seconds to avoid interfering with speed control functions. 

More info on this clever hack can be found in its well-detailed write-up, and be sure to check out the very entertaining video of what’s involved in such a repurposing feat below! 
Arduino Blog 14 May 14:17

Stator Library Makes Your Arduino Code Easier To Read

The readability of your code can make the difference between your project being a joy to work on, or an absolute headache. This goes double when collaborating with others. Having easily parsed code reduces your cognitive load and makes solving problems easier. To try and help with this, [PTS93] developed the Stator library to make certain common tasks simpler to read.

The aim of the library is to get rid of piles of state tracking variables and endless if/else statements – hence the name. It’s designed primarily for the Arduino IDE but doesn’t have any dependencies on the API, so can be used in other C++ environments. It comes with a variety of neat tools for common jobs, such as reading an analog sensor with hysteresis around a trigger point, as well as easy ways to track state changes across multiple variables. By using basic English terms instead of condition checks and mathematical operators, it can make things more readable and easier to follow.

The power of the Arduino platform has always been in its easy to use libraries that make everything easier, from interfacing LCDs to working with Amazon Dash buttons.

Clean your whiteboard automatically with Wipy

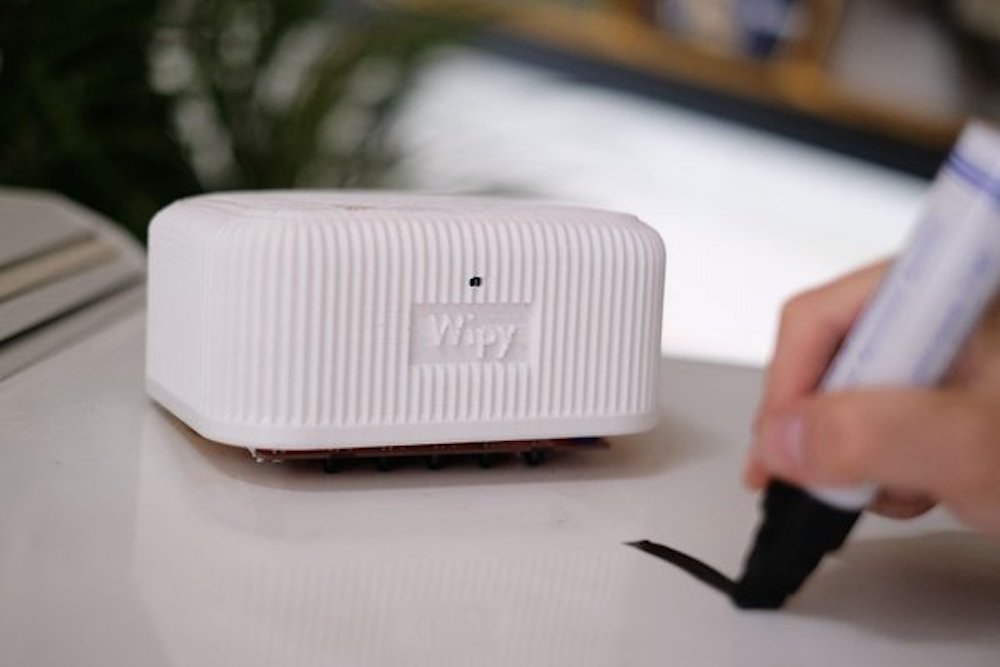
If you have to do a lot of drawing on a whiteboard, you also have to clean it. Why not have a robot do this instead? That’s the idea behind Wipy, an Arduino Uno-based robot that uses magnets to stick it to the board, plus grippy wheels and motors to power it across your scribbles.

Wipy employs an array of IR sensors that enable it to act as a line follower, along with a time-of-flight (ToF) sensor to detect your hand on the board. While one might assume this sensing arrangement would prevent it from erasing your work-in-progress, it annoyingly allows it to start erasing immediately when you start drawing on the board. At least it has a cute LED face!

Did you ever get tired of cleaning the whiteboard? Have you ever wondered how much your life would improve if a robot could do this for you? You now have the chance to make this a reality with Wipy: the overly motivated whiteboard cleaner. Wipy will properly clean your embarrassingly bad drawings, and it will even do it with a cute smile. You don’t even need to activate it! It will just clean the board when you least expect it… Uhhh…*cough cough*…we, of course, mean: when you need it most!

– Our future friend will be able to stick to the board using magnets and is able to move through space using grippy wheels.

– It will be able to follow a line and erase it using a line-following sensor and a sponge.

– Wipy has the ability to measure the distance to your hand using a time-of-flight sensor.

– We will give Wipy a cute personality using a small OLED screen.

Automated plant tending with Arduino

Do you like plants, but not so much the tending to and watering them? If that sounds like you, then you might be interested in your own CNC growing machine. The system—created by 15-year-old maker “daily3dprinting”—is controlled by an Arduino Uno, and uses a single stepper motor to pull a watering head into position based on hygrometer readings.

A relay is used to turn the grow light on at 6am and off at 8pm, and another to activate the unit’s water pump. A third relay is employed to power off the L298N stepper driver when not needed. 

The project took home second place in the math and engineering category at daily3dprinting’s high school science fair, and more info on the build is available in its write-up here.

sprintf function

Description

This tutorial will help you to understand the sprintf function, and how to use it. Essentially, the sprintf function allows you to construct a string using a pre-formatted string template to which you can insert variables at pre-defined locations. The sprintf function will "compile" the string and assign it to a char array. All you have to do is make sure that the char array is large enough to hold all of the characters in the string. The best way to understand the sprintf function is with examples. And luckily, I have examples. What are we waiting for ? Let's dive in.

Parts Required: an Arduino and a USB cable.


sprintf ( char* array,   const char* strTemplate,   var1...);


Arduino IDE

While there are many Arduino IDE alternatives out there, I would recommend that you use the official Arduino IDE for this project. I used the official Arduino IDE app (v1.8.5) for Windows 10.
Make sure to get the most up-to-date version for your operating system here.


Arduino Code

The code below will show you how to use the sprintf function and includes a number of different format specifiers to play with. In each case the sprintf function writes to the "data" character array, and subsequently sends it through to the Serial monitor. The string template helps to construct the data output, allowing you to insert variables at specific locations within the text. The format of the variable is defined by the "format specifier" used in the sprintf function. The format specifier is always prefixed with a percentage sign (%).


Serial Monitor Output

  1. Upload the code to the Arduino.
  2. Open the Serial monitor in the Arduino IDE (Ctrl+Shift+M).
  3. Ensure that you have set the baud rate in the Serial monitor to 9600.
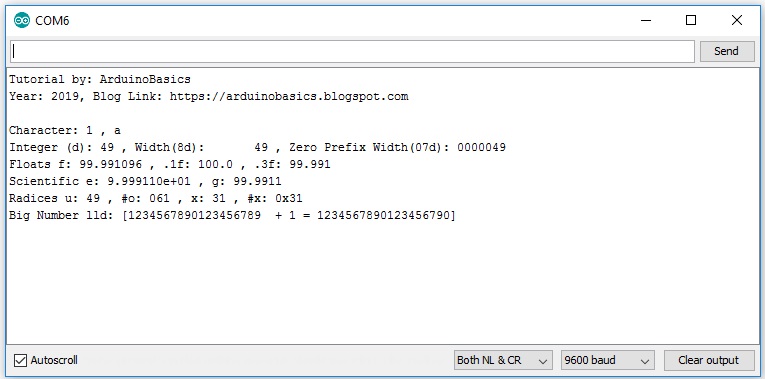
  4. You should see the following output:


The sprintf function requires that you have a character array to store the output. In the example code above, the output is stored in the "data" character array. It also requires a template that tells the function where to insert the variables. As you can see from the table below, the variables will be formatted based on the format specifier used. The format specifier can be quite useful for numeric conversions. Eg. decimal to hex conversions.


Format Specifiers

Some of the different format specifiers that can be used with the sprinf function are listed below.

Conclusion

Now that you know all about the sprintf function, I hope it will inspire you to use it in your own projects. Please let me know in the comments below how you use the sprintf function, and whether there was anything that you feel I failed to mention in this tutorial.
Happy Coding !!


If you found this tutorial helpful, please consider supporting me by buying me a virtual coffee/beer.

$3.00 AUD only
 

Social Media

You can find me on various social networks:

Follow me on Twitter: ScottC @ArduinoBasics.
I can also be found on Instagram, Pinterest, and YouTube.
And if all else fails, I have a server on Discord.


Ardunio’s Pluggable Discovery Programs With Any Protocol

The first Arduino was serial, and over the decade and a half, this has been the default way to upload code to an Arduino board. In 2008, support for in-circuit programmers was added, and later port detection was added. The latest version of the Arduino IDE adds something new: pluggable discovery. Now any protocol is supported by the Arduino IDE.

This feature is the brainchild of [Paul Stoffregen], creator of the Teensy. If you’ve ever used a Teensy, you’ll remember the Teensyduino application used to upload code to the board. The Teensy uses HID protocol instead of serial for uploading. After working to improve the integration between the Teensy and Arduino IDE, [Paul] stated extending the DiscoveryManager. After some discussion with the Arduino developers, this feature was then added to Arduino 1.8.9, released a month or so ago.

There are some issues with Pluggable Discovery, most importantly that it doesn’t yet exist in the Arduino Command Line Interface (yeah, that exists too). If you’re looking to contribute to Open Source, that would be a nice project to pick up.

With the right JSON, and configuration, it is now theoretically possible to extend the Arduino IDE to any sort of protocol. This means (again, theoretically), it’s possible to update the firmware in your DIY MIDI synth over SysEx message, or a parallel port, maybe. Someone is going to upload to an Arduino board over PCIe, eventually.

Arduino Leonardo Gets A Lockable Bootloader

Security is something that’s far too often overlooked in embedded devices. One of the main risks is that if the device doesn’t verify the authenticity of incoming firmware updates. [Walter Schreppers] was working on a USB password storage device, so security was paramount. Thus, it was necessary to develop a secure bootloader.

[Walter]’s device was based upon the Arduino Leonardo. Starting with the Caterina bootloader, modifications were made to enable the device to be locked and unlocked for programming. This can be done in a variety of ways, depending on how things are setup. Unlocking can be by using a secret serial string, an onboard jumper, and [Walter] even suspects a SHA1 challenge/response could be used if you were so inclined.

It’s never too soon to start thinking about security in your projects. After all, we must stave off the cyberpunk future in which leather-clad youths flick all your lights on and off before burning your house down in the night by overclocking the water heater. Naturally, we’ve got a primer to get you going in the right direction. Happy hacking!

Insert Coin (Cell) To Play LedCade

In this era of 4K UHD game console graphics and controllers packed full of buttons, triggers, and joysticks, it’s good to occasionally take a step back from the leading edge. Take a breath and remind ourselves that we don’t always need all those pixels and buttons to have some fun. The LedCade is a μ (micro) arcade game cabinet built by [bobricius] for just this kind of minimalist gaming.

Using just three buttons for input and an 8×8 LED matrix for output, the LedCade can nevertheless play ten different games representing classic genres of retro arcade gaming. And in a brilliant implementation of classic hardware hacking humor, a player starts their game by inserting not a monetary coin but a CR2032 coin cell battery.

Behind the screen is a piezo speaker for appropriately vintage game sounds, and an ATmega328 with Arduino code orchestrating the fun. [bobricius] is well practiced at integrating all of these components as a result of developing an earlier project, the single board game console. This time around, the printed circuit board goes beyond being the backbone, the PCB sheet is broken apart and reformed as the enclosure. With classic arcade cabinet proportions, at a far smaller scale.

If single player minimalist gaming isn’t your thing, check out this head-to-head gaming action on 8×8 LED arrays. Or if you prefer your minimalist gaming hardware to be paper-thin, put all the parts on a flexible circuit as the Arduflexboy does.

The HackadayPrize2019 is Sponsored by:

Play Tetris on a Transistor Tester, Because Why Not?

[Robson] had been using the same multimeter since he was 15. It wasn’t a typical multimeter, either. He had programmed it to also play the Google Chrome jumping dinosaur game, and also used it as a badge at various conferences. But with all that abuse, the ribbon cable broke and he set about on other projects. Like this transistor tester that was just asking to have Tetris programmed onto its tiny screen.

The transistor tester is a GM328A made for various transistor testing applications, but is also an LCR meter. [Robson]’s old meter didn’t even test for capacitance but he was able to get many years of use out of that one, so this device should serve him even better. Once it was delivered he set about adding more features, namely Tetris. It’s based on an ATmega chip, which quite easy to work with (it’s the same chip as you’ll find in the Arduino Uno but [Robson’s] gone the Makefile route instead of spinning up that IDE). Not only did he add more features, but he also found a mistake in the frequency counter circuitry that he fixed on his own through the course of the project.

If you’ve always thought that the lack of games on your multimeter was a total deal breaker, this project is worth a read. Even if you just have a random device lying around that happens to be based on an ATmega chip of some sort, this is a good primer of getting that device to do other things as well. This situation is a fairly common one to be in, too.

Build a fully functional binary clock with your Uno

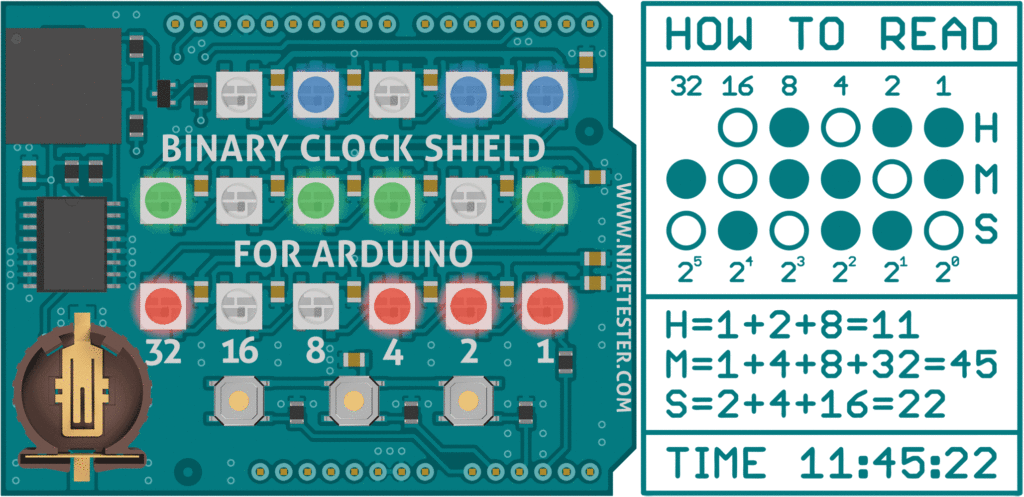
If you want to show everyone your computer prowess—or perhaps get a little practice—binary clocks are a great way to do so. These clocks express time in 1s and 0s instead of 0 through 9, and while the concept is pretty simple, actually creating one is less than straightforward… or used to be.

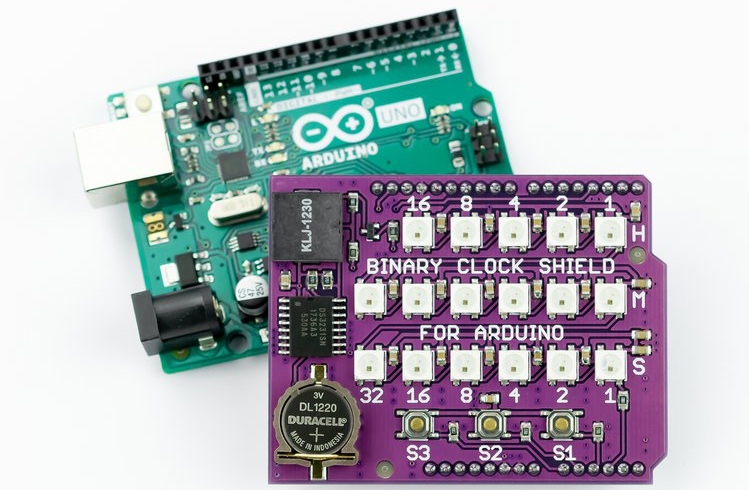
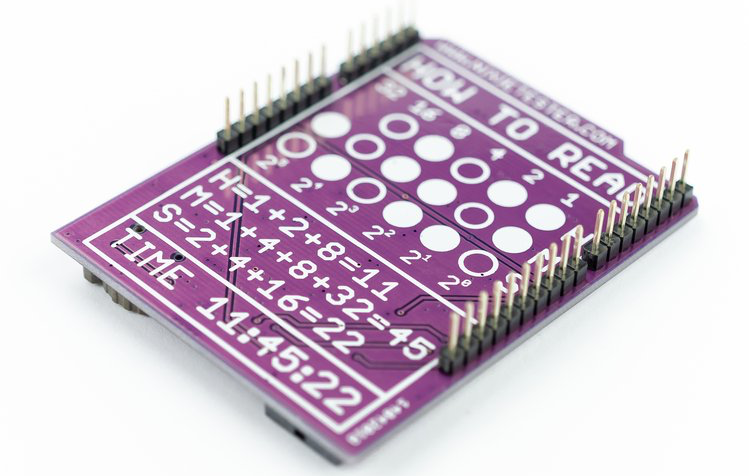
The Binary Clock Shield, now on Crowd Supply, aims to make this type of clock build extremely easy. This board plugs into an Arduino Uno and features 17 RGB LEDs to act as binary digits, along with an RTC module and backup battery socket. 

The device also includes a piezo speaker for sound output, plus three user buttons, great for setting the time or whatever other unique application you have in mind!