

sprintf function

Description
This tutorial will help you to understand the sprintf function, and how to use it. Essentially, the sprintf function allows you to construct a string using a pre-formatted string template to which you can insert variables at pre-defined locations. The sprintf function will "compile" the string and assign it to a char array. All you have to do is make sure that the char array is large enough to hold all of the characters in the string. The best way to understand the sprintf function is with examples. And luckily, I have examples. What are we waiting for ? Let's dive in.
Parts Required: an Arduino and a USB cable.
Arduino IDE
While there are many Arduino IDE alternatives out there, I would recommend that you use the official Arduino IDE for this project. I used the official Arduino IDE app (v1.8.5) for Windows 10.
Make sure to get the most up-to-date version for your operating system here.

Arduino Code
The code below will show you how to use the sprintf function and includes a number of different format specifiers to play with. In each case the sprintf function writes to the "data" character array, and subsequently sends it through to the Serial monitor. The string template helps to construct the data output, allowing you to insert variables at specific locations within the text. The format of the variable is defined by the "format specifier" used in the sprintf function. The format specifier is always prefixed with a percentage sign (%).
Serial Monitor Output
- Upload the code to the Arduino.
- Open the Serial monitor in the Arduino IDE (Ctrl+Shift+M).
- Ensure that you have set the baud rate in the Serial monitor to 9600.
- You should see the following output:
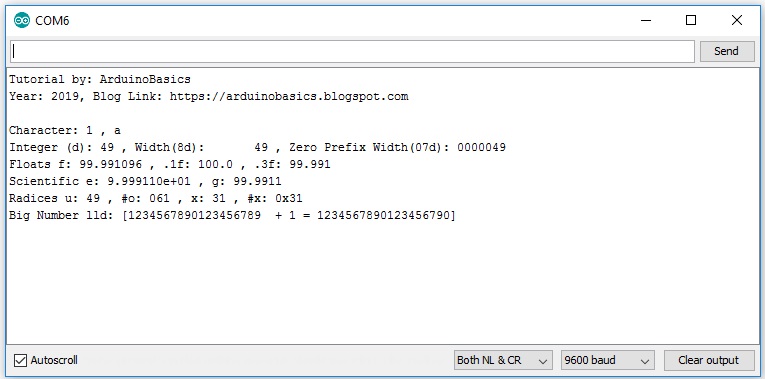
The sprintf function requires that you have a character array to store the output. In the example code above, the output is stored in the "data" character array. It also requires a template that tells the function where to insert the variables. As you can see from the table below, the variables will be formatted based on the format specifier used. The format specifier can be quite useful for numeric conversions. Eg. decimal to hex conversions.
Format Specifiers
Some of the different format specifiers that can be used with the sprinf function are listed below.

Conclusion
Now that you know all about the sprintf function, I hope it will inspire you to use it in your own projects. Please let me know in the comments below how you use the sprintf function, and whether there was anything that you feel I failed to mention in this tutorial.
Happy Coding !!
If you found this tutorial helpful, please consider supporting me by buying me a virtual coffee/beer.
Social Media
You can find me on various social networks:
Follow me on Twitter: ScottC @ArduinoBasics.
I can also be found on Instagram, Pinterest, and YouTube.
And if all else fails, I have a server on Discord.


[original story: ScottC]