Posts with «arduino» label

Twelfth day of freshman design seminar

My counts of which days were which in the freshman design seminar were all messed, so three of my blog posts were misnamed:

date which day of class blog post
Mon 2014 Jan 6 1 First day of freshman design seminar
Wed 2014 Jan 8 2 Second day of freshman design seminar
Mon 2014 Jan 13 3 (Baskin lab tour) Third day of freshman design seminar
Wed 2014 Jan 15 4 Fourth day of freshman design seminar
Wed 2014 Jan 22 5 Fifth day of freshman design seminar
Mon 2014 Jan 27 6 Sixth day of freshman design seminar
Wed 2014 Jan 29 7 (Biomed lab tour) Biomed lab tours and online discussions
Mon 2014 Feb 3 8* Seventh day of freshman design seminar
Wed 2014 Feb 5 9 no post (ill and group tutor ran class)
Mon 2014 Feb 10 10* Ninth day of freshman design seminar
Wed 2014 Feb 12 11* Tenth day of freshman design seminar
Wed 2014 Feb 19 12 Twelfth day of freshman design seminar (this post)

Today we started by having the students turn in their Arduino programming homework, then start writing the program as a group. I told them that I particularly wanted those who had trouble with the assignment to provide input—I’m trying to get them to realize that questions and confusion are normal, and that the right action to take in college is to ask questions, rather than to hide ignorance.

This particular assignment was expected to be hard for them—I had not done the scaffolding for it that I had originally planned, but threw them into it with very little preparation. I told them that, but also that I was trying to get them used to looking things up and figuring them out, rather than waiting to be told exactly what to do. Again, I’m trying to get them out of the “regurgitate what the teacher said” mode that K–12 education has trained them into. If I accomplish nothing else this quarter, I hope to increase their willingness to ask questions (of their teachers and of the things they read).

We did get the program written, with some digressions into the difference between “==” and “=” in C++ and the convention in C and C++ that 0 is false and any other value is true. I also managed to work in the importance of good variable names to tell people what things meant, though this particular program doesn’t need any variables.  The students now have the notions of serial execution, conditional expressions, if-statements, digital I/O, serial communication (we had a digression into baud rate), and the Arduino setup/loop structure, which may be enough for their projects—they may also need analogRead(), which I should be sure to demo on Monday.

I then typed in the program we had created together and demoed it with Arduino. I had deliberately left in a bug that I had spotted (no space between the printing of the different fields), and the class spotted it and came up with a reasonable correction when the first output came out.

We only had about 10 minutes left, so I gave them feedback on their project proposals:

  • Type homework for college classes!  Two of the groups had turned in hastily scribbled notes.
  • Give explicit specifications for the project.  How big an incubator? How precisely does the temperature need to be controlled? How fast does temperature have to change for PCR? What temperatures are needed and how precisely? How many tubes need to be run through the PCR machine at once?  How much acceleration does the centrifuge need to produce? How precisely does the speed need to be controlled?
  • Provide a block diagram giving all the components of the system (power supply, motor, fan, rotor, temperature sensor, … ) and lines showing the connections.  I talked about the importance of specifying the interfaces between components so that people could work simultaneously on different parts, and the need to renegotiate interfaces if the initial specification of them caused problems.

We talked a bit about prototyping—I want them to build something and learn enough to make an improved design, even if they don’t get a fully functional prototype.

For Monday, I assigned them the task of fleshing out the specifications for their project and producing a block diagram, filling in as many details as they could.  The group tutor is going to try to find time to meet with each group for an hour before then, to help them with flesh out their designs.


Filed under: freshman design seminar Tagged: Arduino, block diagram, computer science education, specifications

Kegbot makes creating an Android-controlled kegerator easy

The idea of a connected kegerator isn't anything new. We've seen quite a few startups build high-tech kegs -- even Google has gotten in on the action. Those projects, however, require quite a bit of technical know-how. Now there's an easier solution for the beer enthusiasts: Kegbot. Kegbot is a bit different simply because it handles most of the geeky stuff for you. To get the device up and running, you just have to connect a flow sensor to your keg's line, and connect the pre-made board to your favorite Android tablet. With a minimal amount of effort, the device can track how much beer is left in your keg, who's drinking it and what days of the week you're consuming the most booze.

Creators Mike Wakerly and Eric Webb have been at the smart keg game for a while. The two originally sold Kegbot as a do-it-yourself open-source project. They realized there was a market for a little easier option, and developed the plug-and-play version they're currently raising money for on Kickstarter. We recently met up with the team to see the device in action. %Gallery-slideshow164837%

Filed under: Household, Wireless, Alt

Comments

Engadget 18 Feb 22:45

Still better I-V plot for Schottky diodes

Last weekend I posted a voltage-versus-current curve for a 1N5817 Schottky diode, to confirm the theoretical formula , where IS is the saturation current of the diode, using the following setup

and measuring the results with an Arduino Leonardo.  I claimed that the resulting data fits the model well for over six decades (> 120dB):

Fitting over a wide range of currents is more robust than fitting over the narrower range that I can get with just one value for R2.
There is quantization error still on the voltages, but the overlapping current ranges give good data for most of the range. VT is now 26.1mV and IS is 0.91µA.
click to embiggen

I was a little dissatisfied at the low end, because of the low resolution of the Arduino analog-to-digital converter (only 10 bits).  This weekend I decided to repeat the measurements, but using a Freedom KL25Z board, which has a 16-bit ADC.  Of course, it doesn’t really get 16 bits of accuracy—the data sheet claims that when you use the hardware averaging of 32 samples in 16-bit differential mode (the most accurate) you get at least 12.8 equivalent bits and typically 14.5 equivalent bits. (For single-ended 16-bit, the effective number of bits is only guaranteed to be 12.2, and the typical is 13.9 bits.)  They claim a ±6.8LSB total unadjusted error.

My son helped me get the bare metal ARM system set up on my laptop, along with ADC and UART routines, so that I could write my own single-purpose data logger for this problem (he’s working on getting the KL25Z board integrated into the Arduino Data Logger, but it isn’t close to being ready yet).  My program used the longest sample times and hardware averaging of 32 samples, to get the most accurate conversions possible from the 16-bit ADC.  The first version of the program used differential inputs for the voltage across the diode (E20-E21), but single-ended readings (E21) for the voltage across the resistor.  I had to reduce the voltage for the test from 5v to 3.3v, because the KL25Z runs on 3.3v, not 5v. I got some rather weird results:

Two runs of measurement with R2=100Ω. The low-current measurements seem to be all noise.
click to embiggen

I could get decent measurement in the low-current range by using a larger resistor, so the problem was not noise in the measurement fixture or problems reading low differential voltages on the diode, but just with the small single-ended read for the current. It is pretty clear to me that the ADC does not work well when the input voltage results in less than about 50 counts.  (Note, that means that at the low end of the voltage range you only have about a 9.4-bit equivalent ADC.)

I modified the circuit to allow differential reading away from 0 for both the voltage across the diode and the voltage across the shunt resistor:

Adding an extra resistor ensured that the lowest voltage did not get too close to ground and I could use differential reads for both voltage (E20-E21) and current (E22-E23)/R2

This gave me a much cleaner reading, with problems only once the differential counts got below about 20:

Differential measurement with R2=100Ω. The low-current measurements have problems when the counts get small, but not nearly as severely as with the single-ended measurements.
click to embiggen

I replaced the 100Ω R2 resistor with a 15.56kΩ resistor (nominally 15kΩ), to extend to lower currents despite the noise in the ADC:

This plot extends the fit down to about 0.1µA, but only by adding an extra term—an offset to the voltage. I thought at first that overshoot to –11mV is an error in the analog-to-digital converter on the KL25Z, as I couldn’t see how my circuit could be back-biasing the diode.
Click to embiggen

I tried using larger resistors, but was unable to get any better data using them—I seem to be limited by the differential voltage measurement of the diode at the low end. I thought I might be able to improve the measurements by adding an instrumentation amp to increase the signal for low voltages.  But first I tried just hooking up a voltmeter, with no ADC or instrumentation amp connections.  When the voltage across R2 (100kΩ) is 0.31mV, the voltage across the diode plus R2 is only 0.05V, so there is -0.26mV across the diode.  The backwards voltage across the diode was not an artifact of the ADC!

I then tried looking at the voltage across the diode with my oscilloscope.  There is about 20mV of AC noise, independent of the DC voltage, until the diode has about 50mV across it (with the 15.5kΩ resistor for R2), by which time the noise has dropped to about 10mV (the Bitscope oscilloscope with the differential probe has a noise floor of about 3mV, if the two leads are connected together, so this is not just oscilloscope noise).  This noise seems to be white noise, not 60Hz hum pickup, so is probably coming from the diode.  This AC noise signal limits how accurately we can measure the DC current, and rectifying the noise could be the source of the mysterious “backwards” bias.

To reduce the noise, I put a 4.7µF ceramic capacitor in parallel with the diode, and redid all the measurements with 100Ω, 15.5kΩ, and 100kΩ resistors for R2.

Modified measurement circuit, adding a bypass capacitor to reduce AC noise on the diode and allow better DC measurement.

Now the signals are very clean down to nanoamp levels. I no longer need to add an offset to the voltage, as it is 0 to within the measurement repeatability. The noise from very small voltage differences for the 100Ω shunt resistor is still a bit of a problem, but that region is well covered by 15.5kΩ data. The curve was fit using just the 15.5kΩ and 100kΩ data, to avoid having to trim out the noise from the 100Ω data.
Click to embiggen

Lessons learned today:

  • Higher-resolution ADCs do give smoother curves, with less digitization noise, but they aren’t a panacea for measurement problems. To get most of the resolution, I had to set the ADC to use long sample times and do a lot of averaging. I understand that Freescale Kinetis M series include 24-bit sigma-delta converters for higher precision at much lower speed (24 bits is 7 decimal digits), as well as the high-speed 16-bit successive-approximation converters. Unfortunately, they don’t have a low-cost development board for this series.
  • Stay away from the bottom end of the ADC range on the KL25Z.  Scale single-ended inputs to have values at least 50, and differential inputs to have values at least 20.  There may be similar problems at the top end of the range, but I did not test for them.
    I wondered if the problem may be switching from the large value for the voltage across the diode to the small voltage across the shunt resistor that was the problem. I tried putting in a dummy read between the voltage and the current reads, but that didn’t help at all. At first I thought that the low-count readings were good with the large shunt resistors, but this is probably an illusion: errors in the current measurement for small currents aren’t visible on the plot, because the voltage across the diode is not changing, and so large horizontal errors in the plot are not visible there.
  • Watch out for AC noise when trying to measure DC parameters.  If there are semiconductor junctions around, the noise may be rectified to produce an unwanted DC signal.
  • The differential ADC settings have a range of ±VDDA, not ±VDDA/2. This means that the least-significant bit step size is twice as big for differential inputs as for single-ended inputs. For some reason the Freescale documentation never bothers to express what the differential range is.
  • Serial USB connections are a bit flakey—the Arduino serial monitor missed a byte about every 200–300 lines.  I looked for anomalous points on the plot, then commented out the lines that produced them—they were almost all explainable by one character having been missed by the serial monitor; e.g., I commented out “662401069     86      19″ right after “660001069       865     17″,  because the last digit of the voltage (the second field) was missing.  The fields were a timestamp (in 24MHz ticks), voltage across the diode (in ADC units), and voltage across the shunt resistance (in ADC units).  [Actually, this was not a new lesson for me—I've had to do the same on almost all files collected from the Arduino serial monitor.  My son's data logger code is better at not losing data, but it is still worthwhile to check for anomalies.]
  • The 3.3v supply from the Freedom board is much cleaner than the 5v USB supply that I get from the Arduino (unless I use an external power supply with the Arduino), but I can only take about 10mA from the 3.3v supply before it begins to droop.  If I want  more than that, I’d better provide my own power supply (or at least my own LDO regulator from the USB 5v supply).

Filed under: Circuits course, Data acquisition Tagged: Arduino, i-vs-v-plot, KL25Z, Schottky diode

Tenth day of freshman design seminar

Yesterday’s class was originally planned to be an Arduino demo of analogRead() and Serial.print(), using either a pressure sensor or a phototransistor, but the class ended up going in a totally different direction.

At the beginning of class, I passed around a cheap vernier caliper and showed students how to measure the disposable cuvettes to 0.05mm precision. This was part of my continuing effort to expose students to simple tools that they should have seen in high school, but for the most part have not.

I started the class by collecting the proposals for design projects.  Since these were group efforts, there were only three proposals: a centrifuge, an incubator, and a PCR thermal cycler.  I’ve not read the proposals yet (I’m still under the weather, and ended up falling asleep last night right after dinner, and only waking up this morning barely in time to get to the department research seminar at noon), but I did read the titles in class, and started talking about what computer aspects there might be for each project.  The centrifuge is mainly a mechanical design, but a non-contact sensor (probably optical) for measuring the rotor speed would be useful—one might even want to include a motor speed control, but that depends on what they use for a motor. The other two designs both depend on regulating a temperature.  Important parameters include how tightly controlled the temperature has to be and how fast you have to move from one temperature to another.  An incubator generally needs to have a fairly fixed temperature, and only needs to respond to slow heat loss, except when the incubator is opened.  A PCR machine has to switch rapidly between three temperatures,  generally around 95° C, 50° C, and 75° C.

So we ended up talking about thermal control.  First I described the basic idea of having a “set point” and of simple on-off heater control, with high threshold and a low threshold.  We talked about temperature sensors, including the old-fashioned bimetal-strip thermostats, thermistors, thermocouples, and RTD sensors. I talked a little about how to choose among the different types (thermocouples for high temperature, RTD for high precision, thermistors for low cost and ease of interfacing).  I also mentioned semiconductor temperature sensors, which are used in a lot of integrated circuits (like CPUs and GPUs on their laptops), but are not very good for general temperature measurement.

We focused on thermistors as the simplest to use with the Arduino, and I showed them a data sheet for the NTCLE413E2103F520L thermistor we use in the Applied Circuits lab.  This lead to a discussion of how the thermistor resistance varies with temperature, and I showed them the Wikipedia page on thermistors, with its discussion of the Steinhart-Hart equation and the “B” parameterization of the formula.  I also explained what the B25/85 specification on the data sheet meant (measuring resistance at only 25° C and 85° C, and solving for B).

I then tried to get the class to come up with a circuit to convert resistance variation into voltage variation, but they were stumped. So I showed them a voltage divider and had them work out as a class what the output voltage was using just Ohms law. They were then able to see that replacing one resistor with a thermistor would allow them to see a voltage variation as a function of temperature. I told them about the first homework in the Applied Circuits course (figuring out the optimal value for the fixed resistor, to get the maximum change in voltage with temperature at a particular operating temperature), but did not assign the problem. Not everyone in the class has had calculus yet, and the problem really does require being able to differentiate and use the chain rule.

I ran out of time before doing anything with the Arduino! I did assign them an Arduino homework, though:

For Wednesday 2014 Feb 19 (no class Monday Feb 17), write an Arduino program that will report over the USB cable once every two seconds the status of pins 8, 9, and 10, whether that pin is high or low. The report should be viewable on the Arduino Serial Monitor. It should look something like

 8:HIGH 9: LOW 10: LOW
 8: LOW 9:HIGH 10: LOW
 8: LOW 9:HIGH 10: LOW
 8: LOW 9: LOW 10: LOW

As a matter of common programming style, there should be a “block comment” at the beginning of every program telling what the program does (from a user’s standpoint, not how it works from a programmer’s standpoint), who wrote it, and when it was written. You may work on the programs in pairs (not larger groups), but the names of everyone who worked on

Turn in a printout of your program. This program is simple enough that I don’t need evidence of it working—for other class you may be asked to turn in the source code electronically, so that the graders can test the program, or provide input-output pairs that show evidence that the program is working correctly.

For those who find this program too easy, you can challenge yourself to do more ambitious programs:

  • Read analog inputs from A0 through A5 and report the values.
  • Accept characters from the USB serial line that change which pins you examine. (For example, getting the character ’8′ with Serial.read() might turn on looking at pin 8, and getting ‘*’ might turn it off looking at pin 8.)
  • Write a little control program that turns on the on-board LED (pin 13) when some combination of conditions is true and off when the conditions are false.

At the end of class, I had everyone use my wire strippers to cut and strip a few small pieces of wire, so that they could do the hardware portion of the Arduino programming.


Filed under: freshman design seminar Tagged: Arduino, bioengineering, engineering education, thermistor

Review – Intel Galileo Arduino-compatible Development Board

Introduction

Over the last year or two the rise of the single-board computer has captured the imagination and energy of many people, to the point where popular opinion has been that the Arduino world had been left behind. However this is far from the truth – there’s Arduino-compatible SBCs such as the pcDuino and now we have one from Intel  – the Intel Galileo.

Apparently the Galileo has been available in limited distribution for a few months, and now that the marketing machine has started up – we finally had the chance to order an Intel Galileo last week and now have one as the subject for this review. It’s our first look, based on information we could find at the time and some experimenting.

What’s in the box?

In the retail package we found the Intel Galileo itself:

… a diagram of what to do in the lid:

… and a universal AC to 5V 2A DC power supply with various fittings for different regions:

The only paper documentation was a safety and regulatory information booklet which gets recycled. We didn’t find a USB cable nor some stand-offs to lift the board off the bench a little.

Specifications

The Galileo is based a new chipset from Intel, the Quark SoC X1000 Application Processor, a 32-bit Intel Pentium-class system on a chip. For the uninitiated, the Galileo is a single-board computer running a small version of Linux that can somewhat emulate an Arduino Uno R3 in software. The hardware specifications are as such (from the Arduino website):

  • 400MHz 32-bit Intel® Pentium instruction set architecture (ISA)-compatible processor o 16 KBytes on-die L1 cache
    • 512 KBytes of on-die embedded SRAM
    • Simple to program: Single thread, single core, constant speed
    • ACPI compatible CPU sleep states supported
    • An integrated Real Time Clock (RTC), with an optional 3V “coin cell” battery for operation between turn on cycles.
  • 10/100 Ethernet connector
  • Full PCI Express* mini-card slot, with PCIe 2.0 compliant features
    • Works with half mini-PCIe cards with optional converter plate
    • Provides USB 2.0 Host Port at mini-PCIe connector
  • USB 2.0 Host connector
    • Support up to 128 USB end point devices
  • USB Device connector, used for programming
    • Beyond just a programming port – a fully compliant USB 2.0 Device controller
  • 10-pin Standard JTAG header for debugging
  • Reboot button to reboot the processor
  • Reset button to reset the sketch and any attached shields
  • Storage options:
    • Default – 8 MByte Legacy SPI Flash main purpose is to store the firmware (or bootloader) and the latest sketch. Between 256KByte and 512KByte is dedicated for sketch storage. The download will happen automatically from the development PC, so no action is required unless there is an upgrade that is being added to the firmware.
    • Default 512 KByte embedded SRAM, enabled by the firmware by default. No action required to use this feature.
    • Default 256 MByte DRAM, enabled by the firmware by default.
    • Optional micro SD card offers up to 32GByte of storage
    • USB storage works with any USB 2.0 compatible drive
    • 11 KByte EEPROM can be programmed via the EEPROM library.

However unlike other SBCs on the market – you don’t get any video or audio output.

Let’s have a quick look around the board. Here you can see the DC socket and microSD card socket:

 From the view below you can see the Arduino shield stacking headers and flash memory:

… more jumpers for settings, a USB host socket, USB connection (client) socket, RS232 via 3.5mm socket (!) and 10/100 Ethernet:

… and some nifty jumpers to select 3.3 or 5V operation for shields and IOREF:

… this jumper pair is to add a 3V battery to keep the real-time clock ticking over when the main supply is removed:

Perhaps a CR2032 button cell holder would be preferable, there’s plenty of room on the PCB. Finally – the two reset buttons:

If you want to reset your emulated Arduino, press the one on the left (labelled I). If you want to reboot the entire computer, press the one on the right (labelled X). This seems a little counter-intuitive, as you would imagine the button closer to the stacking headers would reset the Arduino. Note that if you reboot the computer, the last sketch you’ve uploaded will be removed and need to be uploaded again. Furthermore, more often than not rebooting the Galileo wasn’t entirely successful – and required a full removal of USB, power then replacing the power and USB to get another connection.

Turning the Galileo over reveals some fascinating PCB track patterns, and the mini-PCIe connector:

Getting Started

Having a slight bent towards Arduino, the first thing we like to do is get the blink sketch running. The documentation is scattered all over the place, so start from maker.intel.com and follow the links listed in the “Explore Intel makers” column. The closest thing to a quick setup guide can be downloaded hereThere’s a video by what sounds to be a ten year old explaining the board – who signs off by telling us it’s ok to break something (hopefully not the Galileo at $77 a pop). Marketing FTW. Eventually we found the official Intel support page for the Galileo, so bookmark that for future reference.

However if you just want to get started as quickly as possible, keep reading. First, download the Arduino IDE for Galileo from here. Next, extract the IDE folder to your root directory – and don’t have any spaces in the folder name. For example, use:

c:\GalileoIDE

and not:

C:\Arduino IDEs\galileo IDE\

Now plug in your Galileo – and always plug the 5V power into the Galileo before the USB (use the “USB client” socket). For Windows the USB driver (for “Gadget Serial v2.4”) is in the IDE folder, just point Windows to the top Galileo Arduino IDE folder.

Note that it takes around twenty seconds for the PC to recognise the Galileo via USB (as the Galileo needs time to boot up – it’s running Linux). For Windows users – after loading the IDE, check which COM port has been allocated. For some reason the Galileo can’t deal with COM10 or higher. To change this, head over to the Device Manager. Open Ports (COM & LPT) then right-click the Galileo and click properties:

Next, click the Port Settings tab, then Advanced:

Then select a free COM port number that’s under 10, close all the dialogue boxes and restart the computer. After the reboot, load the IDE, select the right board and serial port in the Tools menu – then select Firmware Update in the Help Menu. If for some reason you put a memory card in the microSD card slot – remove it before this process.

A confirmation box will appear, so move forward and wait for the process to finish. Don’t touch the IDE, board or anything near the Galileo until this finishes. Read some kit reviews. The update process took eight minutes for us, however will depend on the speed of your Internet connection.

Finally, try the ubiquitous blink sketch. Once uploaded,  the tiny LED next to the coin cell jumpers will blink as requested. Now we’ll explore more about using the Galileo as an Arduino-compatible board.

How Arduino-compatible is the Galileo?

The first thing we like to do with new boards that differ from the classic Uno is to run a speed test, and for this we use the following sketch by Steve Curd from the Arduino forum:

//
// Pi_2
//
// Steve Curd
// December 2012
//
// This program approximates pi utilizing the Newton's approximation.  It quickly
// converges on the first 5-6 digits of precision, but converges verrrry slowly
// after that.  For example, it takes over a million iterations to get to 7-8
// significant digits.
//
// I wrote this to evaluate the performance difference between the 8-bit Arduino Mega,
// and the 32-bit Arduino Due.
// 

#define ITERATIONS 100000L    // number of iterations
#define FLASH 1000            // blink LED every 1000 iterations

void setup() {
  pinMode(13, OUTPUT);        // set the LED up to blink every 1000 iterations
  Serial.begin(57600);
}

void loop() {

  unsigned long start, time;
  unsigned long niter=ITERATIONS;
  int LEDcounter = 0;
  boolean alternate = false;
  unsigned long i, count=0;
  float x = 1.0;
  float temp, pi=1.0;

  Serial.print("Beginning ");
  Serial.print(niter);
  Serial.println(" iterations...");
  Serial.println();

  start = millis();  
  for ( i = 2; i < niter; i++) {
    x *= -1.0;
    pi += x / (2.0f*(float)i-1.0f);
    if (LEDcounter++ > FLASH) {
      LEDcounter = 0;
      if (alternate) {
        digitalWrite(13, HIGH);
        alternate = false;
      } else {
        digitalWrite(13, LOW);
        alternate = true;
      }
      temp = 40000000.0 * pi;
    }
  }
  time = millis() - start;

  pi = pi * 4.0;

  Serial.print("# of trials = ");
  Serial.println(niter);
  Serial.print("Estimate of pi = ");
  Serial.println(pi, 10);

  Serial.print("Time: "); Serial.print(time); Serial.println(" ms");

  delay(10000);
}

It calculates Newton Approximation for pi using an infinite series. For comparison an Arduino Due takes 690 ms, an Arduino Mega 2560 takes 5765 ms, and a pcDuino v2 can do it in 9 to 43 ms (depending on what else is running on Linux). So out of the box, the Galileo takes 279 ms:

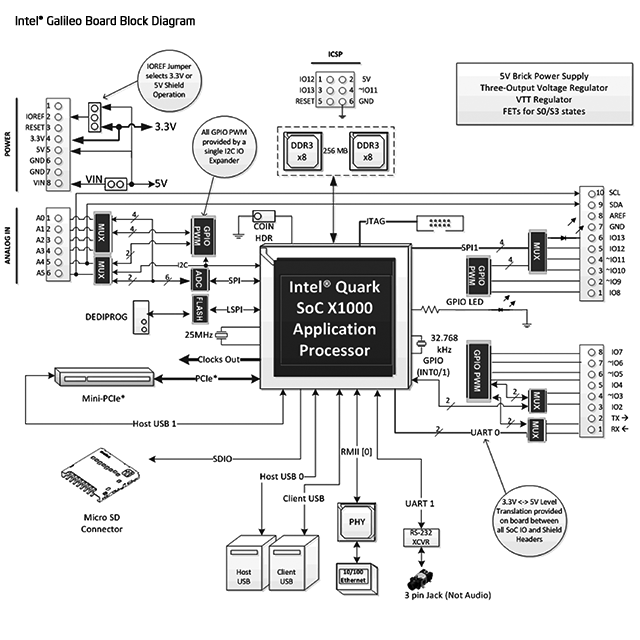
Out of the box there is 262144 bytes available for sketches. As the Arduino is emulated, the hardware for I/O is a little different than you may have expected, and provided by a variety of I2C port expanders, MUXs and so on. For example I2C can only run at 100 kHz in master mode, no slave mode, and similar restrictions on SPI as well. Again, review this page to learn more about the internal hardware differences between an Arduino Uno and Intel Galileo.

Visit this page and scroll down to the block diagram for a visual representation, and while you’re there – review the entire page to learn more about the specific Arduino Uno R3 implementation on the Galileo. A lot of work has been done to allow successful emulation of the Arduino using the Quark CPU and internal OS. For example the EEPROM library just works, and has 11264 bytes of storage.

You can get an idea of what is supported “out of the box” by reviewing the libraries included with the Galileo’s IDE installation, for example:

So most of the basic requirements are covered at the time of writing. And unlike some other SBCs emulating Arduino, the onboard Ethernet “just works” as it should with the Ethernet library – and the USBHost library can take advantage of the matching socket on the board. Again – research is the key, so spend some time determining if the Galileo can solve your problems.

One interesting example of the limitations of the “emulated” Arduino is the speed, and this has been highlighted by Al Williams of Dr Dobb’s journal – who ran a simple sketch to see how fast a digital output pin could be set. As GPIO is provided by external SPI- and I2C-based interface ICs, there will be a speed hit. But how much? Naturally we can’t use port manipulation so we’re back to simple digitalWrite functions with the following sketch:

int pin = 2;
boolean a = false;
void setup() 
{                
  pinMode(pin, OUTPUT);     
}

void loop() 
{
  digitalWrite(pin, a=!a);
}

An Arduino Uno running the sketch was clocked at 96.34 kHz:

… and the Intel Galileo was clocked at … 225.2 Hz:

This test isn’t a criticism of the Galileo, just an example of what you need to keep in mind when using it. If you’re curious about the real-time clock it’s accessed via Linux. Finally, there’s a list of known issues on the Intel forum – so check this out to get a grip on what is and is not working in terms of Arduino compatibility. One more thing – you will need a memory card installed if you want the Galileo to remember sketches after power-off.

Update – thanks to our friends (!) at reddit, you can push some I/O faster – see this post in the Intel forum.

Linux – internal

The Galileo arrived pre-loaded with a very light version of Linux, however due to the lack of video output you need to access the “computer” via some old-school methods. And thus one method is via Telnet over Ethernet. If you don’t have a Telnet client, try PuTTY. To get started, ensure you have your Galileo connected to power, client USB to PCm and to your LAN. Then upload the following sketch to your Galileo:

// https://communities.intel.com/message/213624
void setup()
{
  system("telnetd -l /bin/sh");
}

void loop()
{
  system("ifconfig eth0 > /dev/ttyGS0");
  sleep(10);
}

The observant will notice by using the system function you can send instructions to the Linux command line from your Arduino sketch. And any resulting output text can be sent to the serial monitor by directing it to ttyGS0.

Anyhow, the above sketch will run the ifconfig command and return relevant networking data about your Galileo – including its IP address:

Once you have the IP address, you can Telnet in and command your Galileo just like it’s 1992:

Don’t get too excited, there isn’t that much installed (e.g. no gcc or make). For more information on the Poky linux, visit the project page. Apart from running vi my *nix memory is a bit vague, however the onboard system is quite minimal. If you want to do anything serious, such as use a WiFi or other PCIe card – you’ll need to boot your Galileo with an external OS stored on a microSD card. Another way of looking at the Galileo is that it’s a board not for development with, but for running code built on a different system and then loaded onto the Galileo.

Linux – external

As I haven’t been a *nix user for a very long time, it didn’t seem worthwhile to spend a whole day preparing for an installing the external OS on the Galileo for review. However from what I can tell you’ll need to do this to run anything substantial including WiFi adaptors, python, node.js and so on. Which in my personal opinion sort of ruins the Galileo for me. Other SBCs can do all of this a lot easier, cheaper and with better documentation.

Arduino Support

As the Galileo is from Intel and not Arduino, you need to ask for support in the Intel forum. This will be an interesting test for Intel, will they invest in a substantial support effort or just stand back and say it’s all open source? Time will tell. In the meanwhile there is a gallery hosted by Intel with links to different projects.

Conclusion

Once again – remember that the Galileo is a limited single-board computer that emulates (to a certain, varying degree) an Arduino Uno R3. It is a contender if you need to integrate some Arduino-based control with software running on a light Linux machine, and all in a compact board. Or if you want to experiment with USB host and Ethernet on the Arduino platform at the same time, this could be a cheaper and more powerful option. Support is there if you can use Google, however this is not the idea beginners’ Arduino board. So don’t be a sheep and rush out and buy one after reading the marketing blurb – do your own research first.

Personally I would say that if you have a need for the specific hardware interfaces of the Galileo, and have a full understanding of the board limitations – then it’s the board for you. Otherwise if you want to experiment with a full single-board computer with Arduino compatibility, get a pcDuino. Full-sized images are available on flickr.

And if you enjoyed this article, or want to introduce someone else to the interesting world of Arduino – check out my book (now in a third printing!) “Arduino Workshop”.

Have fun and keep checking into tronixstuff.com. Why not follow things on twitterGoogle+, subscribe  for email updates or RSS using the links on the right-hand column, or join our forum – dedicated to the projects and related items on this website. Sign up – it’s free, helpful to each other –  and we can all learn something.

[Note – Intel Galileo purchased for review by tronixstuff.com and not a promotional consideration]

The post Review – Intel Galileo Arduino-compatible Development Board appeared first on tronixstuff.
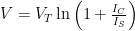
Tronixstuff 12 Feb 03:59

Ninth day of freshman design seminar

The astute reader of this blog may notice that there was no “eighth day of freshman design seminar” post.  I was sick last Wednesday and unable to attend class, so I had the group tutor (a senior in bioengineering) take the class and have them discuss possible projects to take on.  I asked them to turn in proposals yesterday, but forgot to collect them—I’ll collect them tomorrow.  We’re about halfway through the course, so it is time for students to start on their projects.

I returned two homeworks yesterday: the colorimeter design and the RGB LED resistor sizing.

The colorimeter designs were not very good, lacking necessary details, but were somewhat better than previous spectrometer attempts. I think I’ll try reversing the order of those assignments in future, as the colorimeter is a simpler device. The biggest problem with the designs is that most of them were pieced together from web pages, with no citations.  Two of them were blatantly copied from Science Buddies, which has a decent design, but the students did not cite the source. I yelled “Cite your sources!” at the class, and explained that I could have flunked several of them out for plagiarism, and that in an upper-division course I would have. I hope they get the message, so that they don’t fail out later on. I decided not to prosecute academic integrity cases in this 2-unit, optional course, though I am making the science-buddy copyists redo the assignment.

I then explained to students the mistake I had made in the photodiode explanations (see Lying to my students) and corrected the understanding of the “open-circuit voltage” spec from the photodiode datasheets. I think that the students are a little more comfortable about finding things on datasheets now—I hope that lasts for them.

We then went over one of the RGB LED datasheets and did the resistor sizing for it.  About a third of the class had done a decent job on that assignment, and I cleared up the common mistakes:

  • If a battery is used in a schematic, both ends need to be connected.  Other options are to use +5v and Gnd port symbols, or a +5V DC voltage source symbol.
  • The LED diode must be forward biased (with a large current flow), and the triangular shape of the diode symbol shows which way conventional current flows.
  • The voltage needed for determining the resistance is the voltage across the resistor, not the voltage across the diode, so it is 5v–VF, not VF.

I think I managed to get these points across—I relied fairly heavily on asking the students to do each step, so I’m pretty sure that at least half the class can now size a resistor for an LED.

Finally we could get to some new material. I wanted to show them how to program an Arduino, so we built up the standard blinking-LED first example for an Arduino.  To make it a little more interesting, I started with a true statement—I did not know whether the LED on pin 13 was hooked up with the anode or the cathode connected to pin 13.  We looked at the two possible circuits and how they would behave differently when the pin was high and when it was low.  I then explained “void setup()”, “void loop()”, and “pinMode(13,OUTPUT);”.  I had the students come up with the body of loop, feeding them the important constructs (digitalWrite and delay) only once they had expressed the action they wanted.  We ended up with a loop that help pin 13 high for a second and low for ¼ second.  After I typed in the program we had written, I showed them how to select the appropriate board type and download it to the Arduino.  The light blinked, and the students were able to figure out from the pattern of on and off that the LED was connected between pin 13 and GND (with a series resistor), with the anode towards pin 13.

I ran out of time and material at about the same time (a first for this quarter), and assigned the students to read about Arduino programming from the Arduino reference website, with particular attention to “if”, “while”, “pinMode”, “digitalWrite”, “digitalRead”, “analogRead”, and the timer functions.  I expect to go over some analogRead stuff in class tomorrow, and assign a small programming assignment over the weekend, probably using “Serial”.


Filed under: freshman design seminar Tagged: Arduino, bioengineering, colorimeter, engineering education, LED, photodiode

'Fish on Wheels' frees your guppy from the tyranny of the tank (video)

A company called Studio Diip has created a motorized go-cart. For fish. Though "why" is the first question that comes to mind, at this point we're only able to give you the "how." When Little Dory starts to swim in a particular direction, her movement is captured by a top-mounted web cam, processed by a Beagleboard and used to steer the Arduino-controlled carriage under her bowl. As seen in the video after the fold, that lets her follow her muse outside the aquarium's confines. We're hoping this experiment makes it beyond the lab one day, as we're pretty damned curious to see where a fish wants to go. ("Away from the cat" or "towards the ocean" seem like safe bets.)

Filed under: Misc, Transportation

Comments

Source: Studio Diip