It is likely that many of us will at some time have experimented with motion detectors. Our Arduinos, Raspberry Pis, Beaglebones or whatever will have been hooked up to ultrasonic or PIR boards which will have been queried for their view of what is in front of them.
[Connornishijima] has stumbled on a different way to detect motion with an Arduino, he’s polling an ADC pin with a simple length of twisted pair hooked up to it and earth, and reliably generating readings indicating when he (or his cat) is in its vicinity. He’s calling the effect “Capacitive turbulence”, and he’s open to suggestions as to its mechanism. He can only make it work on the Arduino, other boards with ADCs don’t cut it.
Frequent Hackaday featuree [Mitxela] may have also discovered something similar, and we’ve hesitated to write about it because we didn’t understand it, but now it’s becoming unavoidable.
It’s always dangerous in these situations to confidently state your opinion as “It must be…” without experimental investigation of your own. Those of us who initially scoffed at the idea of the Raspberry Pi 2 being light sensitive and later had to eat their words have particular cause to remember this. But this is an interesting effect that bears understanding. We would guess that the Arduino’s fairly high input impedance might make it sensitive to mains hum, if you did the same thing to an audio amplifier with a phono input you might well hear significant hum in the speaker as your hand approached the wire. It would be interesting to try the experiment at an off-grid cabin in the woods, in the absence of mains hum.
If you’d like to give his experiment a try, he’s posted his sketch on Pastebin. And he’s put up the video below the break demonstrating the effect in action, complete with cats.
We like to see people pushing the boundaries of what is possible with their microcontroller I/O lines, it furthers our collective knowledge as a community. We’ve seen people making TV transmitters from ESP8266s, and not so long ago a Raspberry Pi ADC port as further examples. Please, keep them coming!
I make things for people that can’t be bought off a shelf, and in the past several years I have gone through a lot of Arduinos. More and more, they are simply the right tool for both the job and the client. This wasn’t always the case; what changed?
My clients today still include startups and other small businesses, but more and more they’re artists, hobbyists venturing into entrepreneurship, or people who make one-offs like the interactive displays you find in museums or science centers. The type of people I work for has changed, and because of this, the right tool for their job is almost always an Arduino.
If Not Arduinos, What?
I was chatting with some new people at a local hackerspace, and we were talking about what we do. I told them I spent a lot of time making one-off devices, prototypes, or small production runs for people who know what they need, but can’t buy it off a shelf. I mentioned that I go through plenty of Arduinos as a result.
“What would you be using if it wasn’t an Arduino?” I was asked.
I thought for a moment and replied something about how I’d probably use an AVR on a board I designed, and roll that out when I needed a microcontroller to do things. I said this because that board was my go-to solution when I needed something for my own projects. There was a nod and the conversation moved on, but after thinking a moment more I realized I had to change my answer.
If I wasn’t using an Arduino, what would I use? Probably nothing. Because the job wouldn’t exist.
The Arduino is the Right Tool for Their Jobs
Prototypes for a mesh wireless client project. Arduinos inside.
A lot of my work looks like this: the client comes in with an idea but it’s not quite there, and it needs some development before it can become a product. First I build a proof of concept, but then we often move to iterative prototypes where we do a lot of testing and measuring. What is learned from one prototype is rolled into subsequent prototypes in a continuous flow of learning and refinement. (The following saying applies to this process: “Developing hardware is just like developing software, except that every time you hit ‘compile’ it takes weeks and costs thousands of dollars.”)
Eventually, we reach the end of what’s possible with the Arduino and readily available components. Then it’s time for the engineers to design a solution: something focused directly around exactly what was discovered, with minimal waste. That engineered solution is not very likely to include an Arduino.
But until we hand the job off to the engineers, the Arduino was part of the solution. And a big reason for that is the comfort level of the client during this phase of iterative refinement. A lot of clients would throw up their hands at an AVR-ISP or a hex file but they know what an Arduino is. They are often comfortable uploading sketches and making changes to them, or even following a wiring diagram. They probably even prototyped their idea with an Arduino. Using an Arduino allows them to remain hands-on with the development of their idea, even as they outsource some of the work to consultants.
The Clients have Changed
Sticking with what the client knows and expects is often the right move but there’s another, deeper reason that an Arduino is even involved in the first place. Without the Arduino and the whole ecosystem of open and accessible hardware and tools that has grown along with it, many of my clients would probably never have even begun to develop their ideas. They certainly would never have gotten to the point of hiring me for my help.
Custom ultra-slow speed turntable used to capture high magnification video for Broken Sound by Gary James Joynes
The observation that I was going through a lot of Arduinos also made me realize that my clients had changed. I now work more with artists who are incorporating electronics into their work in ways that weren’t accessible just a few years ago, basement inventors who are taking the plunge to see if their idea will fly, people who need small production runs of 10-100 in a world where “small” often means thousands, and stage magicians who need someone to help them make the next great trick happen. (I hadn’t expected that last one, but you better believe that market exists.)
All of these clients need someone to handle the hard or time-consuming parts of something they otherwise grasp, or someone to make them something they can plug in to the rest of their work. They don’t always have much of a budget to work with, but they do have enthusiasm and they know what they want. They’re idea people who roll up their sleeves and get their hands dirty, and they weren’t around in the numbers that they are now.
There’s one more advantage to working with these types of folks: when people have experience with developing their own solutions and experience running into the roadblocks, they usually also have some understanding of and appreciation for the kind of time, work, detail, and costs that go into development. Those of you who have done professional development work will recognize what a boon that is.
I’ve done custom work for many people over the years, but change is constant. It’s a big world and I’ve only worked in and seen my piece of it. Have you found things to be as I described, or different? Is my experience somehow unique? Post up in the comments!
A few years ago, you could buy an IRIS 9000 Bluetooth speaker. Its claim to fame was that it looked like the “eye” from the HAL 9000 computer on 2001: A Space Oddessy. There’s something seductive about the idea of having a HAL eye answer your queries to Google Now or Siri. The problem is, it still sounds like Google or Siri, not like HAL.
[Badjer1] had the same problem so he decided to build his own eye. His goal wasn’t to interface with his smartphone’s virtual assistant, though. He settled on making it just be an extension cord with USB ports. As you can see in the video below, the build has HAL-style memory units, a key, and can speak phrases from the movie (well, 28 of them, at least). The key is like the one Dave used to deactivate HAL in the movie.
Inside the MDF enclosure is an Arduino and a wave shield that handles the audio playback. The memory cards are acrylic and the key is machined brass. The result is a good looking project.
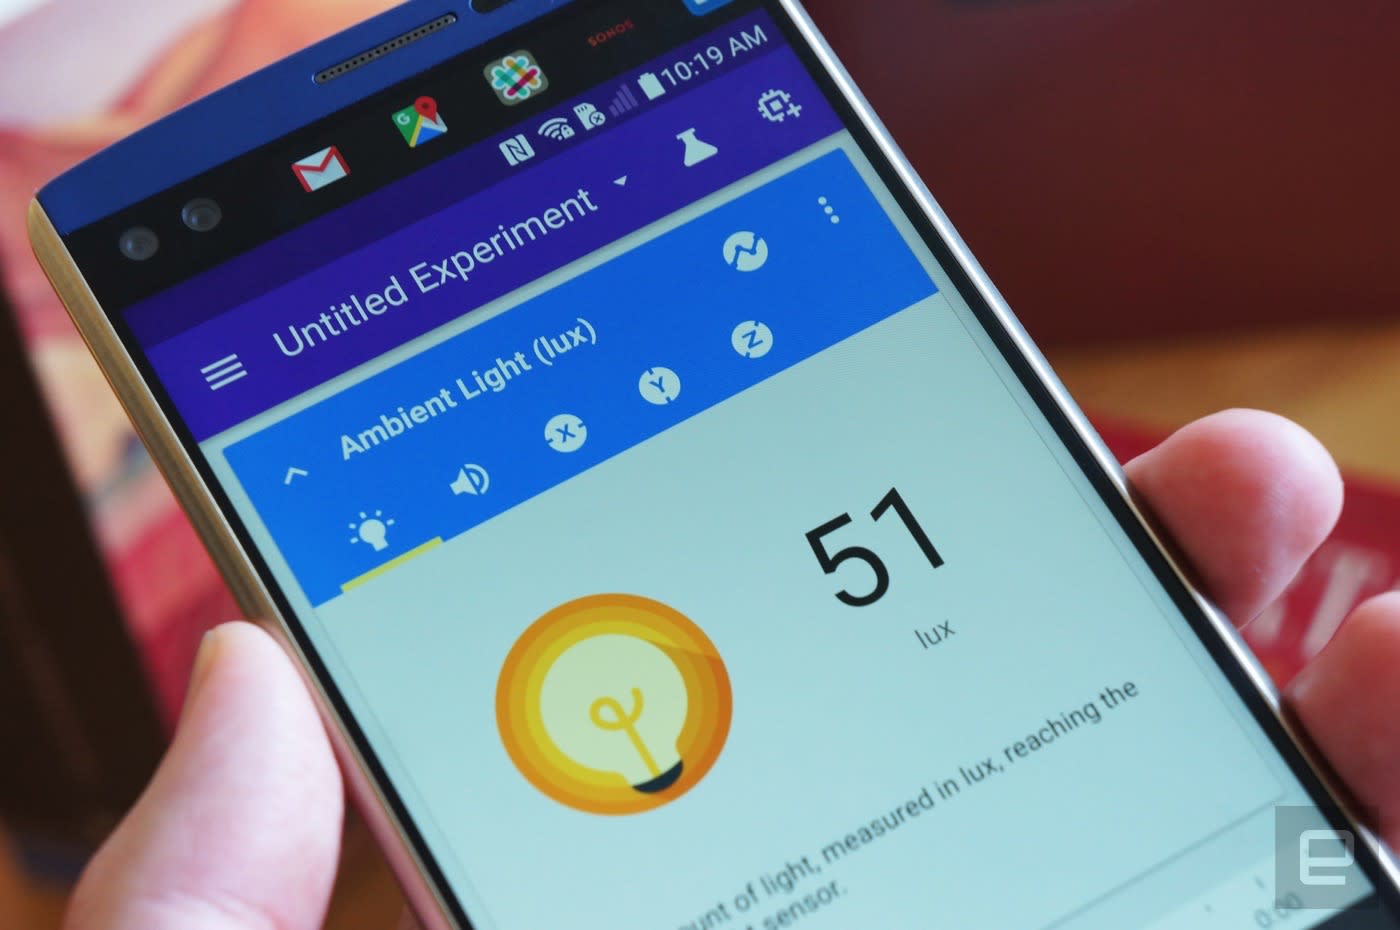
Are you (or your kid) curious about the world around you? Google wants to help. It just launched Science Journal, an Android app that helps you perform (and comment on) simple science experiments. The app can record light, motion and sound levels using only your phone's sensors, letting you study everything from a light bulb's brightness to the acceleration in a jump. It's easy to kick things up a notch, though. You can connect Arduino-powered sensors, and Google is partnering with Exploratorium to offer starter kits to help budding scientists. Science Journal is free, so there's no harm in giving it a try -- even if you're a full-fledged adult, you might learn something.
Are you (or your kid) curious about the world around you? Google wants to help. It just launched Science Journal, an Android app that helps you perform (and comment on) simple science experiments. The app can record light, motion and sound levels using only your phone's sensors, letting you study everything from a light bulb's brightness to the acceleration in a jump. It's easy to kick things up a notch, though. You can connect Arduino-powered sensors, and Google is partnering with Exploratorium to offer starter kits to help budding scientists. Science Journal is free, so there's no harm in giving it a try -- even if you're a full-fledged adult, you might learn something.
Are you (or your kid) curious about the world around you? Google wants to help. It just launched Science Journal, an Android app that helps you perform (and comment on) simple science experiments. The app can record light, motion and sound levels using only your phone's sensors, letting you study everything from a light bulb's brightness to the acceleration in a jump. It's easy to kick things up a notch, though. You can connect Arduino-powered sensors, and Google is partnering with Exploratorium to offer starter kits to help budding scientists. Science Journal is free, so there's no harm in giving it a try -- even if you're a full-fledged adult, you might learn something.
Electrospinning is a fascinating process where a high voltage potential is applied between a conductive emitter nozzle and a collector screen. A polymer solution is then slowly dispensed from the nozzle. The repulsion of negative charges in the solution forces fine fibers emanate from the liquid. Those fibers are then rapidly accelerated towards the collector screen by the electric field while being stretched and thinned down to a few hundred nanometers in diameter. The large surface area of the fine fibers lets them dry during their flight towards the collector screen, where they build up to a fine, fabric-like material. We’ve noticed that electrospinning is hoped to enable fully automated manufacturing of wearable textiles in the future.
[Douglas Miller] already has experience cooking up small batches of microscopic fibers. He’s already made carbon nanotubes in his microwave. The next step is turning those nanotubes into materials and fabrics in alow-cost, open source electrospinning machine, his entry for the Hackaday Prize.
As always in fundamental research projects, a whole lot of parameters have to be tuned just right. To speed up the process of finding suitable values for the electric potential, dosing feed rate, emitter to collector plate distance, temperature, and humidity, [Douglas] build his machine with a CNC controlled vertical axis and syringe pump, that can dispense even the smallest amounts of a given solutions accurately. Temperature and humidity control will be added as the project progresses. A host software and GUI allows for easy control of all parameters and will also save and recall presets for different spinning solutions once everything has been dialed in. [Douglas] already ran a few tests, spraying saline solution from an old 3D printer nozzle, and we can soon expect first tests with polymer solutions from the better-suited syringe nozzles he installed.
To keep the build affordable and easy to reproduce for other makers, [Douglas] uses available materials and came up with a few design tricks that could also be applied to other projects. The belt-driven vertical axis is based on PVC pipes, on which a 3D-printed bushing block slides up and down, adjusting the distance between the nozzle and the collector plate. An acrylic door with a safety switch prevents the polymer spray from escaping from the spinning chamber. In the heart of the machine sits an Arduino Uno with a gShield, controlling the stepper motors and talking to the host computer. The 3D-printed syringe pump, a custom design, swings out from the side of the machine to allow for easy refilling. Submerged in mineral oil, which may have been chosen to reduce the risk of overheating and arcing, lies a half-wave series voltage multiplier, cranking up the voltage from an AC power supply to a maximum of 30 kV DC.
Flying a drone usually leads to–sooner or later–crashing a drone. If you are lucky, you’ll see where it crashes and it won’t be out of reach. If you aren’t lucky, you’ll know where it is, but it will be too high to easily reach. The worst case is when it just falls out of the sky and you aren’t entirely sure where. [Just4funmedia] faced this problem and decided to use some piezo buzzers and an Arduino to solve it.
Yeah, yeah, we know. You don’t really need an Arduino to do this, although it does make it easy to add some flexibility. You can pick two tones that are easy to hear and turn on the buzzers with a spare channel or sense a loss of signal or power.
The device has its own battery so it will work even if the drone’s power depletes. Apparently, the 9V battery will run the whole thing for over 20 hours. Pulsing the audio would probably push that number even higher. Of course, the downside is the drone has to carry the extra weight, but if you recover an otherwise lost drone, that might be a small price to pay.
This might be more practical than a calculus-based approach. Maybe like a tightrope walker, you’d rather use a net.
Arduino Create, which came out of beta today, is a web-based development platform for Arduino that allows you to write, share, and collaborate on sketches.
Otto walks, dances, makes sounds and avoids obstacles, is completely open source, Arduino compatible, 3D printable, and with a social impact mission to create an inclusive environment for all kids.
Otto was inspired by another robot instructable BoB the BiPed and programmed using code from another open source biped robot called Zowi.
CC-BY-SA
Otto's differences are in the assembled size (11cm x 7cm x12cm), cleaner integration of components and expressions.