You can still use punch cards to operate knitting machines, but a few groups are now bringing the technology full circle by hacking knitting machines so that they may be operated digitally via an Arduino.
I just launched a contest to give away 2 prototypes of the new Jetduino robotics interface board for the Jetson TK1. The Jetduino mounts on top of the TK1 and level shifts all of its GPIO, I2C, serial and SPI lines to 3.3V or 5v. It has Grove and 3-pin 2.54mm headers to make it very easy to connect commercial off-the-shelf sensors to the Jetson and communicate with them via Python or C++. It also has a built-in shield for any Mega or Uno form factor Arduino.
Everyone loves learning a new programming language, right? Well, even if you don’t like it, you should do it anyway, because thinking about problems from different perspectives is great for the imagination.
Juniper is a functional reactive programming language for the Arduino platform. What that means is that you’ll be writing your code using anonymous functions, map/fold operations, recursion, and signals. It’s like taking the event-driven style that you should be programming in one step further; you write a=b+3 and when b changes, the compiler takes care of changing a automatically for you. (That’s the “reactive” part.)
If you’re used to the first-do-this-then-do-that style of Arduino (and most C/C++) programming, this is going to be mind expanding. But we do notice that a lot of microcontroller code looks for changes in the environment, and then acts (more or less asynchronously) on that data. At that level of abstraction, something like Juniper looks like a good fit.
Changing up the programming paradigm for Arduino is an ambitious project, especially considering that it was started by two undergraduates [Caleb Helbling] and [Louis Ades] as a senior design project. It’s also brand new, so there’s not much of a codebase out there yet. Time, and your participation, will tell if it’s useful. But one thing’s for sure, once you’ve programmed in a reactive language, you’re not going to be able to look at a delay loop the same again.
What’s the wierdest language you’ve ever programmed a microcontroller in?
(The XKCD comic’s alt-text reads “Functional programming combines the flexibility and power of abstract mathematics with the intuitive clarity of abstract mathematics”.)
As fun as petting your dog can be, sometimes you’re just too busy to give it the attention it deserves — especially if he or she is needy. Luckily, there is now an automated mechanism that’ll give Fido a nice pat and reward him with a treat at the press of an arcade button. But that’s not all. Engineer James Cochrane’s “IOT Robot People/Pet Affectionator” allows your pup to reciprocate their appreciation, too.
The robot itself consists of an Arduino Nano, two H-Bridge motor drivers, two geared Pittman motors, and two geared hobby motors. The Kibbles ‘n Bits are delivered using a wooden spoon, while a button on the pup’s side enables them give their owner a nice rub of the head and a snack with a fork as well.
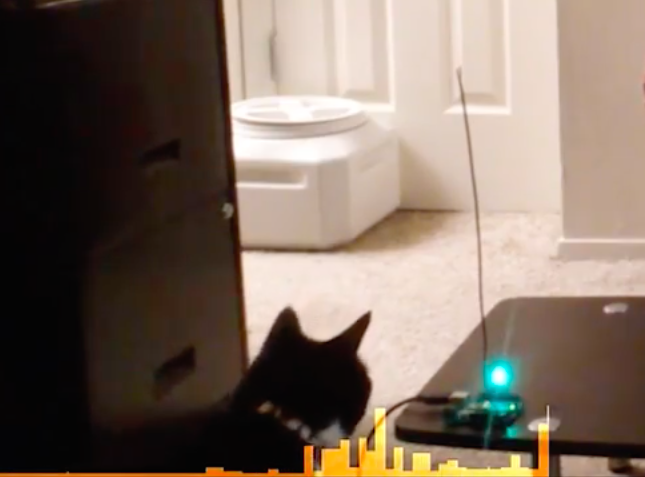
Connor Nishijima has come with a unique way to detect motion using an Arduino Uno. The active media developer is polling an ADC pin with a pair of wires twisted tightly together — one plugged into A3, another plugged into ground — and generating readings whenever a large living object (like his two cats) is nearby.
“The closest I have ever come to explaining this is capacitive coupling. So what it is is the antenna is leaching a little bit of electricity off you, and you are leaching a little bit of electricity from the antenna. The differential that happens when you move around is what the Arduino is picking up.”
He’s calling this effect “Capacitive Turbulence,” and so far he’s only got it work on the Arduino, no luck using other boards with ADCs. You can watch him explain this magical phenomenon in more detail below!
The subreddit for Shower Thoughts offers wisdom ranging from the profound to the mundane. For example: “Every time you cut a corner you make two more.” Apparently, [Harin] has a bit of an addiction to the subreddit. He’s been sniffing the CAN bus on his 2012 Hyundai Genesis and decided to display the top Shower Thought on his radio screen.
To manage the feat he used both a Raspberry Pi and an Arduino. Both devices had a MCP2515 to interface with two different CAN busses (one for the LCD display and the other for control messages which carries a lot of traffic.
The code is available on GitHub. There’s still work to do to make the message scroll, for example. [Harin] has other posts about sniffing the bus, like this one.
Hacking has always brought more good to the world than not hacking. The successful efforts of the Allies during World War II in deciphering the Enigma machine output still reminds us of that. Today, the machine is a classic example of cryptography and bare-metal computing.
We have covered quite a few DIY Enigma machines in the past, yet 14 years old [Andy] really impressed us with his high school science fair project, a scratch built, retro-modern Enigma machine.
As close as you can get: Andy’s modern enigma machine (left) next to an original from the Worldwar II (right, image source)
With its wooden enclosure, keyboard, interchangeable rotors, and plugboard, his build resembles an original Worldwar II enigma machine down to the letter. However, when looking closer, you’ll find that the rotors are implemented as electronic modules that plug into D-Sub sockets on the machine. Also, there is a 16 segment display that displays the rotor position as well as an LCD screen that lets you comfortably read the plain- and ciphertext. On the inside, you’ll find an Arduino Mega along with 1,800 other parts and 500 wires, and of course, this modern version has a backspace key.
It took [Andy] over 9 months to put all this together, and he now finds himself among the winners of the State Science & Engineering Fair (SSEF), who will be sent to Intel as representatives of their states. Given his experience in field-capable computing, we’re sure [Andy] can help Intel reconquering mobile. Enjoy the video!
It is likely that many of us will at some time have experimented with motion detectors. Our Arduinos, Raspberry Pis, Beaglebones or whatever will have been hooked up to ultrasonic or PIR boards which will have been queried for their view of what is in front of them.
[Connornishijima] has stumbled on a different way to detect motion with an Arduino, he’s polling an ADC pin with a simple length of twisted pair hooked up to it and earth, and reliably generating readings indicating when he (or his cat) is in its vicinity. He’s calling the effect “Capacitive turbulence”, and he’s open to suggestions as to its mechanism. He can only make it work on the Arduino, other boards with ADCs don’t cut it.
Frequent Hackaday featuree [Mitxela] may have also discovered something similar, and we’ve hesitated to write about it because we didn’t understand it, but now it’s becoming unavoidable.
It’s always dangerous in these situations to confidently state your opinion as “It must be…” without experimental investigation of your own. Those of us who initially scoffed at the idea of the Raspberry Pi 2 being light sensitive and later had to eat their words have particular cause to remember this. But this is an interesting effect that bears understanding. We would guess that the Arduino’s fairly high input impedance might make it sensitive to mains hum, if you did the same thing to an audio amplifier with a phono input you might well hear significant hum in the speaker as your hand approached the wire. It would be interesting to try the experiment at an off-grid cabin in the woods, in the absence of mains hum.
If you’d like to give his experiment a try, he’s posted his sketch on Pastebin. And he’s put up the video below the break demonstrating the effect in action, complete with cats.
We like to see people pushing the boundaries of what is possible with their microcontroller I/O lines, it furthers our collective knowledge as a community. We’ve seen people making TV transmitters from ESP8266s, and not so long ago a Raspberry Pi ADC port as further examples. Please, keep them coming!
I make things for people that can’t be bought off a shelf, and in the past several years I have gone through a lot of Arduinos. More and more, they are simply the right tool for both the job and the client. This wasn’t always the case; what changed?
My clients today still include startups and other small businesses, but more and more they’re artists, hobbyists venturing into entrepreneurship, or people who make one-offs like the interactive displays you find in museums or science centers. The type of people I work for has changed, and because of this, the right tool for their job is almost always an Arduino.
If Not Arduinos, What?
I was chatting with some new people at a local hackerspace, and we were talking about what we do. I told them I spent a lot of time making one-off devices, prototypes, or small production runs for people who know what they need, but can’t buy it off a shelf. I mentioned that I go through plenty of Arduinos as a result.
“What would you be using if it wasn’t an Arduino?” I was asked.
I thought for a moment and replied something about how I’d probably use an AVR on a board I designed, and roll that out when I needed a microcontroller to do things. I said this because that board was my go-to solution when I needed something for my own projects. There was a nod and the conversation moved on, but after thinking a moment more I realized I had to change my answer.
If I wasn’t using an Arduino, what would I use? Probably nothing. Because the job wouldn’t exist.
The Arduino is the Right Tool for Their Jobs
Prototypes for a mesh wireless client project. Arduinos inside.
A lot of my work looks like this: the client comes in with an idea but it’s not quite there, and it needs some development before it can become a product. First I build a proof of concept, but then we often move to iterative prototypes where we do a lot of testing and measuring. What is learned from one prototype is rolled into subsequent prototypes in a continuous flow of learning and refinement. (The following saying applies to this process: “Developing hardware is just like developing software, except that every time you hit ‘compile’ it takes weeks and costs thousands of dollars.”)
Eventually, we reach the end of what’s possible with the Arduino and readily available components. Then it’s time for the engineers to design a solution: something focused directly around exactly what was discovered, with minimal waste. That engineered solution is not very likely to include an Arduino.
But until we hand the job off to the engineers, the Arduino was part of the solution. And a big reason for that is the comfort level of the client during this phase of iterative refinement. A lot of clients would throw up their hands at an AVR-ISP or a hex file but they know what an Arduino is. They are often comfortable uploading sketches and making changes to them, or even following a wiring diagram. They probably even prototyped their idea with an Arduino. Using an Arduino allows them to remain hands-on with the development of their idea, even as they outsource some of the work to consultants.
The Clients have Changed
Sticking with what the client knows and expects is often the right move but there’s another, deeper reason that an Arduino is even involved in the first place. Without the Arduino and the whole ecosystem of open and accessible hardware and tools that has grown along with it, many of my clients would probably never have even begun to develop their ideas. They certainly would never have gotten to the point of hiring me for my help.
Custom ultra-slow speed turntable used to capture high magnification video for Broken Sound by Gary James Joynes
The observation that I was going through a lot of Arduinos also made me realize that my clients had changed. I now work more with artists who are incorporating electronics into their work in ways that weren’t accessible just a few years ago, basement inventors who are taking the plunge to see if their idea will fly, people who need small production runs of 10-100 in a world where “small” often means thousands, and stage magicians who need someone to help them make the next great trick happen. (I hadn’t expected that last one, but you better believe that market exists.)
All of these clients need someone to handle the hard or time-consuming parts of something they otherwise grasp, or someone to make them something they can plug in to the rest of their work. They don’t always have much of a budget to work with, but they do have enthusiasm and they know what they want. They’re idea people who roll up their sleeves and get their hands dirty, and they weren’t around in the numbers that they are now.
There’s one more advantage to working with these types of folks: when people have experience with developing their own solutions and experience running into the roadblocks, they usually also have some understanding of and appreciation for the kind of time, work, detail, and costs that go into development. Those of you who have done professional development work will recognize what a boon that is.
I’ve done custom work for many people over the years, but change is constant. It’s a big world and I’ve only worked in and seen my piece of it. Have you found things to be as I described, or different? Is my experience somehow unique? Post up in the comments!
A few years ago, you could buy an IRIS 9000 Bluetooth speaker. Its claim to fame was that it looked like the “eye” from the HAL 9000 computer on 2001: A Space Oddessy. There’s something seductive about the idea of having a HAL eye answer your queries to Google Now or Siri. The problem is, it still sounds like Google or Siri, not like HAL.
[Badjer1] had the same problem so he decided to build his own eye. His goal wasn’t to interface with his smartphone’s virtual assistant, though. He settled on making it just be an extension cord with USB ports. As you can see in the video below, the build has HAL-style memory units, a key, and can speak phrases from the movie (well, 28 of them, at least). The key is like the one Dave used to deactivate HAL in the movie.
Inside the MDF enclosure is an Arduino and a wave shield that handles the audio playback. The memory cards are acrylic and the key is machined brass. The result is a good looking project.


 You can still use punch cards to operate knitting machines, but a few groups are now bringing the technology full circle by hacking knitting machines so that they may be operated digitally via an Arduino.


