We enjoy access to cheap stuff because of the mass market for things like mice, keyboards, and cell phones. But if you need a device that doesn’t have mass appeal, you will have to pay a lot more if you can find it at all. However, with modern techniques like 3D printing and Arduino-like microcontrollers being cheap and simple to use, you now have the option to build that special one-of-a-kind device. Case in point: [Davy’s] mouse for people who have brain or nervous system disorders. This particular device is helping a 6-year-old who can’t manipulate a normal mouse.
The device uses an Arduino Pro and an MPU-6050 accelerometer and gyroscope. The original design uses machined aluminum, but 3D printing should work, too. There’s something wrong with the link to the design files in the post, but it is easy to find the correct link.
There are, of course, many ways you could make this work, and besides, every special user will be a little different. But what a great feeling to help someone be able to do what most people take for granted.
This is a rewrite of a project I created in 2010 which brought me a lot of joy, so I hope you enjoy it too.Please read the entire article before starting your own. You can still make it today, the parts are easily available.
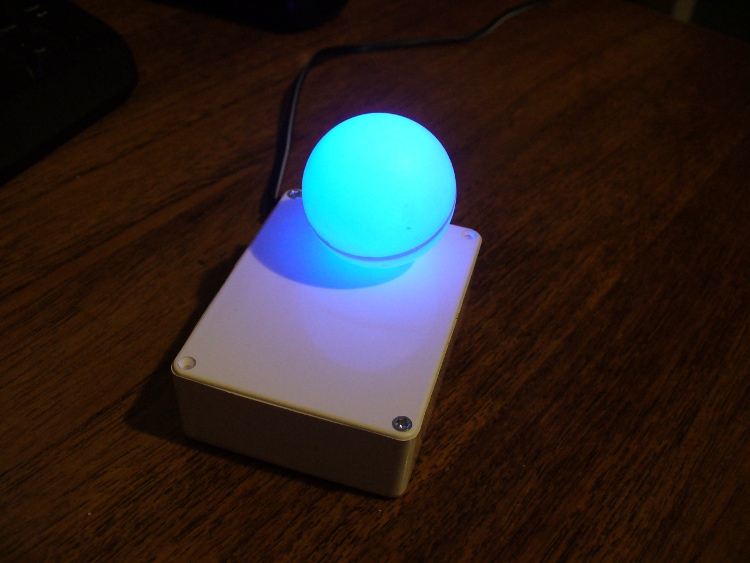
I’ve always enjoyed making Arduino-powered clocks, however over time they tended to become increasingly complex. So to counter this, allow me to introduce you to “Blinky” the one-eyed clock:
It reminds me of the giant killer orb “Rover” from “The Prisoner“… Using a minimal Arduino bootrom system, a DS1307 real time clock IC and an RGB diffused LED, you can make a clock that blinks the time, using the colours of the LED to note different numerical values.
For example, if the time is 12:45, the clock will blink red 12 times, then show blue for a second (think of this as the colon on a digital clock) then blink four times in green (for forty minutes), then blink three times in red for the individual minutes.
If there is a zero, blink blue quickly. Then the clock will not display anything for around forty seconds, then repeat the process. Here he (she, it?) is blinking the time:
Setting the clock is simple. It is set to start at 12:00 upon power up. So for the first use you have to wait until about five seconds before midday or midnight, then power it up. To save cost it doesn’t use a backup lithium battery on the real-time clock IC, but you could add one if required. So let’s get started.
The first thing to do was test the RGB LED for brightness levels, so I just connected it to the digital output pins of my Arduino-compatible board via suitable current-limiting resistors. Red, green and blue to D9, D10 and D11 respectively. Each LED is going to be different, so to ensure maximum brightness without causing any damage you need to calculate the appropriate resistor values.
This is quite easy, the formula is: resistor (ohms) = voltage drop / LED current So if you have a 5V supply, and LED that needs only 2 volts, and draws 20 milliamps (0.2 amps) , the calculation will be: resistor = (5-2)/0.02 = 150 ohms. To be safe I used 180 ohm resistors. The LED was tested with this simple sketch:
/*
  blinky LED test
 */

int red = 2;
int green = 3;
int blue = 4;
int d = 300;
void setup()
{
  pinMode(red, OUTPUT);
  pinMode(green, OUTPUT);
  pinMode(blue, OUTPUT);
}

void loop()
{
  digitalWrite(red, HIGH);
  delay(d);
  digitalWrite(red, LOW);
  delay(d);
  digitalWrite(green, HIGH);
  delay(d);
  digitalWrite(green, LOW);
  delay(d);
  digitalWrite(blue, HIGH);
  delay(d);
  digitalWrite(blue, LOW);
  delay(d);
}
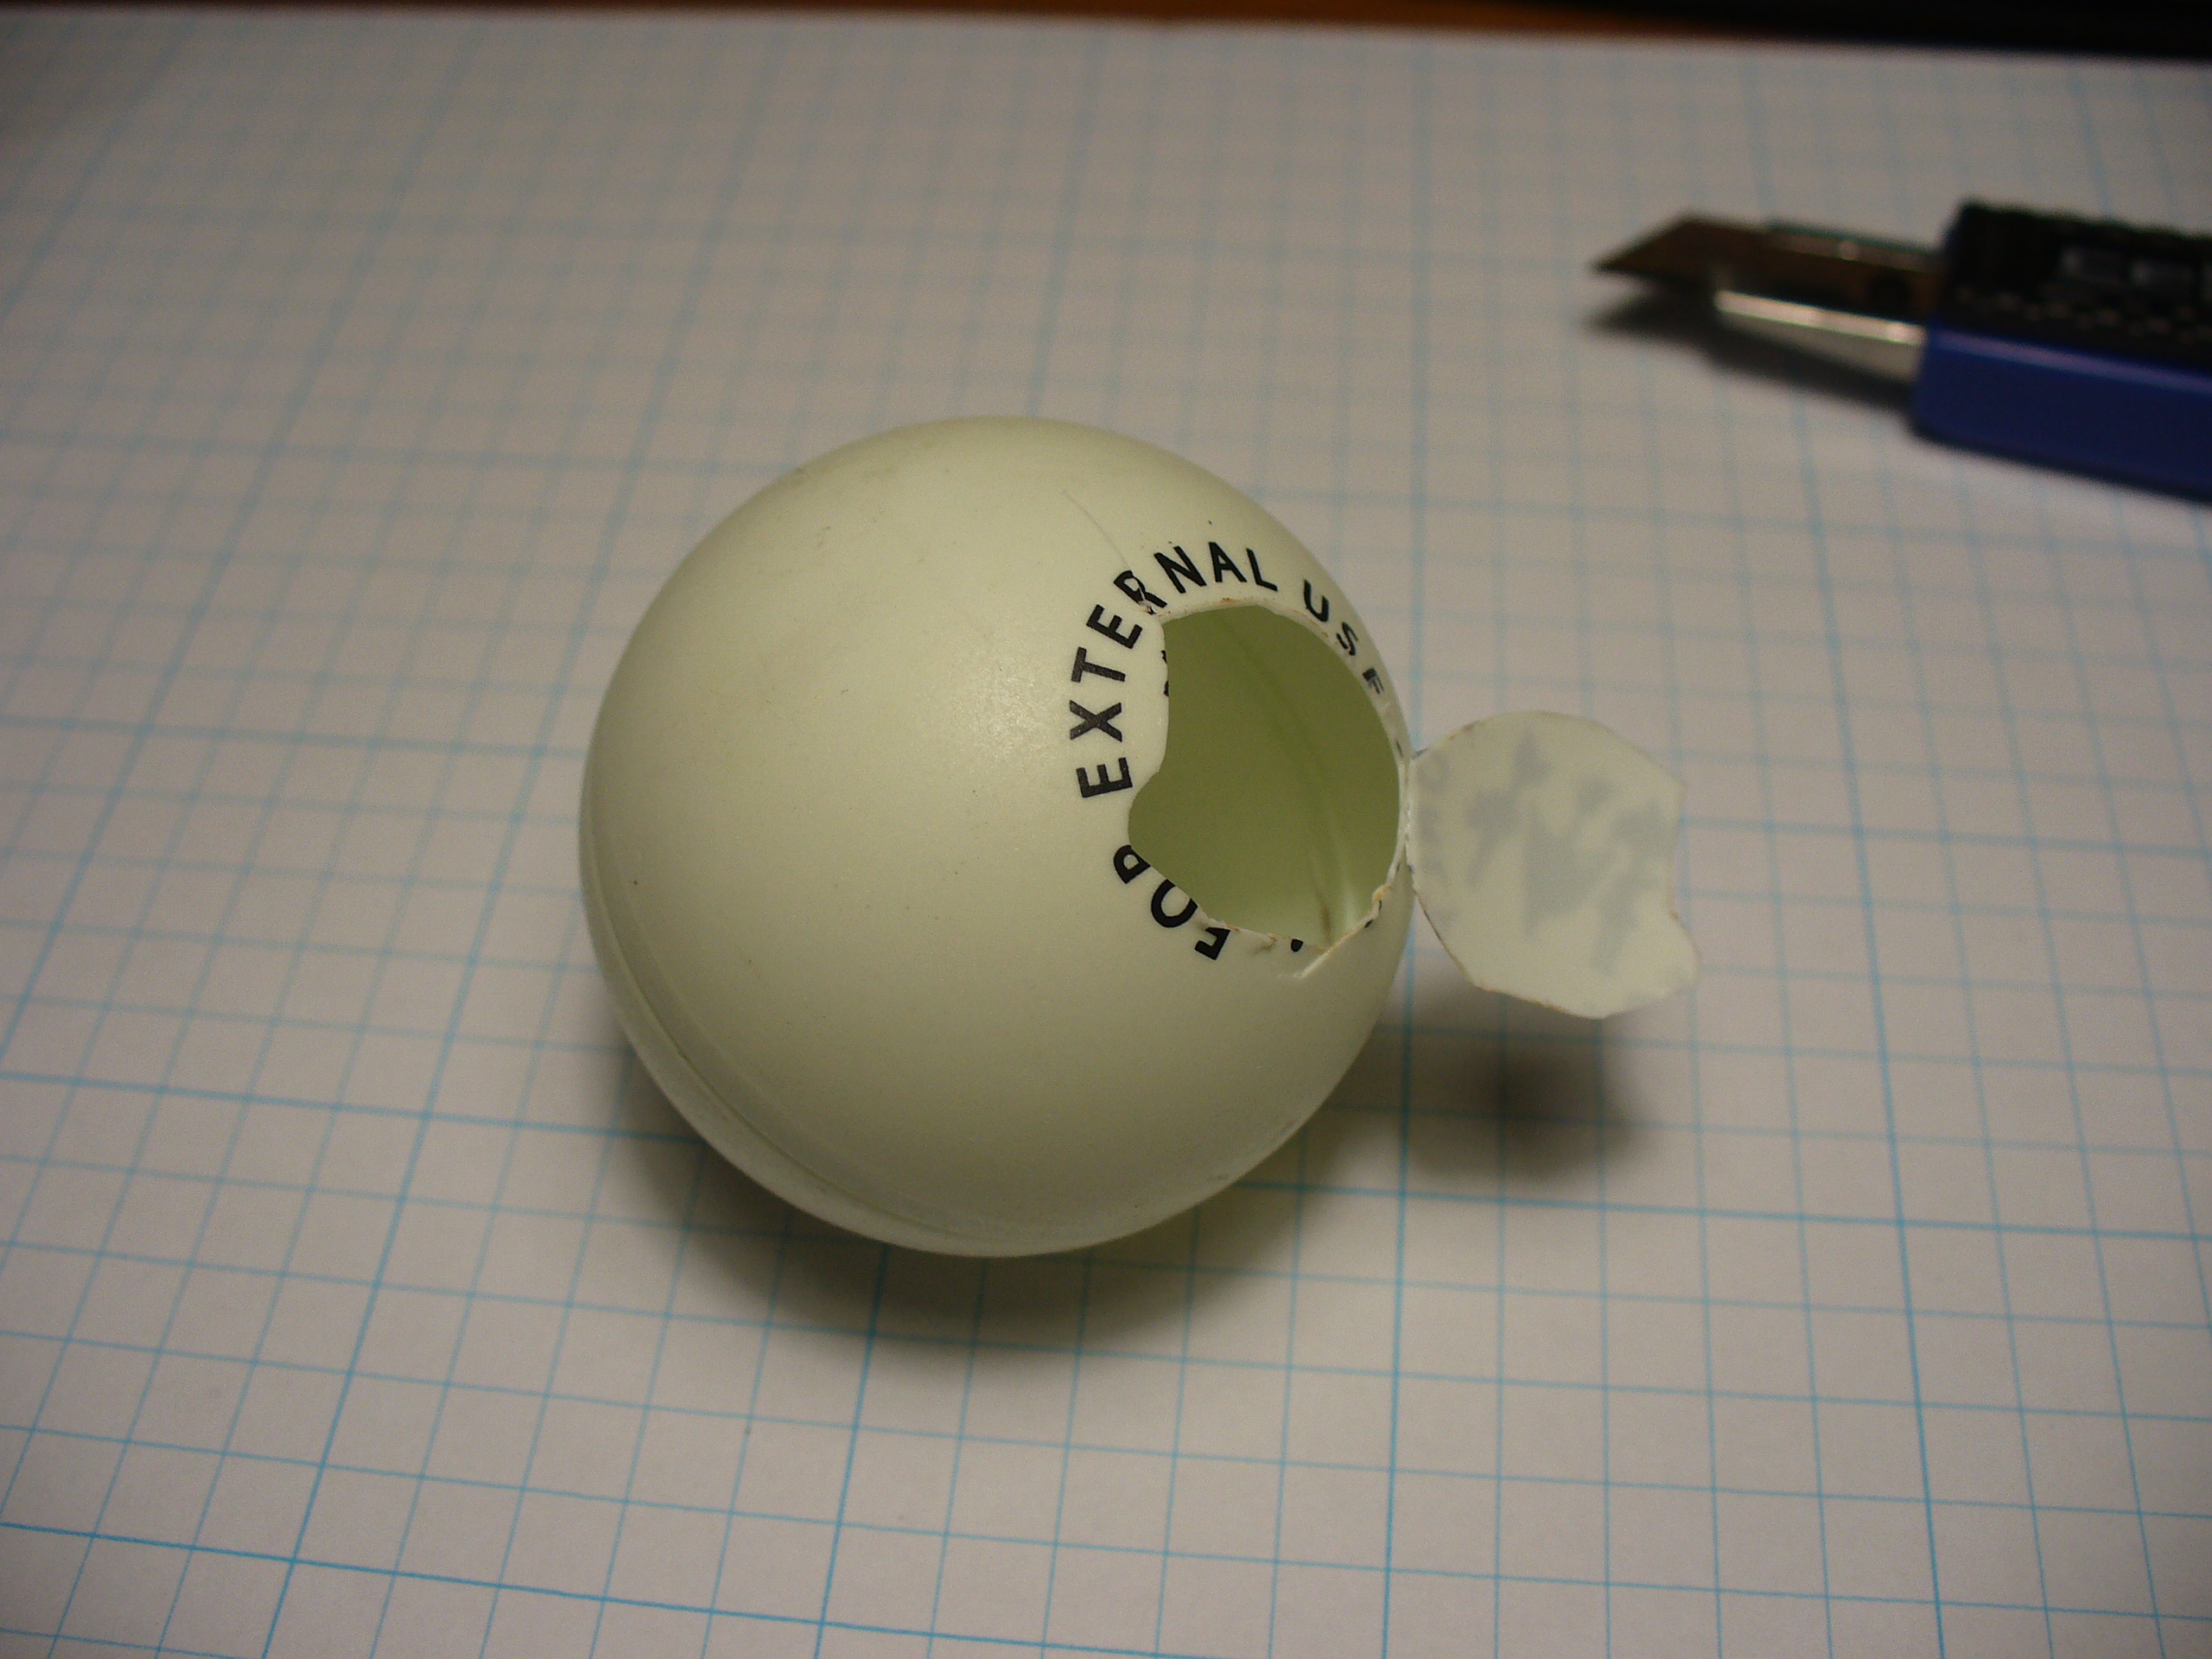
It was interesting to alter the value of d, the delay variable, to get an idea for an appropriate blinking speed. Originally the plan was to have the LED in a photo frame, but it was decided to mount a ping-pong ball over the LED for a retro-style look. Here is a short video of the result of the test:
If you are going to use a ping-pong ball, please be careful when cutting into it with a knife, initially it may require a lot of force, but once the knife cuts through it does so very quickly.
Now it was time to develop the sketch to convert time into blinks. The sketch itself is quite simple. Read the hours and minutes from the DS1307 timer IC; convert the hours to 12 hour time; then blink an LED for the number of hours, display another colour for the colon; divide the minutes by ten and blink that in another colour; then the modulus of minutes and ten to find the individual minutes, and blink those out. Here is the first test sketch:
/*
  "blinky" the one-eyed clock
  Version beta 1
  John Boxall August 2010/6th April 2022 - http://tronixstuff.com
  DS1307/i2c timekeeping based on code by Maurice Ribble 17-4-2008 -     http://www.glacialwanderer.com/hobbyrobotics
*/

#include "Wire.h"
#define DS1307_I2C_ADDRESS 0x68

int red = 9; // LEDs connected to these pins as you might want to PWM them to alter brightness
int green = 10;
int blue = 11;

// Convert normal decimal numbers to binary coded decimal
byte decToBcd(byte val)
{
  return ( (val / 10 * 16) + (val % 10) );
}

// Convert binary coded decimal to normal decimal numbers
byte bcdToDec(byte val)
{
  return ( (val / 16 * 10) + (val % 16) );
}

void setDateDs1307(byte second,        // 0-59
                   byte minute,        // 0-59
                   byte hour,          // 1-23
                   byte dayOfWeek,     // 1-7
                   byte dayOfMonth,    // 1-28/29/30/31
                   byte month,         // 1-12
                   byte year)          // 0-99
{
  Wire.beginTransmission(DS1307_I2C_ADDRESS);
  Wire.write(0);
  Wire.write(decToBcd(second));    // 0 to bit 7 starts the clock
  Wire.write(decToBcd(minute));
  Wire.write(decToBcd(hour));
  Wire.write(decToBcd(dayOfWeek));
  Wire.write(decToBcd(dayOfMonth));
  Wire.write(decToBcd(month));
  Wire.write(decToBcd(year));
  Wire.write(0x10); // sends 0x10 (hex) 00010000 (binary) to control register - turns on square wave
  Wire.endTransmission();
}

void getDateDs1307(byte *second,
                   byte *minute,
                   byte *hour,
                   byte *dayOfWeek,
                   byte *dayOfMonth,
                   byte *month,
                   byte *year)
{
  // Reset the register pointer
  Wire.beginTransmission(DS1307_I2C_ADDRESS);
  Wire.write(0);
  Wire.endTransmission();
  Wire.requestFrom(DS1307_I2C_ADDRESS, 7);
  *second     = bcdToDec(Wire.read() & 0x7f);
  *minute     = bcdToDec(Wire.read());
  *hour       = bcdToDec(Wire.read() & 0x3f);  // Need to change this if 12 hour am/pm
  *dayOfWeek  = bcdToDec(Wire.read());
  *dayOfMonth = bcdToDec(Wire.read());
  *month      = bcdToDec(Wire.read());
  *year       = bcdToDec(Wire.read());
}

void blinkLED(int colour, int ondelay, int offdelay, int blinks)
// blinks LED on pin 'colour' for 'blinks' times with on and off delay of 'ondelay', 'offdelay'
// colour: 9 is red, 10 is green, 11 is blue
{
  for (int a = 0; a < blinks; a++) {
    digitalWrite(colour, HIGH); delay(ondelay); digitalWrite(colour, LOW); delay(offdelay);
  }
}

void blinkTime() // blinks the time
{
  byte second, minute, hour, dayOfWeek, dayOfMonth, month, year;
  float aa;
  int bb;

  getDateDs1307(&second, &minute, &hour, &dayOfWeek, &dayOfMonth, &month, &year);
  // convert hours from 24 to 12 hour time
  if (hour == 0)
  {
    hour = 12;
  }
  if (hour > 12)
  {
    hour = hour - 12;
  }
  blinkLED(9, 500, 500, hour); // blink hours in red
  blinkLED(11, 1000, 500, 1); // show blue for one second
  aa = minute;
  aa = aa / 10;
  bb = int(aa); // find the value of tens of minutes (0~5)
  if (bb > 0)
  {
    blinkLED(10, 500, 500, bb); // blink tens of minutes
  }
  if (bb == 0) // but if the time is something like 03:02?
  {
    blinkLED(11, 200, 200, 1); // blink blue quickly for zero
  }
  aa = minute % 10; // find modulo of minutes to get single minutes
  if (bb > 0)
  {
    blinkLED(9, 500, 500, bb);
  }
  if (bb == 0)
  {
    blinkLED(11, 200, 200, 1); // blink blue quickly for zero
  }
}

void setup()
{
  byte second, minute, hour, dayOfWeek, dayOfMonth, month, year;
  Wire.begin();
  second = 0;
  minute = 17;
  hour = 4;
  dayOfWeek = 6; // these values are moot, but need to store something
  dayOfMonth = 28;
  month = 5;
  year = 10;
  setDateDs1307(second, minute, hour, dayOfWeek, dayOfMonth, month, year);
  pinMode(red, OUTPUT);
  pinMode(green, OUTPUT);
  pinMode(blue, OUTPUT);
}

void loop()
{
  blinkTime();
  delay(5000);
}
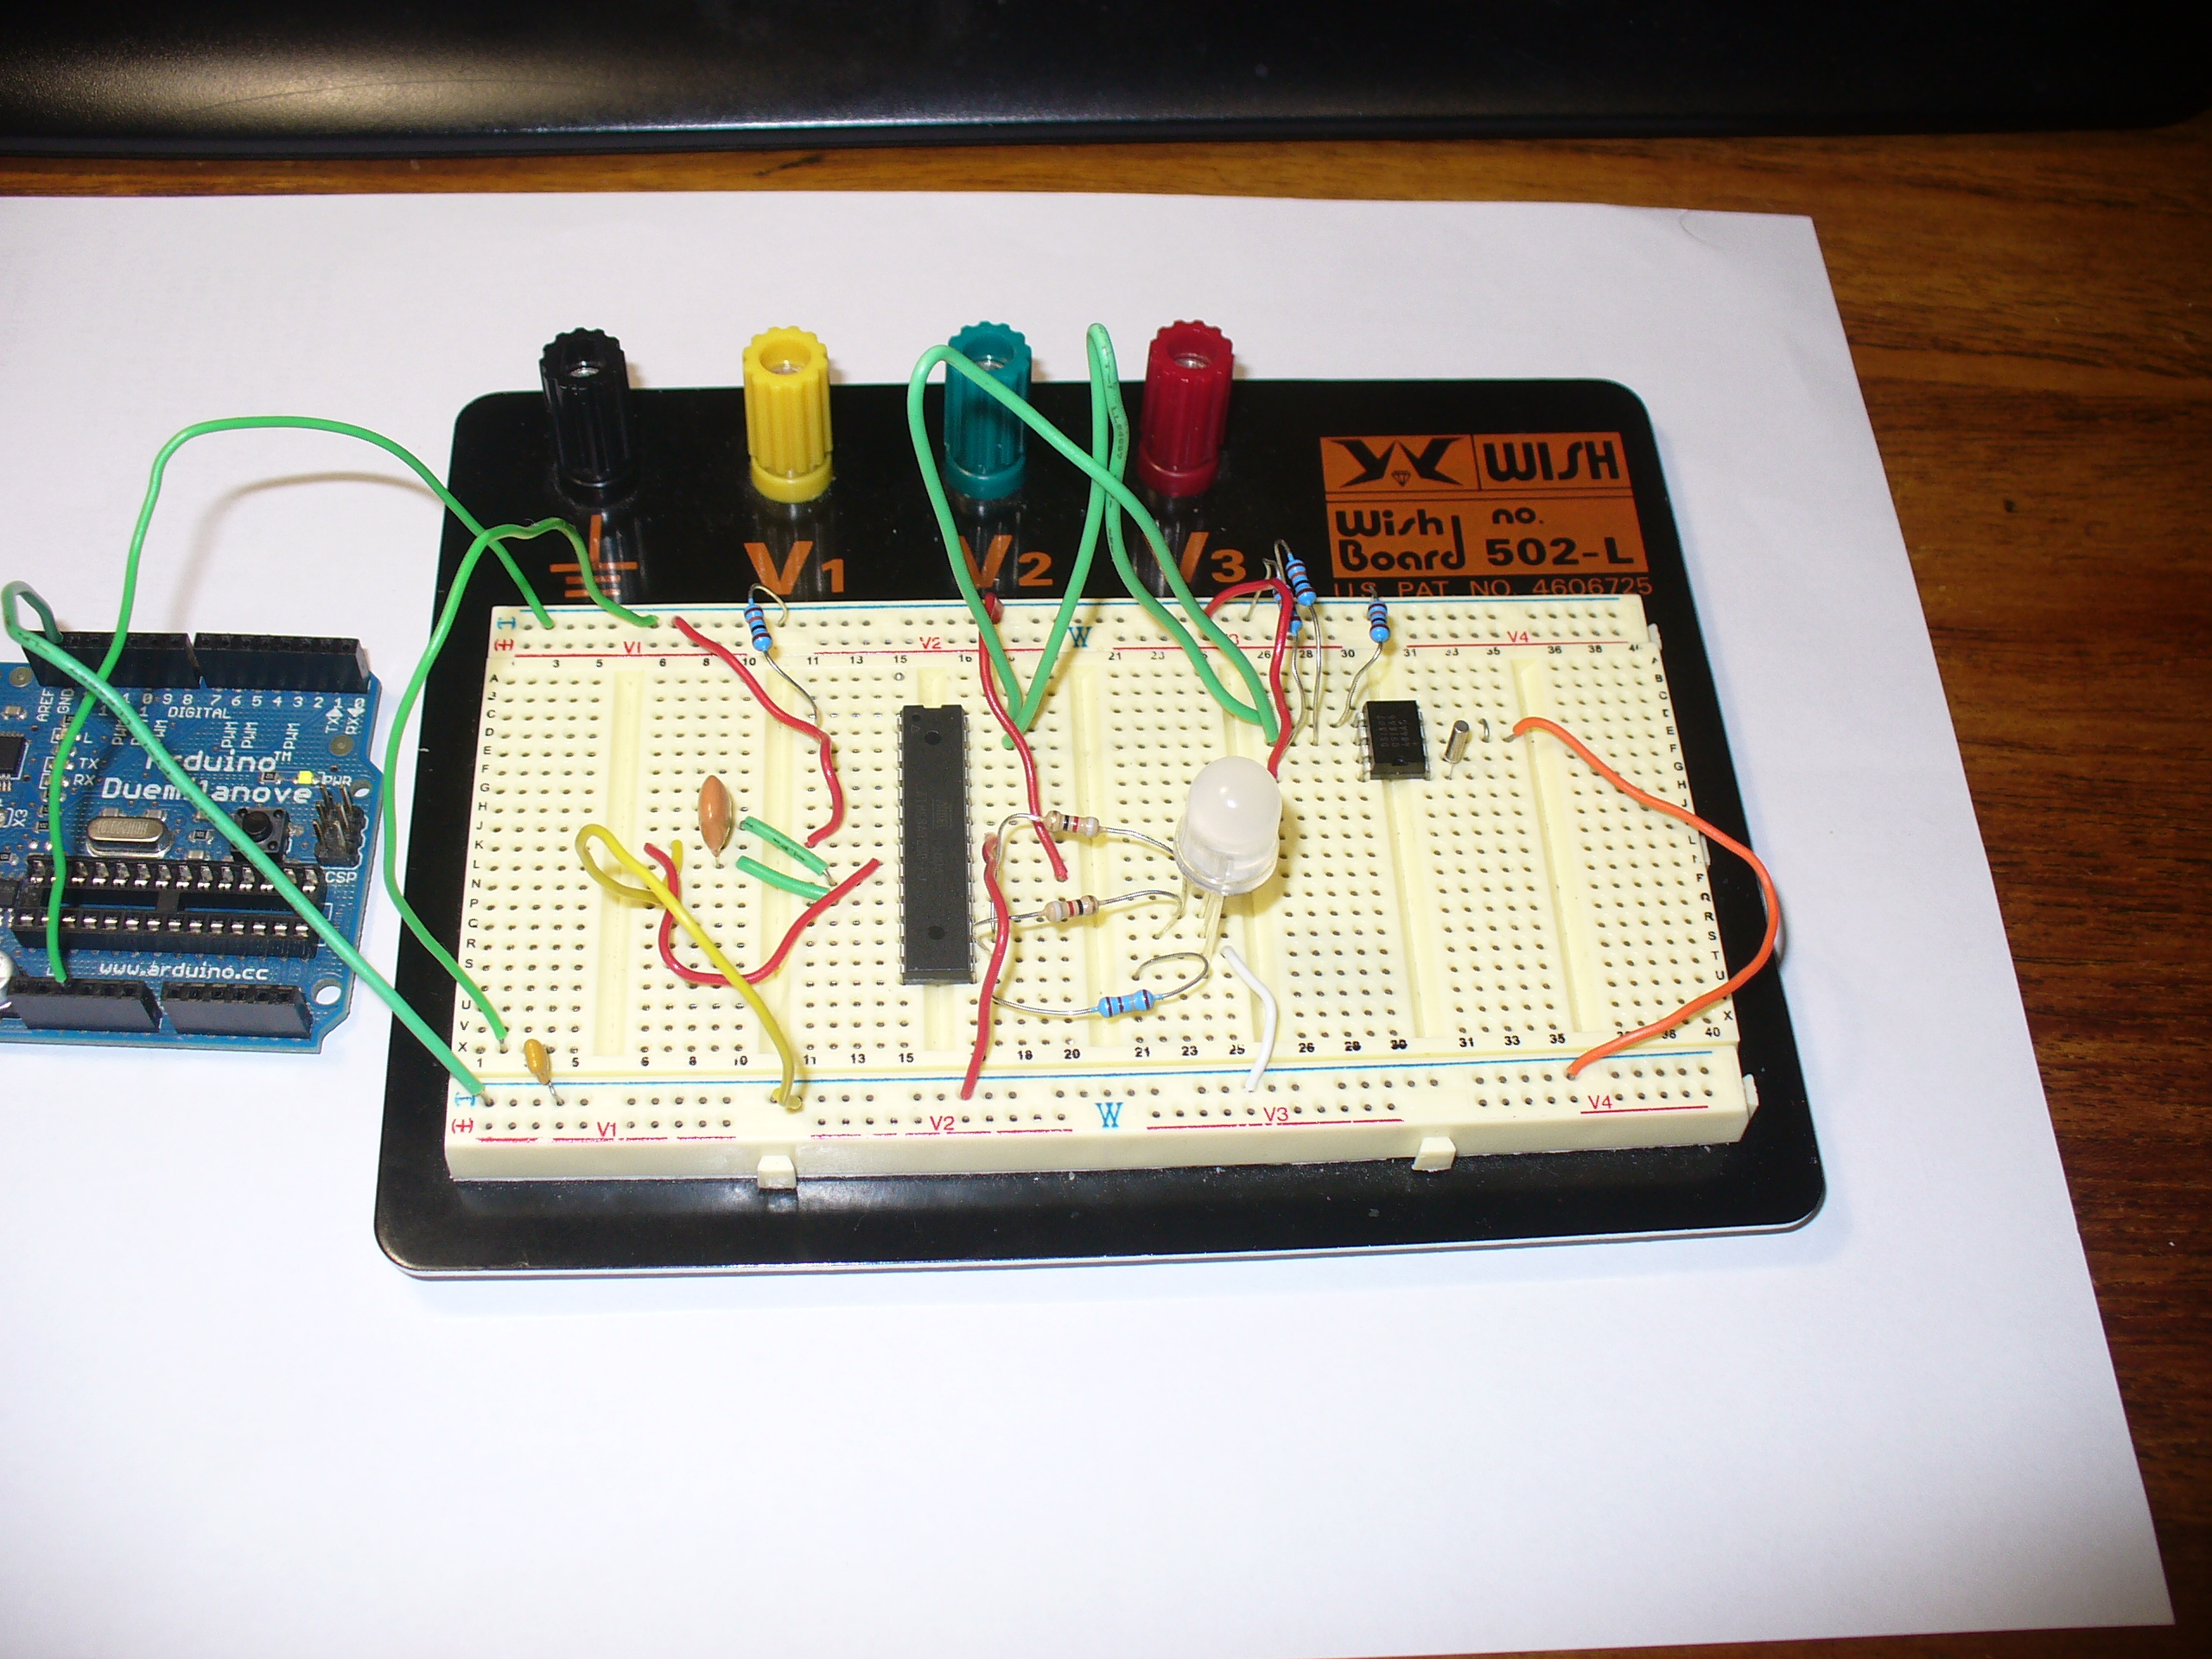
Finally, the code was tested using the Arduino-compatible board and my home-made DS1307 real time clock shield (hey it was 2010, DS32xx were expensive). It is best to use existing hardware while testing, before committing to purchasing new hardware and so on. So here it is on the breadboard:
Here is the prototype in action:
If you’re wondering why the videos are potato-cam quality, smartphones couldn’t record using 4K Ultra HD in 2010.
But perhaps the first version was a little bland. By using analogWrite() we can control the brightness of the LED segments. So I’ve added two more functions, whiteGlow() and blueGlow(); whose purpose is to make the display “glow” by increasing then decreasing the brightness.
And I’ve scaled back the amount of blinking, to make blinky less obvious. So now the display will glow white to announce the forthcoming display of time, wait a second, blink the time (with a blue glowing colon) then stay dark for ten seconds before repeating the process. Here is a quick demonstration of this display style:
Here is the sketch for the above demonstration, and the final one I will use with the hardware prototype:
/*
  "blinky" the one-eyed clock - Version 2.1
  John Boxall 04 August 2010/6th April 2022
  IDGAF licence
  DS1307/i2c timekeeping based on code by Maurice Ribble
  17-4-2008 - http://www.glacialwanderer.com/hobbyrobotics
*/

#include "Wire.h"
#define DS1307_I2C_ADDRESS 0x68

int red = 9; // LEDs connected to these pins as you might want to PWM them to alter brightness
int green = 10;
int blue = 11;

// Convert normal decimal numbers to binary coded decimal
byte decToBcd(byte val)
{
  return ( (val / 10 * 16) + (val % 10) );
}

// Convert binary coded decimal to normal decimal numbers
byte bcdToDec(byte val)
{
  return ( (val / 16 * 10) + (val % 16) );
}

void setDateDs1307(byte second,        // 0-59
                   byte minute,        // 0-59
                   byte hour,          // 1-23
                   byte dayOfWeek,     // 1-7
                   byte dayOfMonth,    // 1-28/29/30/31
                   byte month,         // 1-12
                   byte year)          // 0-99
{
  Wire.beginTransmission(DS1307_I2C_ADDRESS);
  Wire.write(0);
  Wire.write(decToBcd(second));    // 0 to bit 7 starts the clock
  Wire.write(decToBcd(minute));
  Wire.write(decToBcd(hour));
  Wire.write(decToBcd(dayOfWeek));
  Wire.write(decToBcd(dayOfMonth));
  Wire.write(decToBcd(month));
  Wire.write(decToBcd(year));
  Wire.write(0x10); // sends 0x10 (hex) 00010000 (binary) to control register - turns on square wave
  Wire.endTransmission();
}

void getDateDs1307(byte *second,
                   byte *minute,
                   byte *hour,
                   byte *dayOfWeek,
                   byte *dayOfMonth,
                   byte *month,
                   byte *year)
{
  // Reset the register pointer
  Wire.beginTransmission(DS1307_I2C_ADDRESS);
  Wire.write(0);
  Wire.endTransmission();
  Wire.requestFrom(DS1307_I2C_ADDRESS, 7);
  *second     = bcdToDec(Wire.read() & 0x7f);
  *minute     = bcdToDec(Wire.read());
  *hour       = bcdToDec(Wire.read() & 0x3f);  // Need to change this if 12 hour am/pm
  *dayOfWeek  = bcdToDec(Wire.read());
  *dayOfMonth = bcdToDec(Wire.read());
  *month      = bcdToDec(Wire.read());
  *year       = bcdToDec(Wire.read());
}

void blinkLED(int colour, int ondelay, int offdelay, int blinks)
// blinks LED on pin 'colour' for 'blinks' times with on and off delay of 'ondelay', 'offdelay'
// colour: 9 is red, 10 is green, 11 is blue
{

  for (int a = 0; a < blinks; a++)
  {
    digitalWrite(colour, HIGH);
    delay(ondelay);
    digitalWrite(colour, LOW);
    delay(offdelay);
  }
}

void blinkTime()
// blinks the time
{
  byte second, minute, hour, dayOfWeek, dayOfMonth, month, year;
  float aa;
  int bb;
  getDateDs1307(&second, &minute, &hour, &dayOfWeek, &dayOfMonth, &month, &year);

  // convert hours from 24 to 12 hour time
  if (hour == 0)
  {
    hour = 12;
  }
  if (hour > 12)
  {
    hour = hour - 12;
  }
  blinkLED(9, 500, 500, hour); // blink hours in red
  blueGlow(1, 10);
  aa = minute;
  aa = aa / 10;
  bb = int(aa); // find the value of tens of minutes (0~5)
  if (bb > 0)
  {
    blinkLED(10, 500, 500, bb); // blink tens of minutes
  }
  if (bb == 0) // but if the time is something like 03:02?
  {
    blinkLED(11, 200, 200, 1); // blink blue quickly for zero
  }
  aa = minute % 10; // find modulo of minutes to get single minutes
  bb = aa;
  if (bb > 0)
  {
    blinkLED(9, 500, 500, bb); // blink tens of minutes
  }
  if (bb == 0)
  {
    blinkLED(11, 200, 200, 1); // blink blue quickly for zero
  }
}

void whiteGlow(int n, int d)
{
  for (int nn = 0; nn < n; nn++)
  {
    for (int a = 0; a <= 255; a++)
    {
      analogWrite(red, a);
      analogWrite(green, a);
      analogWrite(blue, a);
      delay(d);
    }
    for (int a = 255; a >= 0; --a)
    {
      analogWrite(red, a);
      analogWrite(green, a);
      analogWrite(blue, a);
      delay(d);
    }
  }
}

void blueGlow(int n, int d)
{
  for (int nn = 0; nn < n; nn++)
  {
    for (int a = 0; a <= 255; a++)
    {
      analogWrite(blue, a);
      delay(d);
    }
    for (int a = 255; a >= 0; --a)
    {
      analogWrite(blue, a);
      delay(d);
    }
  }
}

void setup()
{
  byte second, minute, hour, dayOfWeek, dayOfMonth, month, year;
  Wire.begin();
  second = 0;
  minute = 17;
  hour = 4;
  dayOfWeek = 6; // these values are moot, but need to store something
  dayOfMonth = 28;
  month = 5;
  year = 10;
  setDateDs1307(second, minute, hour, dayOfWeek, dayOfMonth, month, year); // every time blinky has new batteries, it will start from midnight/midday
  pinMode(red, OUTPUT);
  pinMode(green, OUTPUT);
  pinMode(blue, OUTPUT);
}

void loop()
{
  whiteGlow(1, 10); // glow white - announces that the time will now be shown
  delay(1000); // give people a second to focus on blinky
  blinkTime();
  delay(50000); // wait 50 seconds
}
Once happy with the sketch, I put a fresh ATmega328P-PU with Arduino bootloader in the board and programmed it with the sketch, to be used in the final version. The next step is to build my own hardware. The last hardware unknown is the amount of current the circuit draws. Once I know this the correct voltage regulator and power supply can be decided upon.
I had a fair idea it would be less than 100 milliamps, so I put a 6V battery onto supply duty via a 78L05 5V regulator (data sheet), and recorded the result:
So it varies, between 20.5 and 46 mA. As it only reaches 46 mA for a short time, we could consider the constant draw to be averaged out at 30 mA. I really want this to be able to run from a battery, but without having an external lead-acid battery lurking around, it will need a plug-pack with an output voltage greater than 7V DC.
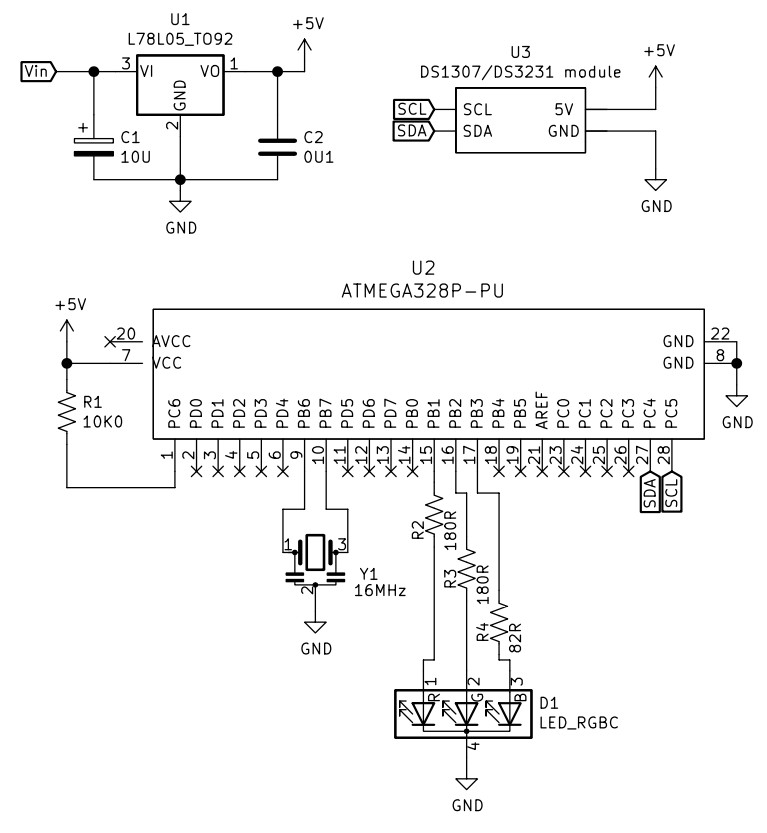
Another alternative would be to run it from a USB socket, a nice source of 5V. If doing so, there wouldn’t be a need for the 78L05 regulator. Which brings us to the circuit diagram, which includes the power regulator. I’ve also altered the resistors to suit the RGB LED used, your values may be different:
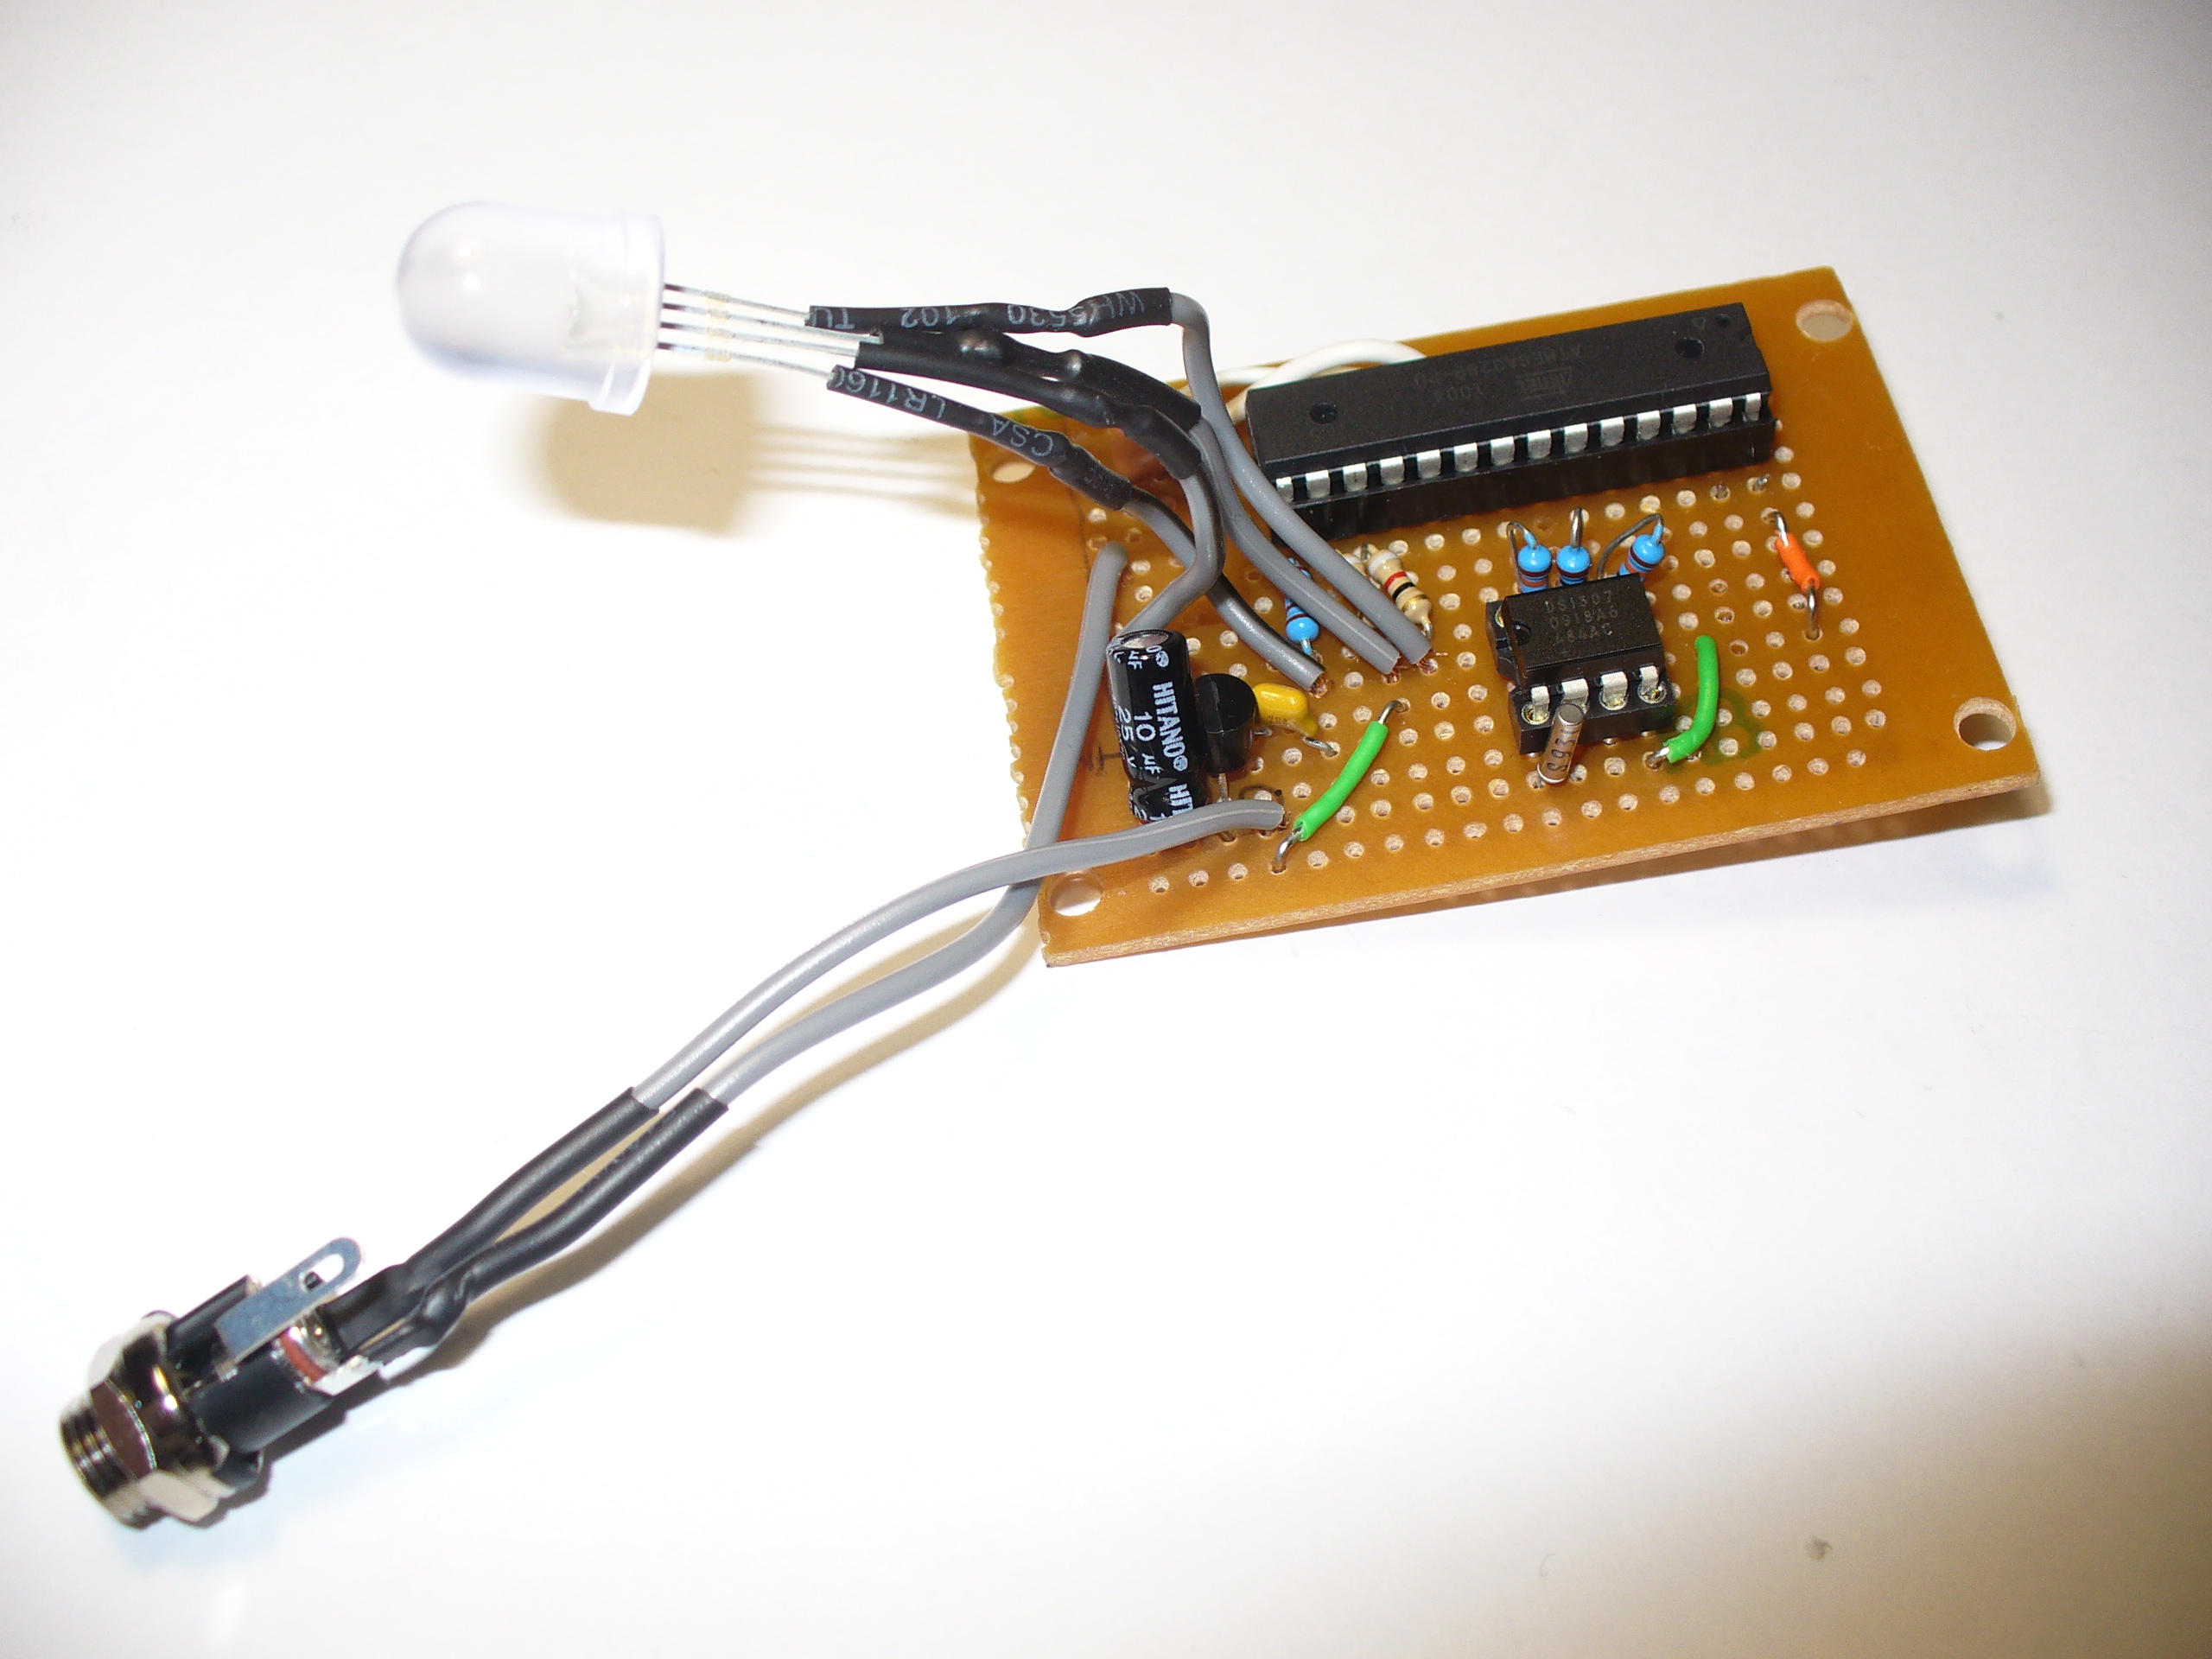
And since it’s 2022, not 2010 – I’ve replaced the DS1307 circuit with a RTC module. Y1 is a three pin 16MHz ceramic resonator, we used those in 2010 as they were cheaper and easier than a crystal and two 22pF capacitors.
The circuit does not allow for uploading code, so you will need to program the microcontroller on another Arduino or compatible board, then transfer it to the blinky circuit board as described above. At this stage you should test it again – but using a solderless breadboard. In doing so you can make final hardware checks, and generally make sure everything works as it should. This is also a good stage to double-check you are happy with the display behaviour, default time and so on.
Used the Duemilanove as a lazy 5V for testing.
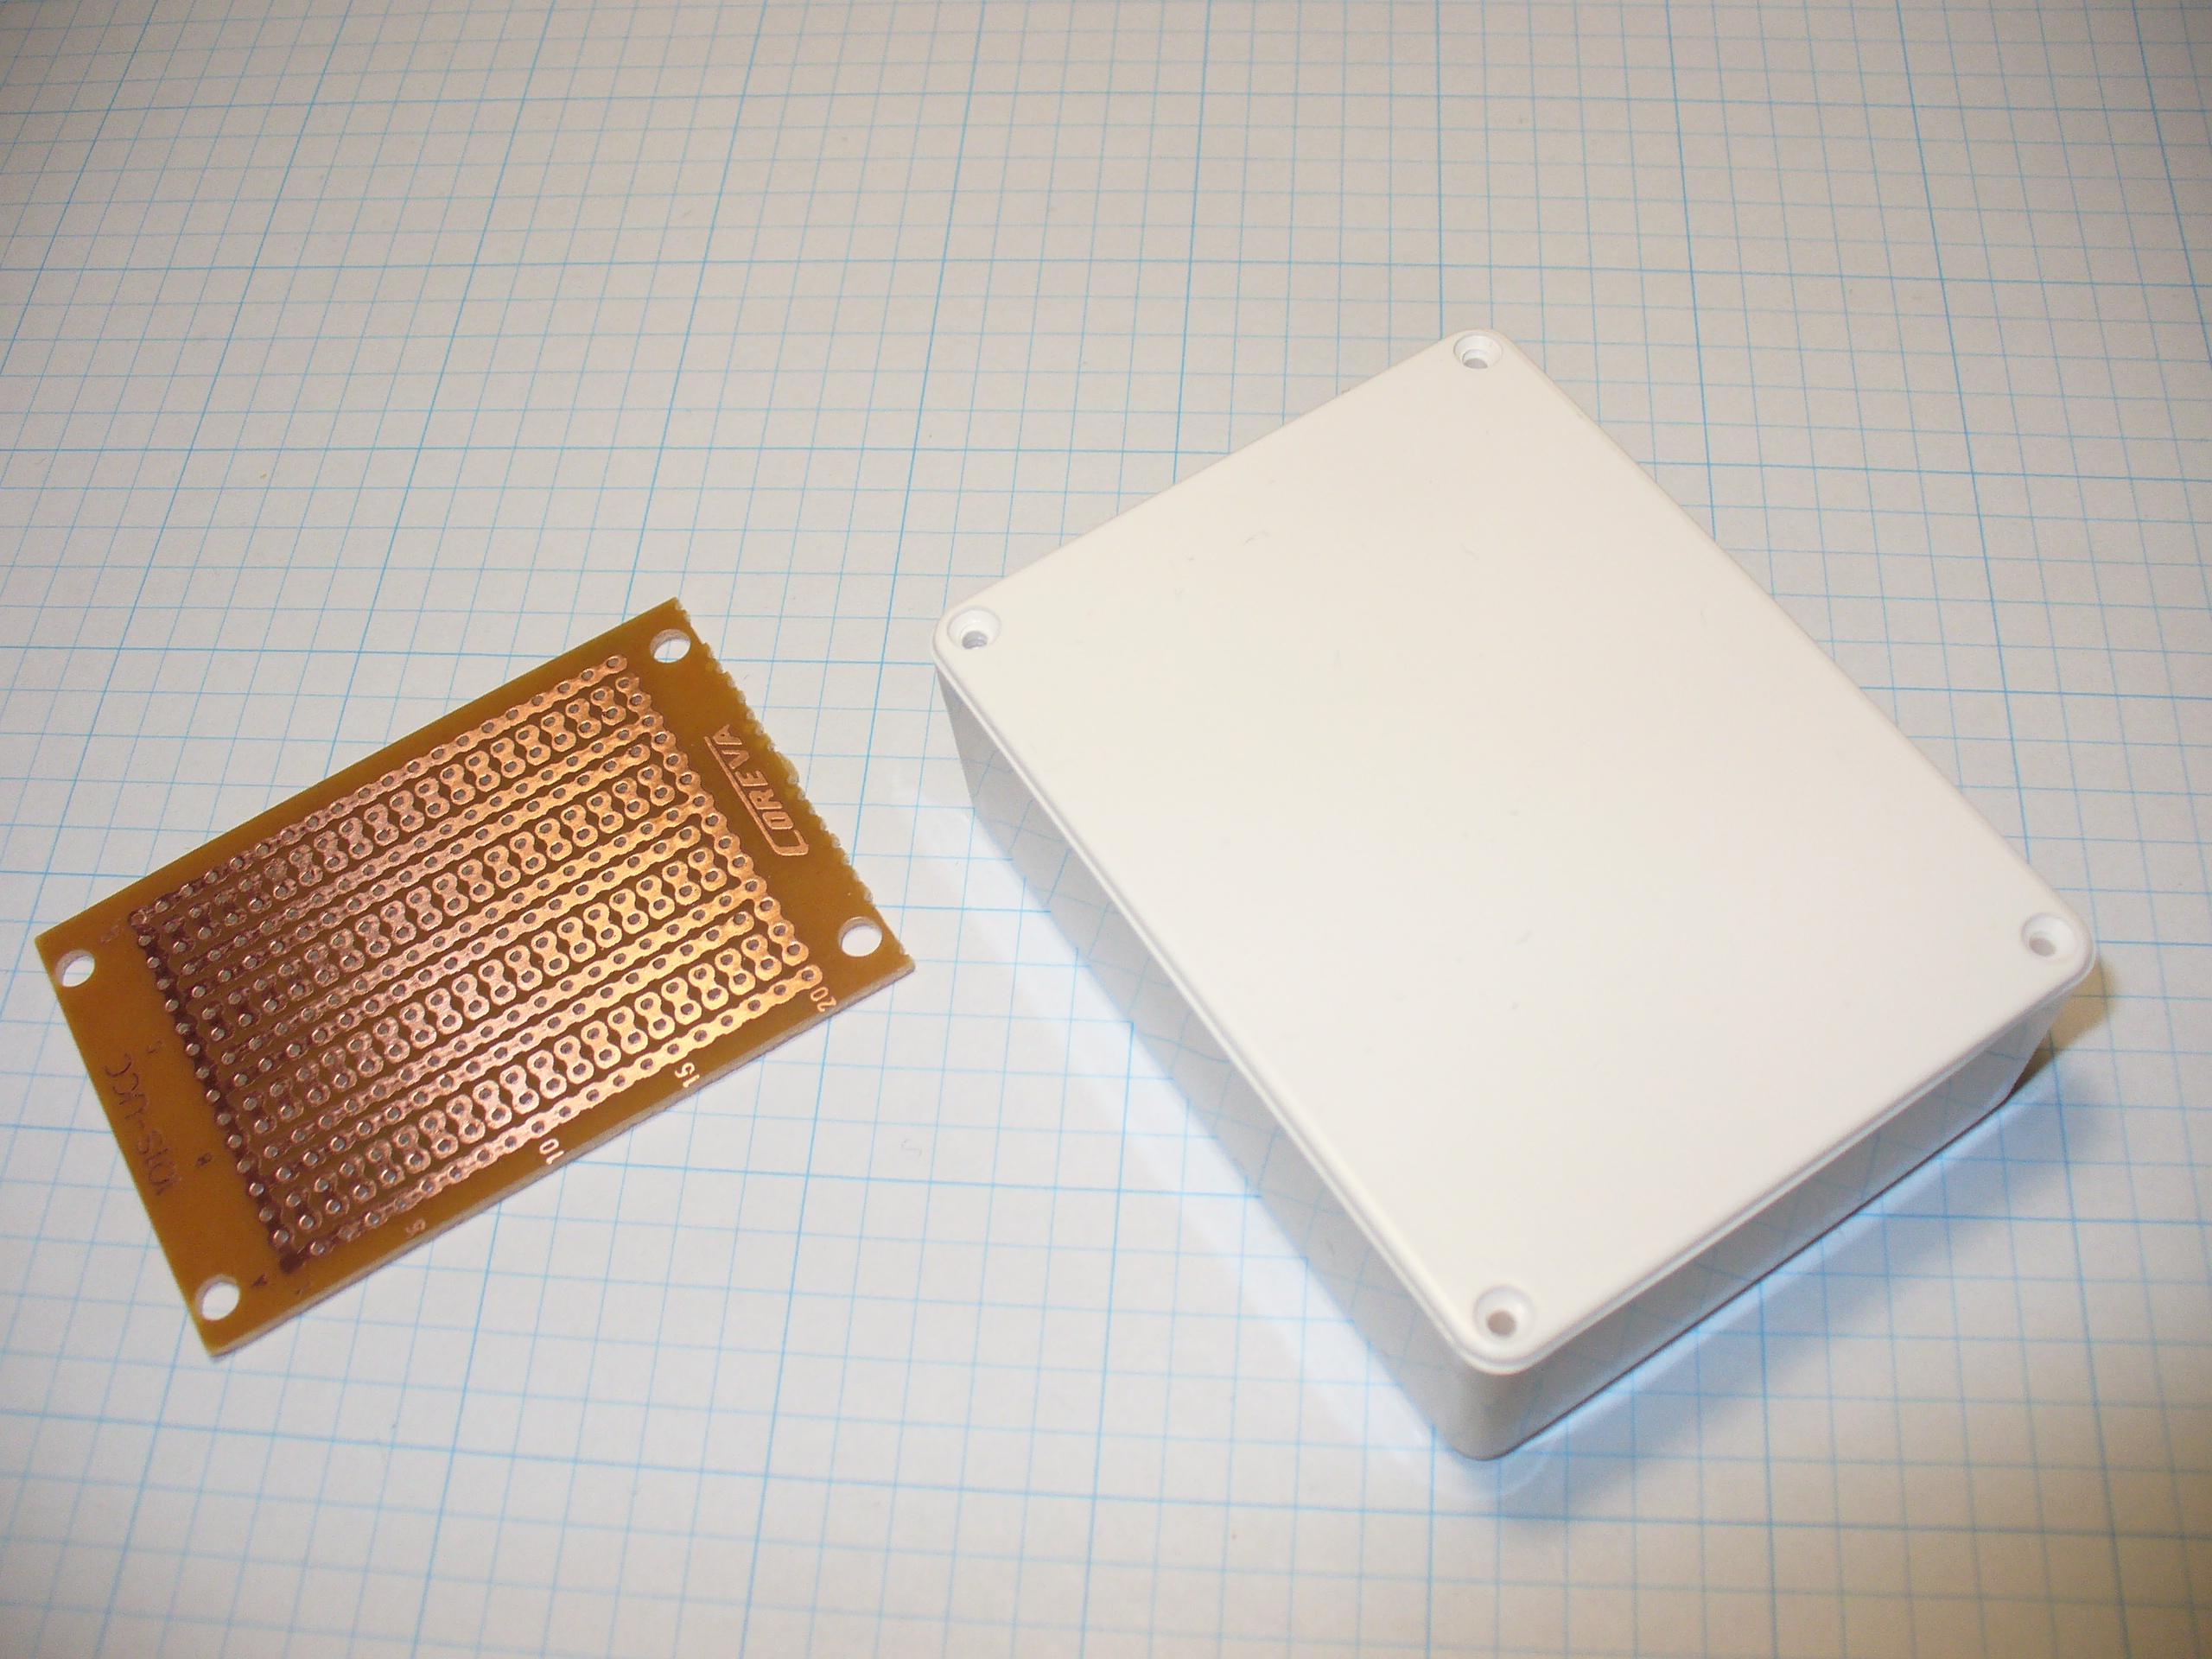
Time to solder up the circuit on some stripboard. Blank stripboard varies, but luckily I found this and a nice box to hold it in:
Stripboard does vary between retailers and so on, so you will need to work out the layout with your own board. In doing so, please double-check your work – follow the layout against the schematic and so on.
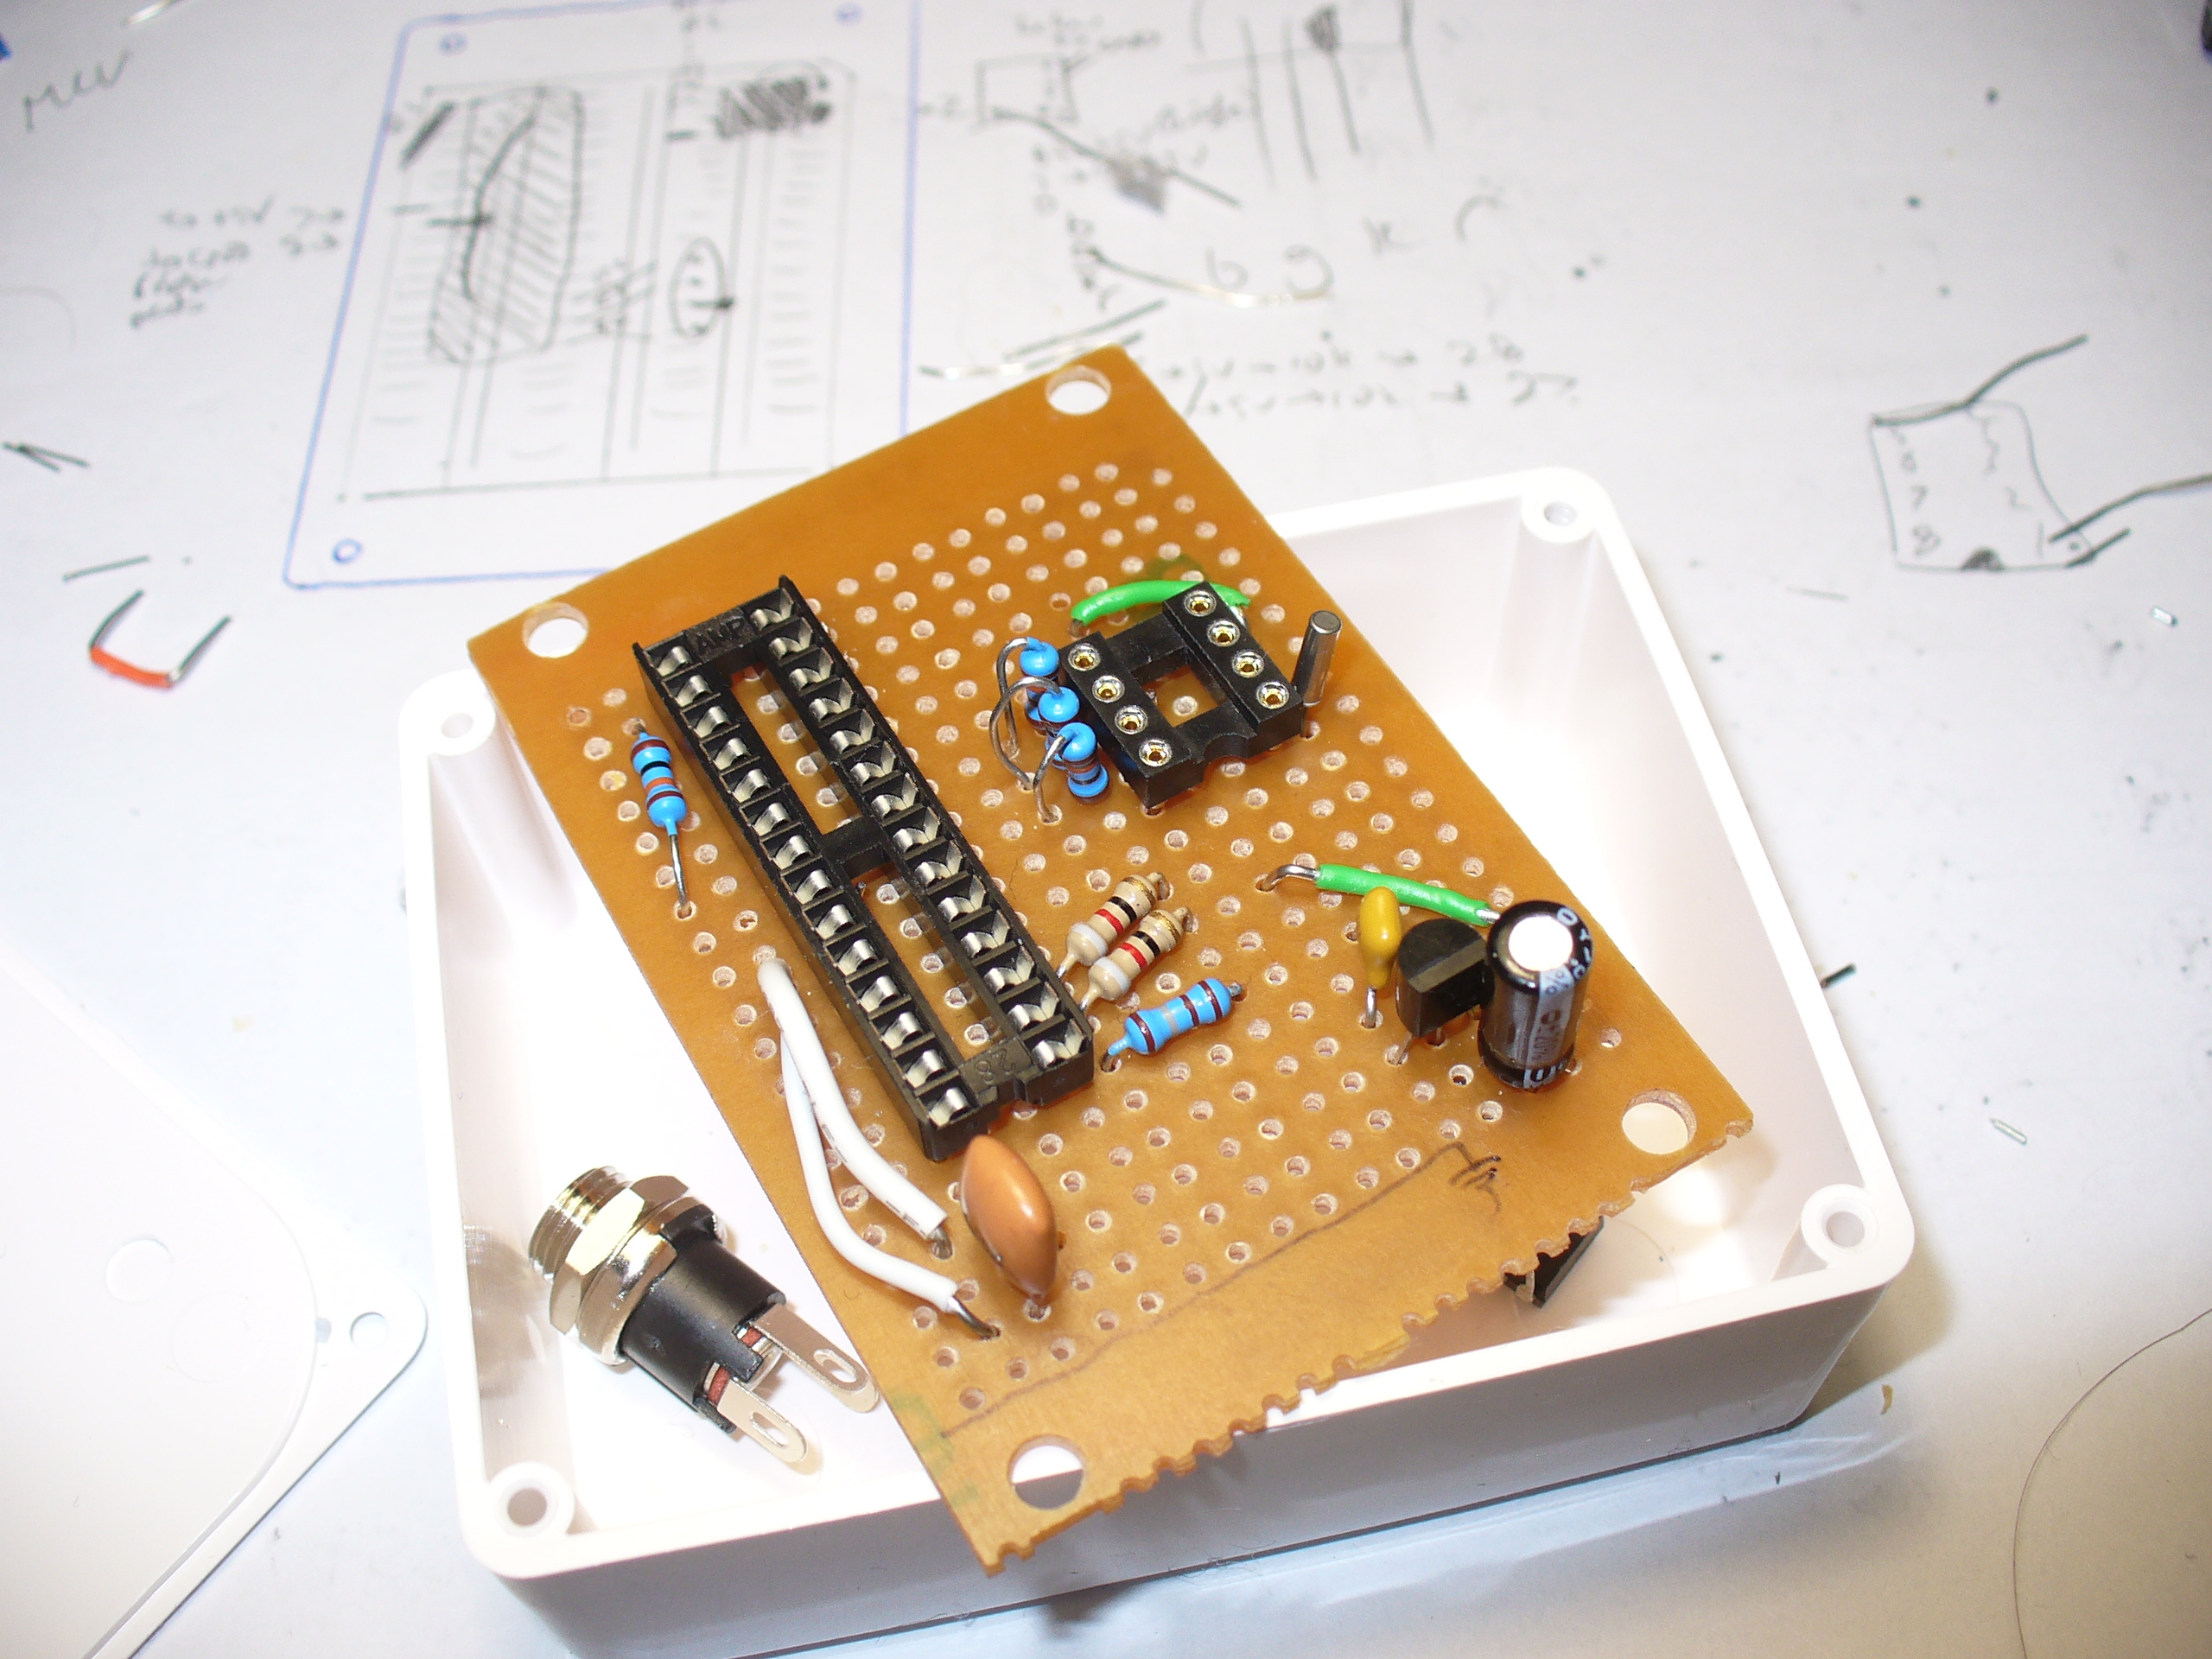
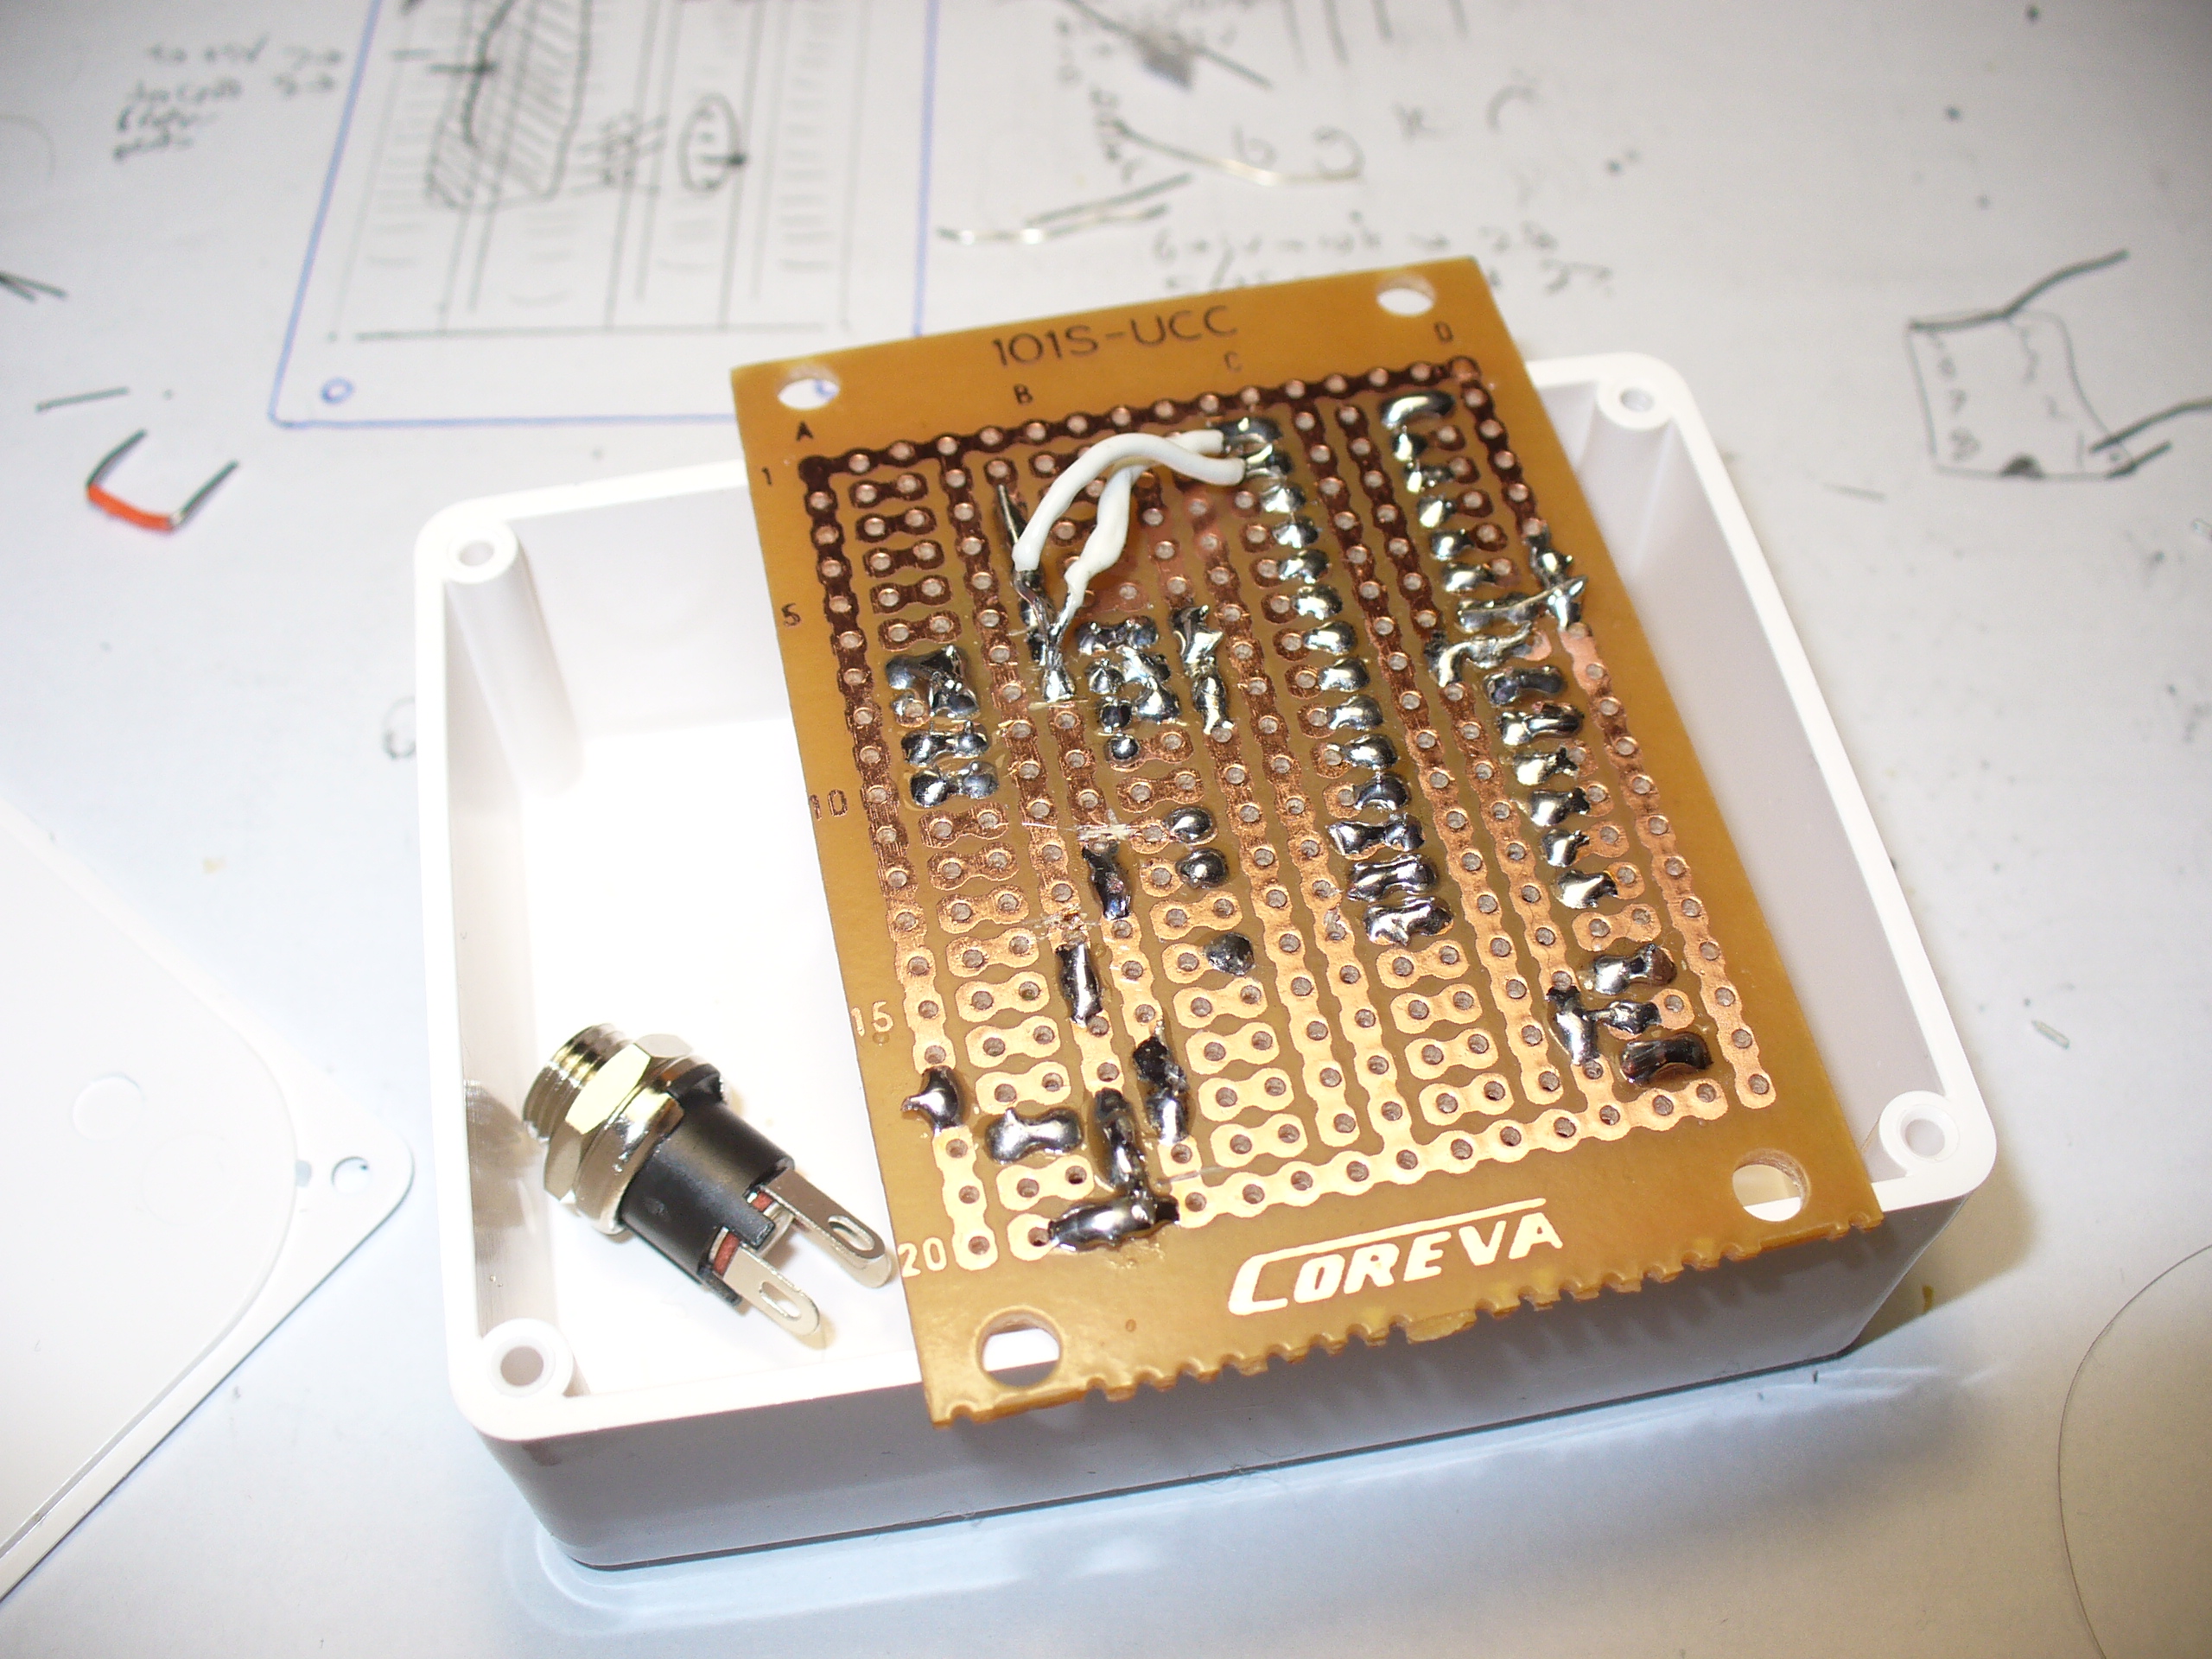
Have a break, then check it again. There is nothing worse than soldering away to realise you are one strip too far over or something. My hand-eye coordination is not the best, therefore my soldering isn’t pretty, but it works:
Note that the images above are using the 2010 circuit – which had a DS1307 sub-circuit.
One would say that there is a good argument for making your own PCBs… and I would agree with that. In 2010 it wasn’t that easy or inexpensive. Now you have KiCAD and Chinese PCB fabs tripping over themselves to give you cheap boards.
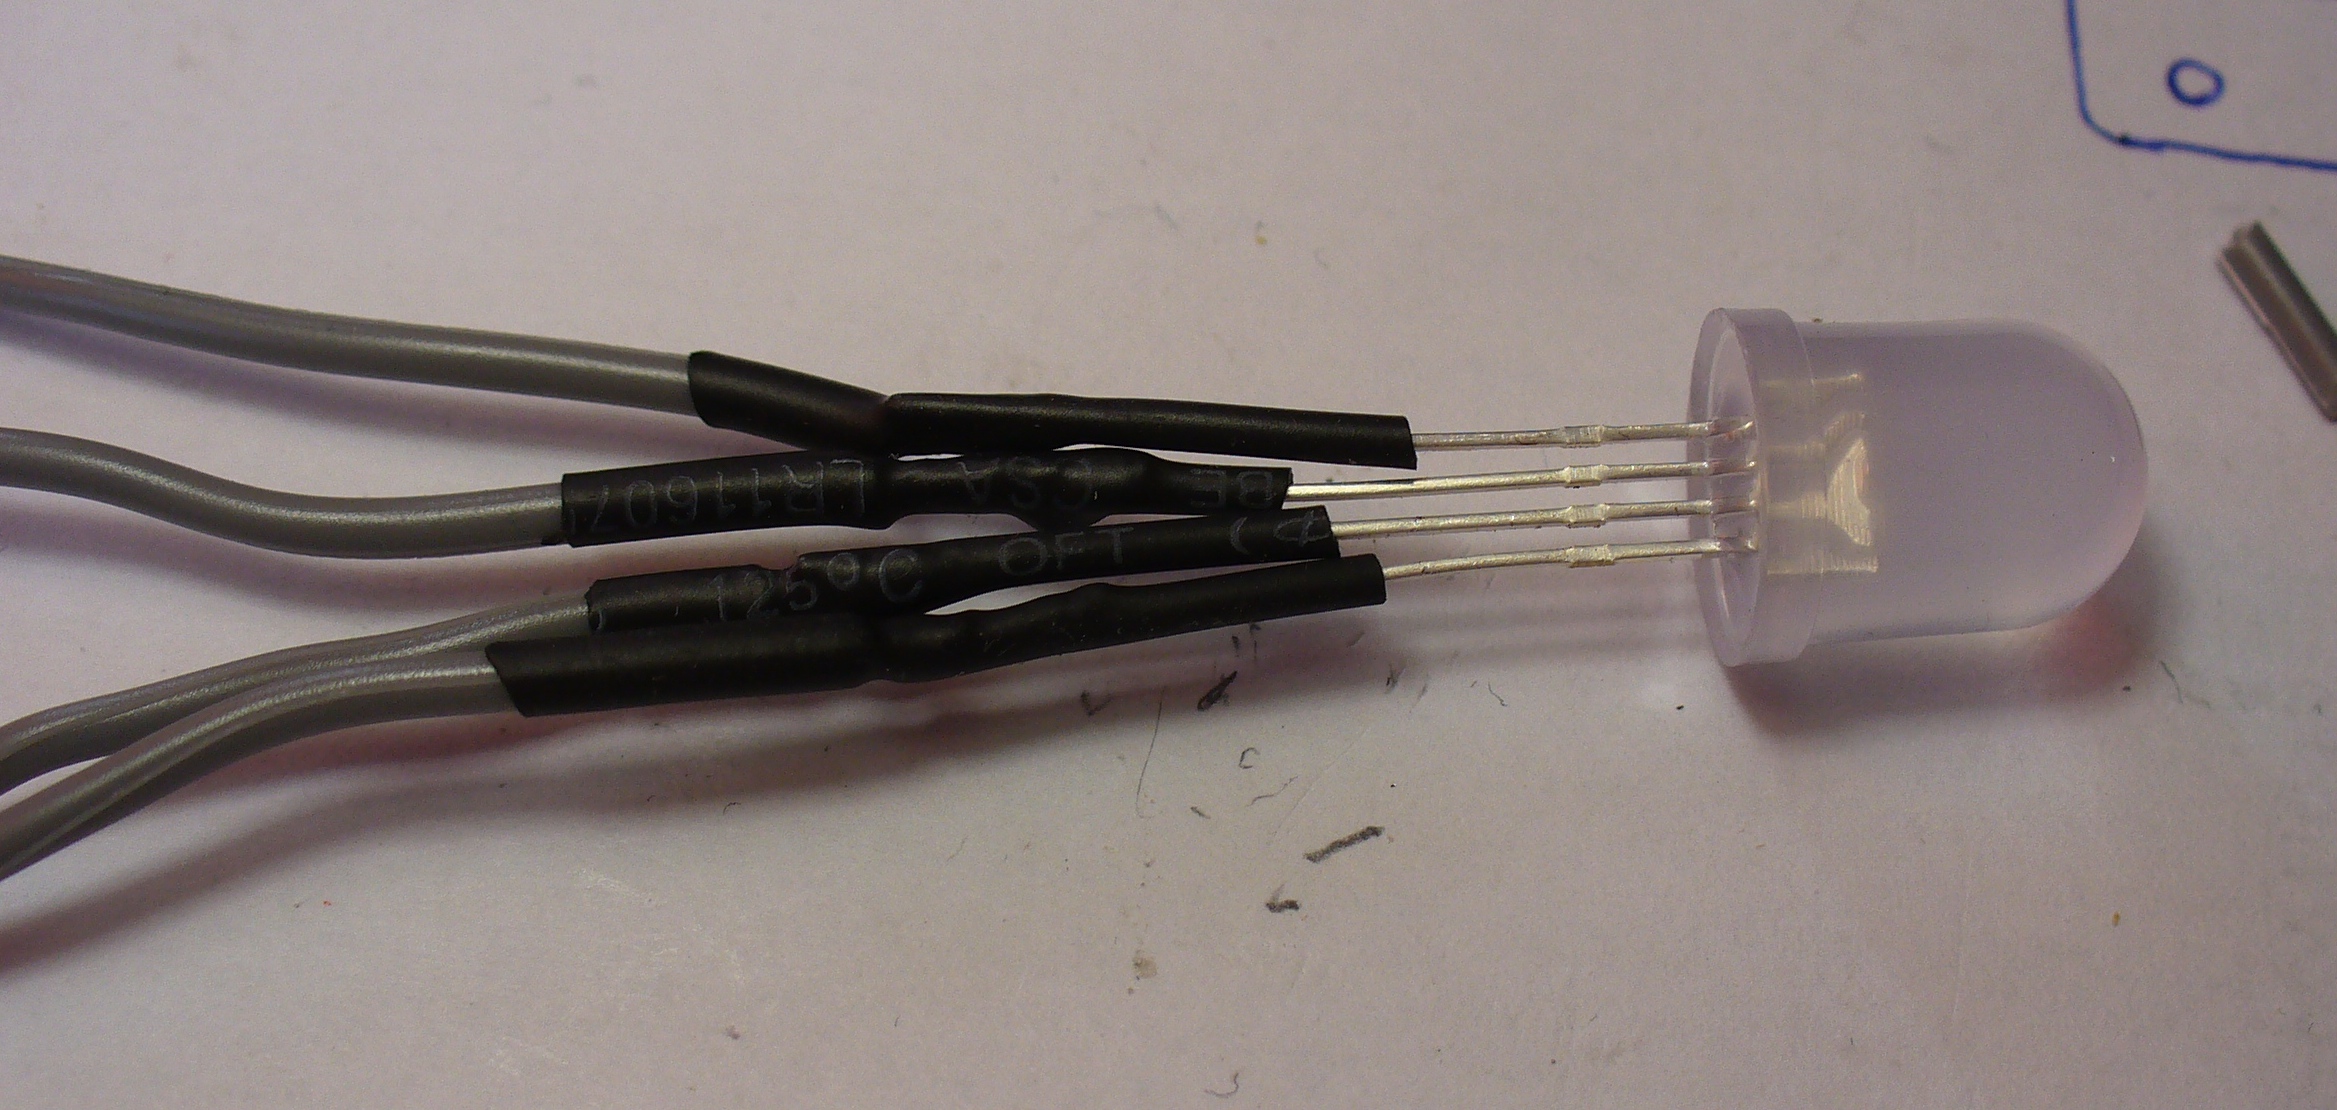
The LED is soldered to some short leads to give it a bit of play, and some heatshrink over the legs to keep them isolated:
And finally, to add a DC socket to feed blinky some power:
The last thing was to check the soldering once more under natural light, to check for bridges or shorts, then have a cup of tea. Upon my return I drilled out a hole in the enclosure lid for the LED, and one one the side for the DC socket, and fitted the lot together… and success! It worked.
I hope you enjoyed making this or at least reading about it. If you find this sort of thing interesting, please consider ordering one or both of my books from No Starch Press, or other book sellers:
[Hal Rodriguez] and [Sahrye Cohen] of Amped Atelier focus on creating interactive wearable garments with some fairly high standards. Every garment must be pretty, and has to either be controllable by the wearer, through a set of sensors, or even by the audience via Bluetooth. Among their past creations are a dress with color sensors and 3D-printed scales on the front that change color, and a flowing pantsuit designed for a dancer using an accelerometer to make light patterns based on her movements.
Conductive Melody — a wearable musical instrument that is the focus of [Sahrye] and [Hal]’s Remoticon 2021 talk — was created for a presentation at Beakerhead Festival, a multi-day STEAM-based gathering in Calgary. [Sahrye] and [Hal] truly joined forces for this one, because [Sahrye] is all about electronics and costuming, and [Hal] is into synths and electronic music. You can see the demo in the video after the break.
The dress’s form is inspired by classical instruments and the types of clothing that they in turn inspired, such as long, generous sleeves for harp players and pianists. So [Hal] and [Sahrye] dreamed up a dress with a single large playable sleeve that hangs down from the mid- and upper arm. The sleeve is covered with laser-cut conductive fabric curlicues that look like a baroque interpretation of harp strings. Play a note by touching one of these traces, and the lights on the front of the dress will move in sync with the music.
[Sahrye] started the dress portion of Conductive Melody with a sketch of the garment’s broad strokes, then painted a more final drawing with lots of detail. Then she made a muslin, which is kind of the breadboard version of a project in garment-making where thin cotton fabric is used to help visualize the end result. Once satisfied with the fit, [Sahrye] then made the final dress out of good fabric. And we mean really good fabric — silk, in this case. Because as [Sahrye] says, if you’re going to make a one-off, why not make as nicely as possible? We can totally get behind that.
[Sahrye] says she is always thinking about how a wearable will be worn, and how it will be washed or otherwise cared for. That sequined and semi-sheer section of the bodice hides the LEDs and their wiring quite well, while still being comfortable for the wearer.
Inside the sleeve is an MPRP121 capacitive touch sensor and an Arduino that controls the LEDs and sends the signals to a Raspberry Pi hidden among the ruffles in the back of the dress.
The Pi is running Piano Genie, which can turn eight inputs into an 88-key piano in real time. When no one is playing the sleeve, the lights have a standby mode of mellow yellows and whites that fade in and out slowly compared to the more upbeat rainbow of musical mode.
We love to see wearable projects — especially such fancy creations! — but we know how finicky they can be. Among the lessons learned by [Sahrye] and [Hal]: don’t make your conductive fabric traces too thin, and silver conductive materials may tarnish irreparably. We just hope they didn’t have to waste too much conductive fabric or that nice blue silk to find this out.
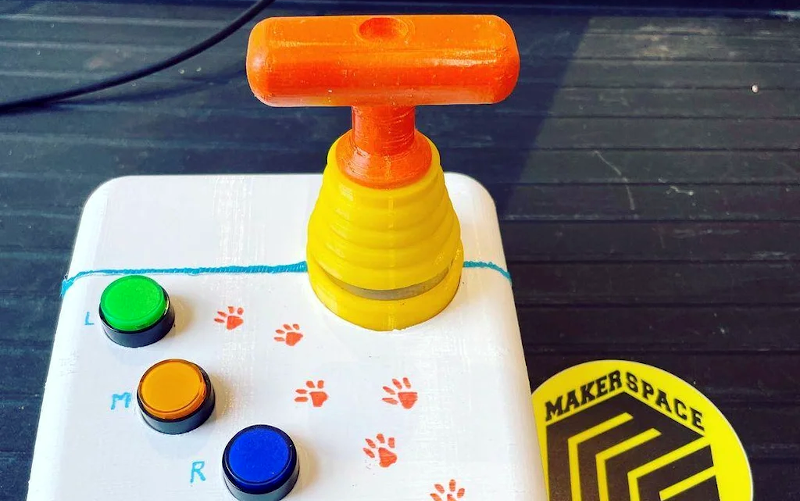
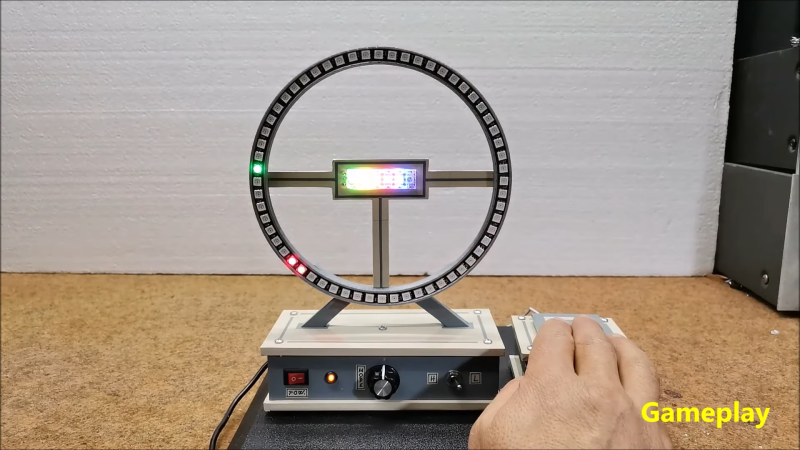
The classic arcade game Cyclone has attracted many players, along with their coins, thanks to its simple yet addictive gameplay. In its most basic form it consists of a light racing around a circular track, which the player then has to stop at exactly the right place. Arduino enthusiast [mircemk] made a home version of this game, which allows addicts to keep playing forever without running out of quarters.
Instead of an arcade cabinet, this smaller version has an upright 3D-printed ring that holds 60 WS2812 LEDs. A further six in the center of the ring act as a score counter. An Arduino in the base drives the LEDs and runs the game, which is based on an earlier iteration built by [oKeeg]. An interesting addition is a large homemade “arcade button”, which is large and sturdy enough to withstand any abuse inflicted on it by a frustrated player.
Retro-style sound effects and flashing light sequences give the game a bit of an arcade vibe, even without a big cabinet and piles of coins. Simple LED games like this are always great eye-catchers in any home or office; if you like this one, be sure to check out other LED games like the handheld LEDBOY, the one-dimensional dungeon crawler TWANG, and this LED racing game.
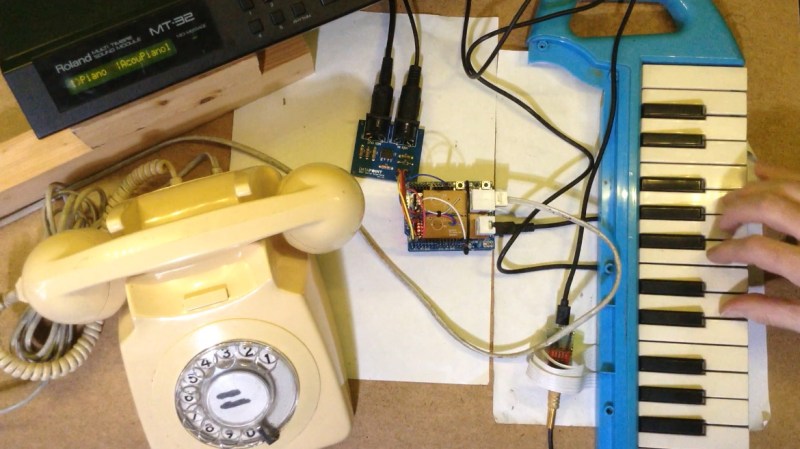
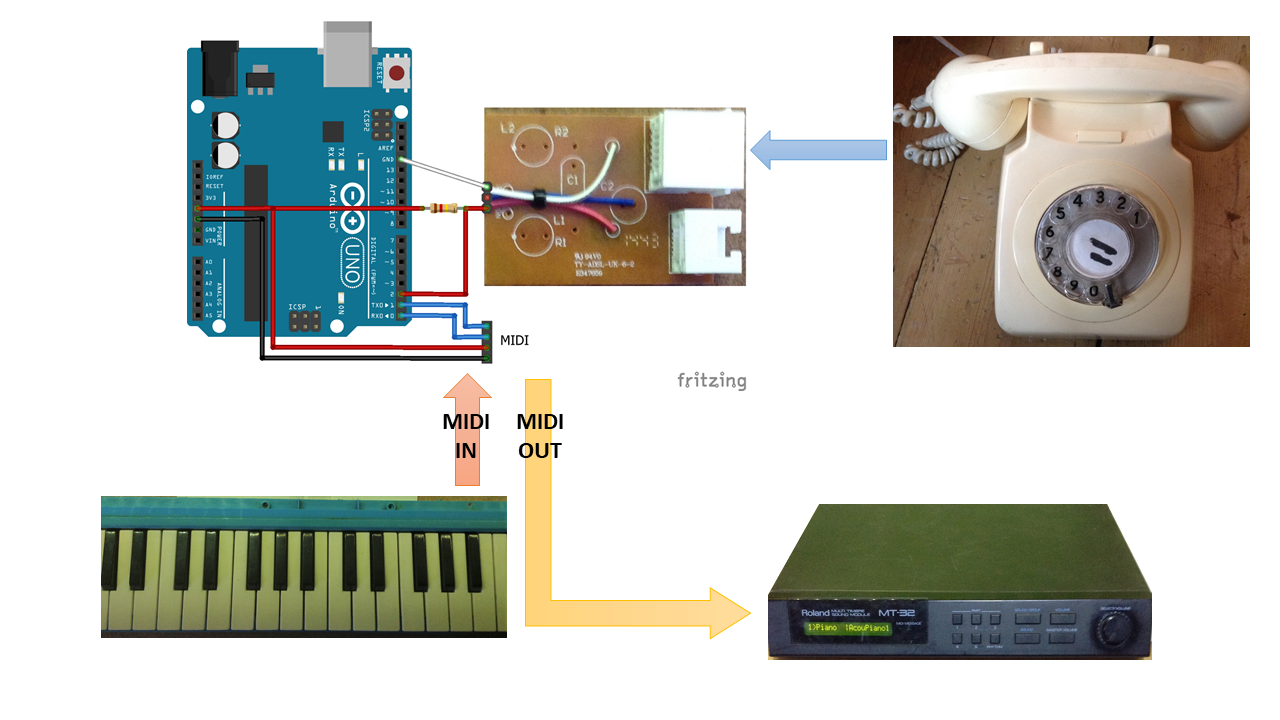
[Kevin] has long wanted to do something musical with a vintage rotary phone and an Arduino, and has finally done so and committed the first of several experiments to HTML in a five-part series. He found a nice old British Telecom number, but it had been converted to plug and socket wiring to work on the modern system. Because of this, [Kevin] wanted to keep it completely functional as a phone. After all, it ought to work fine until 2025, when pulse dialing will no longer be supported in [Kevin]’s locality.
As you can likely understand, [Kevin] was keen to interface with the phone from the outside and leave the inside untouched. He used a sacrificial ADSL filter’s PCB to break out the socket, and added a pull-up resistor between the pin and 5 V.
Pretty quickly, [Kevin] figured out that when the phone is on the hook, it gives a constant high signal, where as the picking up the phone presents as a high signal going low, and dialing each number results in pulses of that quantity that alternate between high and low.
In part two of the series, [Kevin] really gets into decoding the pulse dialing, which is necessary for the third installment when things get musical. Here, [Kevin] adds in a MIDI module and a Roland MT-32 synth to use the dial as a MIDI note generator — each note dialed will sustain until the receiver is replaced on the hook.
Part four focuses on a MIDI patch changer. [Kevin] picks up the phone, dials a code up to three digits long, and hangs up, which this triggers the synth to change to the assigned voice. In part five, the phone becomes a random note sequencer, and each successive spin of the same digit will produce a different, randomly-chosen note. This is really just the beginning, however, so we’ll be checking back for updates. In the meantime, you can listen to the note generator and the random note sequencer demos after the break.
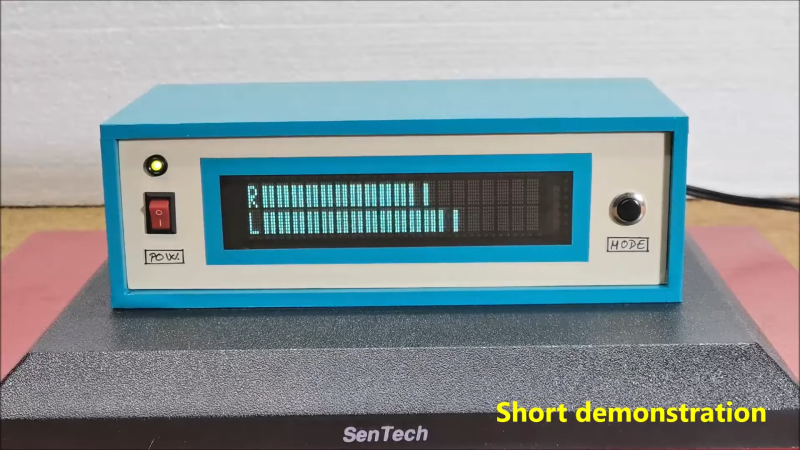
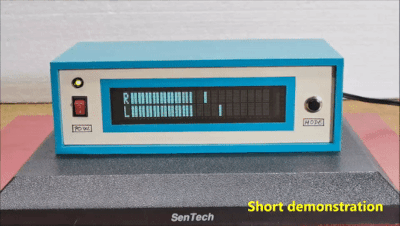
Humans love visualising music, whether it’s in the form of an inscrutable equation drawing squiggles in Winamp, or a simple VU meter pulsing with the beat. This build from [mircemk] is of the latter variety, repurposing a VFD display to do the job.
The project is built around a VFM202MDA vacuum fluorescent display, which provides that lovely green-blue glow we all know and love, driven by a PT6314 driver chip. This has the benefit that it can be readily driven by a microcontroller in much the same way as the familiar HD44780 character LCD driver chip. With some minor tweaks, the character set can be modified to allow the display to become a surprisingly-responsive VU meter.
An Arduino Nano runs the show, with an envelope follower circuit feeding a signal for the left and right channels into the analog inputs of the microcontroller. The Arduino then measures the voltage on those inputs and feeds the necessary commands to the PT6314 driver to update the display.
The resulting VU meter has 38 bars per channel, and is highly responsive. The fast flickering of the meter bars in response to the music make it compelling to watch, and the era-appropriate enclosure the project is built in adds plenty to the aesthetic.
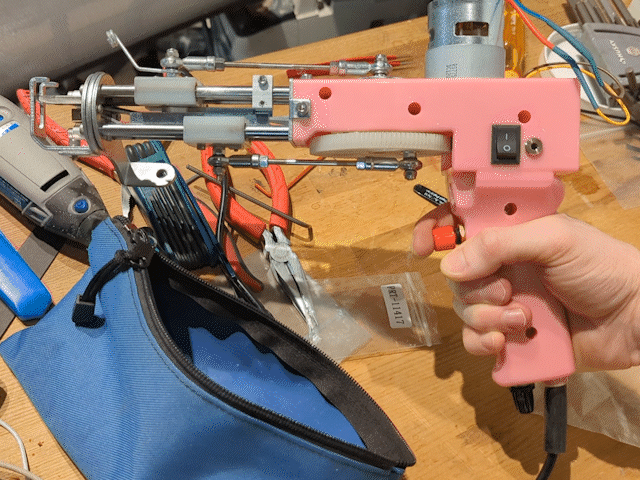
Often used to make rugs, tufting is a process wherein a hollow needle is used to cram thread or yarn into fabric in some kind of pattern. This can be done by hand, with a gun, or with big machines. Some machines are set up to punch the same pattern quickly over and over again, and these are difficult to retool for a new pattern. Others are made to poke arbitrary patterns and change easily, but these machines move more slowly.
This robotic tufting system by [Owen Trueblood] is of the slow and arbitrary type. It will consist of a modified tufting gun strapped to a robot arm for CNC textile art. Tufting guns are manufactured with simple controls — a power switch, a knob to set the speed, and a trigger button to do the tufting. Once it’s affixed to the robot arm, [Owen] wants to remote control the thing.
The gun’s motor driver is nothing fancy, just a 555 using PWM to control a half H-bridge based on input from the speed control potentiometer. [Owen] replaced the motor controller with an Arduino and added an I/O port. The latter is a 3.5 mm stereo audio jack wired to GND and two of the Arduino’s pins. One is a digital input to power the gun, and the other is used as an analog speed controller based on input voltage. [Owen] is just getting started, and we’re excited to keep tabs on this project as the gun goes robotic.
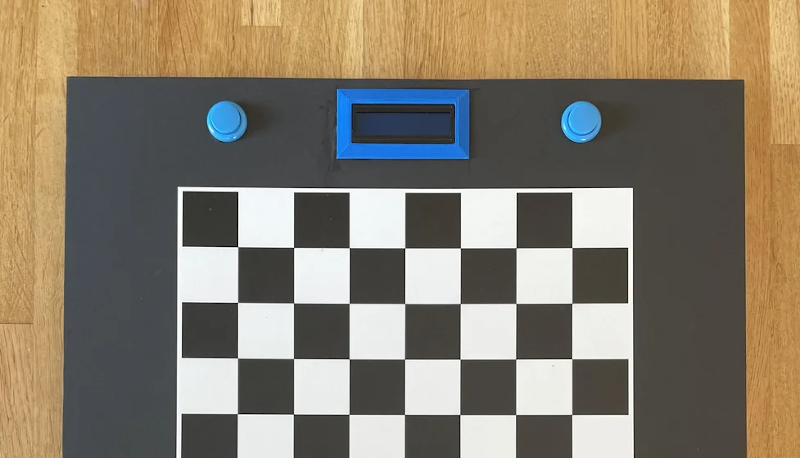
If you’ve ever played chess or even checkers, you’ve probably thought about making a board that lets a computer play you without having to enter your moves and look at the board on a screen. [Greg06] not only thought about it, but he built it.
The board looks great and uses foamboard which makes it easy to reproduce. Each piece has a small magnet within and an electromagnet on an XY motion system can selectively pick up and move pieces. In addition, a reed switch under each square can tell if a square is occupied or not.
This system is pretty simple, but it is effective. After all, you know the position of the pieces at the start. So if a bishop leaves a square and a new square gets a piece, you can assume it is the bishop. There is no need to actually distinguish the pieces.
An LCD and some buttons act as a chess clock, and note if a move is illegal. The Arduino has a pretty basic chess algorithm known as Micro Max that runs on the Arduino, but we wondered if you couldn’t connect to a remote computer to get more sophisticated gameplay or even interface to the Internet to play remote humans, something we’ve seen before. You could even adapt it for other input methods.
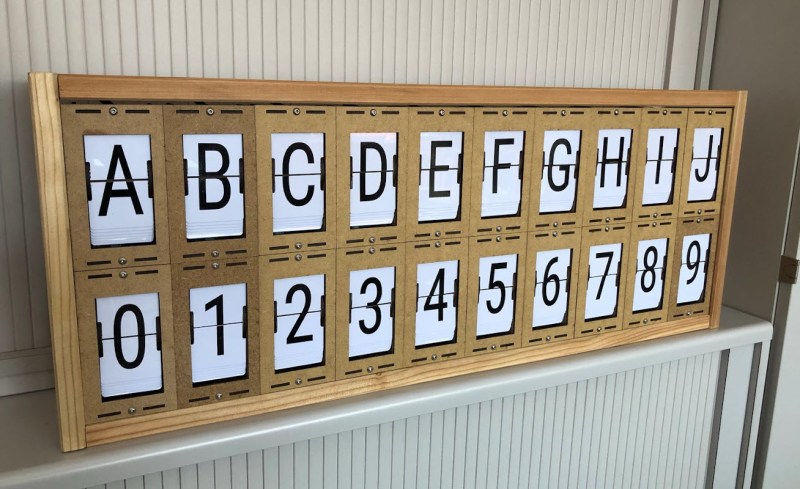
LED and LCD displays are a technological marvel. They’ve brought the price of televisions and monitors down to unheard-of levels since the days of CRTs, but this upside arguably comes with an aesthetic cost. When everything is covered in bland computer screens, the world tends to look a lot more monotonous. Not so several decades ago when there were many sharply contrasting ways of displaying information. One example of this different time comes to us by way of this split-flap display that [Erich] has been recreating.
Split-flap displays work by printing letters or numbers on a series of flaps that are attached to a spindle with a stepper motor. Each step of the motor turns the display by one character. They can be noisy and do require a large amount of maintenance compared to modern displays, but have some advantages as well. [Erich]’s version is built out of new acrylic and MDF, and uses an Arduino as the control board. A 3D printer and CNC machine keep the tolerances tight enough for the display to work smoothly and also enable him to expand the display as needed since each character display is fairly modular.
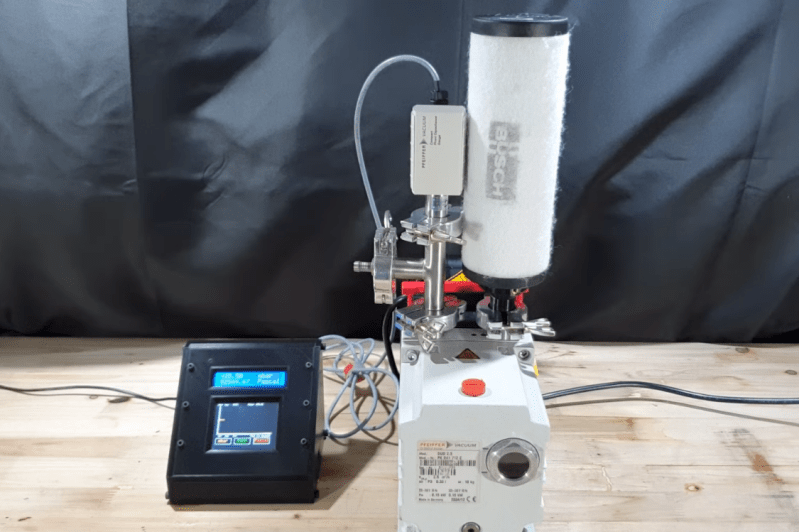
Necessity might be the mother of all invention, but we often find that inventions around here are just as often driven by expensive off-the-shelf parts and a lack of willingness to spend top dollar for them. More often than not, we find people building their own tools or parts as if these high prices are a challenge instead of simply shrugging and ordering them from a supplier. The latest in those accepting the challenge of building their own parts is [Advanced Tinkering] who needed a specialty pressure gauge for a vacuum chamber.
In this specific case, the sensor itself is not too highly priced but the controller for it was the deal-breaker, so with a trusty Arduino in hand a custom gauge was fashioned once the sensor was acquired. This one uses an external analog-to-digital converter to interface with the sensor with 16-bit resolution, along with some circuitry to bring the ~8 V output of the sensor down to the 5 V required by the microcontroller. [Advanced Tinkering] wanted a custom live readout as well, so a 3D printed enclosure was built that includes both an LCD readout of the pressure and a screen with a graph of the pressure over time.


 The project is built around a VFM202MDA vacuum fluorescent display, which provides that lovely green-blue glow we all know and love, driven by a PT6314 driver chip. This has the benefit that it can be readily driven by a microcontroller in much the same way as the familiar HD44780 character LCD driver chip. With some minor tweaks, the character set can be modified to allow the display to become a surprisingly-responsive VU meter.