Posts with «arduino uno» label

Temperature controlled dc fan

In this post, we will control the speed of dc fan based on the temperature.

List of components:

1. Arduino Uno
2. LM 35 temperature sensor
3. LCD 16*2
4. 10k potentiometer
5. ULN 2003
6. DC motor
7. Breadboard/ perfboard

First of all, we will monitor the temperature by using lm35 i.e. temperature sensor. It's scale factor is +10mV/°C which means with increment in temperature by 1° Celsius, the voltage is rise by 10 mV.
We can read adc count by analogRead(A0); // we are using channel A0

This will give us a digital count of adc which varies from 0 to 1023, we have to convert these count into voltage and then into temperature. First of all, we will convert into voltage:
In arduino uno, adc is of 10-bit.
Resolution = Vref/(2^n-1), where n is bit (in our case it's 10)
Resolution = 5000 / 1023, ( Verf = 5000 mV and 2^10 is 1024 minus 1 is 1023)

Resolution = 4.887 mV
Now, we have to convert voltage into temperature:
Temperature (in °C) = Voltage (in mV) / 10.0
With this temperature monitoring is over.

LCD interfacing is simple since we have library for the same with proper documentation.

Now coming to pwm part. In arduino, we can control output voltage by pulse width modulation (pwm).
Duty Cycle = Ton / (Ton + Toff)
Duty Cycle = Ton / T

Duty Cycle (in %age) = (Ton / T)*100

In arduino, for pwm we have analogWrite function :

In arduino uno, we have six pwm channels viz, pin no. 3, 5, 6, 9, 10 and 11.

analogWrite(pin no, value)

Pin no may be 3, 5, 6, 9, 10 and 11
Value varies from 0 to 255 since pwm resolution is of 8-bit (2^8-1)

0 for 0% duty cycle                  0 volts
64 for 25% duty cycle              1.25 volts            if(val<=40.0)
127 for 50% duty cycle            2.50 volts            if(val>40.0 && val<=50.0)
192 for 75% duty cycle            3.75 volts            if(val>50.0 && val<=60.0)
255 for 100% duty cycle          5.00 volts            if(val>60.0)

where val is temperature in °C

Vavg = Duty Cycle  * 5.0 volts
 
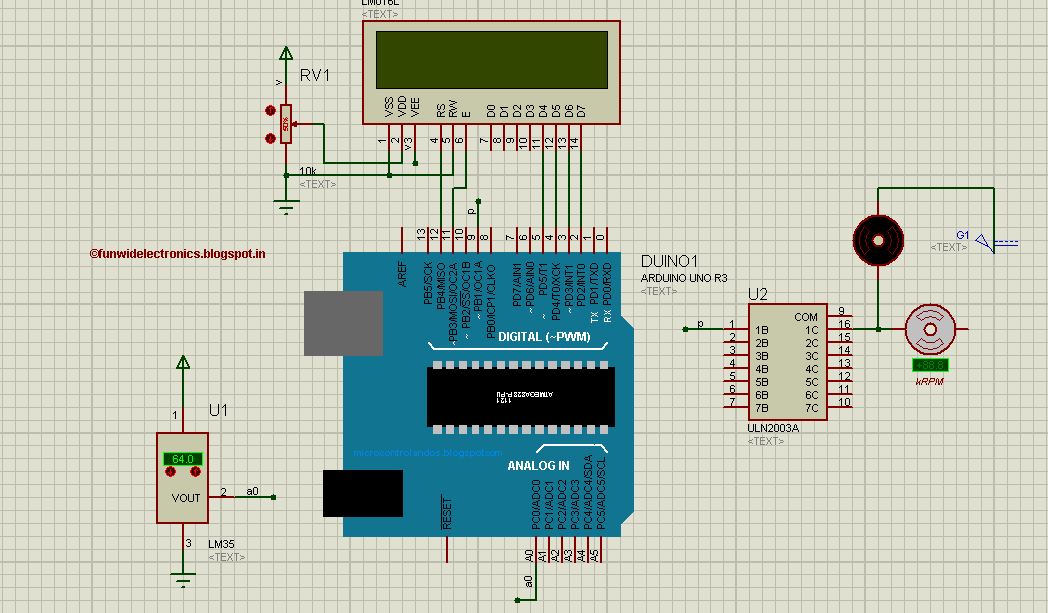
Schematic of temperature controlled fan
Download the source code from the link below:


Stay tuned for more updates !!


Hacked IKEA table “dances” to your favorite music

Your coffee table can have many uses — it rests your drinks (with coasters, of course), stores miscellaneous items, adds some style to your living room, and even serves as the center of a conversation area. Up until now, though, one thing it hasn’t been was a music visualizer. But thanks to this guide from Make: Magazine, you’ll soon be able to start a dance party on demand using your $10 jumbo-sized IKEA side table.

Aside from the inexpensive piece of furniture, the project calls for an LED matrix, tons of lights, a mic, some small electronic components, and an Arduino Uno for its brain. This allows its display to react and “dance” to the tunes coming from your speakers. Since it employs a minimal amount of current, the good news is that you’ll be able to run it off an iPhone charger or any other USB port that’s nearby.

It’s based on the Tiny Music Visualizer project from Adafruit, using their I2C multiplexer board for a tiny 8×8 bicolor LED matrix. The Arduino code is from there, the circuit is from there — all I really created was a big handmade LED matrix, and put it into an IKEA table!

Plug its USB cable into a phone charger or any USB port, then crank up the tunes and enjoy watching the giant tricolor pixels dance like splashing fountains of spectrum analyzer goodness!

If you’re looking for an accessory that’ll be the light of your next shindig, head over to Make:’s full tutorial here. 

Simone Giertz built a hair washing robot

From getting out of bed to applying lipstick to eating breakfast, Simone Giertz has seemingly found every possible way to automate her morning routine. Next on that list? A hair-washing robot made up of a rubber hand, a bottle of shampoo and some basic electronics that allows her to lather, rinse and repeat, while leaving her hands free for other tasks like brushing her teeth.

Giertz’s latest project features a pair of Hitec servo motors, Actobotics from Servocity, an Arduino Uno and a 6V battery pack. Although you’d probably never use this thing in an actual real shower, a shampoo robot is still pretty darn hilarious. See it in action below!

I built a hair washing robot. pic.twitter.com/TSEAugnlfJ

— Simone Giertz (@SimoneGiertz) May 6, 2016

Brew some iced coffee with an Arduino-controlled drip tower

Like the majority of us, John Edgar Park loves himself a nice cup of fresh-brewed iced coffee to get him through a warm summer day. Conventional hot-brewed coffee methods simply can’t compare; when chilled and served on ice they tend to taste diluted and acidic. Of course, you could always go buy a large cold-brew tower, but unless you’re willing to dig deep into your wallet, they’re usually only accessible to coffee shops. So, like any Maker would, he decided to build his own high-precision, automated tower from scratch using an Arduino-driven solenoid valve for exact drip rate.

For those unfamiliar with cold-brew coffee towers, these systems are comprised of three parts: a water receptacle at the top with a drip control valve, a chamber for grounds in the middle where the brewing takes place, and a carafe to receive the brewed coffee at the bottom. Park elaborates upon his project on MAKE: Magazine:

After much hunting I found the ideal components: a water serving pitcher for the top receptacle, a siphon brewing upper beaker as the grounds chamber, and a flat-bottomed boiling flask as the receiving vessel. For a bit of spiraling glass laboratory aesthetic I added a Graham condenser to the mix, purely for looks.

Since this behemoth would stand 4? tall and need quite a bit of support to hold the components, I decided to mount the tower on the wall using laser cut acrylic holders connected to angle brackets. If you don’t have access to a laser cutter, you can print the linked files and use them as a guide for cutting with a bandsaw or scroll saw.

For ultimate control over the water drip rate, I chose a food-safe solenoid valve and I built an Arduino-based controller for it. The controller consists of a transistor circuit mounted on a prototyping shield, two 1000-ohm potentiometers, and a bit of Arduino code running on an Arduino Uno. This allows you to use the two knobs to adjust the frequency of the valve opening and closing, and the length of time it remains open per drip. Since the volume of water the solenoid valve allows through is much more than we want per drip for a long, overnight brew, I needed to reduce the size of the drip tube inner diameter. I attempted this with various tubes, straws, and fairly janky contraptions, until I eventually succeeded when I “borrowed” the miniature drip valve from my small commercial brewer. A Hario valve (available from coffee parts suppliers online) press-fits very nicely inside ¼” tubing — you can use any food-safe stopcock valve that fits.

Build a Behemoth Cold Brew Coffee Drip Tower

You can buy large cold-brew towers, but they’re very expensive, aimed at coffee shops. Instead you can make your own automated tower that uses arduino.

Read more on MAKE

The post Build a Behemoth Cold Brew Coffee Drip Tower appeared first on Make: DIY Projects and Ideas for Makers.

Interfacing SIM900 with arduino uno

In this post, we will learn how to interface SIM900 with arduino uno.

First of all, insert sim in sim socket of GSM module. Power it up by 12V 2A dc adapter.

Now, we have to make connections as follows:

Arduino Side                       GSM module
Tx                =====>          Rx
Rx                =====>          Tx
GND            =====>          GND

The source code is given below:

    boolean bOK = HIGH;

    void setup()
    {
    Serial.begin(4800);
    delay(1200);
    }
    void loop()
    {
 
    if(bOK==1)
    {
    Serial.println("AT+CMGF=1"); // sets the SMS mode to text
    delay(1500);
    Serial.print("AT+CMGS=\""); // send the SMS number
    Serial.print("+9199XXXXXXXX"); // +91 for india
    Serial.println("\"");
    delay(1000);
    Serial.print("Hello World "); // SMS body
    delay(500);

    Serial.write(0x1A);
    Serial.write(0x0D);
    Serial.write(0x0A);
    bOK=LOW;
    }
    }

The source code is self-explanatory.

Thanks for visiting this blog.

Stay tuned for more projects !!

FunWithElectronics 02 May 20:44
arduino uno  sim 900  sms  

Shoot Super Detailed Macro Photographs with an RTI Camera Rig

Using many light sources, reflectance transformation imaging (RTI) is a method for photographing that allows you to get 3D map of surfaces.

Read more on MAKE

The post Shoot Super Detailed Macro Photographs with an RTI Camera Rig appeared first on Make: DIY Projects and Ideas for Makers.

Simulating arduino uno in proteus

By default, proteus don't have any library for arduino.

First of all, install library for proteus using the previous post Arduino library

Now, one problem arises how to get hex file of our program.

It lies in the following directory:
C:\Users\ \AppData\Local\Temp

You can make a shortcut of temp folder on your desktop to easily access it. By default, temp folder is hidden you have to unhide it.

This picture will make it simple

File directory
In proteus, double click on arduino uno. It will pop-up a window named edit component on program file click on browse icon to browse your hex file.
Browsing hex file
Always double the time and date of your hex file to ensure that are using correct file.

Thanks for giving your valuable time.

Stay tuned for more updates !!


Cartesio – low cost cartesian plotter robot

Primary image

What does it do?

Plotter robot arm

Recently the famous site evilmadscientist introduced the new art robot called Axidraw.I saw the robot in action and it is very similar to the robot I built in the 2015, called Cartesio, a 3d printed cartesian robot.

Cost to build

$60, 00

Embedded video

Finished project

Complete

Number

Time to build

Type

URL to more information

Weight

read more

Strap a Robot to Your Face! Your Expressions Are Now Controlled by Technology

Turn an old headlamp into a power assist for your eyebrows. Use an infrared remote control to raise, lower, waggle, and adjust.

Read more on MAKE

The post Strap a Robot to Your Face! Your Expressions Are Now Controlled by Technology appeared first on Make: DIY Projects and Ideas for Makers.