Posts with «arduino uno» label

Hear the sound of 300 stars

Stellar is an interactive installation by sound artist Francesco Fabris, which aims to create a sonic representation of stars and constellations through a dedicated interface.

The project has been developed using two Arduino Uno, LeapMotion and Max7 software managing data of more than 300 stars and 44 constellations, stored from the open-source software Stellarium, and coded to interact with the robotic arms.

One Arduino Uno board controls four servo motors and a second one controls the led stripes. The motors are controlled with two LeapMotion but since LeapMotion doesn’t support two devices on one computer, he used two miniMac  connected through an Ethernet network.

Since there’s no sound in space, Francesco wanted  to conceptualize a link between electromagnetic and sound waves  to create a minimalistic, interactive device which would allow visitors to learn about specific stars through sound information:

The base of the system is a cylindrical structure, on top of which are displayed the most important constellations of the northern sky. Above this representation are two robotic arms. When the tip of one of the arms aligns with a star, information on the selected star is transformed into simple sine waves, changing the colour the star emanates.

Two players can use the system at the same time, by moving their right hands over the two black, circular sensors. This allows them to move the robotic arm both horizontally and vertically.
The data analyzed for each star are: temperature (color index: red star = old and cold, blue star = hot and young), brightness (as seen from Earth), distance (from Earth) respectively transformed into: frequency (Hz), amplitude (dB), duration (ms).
The colder the star, the lower the pitch; the brighter it appears to us from Earth, the louder the sound; the further from Earth, the longer the duration.
For example, a bright, red star four thousands light years from the Earth would generate a low frequency, loud and long sound. A blue star which is closer to the Earth would generate a high frequency, weaker and shorter sound.

The background drone-sound is white noise (which is a combination of all frequencies, the opposite of space-silence). When a constellation is triggered, the number representing its area (squared degrees), becomes the cutoff frequency of a low-pass filter for the noise signal. In this way, larger constellations will gradually increase their frequency.

Don’t miss the “Making of” video:

Stellar has been produced with the support of the DE.MO./MOVIN’UP I Session 2015 project, and promoted by the Ministry of Cultural Heritage & Activities & Tourism, General Directorate for Contemporary Art, Architecture and Urban Suburbs and GAI – Association for the Circuit of the Young Italian Artists.

Testing riders’ clothing with Arduino

Worse for Wear is a clothing company  for women who ride motorcycles. The fascinating clothing they produce is very fashionable, comfortable, and needs to protect riders from impact and abrasion if they have an accident. Jackets and trousers have knee and hip pads  included to protect the rider when sliding many meters across asphalt. That’s why the fabric must be strong and abrasion resistant because if the fabric wears away too quickly, the rider’s skin will be exposed and injured.

To choose the perfect fabric, Scott and Laura, co-founders of the company, created an Impact Abrasion Resistance Testing Machine running on Arduino Uno to perform tests on different materials like knit fabrics, woven fabrics, and leather, to see how long it takes before the material is sanded completely through. I interviewed them to learn more about it!

- What is the impact abrasion resistance testing machine and how does it work?

When selecting fabric to use in our clothes, we have to make sure that it is strong and abrasion resistant. We use the impact abrasion resistance test machine to determine which fabrics will withstand abrasion (scraping and sliding) the best. It is important to us to test the fabrics ourselves and not rely solely on the claims of fabric manufacturers.

The machine has a weighted arm, like a hammer, suspended above an abrasive belt sander. A sample of the fabric that we want to test is wrapped around the head of the hammer and then dropped onto the moving sanding belt. An Arduino Uno is used to record the amount of time it takes to sand through the fabric sample.

Check the video below to see how it works:

- Why did you decide to use Arduino?

We have used Lilypad Arduino and Arduino Uno before to prototype some e-textile projects, so it was easy for us to get started on this one with our previous experience. The large number of accessory boards available made it simple to add an informational display and user interface to the machine. In just a few hours, we were able to very quickly create a machine to compare the abrasion resistance of a variety of fabric samples. The simplicity of working with Arduino was a very good choice for us, because our real business is creating clothing, not building test machines!

- What does Arduino control in the machine? 

An Arduino Uno is used to record the amount of time it takes to sand through the fabric sample. The method we use is based on European Union standards for motorcycle safety gear testing. To measure the fabric’s abrasion time, we use two thin copper wires (magnet wire). One wire is placed inside and another outside of the fabric sample before everything is wrapped around the head of the hammer. Each wire is then connected to ground on one end and an to input pin on the Arduino on the other end. The pins are in INPUT_PULLUP mode so a current runs through them. The LCD display on the Arduino tells us when both wires are connected properly.

Then, we start the belt sander and drop the hammer onto the spinning sanding belt. The outer wire breaks very quickly, breaking the connection to that pin [ digitalRead(outerWireIn) == HIGH ]. At this point, the Arduino records the start time. When the fabric wears through – usually within a couple of seconds – the inner wire is exposed to the sanding belt and quickly breaks. That marks the end time, which the Arduino records and displays on the LCD shield. A single type of fabric must be tested at least five times in order to make sure our recorded times are accurate.

Explore the details and download the code on Worse for Wear blog.

Monitor your Bonsai with the help of Arduino Uno

Bonsai trees are not like other plants. There’s no single watering schedule that can be applied to a bonsai and the best way to tell if the bonsai needs water is to touch the soil. Experienced growers know when a tree needs to be watered by observing the foliage or just by the weight of the pot. If you are not used to taking care of this type of tree, Bonsai Watchdog could be the perfect project for you. It runs on Arduino and Genuino Uno and makes it really easy to monitor the moisture level in the soil.

Thomas Baum, created it and shared it some days ago on the Arduino Community on G+ :

Two pencil leads, an Arduino and a 12864 (ST7565) LCD watches out my little bonsai. The filling level shows how often the sapling need to be watered.
source and discription (in german) you can find here:
http://tiny.systems/categorie/lcdProjekt/BonsaiWatchdog.html


The real open source Theremin on Arduino

Open.Theremin is an open source hardware and software project by Urs Gaudenz of  Gaudi Lab with the aim of building the next digital generation of the legendary music instrument developed in the ’20s by the Russian inventor professor Leon Theremin. The project is documented under a open license and uses Open.Theremin.UNO, an Arduino  or Genuino Uno shield featuring a digital mixer, combined 12 bit audio and CV out, audio jack on the bottom for more compact design, two completely separate antenna circuits:

The theremin is played with two antennas, one to control the pitch and one for volume. The electronic shield with two ports to connect those antennas comprises two heterodyne oscillators to measure the distance of the hand to the antenna when playing the instrument. The resulting signal is fed into the arduino. After linearization and filtering the arduino generates the instruments sound that is then played through a high quality digital analog audio converter on the board. The characteristics of the sound can be determined by a wave table on the arduino.

Most theremins on the market are either expensive or then not really playable. That’s how I decided to design a playable, open and affordable theremin. The first version was modular and difficult to program. Then I decided to redesign it as a shield to fit on the Arduino.UNO. This was a big success and many people could start using it, change the sounds and adapt it to their own application. The whole design is open source and documented on the website. I produced a small batch of the shield that can be bought through the small batch store on the website.

Watch the video below with Coralie Ehinger, a Swiss theremin player and organizer of the first Swiss theremin festival N / O / D / E, playing the instrument:

Arduino Blog 11 Jan 18:43

LED strips installation beyond Xmas

The installation of Dmitry Morozov (:: vtol: :)”Wave is my nature” exhibited at the Mars center in Moscow is focused on the concept of Wave as the basis of all audiovisual art:

The project draws from the theory of Wave–particle duality which considers the light to be a particle and a wave at the same time. In this case, the notion of the “wave” is uniform for the sound wave, light wave and a “tangible” kinetic wave with wide amplitude, physically presented in the space as stretched cables moved by a system of motors. The piece also refers to the topic of physical modeling of the wave processes which take place in various media and materials: “string”, “data flow”, “visualisation of sound”, “sonification of light” etc. In general, the installation can be viewed as a kinetic spacial light installation which reacts to the presence of audience and creates an autonomous sound and light composition.

The artist used led strips, servo motors, 2-channel sound system, ir motion sensors running on Arduino Mega and Arduino Uno:

Code Craft – Embedding C++: Templates

The language C++ is big. There is no doubting that. One reason C++ is big is to allow flexibility in the technique used to solve a problem. If you have a really small system you can stick to procedural code encapsulated by classes. A project with a number of similar but slightly different entities might be best addressed through inheritance and polymorphism.

A third technique is using generics, which are implemented in C++ using templates. Templates have some similarities with #define macros but they are a great deal safer. The compiler does not see the code inserted by a macro until after it has been inserted into the source. If the code is bad the error messages can be very confusing since all the developer sees is the macro name. A template is checked for basic syntax errors by the compiler when it is first seen, and again later when the code is instantiated. That first step eliminates a lot of confusion since error messages appear at the location of the problem.

Templates are also a lot more powerful. They actually are a Turing complete language. Entire non-trivial programs have been written using templates. All the resulting executable does is report the results with all the computation done by the compiler. Don’t worry, we aren’t going there in this article.

Template Basics

You can use templates to create both functions and classes. The way this is done is quite similar for both so let’s start with a template function example:

template<typename T, int EXP = 2>
T power(const T value, int exp = EXP) {
	T res { value };
	for (; exp > 1; --exp) {
		res *= value;
	}
	return res;
}

This is a template function for raising value by the integer exponent, exp. The keyword template is followed in angle brackets by parameters. A parameter is specified using either typename or class followed by a name, or by an integer data type followed by a name. You can also use a function or class as a template parameter but we won’t look at that usage.

The name of a parameter is used within the body of the class or function just as you would use any other type, or value. Here we use T as the type name for the input and return values of the function. The integer EXP is used to set a default value of 2 for the exponent, i.e. making power calculate the square.

When the compiler instantiates a template function or class, it creates code that is the same as a handwritten version. The data types and values are inserted as text substitutions. This creates a new version typed by the actual arguments to the parameters. Each different set of arguments creates a new function or type. For example, an instance of power() for integers is not the same as power() for floats. Similarly, as we’ll see in a moment, a class Triple for integers is not the same as one for float. Each are distinct types with separate code.

Since power() is a template function it will work directly for any numeric data type, integer or floating point. But what if you want to use it with a more complex type like the Triple class from the last article? Let’s see.

Using Templates

Here’s the declaration of Triple reduced to only what is needed for this article:

class Triple {
public:
	Triple(const int x, const int y, const int z);
	Triple& operator *=(const Triple& rhs);

	int x() const;
	int y() const;
	int z() const;

private:
	int mX { 0 };	// c++11 member initialization
	int mY { 0 };
	int mZ { 0 };
};

I switched the plus equal operator to the multiple equal operator since it is needed by the power() function.

Here is how the power() function is used for integer, float, and our Triple data types:

int p = power(2, 3);
float f = power(4.1, 2);

Triple t(2, 3, 4);
Triple res = power(t, 3);

The only requirement for using a user defined data type (UDT) like Triple with power() is the UDT must define an operator=*() member function.

Template Classes

Assume you’ve been using Triple in a project for awhile with integer values. Now a project requirement needs it for floating point values. The Triple class code is all debugged and working, and more complex than what we’ve seen here. It’s not a pleasant thought to create a new class for float. There are also hints that a long or double version might be needed.

With not much work Triple can be converted to a generic version as a template class. It’s actually fairly straightforward. Begin with the template declaration just as with the function power() and replace all the declarations of int with T. Also check member function arguments for passing parameters by value. They may need to be changed to references to more efficiently handle larger data types or UDTs. I changed the constructor parameters to references for this reason.

Here is Triple as a template class:

template<typename T>
class Triple {
public:
	Triple(const T& x, const T& y, const T& z);
	Triple& operator *=(const Triple& rhs);

	T x() const;
	T y() const;
	T z() const;

private:
	T mX { 0 };	// c++11 member initialization
	T mY { 0 };
	T mZ { 0 };
};

Not a lot of difference. Here’s how it could be used:

Triple<int> ires = power(Triple { 2, 3, 4 }, 3);
Triple fres = power(Triple(1.2F, 2.2, 3.3)); // calc square
Triple dres = power(Triple(1.2, 2.2, 3.3));// calc square
Triple lres = power(Triple(1, 2, 3.3), 2);

Unfortunately, the new flexibility comes at the cost of telling the template the data type to use for Triple. That is done by putting the data type inside brackets following the class name. If that is a hassle you can always use typedef or the new using to create an alias:

using TripleInt = Triple;
TripleInt ires = power(Triple { 2, 3, 4 }, 3);

Creating a template class like this saves debugging and maintenance costs overall. Once the code is working, it works for all related data types. If a bug is found and fixed, it’s fixed for all versions.

Template Timing and Code Size

The code generated by a template is exactly the same code as a handwritten version of the same function or class. All that changes between versions is the data type used in the instantiation. Since the code is the same as the handwritten version, the timing is going to be the same. Therefore there is no need to actually test timing. Phew!

Templates are Inline Code

Templates are inherently inline code. That means every time you use a template function or a template class member function the code is duplicated inline. Each instance with a different data type creates its own set of code, but that will be no more than if you’d written a class for each data type. There can be savings using template classes since member functions are not instantiated if they are not used. For example, if the Triple class getter functions – x(), y(), z() – are never used, their code is not instantiated. They would be for a regular class, although a smart linker might drop them from the executable.

Consider the following use of power() and Triple:

int i1 = power(2, 3);
int i2 = power(3, 3);
Triple t1 = power(Triple(1, 2, 3), 2);

This creates two inline integer versions of power even though both are instantiated for the same data type. Another instance is created for the Triple version. A single copy of the Triple class is created because the data type is always int.

Here we’re relying on implicit instantiation. That means we’re letting the compiler determine when and where the code is generated. There is also explicit instantiation that allows the developer to specify where the code is produced. This takes a little effort and knowledge of which data types are used for the templates.

Generally, implicit instantiation means inline function code with the possibility of duplication of code. Whether that matters depends on the function. When a function, not an inline function, is called there is overhead in invocation. The parameters to the function are pushed onto the stack along with the housekeeping information. When the function returns those operations are reversed. For a small function the invocation may take more code than the function’s body. In that case, inlining the function is most effective.

The power() function used here is interesting because the function’s code and the code to invoke it on an Uno are similar in size. Of course, both vary depending on the data type since large data types require more stack manipulation. On a Arduino Uno, calling power() with an int takes more code than the function. For float, the call is slightly larger. For Triple, the code to invoke is a good piece larger. On other processors the calling power() could be different. Keep in mind that power() is a really small function. Larger functions, especially member functions, are typically going to outweigh the cost to call them.

Specifying where the compiler generates the code is an explicit instantiation. This will force an out-of-line call with the associated overhead. In a source file you tell the compiler which specializations you need. For the test scenario we want them for int and Triple:

template int power(int, int);
template Triple<int> power(Triple<int>, int);

The compiler will create these in the source file. Then, as with any other function, you need to create an extern declaration. This tells the compiler to not instantiate them as inline. These declarations are just the same as above, only with extern added:

extern template int power(int, int);
extern template Triple power(Triple, int);

Scenario for Testing Code Size

It took me a bit to create a test scenario for demonstrating the code size differences between these two instantiations. The problem is the result from the power() function must be used later in the code or the compiler optimizes the call away. Adding code to use the function changes the overall code size in ways that are not relevant to the type of instantiation. That makes comparisons difficult to understand.

I finally settled on creating a class, Application, with data members initialized using the power() function. Adding data members of the same or different types causes minimal overall size changes so the total application code size closely reflects the changes only due to the type of instantiation.

Here is the declaration of Application:

struct Application {
public:
	Application(const int value, const int exp);

	static void loop() {
	}

	int i1;
	int i2;
	int i3;
	Triple t1;
	Triple t2;
	Triple t3;
};

and the implementation of the constructor:

Application::Application(int value, const int exp) :
		i1 { power(value++, exp) }, //
				i2 { power<int, 3="">(value++) }, // calcs cube
				i3 { power(value++, exp) }, //

				t1 { power(Triple(value++, 2, 3)) }, // calcs square
				t2 { power(Triple(value++, 4, 5), exp) }, //
				t3 { power(TripleInt(value++, 2, 3), exp) } //
{
}

The minimum application for an Arduino has just an empty setup and loop() functions which takes 450 bytes on a Uno. The loop() used for this test is a little more than minimum but it only creates an instance of Application and calls its loop() member function:

void loop() {
	rm::Application app(2, 3);
	rm::Application::loop();	// does nothing
}

Code Size Results

Here are the results for various combinations of implicit and explicit instantiation with different numbers of class member variables:

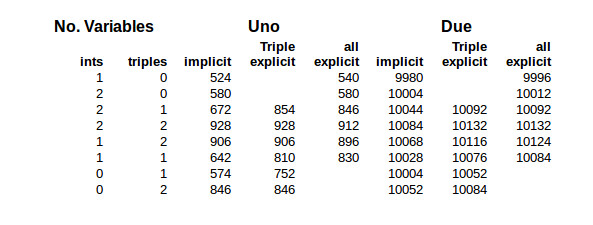
The first columns specify how many variables were included in the Application class. The columns under Uno and Due are the code size for those processors. They show the size for implicit instantiation, explicit instantiation of power() for just the Triple class, and explicit instantiation for both int and Triple data types.

The code sizes are dependent on a number of factors so can only provide a general idea of the changes when switching from implicit to explicit template instantiation. Actual results depend on the tool chains compiler and linker. Some of that occurs here using the Arduino’s GCC tool chain.

In all the cases with the Uno where one variable is used, the code size increases with explicit instantiation. In this case the function’s code plus the code for calling the function is, as expected, greater than the inline function’s code.

Now look at the Uno side of the table where there are 2 integers and 2 Triples, i.e. the fourth line. The first two code sizes remain the same at 928 bytes. The compiler optimized the code for the two Triples() by creating power() out-of-line without being told to do it explicitly. In the third column there is a decrease in code size when the integer version of power() is explicitly instantiated. It did the same a couple of lines below that when there are only the 2 Triples. These were verified by examing the assembly code running objdump on the ELF file.

In general, the Due’s code size did not improve with explicit instantiation. The larger word size of the Due requires less code to call a function. It would take a function larger than power() to make explicit instantiation effective in this scenario.

As I mentioned, don’t draw too many conclusions for these code sizes. I repeatedly needed to check the content of the ELF file using objdump to verify my conclusions. As a case in point, look at the Due side, with 2 integers and a Triple, with the two code sizes of 10092. They’re just coincidence. In one the integer version of power() is inlined and in the other, explicitly out-of-lined. The same occurs on the first line under Uno where there are just two integers and no Triples.

You can find other factors influencing code size. When three Triples are involved the compiler lifts the multiplication code from power(), but not the entire function. This isn’t because power() is a template function but just a general optimization, i.e. lifting code from inside a loop.

Wrap Up

Templates are a fascinating part of C++ with extremely powerful capabilities. As mentioned above, you can write an entire program in templates so the compiler actually does the computation. The reality is you probably are not going to be creating templates in every day programming. They are better suited for developing libraries and general utilities. Both power() and Triple fall into, or are close to, that category. This is why the C++ libraries consist of so many template classes. Creating a library requires attention to details beyond regular coding.

It’s important to understand templates even if you don’t write them. We’ve discussed some of the implications of usage and techniques for making optimal use of templates because they are an inherent part of the language. With them being such a huge part of C++ we’ll come back to them again to address places where they can be used.

The Embedding C++ Project

Over at Hackaday.io, I’ve created an Embedding C++project. The project will maintain a list of these articles in the project description as a form of Table of Contents. Each article will have a project log entry for additional discussion. Those interested can delve deeper into the topics, raise questions, and share additional findings.

The project also will serve as a place for supplementary material from myself or collaborators. For instance, someone might want to take the code and report the results for other Arduino boards or even other embedded systems. Stop by and see what’s happening.


Filed under: Arduino Hacks, Hackaday Columns, Software Development

Making a Vintage Star Wars AT-AT toy walk with an Arduino

Dave Stein is a software engineer during the day and a tinkerer on Arduino projects in his free time after work. He submitted on the blog his first Arduino project with the goal of powering his old AT-AT Walker toy (mid 1980s) with Arduino Uno and make it walk and perform some of the functions we see in the Star Wars movies.

AT-AT (All Terrain Armored Transport) are four-legged combat walkers 22.5mt (73.8ft) tall of the Galactic Empire, one of its most famous military symbols introduced  in “Star Wars V: The Empire strikes back”, and we may see them again in the next weeks on “Star Wars: The Force Awakens” the upcoming episode of the saga opening December 18th.

The AT-AT walker toy updated by Dave is controlled by a wired Xbox 360 controller that interfaces with a computer and transports a signal to the Arduino Uno for walker movement:

The left and right triggers move the walker forward and backward while the right stick moves the head horizontally. If you have ever played with this toy you may remember it was clumsy and difficult to move. In my project I wanted to learn about and conquer the difficulties of quadrupedal movement. The realization process for my project involved a massive amount of trial and error, research, and failures. I have to say that I failed many more times than I succeeded with configuring the servos with the Arduino. I went down many long roads to learn about prototyping with the breadboard, soldering, and redesigns of the final product. The most difficult part of the project aside from adjusting the gait of the walker for balance and movement was providing enough power to the servos without frying the microcontroller or any of the components. I was finally able to overcome these difficulties by implementing the Adafruit servo shield.

Check AtAt Project website for all info, parts list and upcoming tutorial!

Explore tangible interfaces with a wooden sequencer

During the Physical Computing and Creative Coding course at School of Form a team composed by Ernest Warzocha, Jakub Wilczewski, Maciej Zelaznowski worked on a project starting from the keyword “the aesthetics of interaction”. With the help of their lecturers – Wies?aw Bartkowski and Krzysztof Golinski – they decided to rethink about typical button-like interface of audio sequencer and design a unique tangible interface for it.

The Wooden Sequencer runs on Arduino Uno and works by using familiarity of real objects and manipulating them similarly to the idea of Durell Bishop’s Marble Answering Machine:

Instead of regular buttons we created wooden discs (4×8 circles) that placed in holes generate audio sequence. Each line corresponds to different instrument and columns are responsible for time when sample is played. To know in which point at timeline our sequence plays there is hidden LED on top of each column that blink through wood and informs user which one is currently played.

To create good-looking round shapes of table we used CNC router at our university. After the milling process we connected all electronics with table and sensors for each hole. The core of our project is Arduino UNO with multiplexers and MP3 module. With rendered samples and build-in speakers our project doesn’t require computer plugged in.

Important and somehow unique in our sequencer is usage of IR reflective sensors to change played instrument sample. To decide which sample we want to play sensor recognizes different grayscale color and intensity of the reflected light at bottom of our discs – actually everything placed on table can generate sound. Creating grayscale-based controller is experimental way to interact with device. Furthermore, using grayscale palette might be great idea for MIDI instrument. For this project we used two colors to show the concept. It’s possible to add more but it’s more sensitive to non-constant background light.

Take a look at the video below and explore more pictures on Behance:

Arduino Pinout ASCII art ready to go

To enable easy documentation of pin assignments, BusyDuckMan created a couple of ASCII art of Arduino Uno and Mega boards marking ports, PWM and coms. You can now then simply copy and paste as a comment into your code and document in an easy way how the arduino is connected to other devices:

They can be pasted into code comments, (use /* and */ in the arduino IDE to create a block comment). They can also be useful in forums, when you need a quick arduino diagram, but don’t want to fire up an image editor.


Testing a Heart Pulse Alarm based on Arduino Uno

Murad is a student of Mechatronics and Engineering at Tafila Technical University in the town of Tafila, in Jordan. He made a submission to our blog presenting his DIY project of a Heart Pulse Alarm based on Arduino Uno.

The HPA (Heart Pulse Alarm) is a portable device prototyped to measure the pulse rate and the body temperature of who’s wearing it. If the device receives an unusual heart pulse, it will send a sms message to paramedics to act quickly. He designed the device to help people who have cardiac problems and they lack  the resources for personal and professional assistants in his country.

Check the bill of materials and code on his blog.


Arduino Blog 18 Nov 16:59
arduino  arduino uno  diy  featured  gps  heart-beat  sms  uno