Posts with «arduino uno» label

Get Arduino Data over the internet using jQuery and AJAX


Description


Have you ever wanted to transmit Arduino data over the internet?

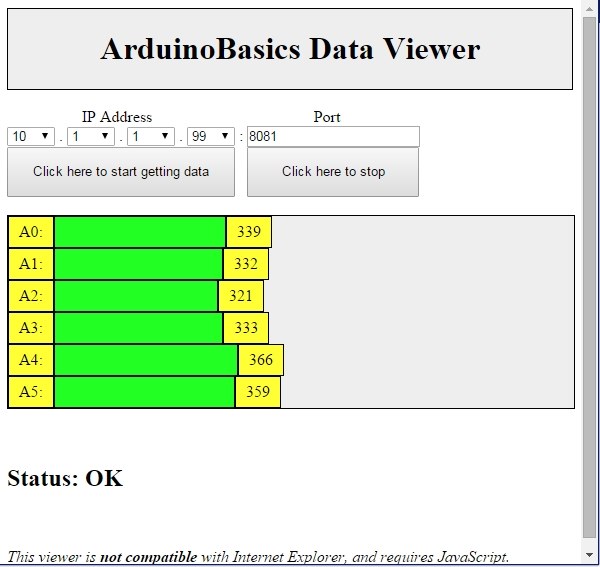
In this tutorial, we will design a web page that will retrieve Analog readings from the Arduino's Analog Pins and display them on a bar chart within the web page.

The web page will use jQuery and AJAX to request the data from the Arduino Web Server, allowing us to update the bar chart dynamically, without having to refresh the entire web page. The Arduino Web Server will send the Analog readings to the web page in JSON format where it will be processed and displayed accordingly.

In this tutorial, I will not have anything connected to the Arduino's Analog pins, which means the data retrieved will be that of randomly floating analog pins. Feel free to connect a potentiometer, temperature sensor or any other analog sensor to these pins if you want to create a more "useful" project.

The main aim here was to show you how to transmit the data in JSON format, and to update only a portion of the web page using asynchronous communication (using AJAX), to improve the performance of data retrieval and visualisation.


Parts Required:


Please note: The WIZnet ioShield-A ver1.1 actually comes with the WIZ550io board. So if you buy the ioShield-A, you will receive both boards. I have provided the link to the WIZ550io shield because you can buy that shield on its own. Regardless, you will need to use both boards for this tutorial.


Arduino Libraries and IDE


To program the Arduino you will need to download the Arduino IDE, and install the WIZnet Ethernet Library. The Arduino IDE version used in this tutorial was version 1.6.4.
You may want to read the WIZnet wiki information for each WIZnet shield before use.


ARDUINO CODE:


Full description of the Arduino code is included in the YouTube video above. Once you have set up your Arduino Web Server, you should be able to ping it. Look at this website, if you don't know how to use the windows ping feature.


Getting the Arduino Board onto the internet:


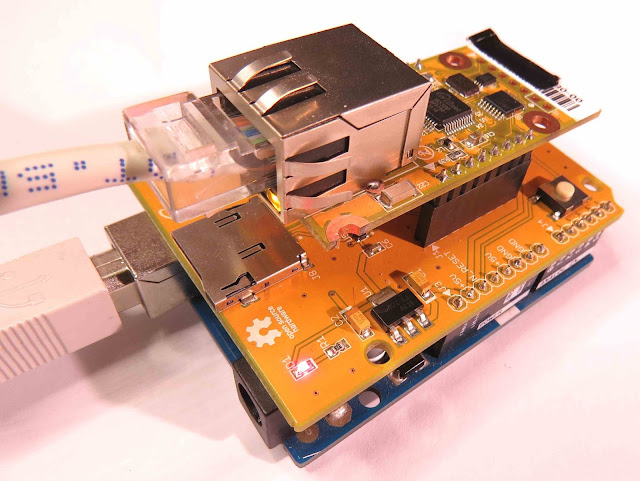
There isn't anything really to hook up for this project. You just have to align the pins for each board and stack them. You can power the Arduino via the USB cable. This will also be useful for debugging and printing to the Serial monitor. An ethernet cable needs to connect the WIZ550io board's ethernet port to your internet/network router

  • The WIZ550io board goes on the top

  • The ioShield-A is in the middle

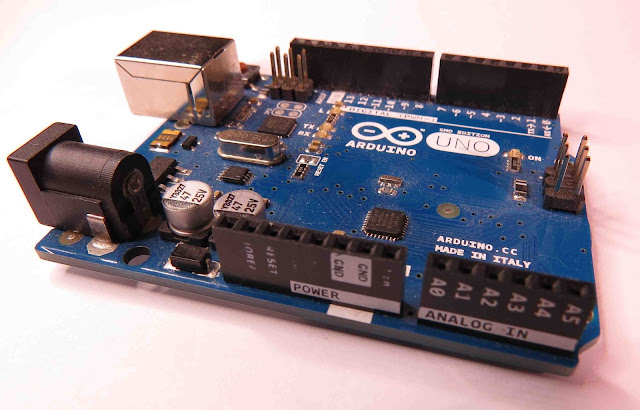
  • The Arduino UNO is on the bottom

  • This is what it looks like when they are stacked together

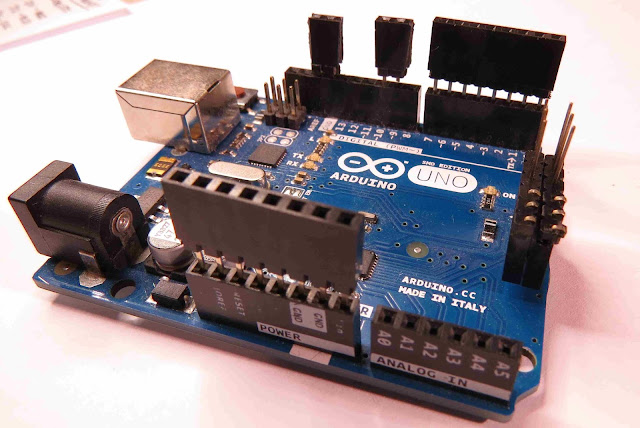
  • If you want to gain easy access to the Analog or digital pins without de-soldering the ioShield-A, you can introduce some female headers like this:

  • Please note that the ioShield-A utilises a number of pins on the Arduino UNO - including: D2, D4, D7, D10, GND, and IOREF, RESET, 5V, GND, GND and ICSP pins
  • All Analog pins are available for use


Set the Arduino Web Server on your local network


You can test this project on your local network. You just have to choose an available IP address and PORT within your router's IP range. If you don't know your local IP address range - you can have a look at this site to give you a helping hand.


Set the Arduino Web Server to be accessed from anywhere in the world


If you want to access your Arduino from anywhere in the world, you need to set up Port Forwarding on your internet network router. The following useful guides will hopefully get you on the right track, if you have never set up Port forwarding.


In my case, I programmed the Arduino UNO Web Server to take the following ip address on my internal network: 10.1.1.99

I programmed the Arduino Web Server to listen for Web Browsers on port 8081.
So if I wanted to connect to the Arduino Web Server through my home network, I just had to type in this web address into my web browser: http://10.1.1.99:8081

If you plan to connect to the Arduino using port 80 (which is the default port for web browsers), you can just type the IP address without specifying the port (eg. http://10.1.1.99/ )

The web browser should display the Arduino data in JSON format (the YouTube video above will show you what that looks like).

Once I knew I could connect to the Arduino in my internal network, I then set up port forwarding on my router so that I could type in my external IP address and special port to tunnel my way into my Arduino Web Server on my internal network. This is what I had to do on my router, but you may need to do something different.

  1. My first step was to find out my public/external IP address by typing "what is my IP address" into google. If you want to know your external IP address click here.
  2. I then typed my router's ip address into a web browser, and logged into my router.
  3. I went to the advanced settings tab
  4. Selected "Port Forwarding" from the side menu
  5. Filled out all of the details on the first line of the Ports list
    • Enable box = ticked
    • Description = Arduino
    • WAN interface = pppoe_atm0/ppp0
    • Inbound port = 8082
    • Type = TCP
    • Private IP address = 10.1.1.99
    • Private port = 8081
  6. Saved the settings

Now that I had port forwarding enabled, I could type the ip address (that I obtained in step 1) into my browser and specified port 8082 (instead of 8081) - eg. http://190.11.70.253:8082/

And now I can access my Arduino Web server from anywhere in the world. I can even access it from my smart phone. Once again, this will only return the Analog data in JSON format.


The Web Page GUI


The Arduino is now on the internet, so there are two options. You can either


Instructions on how to use these web pages, are listed below the HTML code.


To retrieve data from your Arduino Web Server, please make sure that it is connected and visible from outside of you local network. You will need to have port forwarding enabled. Information on port forwarding is described above.
  1. Find what your external IP address is.
  2. Enter this address using the IP address drop-down boxes within the "ArduinoBasics Webserver Data viewer" web page
  3. Enter the port forwarding port number (eg. 8082) into the box labelled "Port"
  4. Then click on the "Click here to start getting data" button - you should start to see the bar charts moving and status should be OK
  5. If the bar charts do not move, and the status message says "Failed to get DATA!!" - then the web page was unable to connect to the Arduino for some reason.


Troubleshooting

  • You may want to type in the web address into your web browser, to make sure that data is being retrieved.
  • You can also open the Serial monitor in the Arduino IDE to make sure that an IP address is being displayed
  • Ensure that you have enabled the port forwarding option on your router
  • Have a look at Developer Tools within Google Chrome to help diagnose web page related issues.
  • The web page will not work properly if you use Internet Explorer or if you have javascript disabled within your browser.


Concluding comments


This tutorial showed you how to connect to your Arduino UNO over the internet, and retrieve data in JSON format using jQuery and AJAX. The web page can be modified to suit your own needs, plus it would be more useful if the Arduino was actually monitoring something, rather than logging data from floating pins. It would also be useful if the Arduino could be controlled to blink an LED, or to turn a motor... but I will leave that project for another day. Thank you.

If you like this page, please do me a favour and show your appreciation :

 
Visit my ArduinoBasics Google + page.
Follow me on Twitter by looking for ScottC @ArduinoBasics.
I can also be found on Pinterest and Instagram.
Have a look at my videos on my YouTube channel.
             
This project would not have been possible without WIZnet's collaborative effort.
Please visit their site for more cool Ethernet products.


However, if you do not have a google profile...
Feel free to share this page with your friends in any way you see fit.

Get Arduino Data over the internet using jQuery and AJAX

Description

Have you ever wanted to transmit Arduino data over the internet?

In this tutorial, we will design a web page that will retrieve Analog readings from the Arduino's Analog Pins and display them on a bar chart within the web page.

The web page will use jQuery and AJAX to request the data from the Arduino Web Server, allowing us to update the bar chart dynamically, without having to refresh the entire web page. The Arduino Web Server will send the Analog readings to the web page in JSON format where it will be processed and displayed accordingly.

In this tutorial, I will not have anything connected to the Arduino's Analog pins, which means the data retrieved will be that of randomly floating analog pins. Feel free to connect a potentiometer, temperature sensor or any other analog sensor to these pins if you want to create a more "useful" project.

The main aim here was to show you how to transmit the data in JSON format, and to update only a portion of the web page using asynchronous communication (using AJAX), to improve the performance of data retrieval and visualisation.


Arduino Libraries and IDE

To program the Arduino you will need to download the Arduino IDE, and install the WIZnet Ethernet Library. The Arduino IDE version used in this tutorial was version 1.6.4.
You may want to read the WIZnet wiki information for each WIZnet shield before use.


ARDUINO CODE:

Full description of the Arduino code is included in the YouTube video above. Once you have set up your Arduino Web Server, you should be able to ping it. Look at this website, if you don't know how to use the windows ping feature.


Getting the Arduino Board onto the internet:

There isn't anything really to hook up for this project. You just have to align the pins for each board and stack them. You can power the Arduino via the USB cable. This will also be useful for debugging and printing to the Serial monitor. An ethernet cable needs to connect the WIZ550io board's ethernet port to your internet/network router

  • The WIZ550io board goes on the top

  • The ioShield-A is in the middle

  • The Arduino UNO is on the bottom

  • This is what it looks like when they are stacked together

  • If you want to gain easy access to the Analog or digital pins without de-soldering the ioShield-A, you can introduce some female headers like this:

  • Please note that the ioShield-A utilises a number of pins on the Arduino UNO - including: D2, D4, D7, D10, GND, and IOREF, RESET, 5V, GND, GND and ICSP pins
  • All Analog pins are available for use


Set the Arduino Web Server on your local network

You can test this project on your local network. You just have to choose an available IP address and PORT within your router's IP range. If you don't know your local IP address range - you can have a look at this site to give you a helping hand.


Set the Arduino Web Server to be accessed from anywhere in the world

If you want to access your Arduino from anywhere in the world, you need to set up Port Forwarding on your internet network router. The following useful guides will hopefully get you on the right track, if you have never set up Port forwarding.


In my case, I programmed the Arduino UNO Web Server to take the following ip address on my internal network: 10.1.1.99

I programmed the Arduino Web Server to listen for Web Browsers on port 8081.
So if I wanted to connect to the Arduino Web Server through my home network, I just had to type in this web address into my web browser: http://10.1.1.99:8081

If you plan to connect to the Arduino using port 80 (which is the default port for web browsers), you can just type the IP address without specifying the port (eg. http://10.1.1.99/ )

The web browser should display the Arduino data in JSON format (the YouTube video above will show you what that looks like).

Once I knew I could connect to the Arduino in my internal network, I then set up port forwarding on my router so that I could type in my external IP address and special port to tunnel my way into my Arduino Web Server on my internal network. This is what I had to do on my router, but you may need to do something different.

  1. My first step was to find out my public/external IP address by typing "what is my IP address" into google. If you want to know your external IP address click here.
  2. I then typed my router's ip address into a web browser, and logged into my router.
  3. I went to the advanced settings tab
  4. Selected "Port Forwarding" from the side menu
  5. Filled out all of the details on the first line of the Ports list
    • Enable box = ticked
    • Description = Arduino
    • WAN interface = pppoe_atm0/ppp0
    • Inbound port = 8082
    • Type = TCP
    • Private IP address = 10.1.1.99
    • Private port = 8081
  6. Saved the settings

Now that I had port forwarding enabled, I could type the ip address (that I obtained in step 1) into my browser and specified port 8082 (instead of 8081) - eg. http://190.11.70.253:8082/

And now I can access my Arduino Web server from anywhere in the world. I can even access it from my smart phone. Once again, this will only return the Analog data in JSON format.


The Web Page GUI

The Arduino is now on the internet, so there are two options. You can either

Instructions on how to use these web pages, are listed below the HTML code.


To retrieve data from your Arduino Web Server, please make sure that it is connected and visible from outside of you local network. You will need to have port forwarding enabled. Information on port forwarding is described above.

  1. Find what your external IP address is.
  2. Enter this address using the IP address drop-down boxes within the "ArduinoBasics Webserver Data viewer" web page
  3. Enter the port forwarding port number (eg. 8082) into the box labelled "Port"
  4. Then click on the "Click here to start getting data" button - you should start to see the bar charts moving and status should be OK
  5. If the bar charts do not move, and the status message says "Failed to get DATA!!" - then the web page was unable to connect to the Arduino for some reason.


Troubleshooting

  • You may want to type in the web address into your web browser, to make sure that data is being retrieved.
  • You can also open the Serial monitor in the Arduino IDE to make sure that an IP address is being displayed
  • Ensure that you have enabled the port forwarding option on your router
  • Have a look at Developer Tools within Google Chrome to help diagnose web page related issues.
  • The web page will not work properly if you use Internet Explorer or if you have javascript disabled within your browser.

Concluding comments

This tutorial showed you how to connect to your Arduino UNO over the internet, and retrieve data in JSON format using jQuery and AJAX. The web page can be modified to suit your own needs, plus it would be more useful if the Arduino was actually monitoring something, rather than logging data from floating pins. It would also be useful if the Arduino could be controlled to blink an LED, or to turn a motor... but I will leave that project for another day. I hope you enjoyed this tutorial - if it helped you in any way, please consider donating a small "tip" into my money jar. Thank you.


If you like this page, please do me a favour and show your appreciation :

 
Visit my ArduinoBasics Google + page.
Follow me on Twitter by looking for ScottC @ArduinoBasics.
I can also be found on Pinterest and Instagram.
Have a look at my videos on my YouTube channel.


This project would not have been possible without WIZnet's collaborative effort.
Please visit their site for more cool Ethernet products.


However, if you do not have a google profile...
Feel free to share this page with your friends in any way you see fit.

Slap Yourself Awake with This Ridiculous “Wake-Up Machine” Alarm Clock

Swedish tech artist and comedienne Simone Giertz tries her hand at creating the most annoying alarm clock possible

Read more on MAKE

The post Slap Yourself Awake with This Ridiculous “Wake-Up Machine” Alarm Clock appeared first on Make: DIY Projects, How-Tos, Electronics, Crafts and Ideas for Makers.

Discover the role of colors in nature

“The color Visualizer” is an immersive installation to understand how color is used in nature to communicate between living organisms and to explore biodiversity through the lens of color:

By plucking an array of multi-colored strings, which are layered over the large array of high resolution screens, visitors can explore over 100 unique color stories as vibrant images and short videos appear before them. Strum a red cord, for example, and learn how a male cardinal bird colors his vibrant red feathers with pigments from food; strum a yellow cord and see how a yellow leopard’s spotted coat allows this predator to blend in with shadow and light while moving through tall grass.

The eye-catching cylindrical installation is part of the permanent exhibition “The color of Life” that opened in June 2015 and was created by Tellart in collaboration with the California Academy of Sciences. It was prototyped using Arduino Uno and it’s currently shortlisted for the Interaction Awards, representing excellence in interaction design.

In the video below the team working at the project explain the main features of the educational installation and show a bit of the making of:

Slap my zombie hand for internet fame!

Halloween time is a great moment to explore nice interactive projects and get inspired for installations for other selfie occasions. To spice up the office Donnie Plumly, a creative technologist, decided to make and share with us a molded zombie arm that takes pictures and post them to Twitter.

He used a silicone arm (molded on his own hand ), a custom steel mount to clip to an office partition, and a vibration sensor hooked up to an Arduino Uno. Once the arm is slapped a photo will be taken using an IR Led and passed to the Eye-Fi card in the camera.

The photo is then saved into a Dropbox folder and, using If This Then That (IFTTT), posted to Twitter on the account @ZombieSelfie.

Donnie created also a very useful tutorial  on Instructable to make it yourself!

Better you team up if you want to win the game!

Team Game is an interactive installation to reflect about video games and controllers made by Caroline Buttet. It runs on an Arduino Uno or Genuino Uno controlling a flex sensor, a custom made potentiometer, and a light sensor with the help of Unity software and Uniduino plugin:

It’s a simple game in which you need to roll a ball from one side to another of the screen. The trick is, you need some custom controllers to play. And you also need 2 partners that will play with you so that you can progress through the 3 levels. Rather than playing against the others, you will have to team up in order to win!

See the game in action described by Caroline:

Learn more about Uniduino plugin and how to use it with Arduino:

Choreograph a Music and Light Display for the Holiday

Trick-or-treaters are bound to get a thrill when you make this choreographed music and light display that plays each time your gate is opened.

Read more on MAKE

The post Choreograph a Music and Light Display for the Holiday appeared first on Make: DIY Projects, How-Tos, Electronics, Crafts and Ideas for Makers.

Led blinking with Arduino Uno

Let's start with led blinking in arduino

Led Blinking Code
Schematics using Fritzing
You can download the source code from the following link:

https://drive.google.com/file/d/0B4Px6Drl6Zz_Z3ZfaGhIallGUnc/view?usp=sharing

The code is self explanatory. Pin number 13 of arduino is configured as output. cost int led=13
makes it a read only variable and also pin number 13 is named as led.
You can use any digital pins i.e from 0 to 13. We have taken pin number 13 because the in-built led of arduino is connected to pin number 13. If you are going to use any other pin please don't forget to connect the external resistor having a minimum value of 220 ohm resistance.

delay(1000)   // It provides a delay of 1000 ms i.e. 1s

Now coming to the calculation of resistance, it is as per according to Ohm's law:

V==IR

The led have forward current of  about 25 milli Amps and voltaage provided by arduino is +5 volts
I = V/R  ....... I  = 5000/25, which comes out to 200 ohms. But this is not a standard value and the nearby value is 220E. Feel free to comment here.


Staying focused with a brain-sensing smart lamp

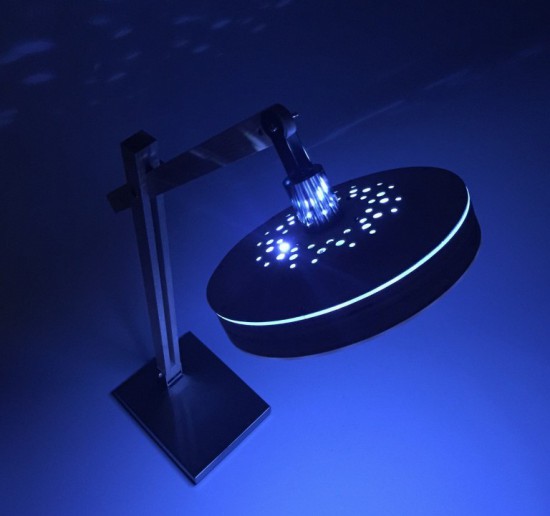
Clara is a smart lamp able to respond to your brain waves and subtly adjust your environment. The project, running on Arduino Uno, was created by  Marcelo Mejía Cobo, Belen Tenorio, and Josh Sucher for a class at the School of Visual Arts in NYC (US).

The team worked with the Neurosky MindWave Mobile, a Bluetooth EEG-reading headset in order to wirelessly detect “attention” and map the lamp’s color temperature and speaker volume accordingly:

At first, the lamp emits a warm, comforting glow, conducive to idea generation and creativity. But as you start homing in on a specific idea, the light becomes crisper and cooler, and the volume of the ambient noise flowing from the embedded speaker slowly increases, enhancing your ability to concentrate and block out external distractions.

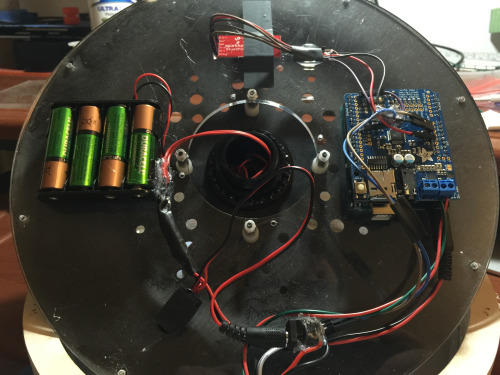
In the picture below you can see the inside of the lamp with the Arduino Uno and Adafruit Music Maker shield:

Explore the Arduino Sketch on Github.

Arduino Blog 09 Oct 23:19

A door-stopper becomes an amazing game with Arduino

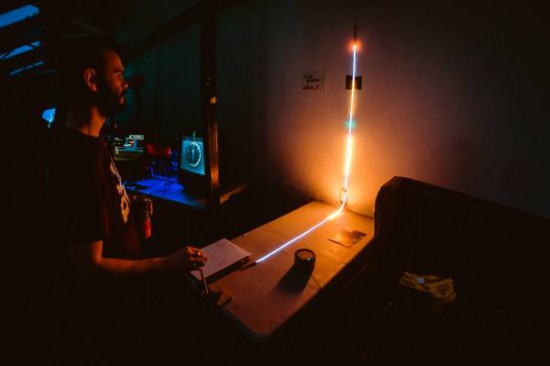
Developed by Robin Baumgarten during a 48-hour game jam,  Line Wobbler is a one-dimensional dungeon crawler game running on Arduino Uno. Robin was inspired watching a cat interacting with a door stopper and having fun!

The game is played using a unique wobble controller made out of a door-stopper spring and a several meter long ultrabright LED strip display. All the movement is controlled by bending the Wobble controller left and right, while enemies are attacked by wobbling:

Using a spring, an accelerometer and a rigid surface, the Wobble controller is a tactile and surprisingly precise joystick with a unique ‘wobble’ action (pull it back and let go to make it oscillate back and forth rapidly). It is this wobble action that is core to the experience and the game we have created for it. Initially made out of a shoe-tree, I’m now using door-stopper springs, since they’re easier to use. Fun fact: the original inspiration for the controller came from this cat video.

Since it was created, it’s been exhibited during Experimental Gameplay Workshop at GDC 2015, at Burning Man 2015 and other city around the world (London, Chicago and Oslo). Line Wobbler won also two prizes at the AMAZE Awards 2015 in Berlin and has been nominated as a finalist for the IndieCade 2015 awards last October!