Posts with «arduino hacks» label

Controlling a Quadcopter with Gestures

[grassjelly] has been hard at work building a wearable device that uses gestures to control quadcopter motion. The goal of the project is to design a controller that allows the user to intuitively control the motion of a quadcopter. Based on the demonstration video below, we’d say they hit the nail on the head. The controller runs off an Arduino Pro Mini-5v powered by two small coin cell batteries. It contains an accelerometer and an ultrasonic distance sensor.

The controller allows the quadcopter to mimic the orientation of the user’s hand. The user holds their hand out in front of them, parallel to the floor. When the hand is tilted in any direction, the quadcopter copies the motion and will tilt the same way. The amount of pitch and roll is limited by software, likely preventing the user from over-correcting and crashing the machine. The user can also raise or lower their hand to control the altitude of the copter.

[grassjelly] has made all of the code and schematics available via github.


Filed under: Arduino Hacks, drone hacks

Kickstarter Monitor Will Brighten Your Day

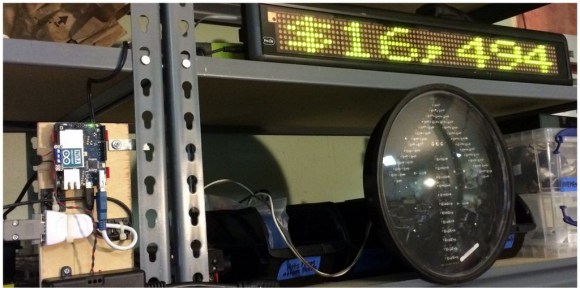
Keeping up with a kickstarter campaign can be quite a task, especially if your project is real (looking at you, Scribble Pen!) and you’re trying to keep up with product fabrication and all the other logistics involved in bringing a product to market. [macetech] are currently in the middle of a campaign themselves and built a loud, bright alert system to notify them of any new kickstarter backers.

The project uses a LED marquee to display the current number of backers, but every time a new backer contributes to the project, a blindingly bright green arrow traffic signal is illuminated and a piezo speaker plays a celebration tune. All of these devices are controlled by an Arduino Yun which, with its built-in Atheros chipset, easily connects to the network and monitors the kickstarter page for changes.

[macetech] used some interesting hardware to get everything to work together. They used a USB-to-RS232 cable with and FTDI chip to drive the LED marquee and a PowerSwitchTail 2 from Adafruit to drive the power-hungry traffic signal. Everything was put together in a presentable way for their workshop and works great! All of the source code is available on their project page, and you can check out their RGB LED Shades kickstarter campaign too.


Filed under: Arduino Hacks

BORAT: Bathroom Monitor for the Future

A recent company move has left [kigster] and his 35 coworkers in a frustrating situation. Their new building only has two single occupancy bathrooms. To make matters worse, the bathrooms are located on two different floors. Heading to one bathroom, finding it occupied, then running upstairs to find the second bathroom also occupied became an all to common and frustrating occurrence at the office.

It was obvious the office needed some sort of bathroom occupancy monitoring system – much like those available on commercial aircraft. [kigster] asked for a budget of about $200 to build such a system. His request was quickly granted it by office management. They must have been on their way to the bathroom at the time.

[kigster] began work on BORAT: Bathroom Occupancy Remote Awareness Technology. The initial problem was detecting bathroom occupancy. The easiest method would be to use door locks with embedded switches, much those used in aircraft. Unfortunately, modifying or changing the locks in a rented office space is a big no-no. Several other human detection systems were suggested and rejected. The final solution was a hybrid. Sonar, Passive Infrared (PIR), and light sensors work in concert to detect if a person is in the bathroom. While we think the final “observer unit” is rather cool looking, we’re sure unsuspecting visitors to the office may be wondering why a two eyed robot is staring at them on the throne.

The display side of the system was easy. The entire system communicates with the venerable nRF24L01+ radio modules, so the display just needed a radio module, an arduino, and a way of displaying bathroom status. Two LED matrices took care of that issue.

We really like this hack. Not only is it a great use of technology to solve a common problem, but it’s also an open source system. BORAT’s source code is available on [kigster's] github.

Want to know more about BORAT? Kigster is answering questions over on his thread in the Arduino subreddit.


Filed under: Arduino Hacks

Build Your Own Stand Alone Web Radio


If you’re the type who enjoys passing idle time by keeping up with podcasts or listening to web stations but don’t always want to occupy your laptop or tablet, this Arduino based radio player will provide a base station for tunes.

The Web Radio project by [Vassilis Serasidis] outlines in a pleasing amount of detail exactly how to wire up a short list of four modules. These including an Ethernet shield, LCD screen, MP3 decoder, and USB serial converter, with an Arduino Mini in order to bookmark and play fourteen of your favorite channels. His hand-soldered board couples everything into one neatly stacked package. The instructional video shows this off and he even explains how to locate your favorite stations on internet-radio.com and copy their port and IP number directly into an example sketch which is provided for use. If you’ve been wanting to build a self contained radio node for your desk free of extra baggage, this is a no-sweat project for both the hardware savvy and those more oriented with code writing.

If you’re going to build your own radio, it’s always cool to disguise your high-tech creation as something more rustic. Check out this project by [Dominic Buchstaller] for a great example of a vintage radio given a second calling.


Filed under: Arduino Hacks, radio hacks

MacGyvered Optoisolator is a Great Introduction

Sometimes the best way to learn about a technology is to just build something yourself. That’s what [Dan] did with his DIY optoisolator. The purpose of an optoisolator is to allow two electrical systems to communicate with each other without being electrically connected. Many times this is done to prevent noise from one circuit from bleeding over into another.

[Dan] built his incredibly simple optoisolator using just a toilet paper tube, some aluminum foil, an LED, and a photo cell. The electrical components are mounted inside of the tube and the ends of the tube are sealed with foil. That’s all there is to it. To test the circuit, he configured an Arduino to send PWM signals to the LED inside the tube at various pulse widths. He then measured the resistance on the other side and graphed the resulting data. The result is a curve that shows the LED affects the sensor pretty drastically at first, but then gets less and less effective as the frequency of the signal increases.

[Dan] then had some more fun with his project by testing it on a simple temperature controller circuit. An Arduino reads a temperature sensor and if the temperature rises above a certain value, it turns on a fan to cool the sensor off again. [Dan] first graphed the sensor data with no fan hooked up. He only used ambient air to cool things down. The resulting graph is a pretty smooth curve. Next he hooked the fan up and tried again. This time the graph went all kinds of crazy. Every time the fan turned on, it created a bunch of electrical noise that prevented the Arduino from getting an accurate analog reading of the temperature sensor.

The third test was to remove the motor circuit and move it to its own bread board. The only thing connecting the Arduino circuit to the fan was a wire for the PWM signal and also a common ground. This smoothed out the graph but it was still a bit… lumpy. The final test was to isolate the fan circuit from the temperature sensor and see if it helped the situation. [Dan] hooked up his optoisolator and tried again. This time the graph was nice and smooth, just like the original graph.

While this technology is certainly not new or exciting, it’s always great to see someone learning by doing. What’s more is [Dan] has made all of his schematics and code readily available so others can try the same experiment and learn it for themselves.


Filed under: Arduino Hacks

Brushless Motor Controller Shield for Arduino

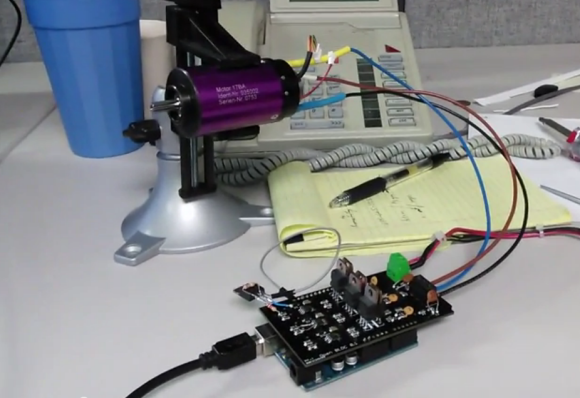
Brushless motors are ubiquitous in RC applications and robotics, but are usually driven with low-cost motor controllers that have to be controlled with RC-style PWM signals and don’t allow for much customization. While there are a couple of open-source brushless drivers already available, [neuromancer2701] created his own brushless motor controller on an Arduino shield.

[neuromancer2701]‘s shield is a sensorless design, which means it uses the back-EMF of the motor for feedback rather than hall effect sensors mounted on the motor. It may seem strange to leave those sensors unused but this allows for less expensive sensorless motors to work with the system. It also uses discrete FETs instead of integrated driver ICs, similar to other designs we have covered. Although he is still working on the back-EMF sensing in his firmware, the shield successfully drives a motor in open-loop mode.

The motor controller is commanded over the Arduino’s serial interface, and will support a serial interface to ROS (Robot Operating System) in the future. This shield could be a good alternative to hobby RC controllers for robots that need a customizable open-source motor controller. The PCB design and source code are available on GitHub.


Filed under: Arduino Hacks

Web Browser Pushes Arduino’s Limits

Some projects that we build fulfill a genuine need for a new piece of hardware or software that will make life easier or fix a common problem. Other projects, on the other hand, we do just because it’s possible to do. [Gilchrist] has finished work on a project that fits squarely in the second category: a web browser that runs exclusively on an Arduino Uno with an ethernet shield.

The Arduino can serve plain-text web pages to an attached LCD and can follow hyperlinks. User input is handled by a small joystick, but the impressive part of the build is on the software side. The Arduino only has 2KB of RAM to handle web pages, and the required libraries take up 20KB of memory, leaving only about 12 KB for the HTML parser/renderer and the LCD renderer.

The Arduino browser is a work in progress, and [Gilchrist] mentions that goals for the project include more robustness to handle poor HTML (the Hackaday retro edition loads flawlessly though), a terminal, and WiFi capabilities. To that end, maybe a good solution would be using the new ESP8266 chip to keep things small and inexpensive?


Filed under: Arduino Hacks

The ESP8266 Becomes a Terrible Browser

The ESP8266 are making their way over from China and onto the benches of tinkerers around the world for astonishing web-enabled blinking LED projects and the like. [TM] thought he could do something cooler with his WiFi to UART module and decided to turn one into a web browser.

There’s no new code running on the ESP8266 – all the HTML is being pushed through an Arduino Mega, requesting data from a server (in this case our fabulous retro edition), and sending the data to the Arduino serial console. The connection is first initiated with a few AT commands to the ESP module, then connecting to the retro server and finally dumping everything received to the console.

It’s not much – HTML tags are still displayed, and images are of course out of the question. The result, however, isn’t that much different from what you would get from Lynx, meaning now the challenge is open for an Arduino port of this ancient browser.


Filed under: Arduino Hacks, wireless hacks

Simple Photo Flash Trigger for Water Balloon Photography

There have been countless projects to make custom photo flash trigger circuits. Usually the circuits react to sound, triggering the camera flash at the moment a certain sound is triggered. That type of trigger can be used to detect the popping of a balloon or shattering of glass. Other triggers detect motion, like a projectile crossing a laser beam for example. [Udo's] friend had a fun idea to take photos of water balloons popping. Unfortunately neither of those trigger methods would be well suited for this situation. That’s when [Udo] had to get creative.

[Udo] built a unique trigger circuit that uses the water inside the balloon as the trigger. The core component of the circuit is an Arduino. One of the Arduino’s analog pins is configured to enable the internal pull-up resistor. If nothing else is connected to the pin, the Arduino will read 5 volts there. The pin is connected to a needle on the end of a stick. There is a second needle on the same stick, just a short distance away from the first. When these needles pierce the balloon’s skin, the water inside allows for a brief moment of conductivity between the two pins. The voltage on the analog pin then drops slightly, and the Arduino can detect that the balloon has popped.

[Udo] already had a flash controller circuit. He was able to trigger it with the Arduino by simply trying the flash controller’s trigger pin to one of the Arduino’s pins. If the Arduino pulls the pin to ground, it closes the switch on the flash controller and the flash is triggered. Both circuits must share a common ground in order for this to work.

All of the code for [Udo's] project is freely available. With such spectacular photographs, it’s only a matter of time before we see more of these floating around.


Filed under: Arduino Hacks
Hack a Day 02 Oct 21:00

Reverse Engineering a Wireless Studio Lighting Remote

If you want to take a photograph with a professional look, proper lighting is going to be critical. [Richard] has been using a commercial lighting solution in his studio. His Lencarta UltraPro 300 studio strobes provide adequate lighting and also have the ability to have various settings adjusted remotely. A single remote can control different lights setting each to its own parameters. [Richard] likes to automate as much as possible in his studio, so he thought that maybe he would be able to reverse engineer the remote control so he can more easily control his lighting.

[Richard] started by opening up the remote and taking a look at the radio circuitry. He discovered the circuit uses a nRF24L01+ chip. He had previously picked up a couple of these on eBay, so his first thought was to just promiscuously snoop on the communications over the air. Unfortunately the chips can only listen in on up to six addresses at a time, and with a 40-bit address, this approach may have taken a while.

Not one to give up easily, [Richard] chose a new method of attack. First, he knew that the radio chip communicates to a master microcontroller via SPI. Second, he knew that the radio chip had no built-in memory. Therefore, the microcontroller must save the address in its own memory and then send it to the radio chip via the SPI bus. [Richard] figured if he could snoop on the SPI bus, he could find the address of the remote. With that information, he would be able to build another radio circuit to listen in over the air.

Using an Open Logic Sniffer, [Richard] was able to capture some of the SPI communications. Then, using the datasheet as a reference, he was able to isolate the communications that stored information int the radio chip’s address register. This same technique was used to decipher the radio channel. There was a bit more trial and error involved, as [Richard] later discovered that there were a few other important registers. He also discovered that the remote changed the address when actually transmitting data, so he had to update his receiver code to reflect this.

The receiver was built using another nRF24L01+ chip and an Arduino. Once the address and other registers were configured properly, [Richard's] custom radio was able to pick up the radio commands being sent from the lighting remote. All [Richard] had to do at this point was press each button and record the communications data which resulted. The Arduino code for the receiver is available on the project page.

[Richard] took it an extra step and wrote his own library to talk to the flashes. He has made his library available on github for anyone who is interested.


Filed under: Arduino Hacks, radio hacks