Since our last article covering the Arduino v. Arduino case, we’ve received a couple of tips, done some more digging, and learned a lot more about what’s going on. We thought it was time to share the story with you as it develops.
The Players
In short, there are two companies calling themselves “Arduino” at the moment. One, Arduino LLC was founded by [Massimo Banzi], [David Cuartielles], [David Mellis], [Tom Igoe] and [Gianluca Martino] in 2009, runs the website arduino.cc, and has been directing and releasing the code that makes it all work. Most of these folks had been working together on what would become the Arduino project since as early as 2005.
The other “Arduino” used to be called Smart Projects and was the manufacturing arm of the project founded and run by [Gianluca Martino]. Smart Projects changed their name to Arduino SRL in November 2014. (A “Società a responsabilità limitata” is one form of Italian limited-liability company.) They have been a major producer of Arduino boards from the very beginning and recently registered the domain arduino.org.
Around the time of the name change [Martino] sold his shares to a Swiss firm Gheo SA and [Federico Musto] was appointed CEO. Gheo SA is owned and directed by [Musto], who also runs a design consultancy based in the US and Taiwan called dog hunter, LLC.
dog hunter and [Musto] helped develop the Arduino Yun, a mashup of an Arduino with an OpenWRT-compatible WiFi router. dog hunter also runs the Linino.org website to support the Linux distribution that’s running on the router part of the Yun.
In short, on one side is Arduino LLC, run by the original Arduino Five and hosting arduino.cc. On the other is now called Arduino SRL, run by a former co-developer [Federico Musto] who bought out the largest producer of Arduino boards and opened up arduino.org.
The Legal Situation
When we previously reported that Arduino LLC brought a lawsuit against Arduino SRL, we only had half of the story. This suit, filed in January 2015 and still pending, is predated by an earlier trademark action filed by Arduino SRL against Arduino LLC.
The trademark case is a petition to cancel Arduino LLC’s trademark on Arduino, filed by Smart Projects SRL on October 3, 2014. This case is also still pending, and because it’s in front of the USPTO, it’s entirely visible. Here’s what we know.
The claims to invalidate Arduino LLC’s trademark on “Arduino” (PDF) can basically be summarized as follows: “We filed for trademark in September of 2014 and have been producing boards labelled Arduino since 2005. Arduino LLC only came into being in 2009 and wasn’t in control of the name at the time it applied for the trademark.”
To which Arduino LLC’s response (PDF) essentially reads “We’ve had the trademark on the word Arduino longer than you have, and we deny all the rest.”
The timeline for the case is laid out here (PDF). Basically, the discovery phase lasts until June 2015, and there’s not going to be a decision until after Christmas unless they settle early.
We’re not lawyers, but it looks like the case is going to revolve around whether or not Arduino LLC actually controlled the “Arduino” name at the time it trademarked it, and whether the extensive production of boards labelled “Arduino” by Smart Projects invalidates that trademark. The relevant trademark law can be found here and if you know your stuff on this, please feel free to illuminate us in the comments or with a direct e-mail to us directly or through the tip line.
So to recap the story so far, two websites, two “Arduinos”, and two lawsuits.
A Tale of Two Internets of Things
Not surprisingly, both groups have differing versions of where to go from here, but both sides are betting on the Internet of Things. Arduino LLC has partnered with Intel on the Galileo and more recently is working with BeagleBoard.org on the forthcoming Arduino TRE. Arduino SRL is sticking with the WiFi router MIPS solution that powers the Yun and keeping it in-house.

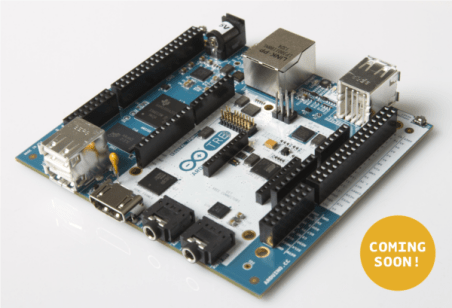
As previously mentioned, the Yun was at least co-designed with [Musto] and dog hunter. And now on arduino.org, there’s a placeholder product photo for the “Arduino Yun Mini” with the date April 30, 2015 attached. The Yun Mini looks exactly like the Linino One in a different color scheme, and it doesn’t take much of a hardware detective to put two and two together, given that [Musto] is now CEO of both dog hunter (which runs Linino.org) and Arduino SRL. The Yun Mini is, naturally, conspicuously lacking from the arduino.cc product lineup.
The next step up from the Yun on the arduino.cc site is the Arduino TRE, which is also a Linux-based solution coupled with an ATmega32u4. In this case, however, the Linux computer comes in the form of a 1-GHz Sitara AM335x processor, essentially a Beaglebone/Arduino mashup. And one can’t help but notice the tagline on the TRE page: “Arduino TRE, the first Arduino board manufactured in the U.S.” which is a dramatic shift away from the proudly “Made in Italy” silkscreens that adorn the Smart Projects / Arduino SRL boards.
Is this the reason for the schism? Massimo Banzi has said that he’s interested in working with many other producers to get newer and better Arduino products out there and would even like to be able to sell in China, land of the clones. (translate) [Martino] and now [Musto] clearly have a vested interest in keeping production in Italy, while Arduino LLC’s interests are better served by going global. Perhaps it’s only natural that the two part ways.
The Code
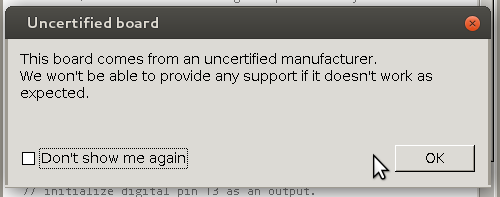
Finally, the story takes a slightly cheeky turn in the most recent version of the Arduino IDE, released on March 10. As of version 1.6.1, there’s been a patch to the Arduino codebase that pops up a warning dialog when an “Arduino” with the USB Vendor ID (VID) 0x2A03 is flashed. The pop-up message reads “This board comes from an uncertified manufacturer. We won’t be able to provide any support if it doesn’t work as expected.”
You may not be surprised that USB VID 0x2A03 belongs to “dog hunter AG”. The Arduino IDE pops up the “uncertified manufacturer” warning any time that this VID is used, on any board type. Conspicuously missing in all of this are any of the VIDs in use by the various other counterfeit “Arduino” boards running around out there. Either there are too many of them to address directly, or this is a targeted, tactical strike against the Arduino SRL camp.
If you don’t have a board with VID 0x2A03, you can see the changes to the IDE on GitHub for the commit “Added warning for uncertified boards“. Scroll on down to the changes to the file “hardware/arduino/avr/boards.txt” and you’ll see what’s going on. (And smile if you don’t have to code in Java for a living: nearly 600 lines of code added just to implement a simple pop-up dialog!)
Apparently, at least a couple of people with an UNO and a Mega256 have seen the warning and claim to have bought their devices through reputable retailers, including Mouser.
Now this isn’t an FTDI-style bricking; it’s just a pop-up dialog. What’s even nicer is that it comes with a “Don’t show me again” button so that you’re not constantly nagged. And it does recognize the boards so that they function normally, but it’s definitely a scare for users when they first stumble upon it.
The Future
So what does all of this mean for the future of Arduino as we know it? There’s certainly been a code fork and there are at least two divergent hardware design approaches to the IoT and strategic visions for the two firms. The trademark issues may not be resolved until 2016, though, so in the mean time there’s going to be significant market confusion. Not to mention the two similar websites.
You can certainly bet that both companies will be pushing themselves to get good product to market and trying to keep hold on the community. Maybe that will all be good for us in the end? Post your wild guesses and conspiracy theories in the comments.
We’ll keep you posted when we learn even more. If you’ve got leads that you’d like us to chase down, hit us up on the tip line.
And thanks very much to [Concerned User] for the tipoff to the trademark filing and to [Another Anonymous Tipster] for the tip to the IDE version 1.6.1 changes.
Filed under:
Arduino Hacks,
news,
slider 


 A quick summary of the legal situation. Arduino LLC was formed in April 2008 by the original five founders to provide a corporate entity behind the Arduino project. Smart Projects SRL, controlled by one of the founders, was tasked with the actual production of the boards. It turns out that Smart Projects had trademarked the Arduino brand in Italy in December 2008, before Arduino LLC got around to filing in April 2009 in the USA. But everyone was friends, right? As long as the licensing fees keep flowing.
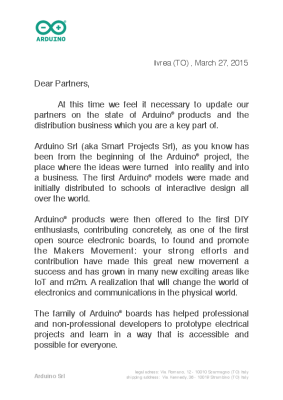 A good portion of the letter reads to be a very carefully worded defense of why Arduino SRL is the true Arduino:


