Posts with «game boy» label

Turn your old Game Boy into a drone controller

What do you do when you find your old Game Boy? Most of us try to boot it up and reminisce the days of playing Tetris, Super Mario and Pokémon. Others like Gautier Hattenberger decide to turn it into a drone controller.

In order to do this, Hattenberger modified the Game Boy’s Game Link port with an Arduino Nano and an FTDI chip, which converts the Game Link signals to USB. Using a small piece of software on his laptop, he is able to control his Parrot ARDrone 2.0 via the classic device— A and B buttons for up or down, and the directional arrows for maneuvering.

Hattenberger has detailed his entire build here, and shared the code on GitHub.

Bill’s Arduino

Pokemon is a great game by itself, but when you realize that not all of the ‘mon are available in one game, trading is required for completion, and some pokemon aren’t available without either hacking or going to a Toys ‘R Us in 1997, you start to see how insidious this game can be. Figuring he could finally complete the game with an Arduino, [Pepijn] decided to build a pokemon storage system.

This build was inspired by an earlier post that also spoofed trades. Instead of building this project around a high-power micro, [Pepijn] decided to use an Arduino. The protocol Game Boys use to communicate with each other is extremely well documented, although that’s only half the battle. Each game using the link cable used specialized data structures for transfer, and after grepping through a disassembled Pokemon ROM,  [Pepijn] figured out how everything worked.

The completed hardware keeps one Pokemon in the EEPROM of an Arduino. It’s not very fast if you want to catch all 151 Pokemon in the Gen 1 games, but any way you look at it, you’re going to be catching a lot of Magikarp anyway.


Filed under: Arduino Hacks, nintendo gameboy hacks

ArTICam Interfaces Game Boy Camera with TI Calculators

[Christopher Mitchell] has given Texas Instruments calculators the ability to capture images through a Game Boy Camera with ArTICam. First introduced in 1998, The Game Boy Camera was one of the first low-cost digital cameras available to consumers. Since then it has found its way into quite a few projects, including this early Atmel AT90 based hack, and this Morse code transceiver.

TI calculators don’t include a Game Boy cartridge slot, so [Christopher] used an Arduino Uno to interface the two. He built upon the Arduino-TI Calculator Linking (ArTICL) Library  to create ArTICam. Getting the Arduino to talk with the Game Boy Camera’s M64282FP image sensor turned out to be easy, as there already are code examples available. The interface between the camera sensor and the Arduino is simple enough. 6 digital lines for an oddball serial interface, one analog sense line, power and ground. [Christopher] used a shield to solder everything up, but says you can easily get away with wiring directly the Arduino Uno’s I/O pins. The system is compatible with the TI-83 Plus and TI-84 Plus family of calculators. Grabbing an image is as simple as calling  GetCalc(Pic1) from your calculator program.

So, If you have an old calculator lying around, give it a try to enjoy some 128×123-pixel grayscale goodness!


Filed under: Arduino Hacks, classic hacks

The Tale of Two Wearable Game Boys

We’re well past the time when Halloween costume submissions stop hitting the tip line, but like ever year we’re expecting a few to trickle in until at least Thanksgiving. Remember, kids: documentation is the worst part of any project.

[Troy] sent us a link to his wearable Game Boy costume. It’s exactly what you think it is: an old-school brick Game Boy that [Troy] wore around to a few parties last weekend. This one has a twist, though. There’s a laptop in there, making this Game Boy playable.

The build started off as a large cardboard box [Troy] covered with a scaled-up image of everyone’s favorite use of AA batteries. The D-pad and buttons were printed out at a local hackerspace, secured to a piece of plywood, and connected to an Arduino Due. The screen, in all its green and black glory, was taken from an old netbook. It was a widescreen display, but with a bezel around the display the only way to tell it’s not original is from the backlight.

Loaded up with Pokemon Blue, the large-scale Game Boy works like it should, enthralling guests at wherever [Troy] ended up last Friday. It also looks like a rather quick build, and something we could easily put together when we remember it next October 30th.

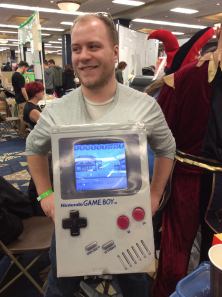
[Troy] wasn’t the only person with this idea. A few hours before he sent in a link to his wearable Game Boy costume, [Shawn] sent in his completely unrelated but extremely similar project. It’s a wearable brick Game Boy, a bit bigger, playing Tetris instead of Pokemon.

[Shawn]‘s build uses a cardboard box overlaid with a printout of a scaled-up Game Boy. Again, a laptop serves as the emulator and screen, input is handled by a ‘duino clone, and the buttons are slightly similar, but made out of cardboard.

Both are brilliant builds, adding a huge Game Boy to next year’s list of possible Halloween costume ideas. Videos of both below.


Filed under: Arduino Hacks, Holiday Hacks, nintendo gameboy hacks