Posts with «uncategorized» label

Low-cost Arduino-compatible electronics kit

There is an Indiegogo campaign to sell a kit for learning electronics that seems to have better pricing than most of the similar kits I’ve seen: BE MAKER! KIT plus FREE lessons on electronics, from Zero to Internet of Things | Indiegogo.

The most popular product they are selling seems to be a $69 kit with a microprocessor board (a clone of the Arduino Leonardo); a “shield” with an LCD display driver, pushbuttons, microSD card reader, 2 servo connections, RGB LED strip driver, and Ethernet adapter; a bunch of useful electronics parts (including an LCD display for the shield and an RGB LED strip); “lessons” (which are probably just assembly instructions for different projects, but may be more tutorial) and a box to keep all the tiny parts in.

As Arduino and Arduino-compatible kits go, this one looks pretty good.  Forget about it for holiday gift-giving though, as they don’t expect to deliver until February 2014.  If you want something similar for this year, look at the somewhat more expensive kits from AdaFruit or SparkFun.


Filed under: Uncategorized Tagged: Adafruit Industries, Arduino, education, electronics, Indiegogo, SparkFun Electronics

First look – Arduino Yún

Introduction

After being announced in May this year, the new Arduino Yún has arrived in the crowded marketplace – and I snapped up one of the first to arrive in Australia for an initial review. The purpose of which is to run through the out of box experience, and to see how easy it was to get the Yún working with the promised new features.

[Update – over time we’ll publish tutorials specifically for the Yún, which are listed here.]

The Yún introduces some interesting new combinations of hardware and connectivity, all within the familiar form-factor. Which gives us plenty to examine and write about, so let’s get started. First, a quick look around the Yún:

Notice the stickers on the header sockets, useful for beginners or the absent-minded…

The usual TX/RX and D13 LEDs, plus notifiers for power, WiFi, LAN and USB use…

Ethernet, USB programming, USB host…

Again with the stickers…

The rear is quite busy. You can also see “Made in Taiwan” – a first for Arduino. I believe the reason for this was due to the new Atheros chipset requirements. Did you notice the multiple reset buttons? There are three – one for the Arduino, one for wifi and one to reboot Linino. As you can see there’s a lot of circuity on the bottom of the Yún, so it would be prudent to use some short standoffs to elevate the board and protect the bottom. Before moving on, you might like the following video where the Arduino team introduce the Yún:

Specifications

The Yún is based around the Arduino Leonardo-specification board – thus you have the ATmega32U4 microcontroller and the usual Leonardo functions. Note you cannot feed wild DC voltages into the Vin pin – it must be a regulated 5V. And the DC socket has gone, so for a solid connection you might want to make or buy your own power shield.

However there is so much more… underneath a small metal shield below the digital I/O pins is an Atheros AR9331 CPU running a Linux distribution based on OpenWRT named Linino. This Atheros part of the board is connected to a microSD socket, 10/100 Ethernet port, a USB 2.0 socket for host-mode functions and also has IEEE 802.11b/g/n WiFi, and Power-over-Ethernet support (with an optional adaptor).

And all of that is connected to the Arduino side of things via a simple serial “bridge” connection (with it’s own library) – which gives the Arduino side of the board very simple methods of controlling the other onboard hardware.

Getting started with the Yún WiFi

First thing is to download and install the new IDE, version 1.5.4. This is for Due and Yún, so keep your older installations as well. On the general Arduino side of things nothing has changed, so we’ll move on to the more interesting side of the board. The first of these is to setup and experiment with the onboard WiFi. After connecting your board to USB for power, you can connect to it with your PC’s WiFi:

… at which point you connect to the Yún network. Then visit 192.168.240.1 from a web browser, and you’re presented with a page that asks for the default password, which is … “arduino”:

At which point you’re presented with the relevant details for your Yún:

… such as the IP address, MAC address, etc. Make note of your MAC address, you might need it later. From here you can configure the Yún WiFi details, for example the name and password, and also the details of your existing WiFi network which can be used to access the Yún. Once you save those, the Yún reboots and tells you to connect the PC back to the existing WiFi network:

If for some reason it doesn’t work or you entered the wrong settings – hold down the “WLAN RST” button (next to the USB host socket) for five seconds. This sets the WiFi details in the Yun back to the default … and you can start all over again.

Note that the Yún’s preset IP of 192.168.240.1 may not be suitable for your own network. For example, if your home router is 10.1.1.1 you need to do some detective work to find out the IP address for the Yún. Head into your router’s administration pages and look for your DHCP Client Log. It will show a list of devices that are connected to the network, including their MAC and IP address – for example:

Then it’s a simple matter of finding the MAC address in the list and the matching IP. Once you have the IP address, enter that into a web browser and after being prompted for the Yún’s password, you’re back to the welcome page with the IP, MAC addresses etc.

WiFi Sketch Uploading

Once your Yún is on the same WiFi network as the PC running the IDE – you can upload a sketch over WiFi! This is possible due to the bridge between the Atheros section on the board and the Arduino hardware. Just select the board type as normal in the IDE, and the port (the IP address version):

… then hit Upload as normal, enter the password:

and you’re done. Awesome.

Console-based control of Arduino over WiFi

There’s a neat example that demonstrates how you can control the Arduino over the WiFi using a console terminal on the PC. Upload this sketch (from http://arduino.cc/en/Guide/ArduinoYun#toc13):

#include <Console.h>

const int ledPin = 13; // the pin that the LED is attached to
int incomingByte;      // a variable to read incoming serial data into

void setup() {
  // initialize serial communication:
  Bridge.begin();
  Console.begin(); 

  while (!Console){
    ; // wait for Console port to connect.
  }
  Console.println("You're connected to the Console!!!!");
  // initialize the LED pin as an output:
  pinMode(ledPin, OUTPUT);
}

void loop() {
  // see if there's incoming serial data:
  if (Console.available() > 0) {
    // read the oldest byte in the serial buffer:
    incomingByte = Console.read();
    // if it's a capital H (ASCII 72), turn on the LED:
    if (incomingByte == 'H') {
      digitalWrite(ledPin, HIGH);
    } 
    // if it's an L (ASCII 76) turn off the LED:
    if (incomingByte == 'L') {
      digitalWrite(ledPin, LOW);
    }
  }
}

Then load your terminal software. We use PuTTY on Windows. Run the terminal software, then login as root, then telnet to “localhost 6571”:

You can then send characters to the Yún just as you would with a USB-connected Arduino via the serial monitor. With the example above you’re turning the D13 LED on and off, but you can get the idea.

The “Internet of Things”

Arduino has teamed up with a service called “Temboo” – which gives you over 100 APIs that your Yún can hook up with to do a myriad of things, such as send tweets, get weather data from Yahoo, interact with Dropbox, etc. This is done easily and explained quite well at the Temboo website. After signing up for Temboo (one account seems to be free at the moment) we tried the Yahoo weather API.

You enter the parameters using an online form in Temboo (in our example, the address of the area whose weather forecast we required), and the Temboo site gives you the required Arduno sketch and header file to upload. And you’re done. With this particular example, I wanted the weather in Sydney CBD – and once running the data is returned to the serial monitor, for example:

It was great to see that work the very first time, and a credit to Temboo and Arduino for making it happen. But how?

There is a Temboo client in the Linino OS, which is the gateway to the API via WiFi, and also communicates with the Arduino via the serial bridge. The Arduino Temboo library can then interact with the Linino client without complex code. The weather data is then returned back from the Internet via the Temboo client and fed to the Arduino serial port, where you can parse it with your own code. This looks like a lot of fun, and also could be quite useful – for example capturing data and sending it to a Google Docs spreadsheet. For more information, check out the Temboo website.

However you can delve deeper and create your own APIs, matching code – and perhaps other services will develop their own APIs in the near future. But for now, it’s a good start.

Where to from here? And support?

This article has only scratched the surface (but not bad considering the board arrived a few hours ago). There’s plenty more examples on the getting started page, in the IDE (under “Bridge”) – plus a dedicated Arduino Yún forum. And check out this gmail notifier. In the near future we’ll create some of our own tutorials, so stay tuned.

Is the Yún a completely open-source product? 

Well it says “open source electronics prototyping platform” on the rear, but is this true? The Arduino Leonardo-side of the board is. However the Atheros AR9331 chip is not. Nevertheless, are you really going to reproduce your own AR9331? So it doesn’t really matter. Being a pragmatist I propose that the Yún solves the problem of Arduino and Internet connectivity quite well for the non-advanced user – so not being totally OSHW isn’t an issue.

Support

This board is very new to us here, so for questions or support please ask on the dedicated Arduino Yún forum.

Conclusion

Since the popularity of various single-board computers has increased exponentially over the last few months, some may say that the Yún is perhaps too little, too late. After only having the Yún for a few hours before writing this article, personally I disagree with this statement – the Yún is a device that still gives us the wide range of hardware control, and what looks to be a very simple method of connectivity that surely is cheaper and less prone to issues than the original Arduino WiFi shield.

What the Yún gives us is a simple, well-executed method of getting our Arduino connected to the outside world – and in a manner that won’t confuse or put off the beginner or intermediate user. So for now, it’s a win.

What do you think? Leave a comment below.

And for more detail, full-sized images from this article can be found on flickr. And if you’re interested in learning more about Arduino, or want to introduce someone else to the interesting world of Arduino – check out my book (now in a third printing!) “Arduino Workshop” from No Starch Press.

In the meanwhile have fun and keep checking into tronixstuff.com. Why not follow things on twitterGoogle+, subscribe  for email updates or RSS using the links on the right-hand column? And join our friendly Google Group – dedicated to the projects and related items on this website. Sign up – it’s free, helpful to each other –  and we can all learn something.

The post First look – Arduino Yún appeared first on tronixstuff.

Tronixstuff 18 Sep 14:39

Mac OS 10.6.8 kernel bug

Today I managed to tickle a rather nasty kernel bug in Mac OS 10.6.8 on my laptop.  The bug resulted in unkillable zombie processes—including one stuck in a busy-wait loop that took up 100% of the CPU (in kernel mode). You can’t kill the processes (not even “kill -9″ works), and you can’t shut down or restart the computer—only power cycling works.

Here is how I tickled the bug:

  1. I had a KL25Z board plugged into a USB slot, providing data at 115200 baud.
  2. I started a python program that read the stream from the USB and echoed it to the terminal window:
    #!/usr/bin/env python
    
    from __future__ import print_function,division
    from glob import glob
    from serial import Serial
    
    USB_serial_ports = glob("/dev/tty.usb*")
    print ("# Possible ports = {}".format(USB_serial_ports))
    usb_serial = Serial(USB_serial_ports[0],baudrate=115200,timeout=5);
    print ("# Opened {}".format(usb_serial))
    
    try:
        for line in usb_serial:
           print (line.strip())
    except KeyboardInterrupt:
        usb_serial.close()
    
  3. I used ^C to kill the python program and close the port.  So far, everything was working great.  The program echoed the stream from the KL25Z board nicely to the terminal window, and the try-except block caught the ^C interrupt and (presumably) closed the port.
  4. I started the python program again.  This time, it was unable to open the USB serial port (never getting to the “Opened” print statement), and could not be killed. The Activity Monitor showed that the kernel was using 100% of a CPU core (I have a dual-core MacBook Pro, so this was only half the available CPU). I tried ^C, Force Quit, and “kill -9″ with the process number of the Python process—none had any effect. ^Z claimed that the process was suspended, but the kernel was still in a busy-wait loop, and attempting to kill the suspended process had no effect on either the kernel busy-wait or the Python process.
  5. Unplugging the USB cable stopped the kernel busy-wait loop (at least the system CPU usage dropped from 100% down to 2%), but the Python process was still unkillable.

I could do this cycle repeatedly, since each time I plugged in the cable to the KL25Z board the Mac assigned a new device number, and I could thereby build up a lot of unkillable Python processes.  Eventually, I got tired of the large number of unkillable processes, and tried restarting the computer.  It got to the blue screen, then spun the waiting icon forever (well, longer than I was willing to wait), so I had to use option-power to turn off the computer.  It rebooted fine.

I have so such trouble with the Arduino Duemilanove board (which resets whenever the USB serial port is opened).  The same Python program also works fine with the Arduino Leonardo board, which does not reset.  I can run my little echoing program, ^C it, and run it again to continue getting the stream from the board.

There must be some difference between how the Leonardo sets up the USB serial connection and how the KL25Z board does it—a difference that causes a kernel busy-wait when reopening the stream from the KL25Z, but not when re-opening the stream from the Leonardo.  Since the default serial setup is the same for both, I’m a little mystified what that could be.

Of course, I’m now left with a bit of a dilemma—how do I record data from the KL25Z board without having to unplug and replug the USB cable for every event I want to record?

I looked around the Web to see if anyone else had similar problems.  It does seem to have been a problem with OS 10.6 in other USB contexts:

http://support.plugable.com/plugable/topics/baud_rate_switches_cause_driver_hangs_in_the_kernel

http://stackoverflow.com/questions/4064832/open-function-hangs-never-returns-when-trying-to-open-serial-port-in-mac-os

And the stackoverflow answers suggest that the problem is buggy device driver, but I’ve no idea which device driver either the Leonardo or the KL25Z board (with MBED firmware) causes to be used on the Mac.  Are they using different drivers?  How do I find out?


According to the USB Prober application, the KL25Z board opens with

           4: MBED CMSIS-DAP@4100000  <class IOUSBDevice>
               AppleUSBCDC  <class AppleUSBCDC>
               USB_MSC@0  <class IOUSBInterface>
                   IOUSBMassStorageClass  <class IOUSBMassStorageClass>
               IOUSBInterface@1  <class IOUSBInterface>
                   AppleUSBCDCACMControl  <class AppleUSBCDCACMControl>
               IOUSBInterface@2  <class IOUSBInterface>
                   AppleUSBCDCACMData  <class AppleUSBCDCACMData>
                       IOModemSerialStreamSync  <class IOModemSerialStreamSync>
               MBED CMSIS-DAP@3  <class IOUSBInterface>
                   IOUSBHIDDriver  <class IOUSBHIDDriver>
                       IOHIDInterface  <class IOHIDInterface>

while the Leonardo opens with

           3: Arduino Leonardo@6200000  <class IOUSBDevice>
               AppleUSBCDC  <class AppleUSBCDC>
               IOUSBInterface@0  <class IOUSBInterface>
                   AppleUSBCDCACMControl  <class AppleUSBCDCACMControl>
               IOUSBInterface@1  <class IOUSBInterface>
                   AppleUSBCDCACMData  <class AppleUSBCDCACMData>
                       IOModemSerialStreamSync  <class IOModemSerialStreamSync>
               IOUSBInterface@2  <class IOUSBInterface>
                   IOUSBHIDDriver  <class IOUSBHIDDriver>
                       IOHIDInterface  <class IOHIDInterface>

The biggest difference seems to be that the KL25Z board (with MBED firmware) offers one more interface—the mass-storage interface that is used for downloading programs to the board. I don’t understand a lot of what I can see poking around with USB Prober, but I’m not seeing anything else that looks like a significant difference between the Leonardo board and the KL25Z (with MBED firmware). Certainly the serial interface specs look identical, so far as I can tell.


Filed under: Uncategorized Tagged: Arduino, busy wait, kernel bug, KL25Z, Mac OS X

FFT on ATMega and BitScope

Yesterday, my son was thinking of adding a microphone to the design he is working on, and was considering adding a fast Fourier transform (FFT) to detect pitch.

He spent a few hours after his 10 a.m.–5 p.m. theater class reading about the FFT algorithm. He found an implementation of the FFT for an Arduino, which he tried reading along with the FFT explanations he found on the web.  I’m actually surprised the the Arduino was capable of doing an FFT, given the slowness of the processor.  It is true that the example code only does a 64-sample FFT with a sampling rate of 1kHz, using 8-bit samples and 16-bit integer arithmetic, but it is reported to do it at better than 10 FFTs per second.

I also pointed him to the Discrete Cosine Transform (DCT), which has somewhat smaller boundary artifacts, and can be computed about twice as fast, but he hasn’t had time to read that yet.  Somewhat surprisingly the DCT article in Wikipedia much better written than the general one on Fourier Transforms, which uses awkward notation and a rather dry, formal factoid dump.

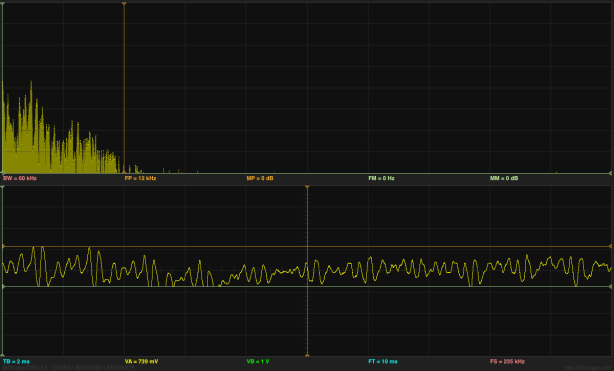
I wanted to show him that FFT did not make pitch extraction trivial (at least not in real musical contexts), so I wired up a microphone and amplifier to my BitScope Pocket Analyzer and we turned on some Internet radio (our local public radio station, KUSP).  The complex mass of rapidly shifting peaks in the FFT made it clear that tracking a pitch would not be easy.  (I think that there are some useful pitch-extraction algorithms that are based on FFT, but they are not trivial.) I think I convinced him that he is better off trying to extract loudness than pitch, if he wants a useful control parameter for his device.

Incidentally, he spent some time yesterday looking for cheap electret microphones. There are quite a few on the market, but many of them say “hand solder only” on the datasheets—even some of the ones with just solder pads! There are mics that can be reflow soldered, but finding prices for them in the 100s is difficult—they mostly seem to be quotes from the manufacturers only. One promising one is the SiSonic SPQ2410HR5H-PD, which is only  3.76mm by 2.24mm and uses a ball grid array (it costs 92¢ in 100s, substantially more than 57¢ for the cheapest through-hole mic (though that needs to be hand soldered). CORRECTION 2013 July 10—that’s a MEMS silicon mic, not an electret.

We looked at digital mics that do the A-to-D conversion already, but the only one with a useful output format was the ADMP441, which costs $4.52 in 100s (way too expensive). The cheaper (down to about $1.02) digital mics all use PDM (pulse-density modulation), but to get that into a usable form inside the ATMega, he’d have to low-pass filter it and pass it through the A/D converter. Still, that may not be any more expensive than an analog mic, DC-blocking high-pass filter, and amplifier, though using a separate amplifier would let him design for the proper microphone sensitivity.  He’s going to have to figure out whether the board area and parts cost are worth the extra functionality of the microphone.  If the board area is not a problem, he could design the mic in, but then have the devices only partially populated to save parts costs, if necessary.

We also noticed that we could tell the bandwidth of the radio station we were listening to, because there was a very clear drop in the spectrum at 10kHz.  I tried capturing that this afternoon, but the station we listened to had a talk program rather than a music program, and I never captured a moment when they were using the full bandwidth.  I tried a different Internet music source, and got the following plot, which seemed to indicate a 12kHz bandwidth, but that may have been limited by the music recording they were playing, rather than the codec used for transmission over the internet.

Snapshot of FFT showing a bandwidth of about 12kHz. The grid for the spectrum is 10dB per division vertically and 6kHz per division horizontally.

Before we’d played with sound input, we’d looked at sine waves generated by the BitScope, by connecting a wire from the GEN output to the CHA input. I don’t think I was able to explain to him why the windowing function used for removing boundary artifacts in the FFT results in spreading the single-frequency spikes into wider peaks. It was too late at night to go into the theory of transforms and how multiplication in the time domain turns into convolution in the frequency domain, and vice versa. For that matter, he hasn’t even had convolution yet, so some of the fundamentals needed for the explanation were missing.

At one point I thought that the FFT on the Bitscope was a crude rectangular window, but I was informed by the Bitscope people that they use a Kaiser window. I should have been able to tell that they were doing some sort of windowing by seeing the spread of the spikes for sine waves, but I wouldn’t have been able to guess which window. (It may be buried in the documentation somewhere.) Actually, now that I look at the spikes, they seem too wide for a Kaiser window, unless they set the α parameter much too large.  They only need the sidelobes to be about 60dB down, which should be a much narrower main lobe—not the 18-bin width I think I’m seeing. Perhaps there is something else spreading the peaks, not just the Kaiser window.

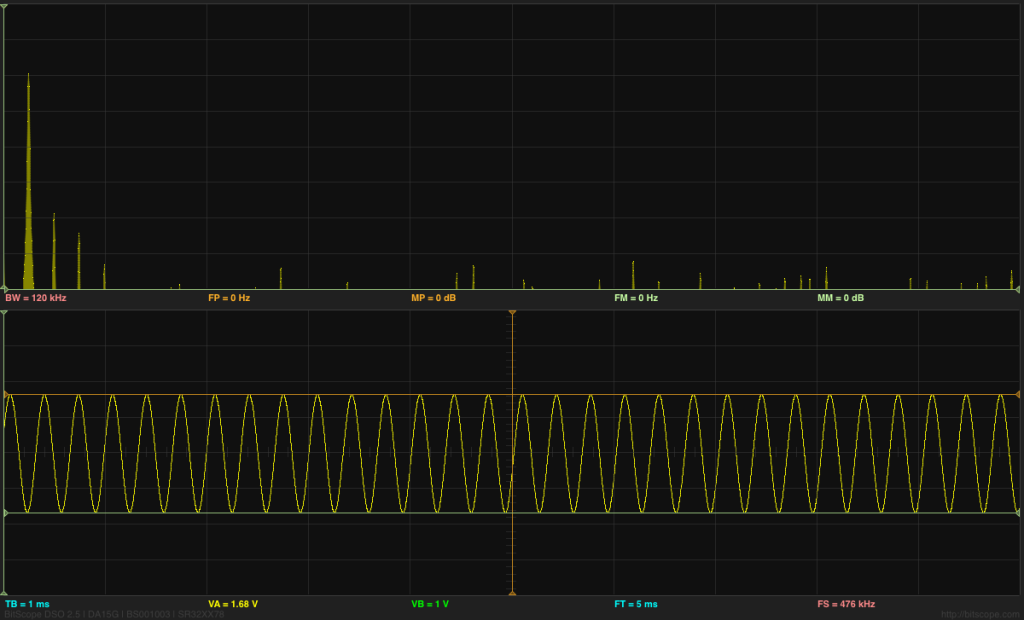
Sine wave and FFT analysis of it (Click on image for larger, clearer picture). Note the harmonic distortion (2nd, 3rd, and 4th harmonic at about –40dB, –45dB, and —53dB).
Good luck figuring out the settings of the Bitscope from the information they show on the display!  TB is the time per division on the x-axis of the plot, while BW=120kHz is the full width of the spectrum (so 12kHz per division), and the sine wave is at about 3kHz.

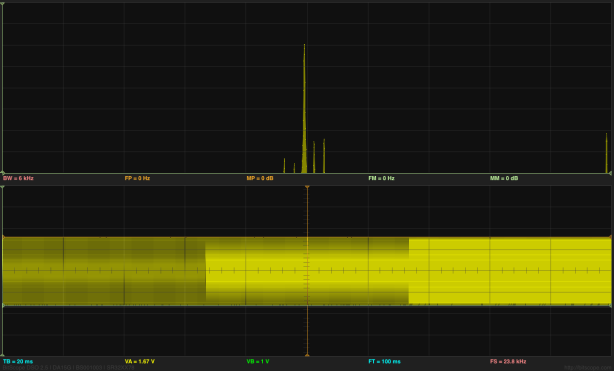
It is interesting to look a a sine wave that is an exact submultiple of the sampling frequency:

Here is a 2975Hz sine wave, where each period should be 8 samples long. Note the appearance of side bands to either side of the main peak. These artifacts are much smaller if we move to a frequency that does not fit so neatly into the FFT buffer.
Note that the time base is different for this screenshot (20ms/division).

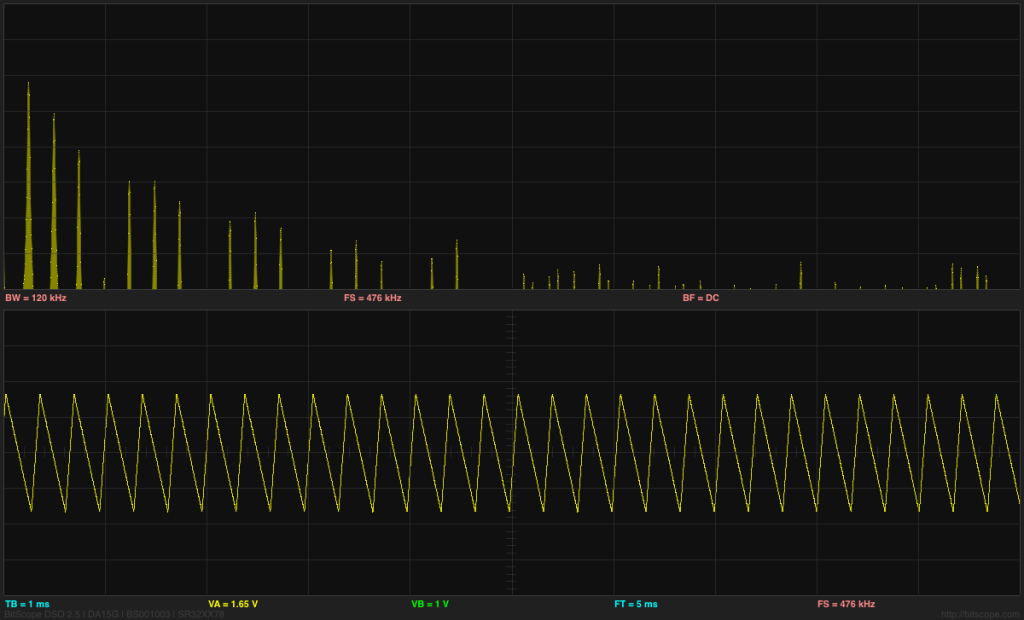
We also looked at the spectra of triangle waves and square waves (since the BitScope waveform generator can do those also). Playing with the duty cycle was fun also. I had not been aware that a duty cycle of 1/n on a square wave or triangle wave suppressed the nth, 2nth, 3nth, … harmonics. I had known that a 50% duty cycle square wave or triangle wave suppressed the even harmonics, but I had never thought about other duty cycles.

Triangle wave with 25% duty cycle, showing suppression of the 4th, 8th, 12th, and 16th harmonics.


Filed under: Uncategorized Tagged: Arduino, BitScope, DCT, Discrete Cosine Transform, electret mic, electret microphone, Fast Fourier Transform, FFT

Upcoming Arduino Site Maintenance

As you may have noticed we’ve been witnessing several problems with our website since last Sunday 3 a.m. CET. In the next hours we’re starting working on some major maintenance to the Arduino website:  tomorrow Thursday 21st of February, around 3 p.m. CET until Friday 22nd of February 2013 same time .

We’ll then be on hand  to resolve any issues that arise after we re-enable the site, but please be aware that further outages may occur as we fine-tune server features. After the site is back, please let us know if you encounter any problems using it.

During this process, we’ll be posting status updates on Twitter and remaining as responsive as possible.

We apologize for any inconvenience! Thanks for your patience.


Arduino Blog 20 Feb 11:28

Plumbing karma

A couple of days ago in Is coding for everyone?, I wrote

Atwood makes an analogy to everyone learning to do plumbing, as if that were a ridiculous idea.  Personally, I think that everyone should learn a little plumbing: enough to clear a toilet or sink trap, or replace a faucet washer, and to know when to call in a professional plumber.

So, naturally, yesterday the kitchen faucet started dripping for the first time in about 15 years.  I figured I knew how to change a faucet washer, and that it would just take a few minutes today. Ha!

The first problem was that the faucet had not been opened up in so long that the threads had seized, so it took two people to get it apart: one under the sink holding onto the valve body with channel-lock pliers, the other using a lot of leverage with an 8″ adjustable wrench.  Even that wasn’t enough, so I had to go down to the hardware store for some penetrating oil and let it soak in for a while.

The Grohe faucet cartridge from the kitchen faucet.

Eventually, the threads eased up and the the faucet came apart.  But there was no washer to replace.  Instead what I had was a Grohe washerless faucet cartridge.  The Grohe cartridges are pretty good (which is why I hadn’t had to do anything with the kitchen faucet in so long), but when they fail, there’s not much you can do but replace the cartridge.

I tried smearing everything with vaseline and replacing the cartridge, just in case the problem was with the rubber gaskets, but the drip continued as before.

Unfortunately, the local hardware store does not carry Grohe parts (too upscale for Ace Hardware), so I had to bicycle 3.7 miles across town to Bay Plumbing, the closest place I could find that stocked the part.  I was pleased that their prices were essentially the same as I would have paid online (cheaper than some of the online places), and I could get the part immediately, rather than waiting 3–5 business days for delivery.

I was not so pleased that Bay Plumbing had no bike parking, so I told them about the Santa Cruz County Regional Transportation Commission bike parking program.   Unfortunately, I found out when I got home that SCCRTC no longer has the Bike Secure parking program.  That’s a shame, because there are still a lot of businesses that need bike parking!

In other news, the Arduino Leonardo that I had ordered arrived today. I ordered the Leonardo to test whether the data logger code worked with the Leonardo’s different way of handling the serial interface and different pin mapping.  But I goofed—despite my admonitions to the students in the circuits class to make sure that they got the right USB cable to go with the Arduino board they bought, I had not checked to see if we had a micro-B USB cable in the house.  We had so many USB cables sitting around, that I was sure one of them was a micro-B.  It turns out that they were all either B or mini-B, not micro B, so we were unable to test the data logger code on the Leonardo until I got a new cable.  (Actually, we had one micro-B cable, but it was a power-only cable for recharging my son’s bicycle headlight.)

I ordered a couple of the cables online earlier in the day, but they won’t come until next week, so after buying the faucet cartridge at Bay Plumbing, I stopped in next door at Santa Cruz Electronics to pick up a cable. Unlike Bay Plumbing, their prices were about three times what the online price would have been, so the only reason to buy there was to get the cable immediately. I’ll report on the status of the data logger software later, when I get an update from my son on the code he’s been adding today and when we’ve had a chance to test the Leonardo.


Filed under: Uncategorized Tagged: Arduino, bicycle parking, faucet, Leonardo, plumbing, USB cable