Posts with «shield» label

Arduino GSM/GPRS Shield gets helping hand from Telefonica for data, remote control

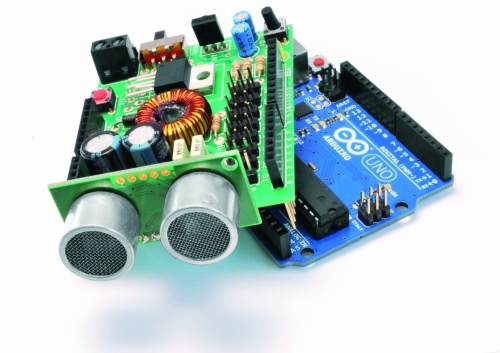
Arduino devices have had the option of a GSM linkup for awhile, but getting that cellular link to truly strut its stuff hasn't always been easy, even for those of us who'd be inclined to program an Arduino in the first place. Enter Telefonica, which wants to be the backbone of your internet of things. It's backing a new version of the GSM/GPRS Shield add-on (shown here) by offering both the expected machine-to-machine SIMs for the cellular connection as well as freshly added remote control of the board through the carrier's BlueVia pages. The Shield itself is getting a quiet upgrade in the process -- the software both takes up a smaller footprint and can now talk to the world in the background while the Arduino keeps on keepin' on. If you happen to be in Berlin, the new Shield is making the rounds at Campus Party workshops until April 25th. Neither side has said how readily available the new part will be available after that; for now, you can familiarize yourself with the current technology at the source link.

Continue reading Arduino GSM/GPRS Shield gets helping hand from Telefonica for data, remote control

Filed under: Peripherals, Wireless

Arduino GSM/GPRS Shield gets helping hand from Telefonica for data, remote control originally appeared on Engadget on Fri, 24 Aug 2012 11:41:00 EST. Please see our terms for use of feeds.

Permalink | Email this | Comments

Arduino WiFi shield available, costs $85 USD

Over on the Arduino blog, the release of the official Arduino WiFi shield was just announced. On the spec page for this WiFi shield. we can see this new board isn’t a slouch; it’s powered by a 32-bit ATMega 32UC3 microcontroller, has provisions for WEP and WPA2 encryption, and supports both TCP and UDP with the Arduino WiFi library. It also costs €69/$85/£55 from the Arduino store.

Now that the announcement of the Arduino WiFi shield is over with, we’ll take this opportunity to go through a few other WiFi adapters for the Arduino that don’t cost an arm and a leg.

The WiFly shield – available from Sparkfun – is a WiFi adapter with the same form factor as the ever popular XBee modules. Of course, it’s possible to make your own breakout board; the WiFly only needs a TX, RX, power and ground connection to connect your Arduino project to the Internet.

We’ve seen a few projects use the WiShield from async labs. It’s a WiFi module packaged in the familiar Arduino shield form factor, and costs $55 USD.

For the hardcore hackers out there, you could always get a bare Microchip WiFi module and get it to work with an AVR as [Quinn Dunki] attempted to. In all fairness, [Quinn] was trying to de-Arduinofy the WiFi library; if you’re cool with Arduino code swimming around in your project, this method will probably work.

There’s also the very, very cool Electric Imp. Basically, it’s an SD card with a built-in WiFi module. After configuring the Imp by holding it up to patterns flashing on your smartphone screen, this device serves as a transparent bridge to the magical ‘cloud’ we’ve been hearing about. The Electric Imp was supposed to have been released in late July/early August, and we’ll put a post up when this cool device actually launches.

Of course we’re neglecting the simplest solution to getting WiFi running on an Arduino project: just use a wireless router. Really, all you need is a pair of TX and RX pins and a copy of OpenWRT. Easy, and you probably have the necessary hardware lying around.

We’re missing a few methods of Arduinofying a WiFi connection (or WiFying an Arduino…), but we’ll let our readers finish what we started in the comments.


Filed under: arduino hacks, wireless hacks
Hack a Day 21 Aug 20:30

An open robot shield for Arduino

Open Electronics‘ staff were looking for a common and standard hardware platform usable on different robots they were working on. Their goal was to find a single platform that had to provide power supply to the microcontroller, it had to provide stabilized voltage for the servos, and, finally, it had to be equipped with an obstacle detector and with an IR receiver.

Having chosen Arduino as the target core board, they developed an ad-hoc shield meeting all these requirements, whose detailed description can be found here, together with the BOM and a lot of source code.

[Via: Open Electronics]

The proper way to put an Arduino in a Raspberry Pi

For all their hoopla, the GPIO pins on the Raspberry Pi aren’t terribly useful on their own. Sure, you can output digital data, but our world is analog and there just isn’t any ADCs or DACs on these magical Raspi pins.

The AlaMode, a project designed by [Kevin], [Anool], and [Justin] over at the Wyolum OSHW collaborative aims to fix this. They developed a stackable Arduino-compatable board for the Raspberry Pi.

Right off the bat, the AlaMode plugs directly into the GPIO pins of the Raspberry Pi. From there, communication with the ATMega of the Arduino is enabled, allowing you to send and receive data just as you would with an Arduino. There’s a real-time clock, servo headers, plenty of ways to power the board, and even a breakout for this GPS module.

A lot of unnecessary cruft is done away with in the AlaMode; There’s no USB port, but it can be programmed directly over the GPIO pins of the Raspberry Pi. Pretty neat, and we can’t wait to grab one for our Raspi.


Filed under: arduino hacks, Rasberry pi

cheap wireless shields for arduino

I was looking for wireless shields for my arduino and stumbled across      this http://www.kickstarter.com/projects/1608192864/open-source-wireless-inventors-shield-for-arduino 

its a wireless shield for arduino that has 177meters range and is easy to program check out the link above for more info

read more

Cheap as chips Arduino Ethernet shield

It’s no secret that Ethernet shields for the Arduino are a little expensive. With the official Ethernet shield selling for about $50 and other options not much cheaper, there’s a lot of room for improvement for Arduinofied Ethernet. [Boris] over at Open Electronics has a solution to this problem: his Ethercard powered by a $3 Ethernet controller.

The Ethercard uses the Microchip ENC28J60, a through-hole Ethernet controller. There isn’t much else on the board apart from an RJ45 jack, caps, resistors, and a cheap buffer chip. This board was designed to be easily produced, and we’re thinking it might be possible to etch this board at home.

There are a few drawbacks to this ENC28J60 Ethernet shield – the official Arduino Ethernet shield has a 10/100 Mbps connection where the Microchip-powered shield is limited to 10 Mbps. Given the reduced cost, ease of assembly, and the fact that it’s pretty hard to saturate a 100Mbps connection with an Arduino this flaw can be easily ignored.

Pretty neat, especially considering how much you can do with an Ethernet connection on your Arduino. Files and code available in the git.


Filed under: arduino hacks, hardware
Hack a Day 10 Jul 23:02

Arduino based Milling Machine

This is a working model of an Arduino based Milling Machine created using FischerTechnik. For those of you who are unaware of FischerTechnik, it is similar to the LEGOTM Building Blocks.

A group of four Mechanical Engineering students at the Delft University of Technology (Netherlands) created this project as part of their Mechatronics class in their Second year of Bachelor of Sciences (B.Sc.) Program.

Laurens Valk, one of the creators, explains the essence of Arduino in the project:

“The system uses the Adafruit motor shield to run two stepper motors, and the Sparkfun EasyDriver for the third stepper motor. The Arduino runs code that listens to Matlab commands over USB. We expanded that code a little to make it possible to add the third stepper motor and some other commands. Most of the actual code was programmed in Matlab, with the Arduino as the interface between computer and motors/sensors.”

We had a little chat with Laurens. Here is the excerpt:


When did you first hear about Arduino, and when did you first start using it?
I’ve seen a lot of Arduino projects over the years, but this was the first time we used it in a project. Personally, I usually build robots with MINDSTORMS NXT, but this felt like a good opportunity to combine mechanical work (the printer hardware) with real electronics (Arduino).
How did you end up making a Milling Machine/ 3D Printer for your project?

We chose to come up with our own design challenge and decided not to do the standard exercise. Initially we thought about making a (2D) plotter or scanner. Then quickly we started thinking about the same things, except in 3D. One of the projects that inspired us was the LEGO Milling Machine by Arthur Sacek. Both a scanner and printer would still be doable in 3D, but the time was limited, so we settled with the printer idea.

All construction had to be done in one workweek for logistical reasons. To make sure we were able to finish in time, we prepared much of the electronics and software outside the lab. We finished just in time, but unfortunately we could do only one complete print before we had to take it apart. Not surprisingly, it was very exciting to wait for the result of the one and only complete test run. We couldn’t see the result until we used the vacuum cleaner to remove the dust.

Here is a video showing the working of this machine. [And the Vacuum Cleaner Laurens is talking about]:

This gives an Insight into the many feats that an Arduino can accomplish.


Quick tutorial: current sensing for DC motors

On her blog, Dustyn Roberts presents her own experience on current sensing for controlling DC electric motors with an Arduino board and an Arduino Motor Shield. This shield, based on a L298 H-bridge, provides two current sensing pins to the user, which can be used to measure the instantaneous current absorpion by each H-bridge. After some trials, Dustyn managed to have a quite clear picture of the absorption behavior of the DC motor:

Sample code and updates can be found on Dustyn’s blog.

[Via: Dustyn's blog]

Traffic signal controller pulls data over WiFi

[Travis Brown] just published a post about the traffic light controller he built. His number one goal was to make the device wireless (except for AC power) and he achieved this by using a WiFi shield for his Arduino. But there is also a separate board that provides a way for the chip to switch the AC lights.

He works for a web hosting company, and the boss wanted a fun way to display the status of the servers among other things. He chose to use the WiServer library which controls the CoperHead WiFi Shield and gives him the ability to serve simple web pages from the Arduino. When power is applied the sketch automatically connects to the AP and starts polling the company’s API for status data. If you’re not within eyesight of the traffic lights you can log into the web server and check that way.

We think [Travis] did a great job of explaining his code, and we applaud him for making proper use of the watchdog timer (something we don’t see in very many projects). This joins the pile of traffic-light display devices we’ve seen around here. We still don’t know where people are getting their hands on the things.


Filed under: arduino hacks

How rough your last mountain bike ride was?

Using an Arduino board with a data logging shield that holds an SD card for storage, an accelerometer on the front fork and some method of recording wheel speed, it’s possible to collect data about your bike ride. Then, when at home, a Python script captures the data dump and graphs it.


Wdm006 also says:

I’m in the process of building an ABS and active suspension system for mountain bikes. The first task after initial modeling and design work was to gather a lot of data for more specific design.

Original post can be read here.

Via:[Hackaday]