Posts with «servo» label

Build a Touchscreen Controlled Marionette with Intel Galileo

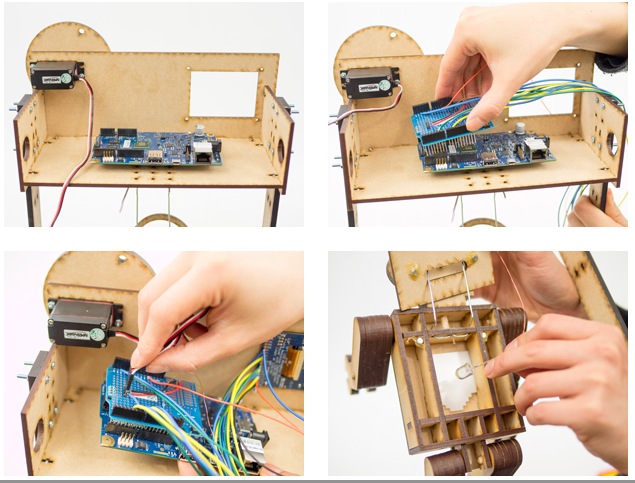
Making gets really interesting and fun especially when mixing laser cut shapes, servo motor, tft screen, MDF, plexiglass and Intel Galileo Gen 2. After you assemble the parts and follow the steps of this tutorial, you’ll be able to control the puppet through an interface on the screen. Enjoy the tutorial!

We are going to have a little fun with the Intel® Galileo development board. This time around, we’ll make a simple puppet control system. We’ve put together a “running robot” marionette with a simple mechanism that uses a continuous servo. We’ll be use a touchscreen interface to control various outputs using sliders and switches.

As always, you can modify the designs to suit your needs. We will teach you how to incorporate touchscreens, and make the interface necessary for controlling the Intel® Galileo Gen 2 board.

Just so you know, the instructions this time around are quite long. That’s due to the assembly of the marionette. I would review the assembly instructions fully before attempting to put it together. While it looks long and complicated, if you group the parts, it much simpler.

So, let’s start the puppet show!

Follow the link and start making!

Pac-Man Clock Eats Time, Not Pellets

[Bob’s] Pac-Man clock is sure to appeal to the retro geek inside of us all. With a tiny display for the time, it’s clear that this project is more about the art piece than it is about keeping the time. Pac-Man periodically opens and closes his mouth at random intervals. The EL wire adds a nice glowing touch as well.

The project runs off of a Teensy 2.0. It’s a small and inexpensive microcontroller that’s compatible with Arduino. The Teensy uses an external real-time clock module to keep accurate time. It also connects to a seven segment display board via Serial. This kept the wiring simple and made the display easy to mount. The last major component is the servo. It’s just a standard servo, mounted to a customized 3D printed mounting bracket. When the servo rotates in one direction the mouth opens, and visa versa. The frame is also outlined with blue EL wire, giving that classic Pac-Man look a little something extra.

The physical clock itself is made almost entirely from wood. [Bob] is clearly a skilled wood worker as evidenced in the build video below. The Pac-Man and ghosts are all cut on a scroll saw, although [Bob] mentions that he would have 3D printed them if his printer was large enough. Many of the components are hot glued together. The electronics are also hot glued in place. This is often a convenient mounting solution because it’s relatively strong but only semi-permanent.

[Bob] mentions that he can’t have the EL wire and the servo running at the same time. If he tries this, the Teensy ends up “running haywire” after a few minutes. He’s looking for suggestions, so if you have one be sure to leave a comment.


Filed under: Arduino Hacks, clock hacks

A Single Pixel Digital Camera with Arduino

[Jordan] managed to cobble together his own version of a low resolution digital camera using just a few components. The image generated is pretty low resolution and is only in grey scale, but it’s pretty impressive what can be done with some basic hardware.

The heart of the camera is the image sensor. Most consumer digital cameras have tons of tiny receptors all jammed into the sensor. This allows for a larger resolution image, capturing more detail in a smaller space. Unfortunately this also usually means a higher price tag. [Jordan’s] sensor includes just a single pixel. The sensor is really just an infrared photodiode inside of a tube. The diode is connected to an analog input pin on an Arduino. The sensor can be pointed at an object, and the Arduino can sense the brightness of that one point.

In order to compile an actual image, [Jordan] needs to obtain readings of multiple points. Most cameras do this using the large array of pixels. Since [Jordan’s] camera only has a single pixel, he has to move it around and take each reading one at a time. To accomplish this, the Arduino is hooked up to two servo motors. This allows the sensor to be aimed horizontally and vertically. The Arduino slowly scans the sensor in a grid, taking readings along the way. A Processing application then takes each reading and compiles the final image.

Since this camera compiles an image so slowly, it sometimes has a problem with varying brightness. [Jordan] noticed this issue when clouds would pass over while he was taking an image. To fix this problem, he added an ambient light sensor. The Arduino can detect the amount of overall ambient light and then adjust each reading to compensate. He says it’s not perfect but the results are still an improvement. Maybe next time he can try it in color.


Filed under: Arduino Hacks

Automated Tea Maker

[Pariprohus] wanted to make an interesting gift for his girlfriend. Knowing how daunting it can be to make your own tea, he decided to build a little robot to help out. His automated tea maker is quite simple, but effective.

The device runs off of an Arduino Nano. The Nano is hooked up to a servo, a piezo speaker, an LED, and a switch. When the switch is turned to the off position, the servo rotates into the “folded” position. This moves the steeping arm into a position that makes the device easier to store and transport.

When the device is turned on to the “ready” position, the arm will extend outward and stay still. This gives you time to attach the tea bag to the arm and place the mug of hot water underneath. Finally the switch can be placed into “brew” mode. In this mode, the bag is lowered into the hot water and held for approximately five minutes. Each minute the bag is raised and lowered to stir the water around.

Once the cycle completes, the Nano plays a musical tune from the piezo speaker to remind you to drink your freshly made tea. All of the parameters including the music can be modified in the Nano’s source code. All of the components are housed in a small wooden box painted white. Check out the video below to see it in action.


Filed under: Android Hacks
Hack a Day 29 Jan 03:01

Arduino + Servo + Scotch tape == An Interesting Conversation

If one could temporarily remove their sense of humor and cast a serious look into a Rube Goldberg machine, they would not say to themselves “well that looks simple.” Indeed, it would almost always be the case that one would find themselves asking “why all the complexity for such a simple task?”

Too often in hacking are we guilty of making things more complicated than they really need to be. Maybe it’s because we can see many different paths to a single destination. Maybe it’s because we want to explore a specific path, even though we know it might be a little harder to tread. Maybe it’s just because we can.

But imagine approaching a hack as simply a means to an end. Imagine if you did not have all of that knowledge in your head. All of those tools at your disposal. How would this change your approach? When [yavin427] decided to automate the leveling up process in his favorite video game, odds are he had never taken a game controller apart. Had never touched an oscilloscope. Indeed, he might have no knowledge of what a transistor or microcontroller even is. While many of our readers would have taken the more difficult path and tapped directly into the TTL of the controller to achieve maximum efficiency; it is most likely that [yavin427] would not have known how to do this, and thus would not have seen the many other paths to his end goal that would have been obvious to us. Yet he achieved his end goal. And he did it far easier and with less complication than many of us would have done.

Thoughts?

Thanks to [euqinimod] for the tip! Keep them coming!


Filed under: Arduino Hacks, xbox hacks

Secret Attic Library Door

We have a pretty good guess where [Krizbleen] hides away any seasonal presents for his family: behind his shiny new secret library door. An experienced woodworker, [Krizbleen] was in the process of finishing the attic in his home when he decided to take advantage of the chimney’s otherwise annoying placement in front of his soon-to-be office. He built a false wall in front of the central chimney obstacle and placed a TV in the middle of the wall (directly in front of the chimney) flanked on either side by a bookcase.

If you touch the secret book or knock out the secret sequence, however, the right-side bookcase slides gently out of the way to reveal [Krizbleen’s] home office. Behind the scenes, a heavy duty linear actuator pushes or pulls the door as necessary, onto which [Krizbleen] expertly mounted the bookcase with some 2″ caster wheels. The actuator expects +24V or -24V to send it moving in one of its two directions, so the Arduino Uno needed a couple of relays to handle the voltage difference.

The effort spent here was immense, but the result is seamless. After borrowing a knock-detection script and hooking up a secondary access button concealed in a book, [Krizbleen] had the secret door he’d always wanted: albeit maybe a bit slow to open and close. You can see a video of its operation below.


Filed under: Arduino Hacks, home hacks

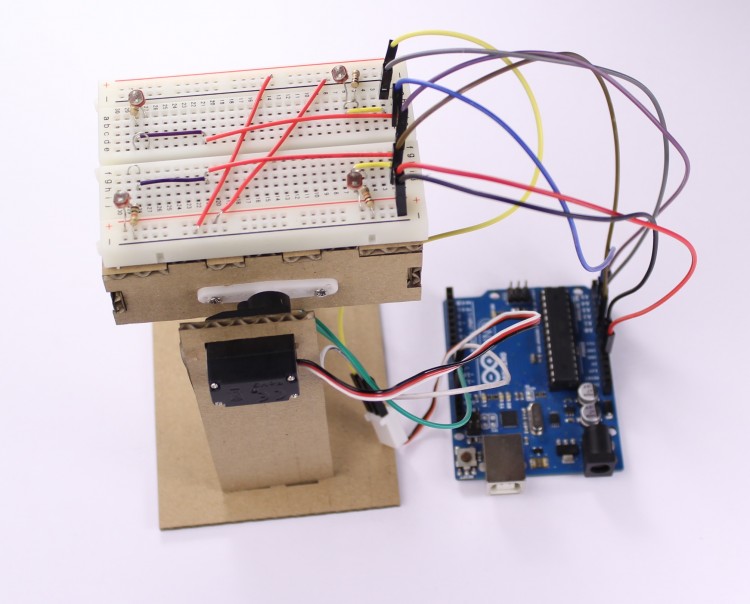
A simple light follower with Analog 180° Micro Servo

Servos are composed of an electric motor mechanically linked to a potentiometer and they are able to translate the width of the pulse into a position. When you command the servo  to rotate, the motor is powered until the potentiometer reaches the value corresponding to the commanded position.

Today we’d like to share with you a tutorial with the aim of showing how to make a simple light follower made of cardboard using Arduino Uno and a microservo, in this case the Analog 180° Micro Servo.

Follow the step by step lesson to build one yourself.


Arduino Blog 10 Nov 22:18

How-To: Hocus Pocus Book Replica

Remember the spell book from Hocus Pocus with the creepy moving eyeball? Since it is the season of Halloween-movie-replica-prop-making, I’ve found a great DIY tutorial that covers the steps required to make a pretty accurate copy! This tutorial doesn’t include how to make the eyeball actually move, but I would […]

Read more on MAKE

Stewart Platform Ball Bearing Balancer

For their Mechanical Engineering senior design project at San Jose State University, [Tyler Kroymann] and [Robert Dee] designed and built a racing motion simulator. Which is slightly out of the budget of most hackers, so before they went full-scale, a more affordable Arduino powered Stewart platform proof of concept was built. Stewart platforms typically use six electric or hydraulic linear actuators to provide motion in six degrees of freedom (6 DOF), surge (X), sway (Y), heave (Z), pitch, roll, and yaw. With a simple software translation matrix, to account for the angular displacement of the servo arm, you can transform the needed linear motions into PWM signals for standard hobby servos.

The 6 DOF platform, with the addition of a resistive touch screen, also doubled as a side project for their mechatronic control systems class. However, in this configuration the platform was constrained to just pitch and roll. The Arduino reads the resistive touch screen and registers the ball bearing’s location. Then a PID compares this to the target location generating an error vector. The error vector is used to find an inverse kinematic solution which causes the actuators to move the ball towards the target location. This whole process is repeated 50 times a second. The target location can be a pre-programmed or controlled using the analog stick on a Wii nunchuck.

Watch the ball bearing seek the target location after the break.

Thanks to [Toby] for sending in this tip.

We at Hackaday look forward to the real life implementation of Marble Madness!

Need help Demystifying PID Control? Or perhaps you would like to build your own Stewart Platform?


Filed under: Arduino Hacks, robots hacks