Posts with «sensors» label

Supplemental sheet for lab, draft 1

In my previous post, I said that I would post drafts of my supplemental sheets describing the course here on my blog, to get feedback before submitting them. Since I’ve been thinking more about the labs than the lectures, I’ll try writing the sheet for the lab first. It will be based, in part, on my prior list of lab topics, somewhat updated.

Undergraduate Supplemental Sheet
Information to accompany Request for Course Approval
Sponsoring Agency Electrical Engineering
Course #
102L (I need to get a number from the department that they are not currently using. Since we are planning the course as an alternative prerequisite to EE 104 in place of EE101+L, I think that 102 would be a good number, with the L suffix for the lab course.)
Catalog Title
Applied Circuits Lab

Please answer all of the following questions using a separate sheet for your response.
1. Are you proposing a revision to an existing course? If so give the name, number, and GE designations (if applicable) currently held.

This is not a revision to any existing course.

2. In concrete, substantive terms explain how the course will proceed. List the major topics to be covered, preferably by week.

  1. Thermistor lab
    The lab will start with having students learn about the test equipment by having them use the multimeters to measure other multimeters. What is the resistance of a multimeter that is measuring voltage? of one that is measuring current? what current or voltage is used for the resistance measurement? The first lab will then have three parts, all involving the use of a Vishay BC Components NTCLE413E2103F520L thermistor or equivalent.

    First, the students will use a bench multimeter to measure the resistance of the thermistor, dunking it in various water baths (with thermometers in them to measure the temperature). They should fit a simple curve to this data (warning: temperature needs to be on an absolute scale).

    Second, they will add a series resistor to make a voltage divider. They have to choose a value to get as large and linear a voltage response as possible at some specified “most-interesting” temperature (perhaps body temperature, perhaps room temperature, perhaps DNA melting temperature). There will be a pre-lab exercise where they derive the formula for maximizing . They will then measure and plot the voltage output for the same set of water baths. If they do it right, they should get a much more linear response than for their resistance measurements.

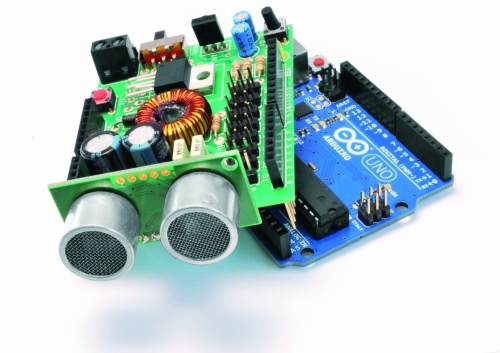
    Finally, they will hook up the voltage divider to an Arduino analog input and record a time series of a water bath cooling off (perhaps adding an ice cube to warm water to get a fast temperature change), and plot temperature as a function of time.EE concepts needed: voltage, resistance, voltage divider, notion of a transducer.

    Lab skills developed: use of multimeter for measuring resistance and voltage, use of Arduino with data-acquisition program to record a time series, fitting a model to data points, simple breadboarding.

    Equipment needed: multimeter, power supply, thermistor, selection of various resistors, breadboard, clip leads, thermoses for water baths, secondary containment tubs to avoid water spills in the electronics lab. Arduino boards will be part of the student-purchased lab kit (separate from rest of kit, so that students can use Arduinos previously purchased). All uses of the Arduino board assume connection via USB cable to a desktop or laptop computer that has the data logger software that we will provide.

  2. Electret microphone

    First, we will have the students measure and plot the DC current vs. voltage for the microphone. The microphone is normally operated with a 3V drop across it, but can stand up to 10V, so they should be able to set the Agilent E3631A power supply to various values from 0V to 10V and get the voltage and current readings directly from the bench supply, which has 4-place accuracy for both voltage and current. There is some danger of the students accidentally delivering too much voltage and frying the mic, but as long as they get the polarity right, that isn’t too big a hazard. Ideally, they should see that the current is nearly constant as voltage is varied—nothing like a resistor.

    Second, we will have them do current-to-voltage conversion with a 5v power supply to get a 2.5v DC output from the microphone and hook up the output of the microphone to the input of the oscilloscope. Input can be whistling, talking, iPod earpiece, … . They should learn the difference between AC-coupled and DC-coupled inputs to the scope, and how to set the horizontal and vertical scales of the scope.

    Third, we will have them design and wire their own DC blocking RC filter (going down to about 1Hz), and confirm that it has a similar effect to the AC coupling on the scope.

    Fourth, they will play sine waves from the function generator through a loudspeaker next to the mic, observe the voltage output with the scope, and measure the voltage with a multimeter, plotting output voltage as a function of frequency. Note: the specs for the electret mic show a fairly flat response from 50Hz to 3kHz, so most of what the students will see here is the poor response of a cheap speaker at low frequencies.

    Those with extra time could look at putting the speaker and mic at opposite ends of tube and seeing what difference that makes.EE concepts: current sources, AC vs DC, DC blocking by capacitors, RC time constant, sine waves, RMS voltage, properties varying with frequency.

    Lab skills: power supply, oscilloscope, function generator, RMS AC voltage measurement.

    Equipment needed: multimeter, oscilloscope, function generator, power supply, electret microphone, small loudspeaker, selection of various resistors, breadboard, clip leads.

  3. Electrode measurements

    First, we will have the students attempt to measure the resistance of a saline solution using a pair of stainless steel electrodes and a multimeter. This should fail, as the multimeter gradually charges the capacitance of the electrode/electrolyte interface.

    Second, the students will use a voltage divider, with 10–100Ω load resistor and the function generator driving the voltage divider. The students will measure the RMS voltage across the resistor and across the electrodes for different frequencies from 3Hz to 300kHz (the range of the AC measurements for the Agilent 34401A Multimeter). They will plot the magnitude of the impedance of the electrodes as a function of frequency and fit an R2+(R1||C1) model to the data. A little hand tweaking of parameters should help them understand what each parameter changes about the curve.

    Third, the students will repeat the measurements and fits for different concentrations of NaCl, from 0.01M to 1M. Seeing what parameters change a lot and what parameters change only slightly should help them understand the physical basis for the electrical model.

    Fourth, students will make Ag/AgCl electrodes from fine silver wire. The two standard methods for this involve either soaking in chlorine bleach or electroplating. To reduce chemical hazards, we will use the electroplating method. Students will calculate the area of their electrodes and the recommended electroplating current, and adjust the bench supplies to get the desired current.

    Fifth, the students will measure and plot the resistance of a pair of Ag/AgCl electrodes as a function of frequency (as with the stainless steel electrodes).

    Sixth, if there is time, students will measure the potential between a stainless steel electrode and an Ag/AgCl electrode.EE concepts:magnitude of impedance, series and parallel circuits, variation of parameters with frequency, limitations of R+(C||R) model.

    Electrochemistry concepts: At least a vague understanding of half-cell potentials. Ag → Ag+ + e-, Ag+ + Cl- → AgCl, Fe + 2 Cl-→ FeCl2 + 2 e-.

    Lab skills: bench power supply, function generator, multimeter, fitting functions of complex numbers, handling liquids in proximity of electronic equipment.

    Equipment needed: multimeter, function generator, power supply, stainless steel electrode pairs, silver wires, frame for mounting silver wire, resistor, breadboard, clip leads, NaCl solutions in different concentrations, beakers for salt water, secondary containment tubs to avoid salt water spills in the electronics lab.

  4. Sampling and Aliasing

    Students will use a PC board that samples and digitizes an input with an 8-bit ADC, then reconstructs the waveform with a DAC. An existing lab has been used in other EE courses for explaining and demonstrating aliasing of sampled signals using this board, a signal generator, and a dual-trace oscilloscope. Note: this is a student-executed demo, rather than a design or measurement lab.EE concepts: quantized time, quantized voltage, sampling frequency, Nyquist frequency, aliasing.

    Lab skills: dual traces on oscilloscope.Equipment needed: ADC/DAC board, dual-trace oscilloscope, function generator.

  5. Audio amplifier

    Students will use an op amp to build a simple non-inverting audio amplifier for an electret microphone, setting the gain to around 6 or 7. Note that we are using single-power-supply op amps, so they will have to design a bias voltage supply as well.If this lab is too short, then students could feed the output of the amplifier into an analog input of the Arduino and record the waveform at the highest sampling rate they can with the software we provide (probably around 300–500 Hz). This would again demonstrate aliasing.EE concepts: op amp, DC bias, bias source with unity-gain amplifier, AC coupling, gain computation.

    Lab skills: complicated breadboarding (enough wires to have problems with messy wiring). If we add the Arduino recording, we could get into interesting problems with buffer overrun if their sampling rate is higher than the Arduino’s USB link can handle.

    Equipment needed: breadboard, op amp chip, assorted resistors and capacitors, electret microphone, Arduino board, optional loudspeaker.

  6. Capacitive touch sensor

    The students will build an op-amp oscillator (a square-wave one, not a sine wave) whose frequency is dependent on the parasitic capacitance of a touch plate, which the students can make from Al foil and plastic food wrap. Students will have to measure the frequency of the oscillator with and without the plate being touched.

    Instead of breadboarding, students will wire this circuit by soldering wires and components on a PC board designed for prototyping op amp and instrumentation amp circuits.
    We will also provide a simple Arduino program that is sensitive to changes in the period of the oscillator and turns an LED on or off, to turn the frequency change into an on/off switch.EE concepts: frequency-dependent feedback, oscillator, RC time constants, parallel capacitors.

    Lab skills: soldering. Frequency measurement with multimeter.

    Equipment needed: Power supply, multimeter, Arduino, clip leads, amplifier prototyping board, oscilloscope.

  7. Phototransistor

    The details of this lab have not been worked out yet. It will probably involve either making a photointerrupter switch or making and characterizing an optoisolater made from an infrared LED and a phototransistor.EE concepts: LEDs and phototransistors (maybe also photodiodes and photoresistors), optoisolators.

    Equipment needed: breadboard, LED, phototransistor, resistors, function generator, oscilloscope, multimeter.

  8. Pressure sensor 1—instrumentation amplifier

    Students will design an instrumentation amplifier with a gain of 300 or 500 to amplify the differential strain-gauge signal from a medical-grade pressure sensor (the Freescale MPX2300DT1), to make a signal large enough to be read with the Arduino A/D converter. The circuit will be soldered on the instrumentation amp/op amp protoboard.The sensor calibration will be checked with water depth in a small reservoir. Note: the pressure sensor comes in a package that exposes the wire bonds and is too delicate for student assembly by novice solderers. We will make a sensor module that protects the sensor and mounts the sensor side to a 3/4″ PVC male-threaded plug, so that it can be easily incorporated into a reservoir, and mounts the electronic side on a PC board with screw terminals for connecting to student circuits.

    EE concepts: differential signals, twisted-pair wiring, strain gauge bridges, instrumentation amplifier, DC coupling, gain.

    Equipment needed: Power supply, amplifier prototyping board, oscilloscope, pressure sensor mounted in PVC plug with breakout board for easy connection, water reservoir made of PVC pipe, secondary containment tub to avoid water spills in electronics lab.

  9. Pressure sensor 2—modeling fluidics with linear circuits
    Students will use the pressure sensors and amplifiers from the previous labs to characterize a pair of water reservoirs connected by a flexible hose. The details of the lab are still being worked out.Students will either induce a step change in pressure in one reservoir and record the step response in each reservoir, or will mount one reservoir on a homemade shaker table driven by a function generator and an audio amplifier.EE concepts: hydraulic analogy, frequency response (both amplitude and phase).

    Equipment needed: Power supply, amplifier prototyping board, oscilloscope, Arduino, pressure sensor mounted in PVC plug with breakout board for easy connection, 2 water reservoirs made of PVC pipe, hose connections, secondary containment tub to avoid water spills in electronics lab, possibly home-made shaker table. Note: the shaker table and power amplifier is the most expensive piece of equipment not already in the lab: it will cost about $50 to build.

  10. Electrocardiogram EKG

    Students will design and solder an instrumentation amplifier with a gain of 2000 and bandpass of about 0.1Hz to 100Hz. The amplifier will be used with 3 disposable EKG electrodes to display EKG signals on the oscilloscope and record them on the Arduino.Equipment needed: Instrumentation amplifier protoboard, EKG electrodes, alligator clips, Arduino, oscilloscope.

3. Systemwide Senate Regulation 760 specifies that 1 academic credit corresponds to 3 hours of work per week for the student in a 10-week quarter. Please briefly explain how the course will lead to sufficient work with reference to e.g., lectures, sections, amount of homework, field trips, etc. [Please note that if significant changes are proposed to the format of the course after its initial approval, you will need to submit new course approval paperwork to answer this question in light of the new course format.]

This is a 2-unit course. Three hours a week will be spent in scheduled labs, another 3 hours a week in pre-lab design activity and post-lab write-ups.

4. Include a complete reading list or its equivalent in other media.

Wikipedia book: http://en.wikipedia.org/wiki/User:Kevin_k/Books/applied_circuits
Because no existing textbook covers all the material of the course, collection of relevant Wikipedia articles has been made that covers all the major topics. The book is available online for free, but students can purchase a printed and bound version (about 350 pages), if they want. Some of the Wikipedia articles contain more detail than is needed for the course, but about 90% of the content is relevant and will be required.

Data sheets: Students will be required to find and read data sheets for each of the components that they use in the lab.

Op amps for everyone by Ron Mancini http://www.e-booksdirectory.com/details.php?ebook=1469 Chapters 1–6 This free book duplicates some of the material in the Wikipedia book, but provides more detail and a cleaner presentation of some of the op-amp material.

Op Amp Applications Handbook by Analog Devices http://www.analog.com/library/analogDialogue/archives/39-05/op_amp_applications_handbook.html has some useful material, particularly in Sections 1-1 and 1-4, but is generally too advanced for a first circuits course. Readings in this book will be optional for the more advanced students.

The classic book The Art of Electronics by Horowitz and Hill has one of the best presentations of op amps in Chapter 4. Chapters 1 and 4, and parts of Chapters 5 and 7 are relevant to this course. Unfortunately, the book is now 23 years old and much of the description of specific chips is obsolete, but the book is still quite expensive. We will provide page and section numbers for optional readings in this book that correspond to the readings in the main texts, but not require this book.

5. State the basis on which evaluation of individual students’ achievements in this course will be made by the instructor (e.g., class participation, examinations, papers, projects).

Students will be evaluated on in-lab demonstrations of skills and on the lab write-ups.

6. List other UCSC courses covering similar material, if known.

EE 101L covers some of the same basic electronic lab skills, but without the focus on sensors or design, and without instrumentation amps.

Physics 160 offers a similar level of practical electronics, but focuses on physics applications, rather than on bioengineering applications, and is only offered in alternate years.

7. List expected resource requirements including course support and specialized facilities or equipment for divisional review. (This information must also be reported to the scheduling office each quarter the course is offered.)

The course will need the equipment of a standard analog electronics teaching lab: power supply, multimeter, function generator,  oscilloscope, and computer plus soldering irons. The equipment in Baskin Engineering 150 (used for EE 101L) is ideally suited for this lab. There are 24 stations in the lab, but only 12 function generators. Adding a dozen $300 function generators would make all 24 stations simultaneously usable, but the lab could be run with only half the stations, if all labs requiring function generators are done only with student pairs rather than individuals.

In addition, a few special-purpose setups will be needed for some of the labs. The special-purpose equipment was designed to be easily constructed with simple tools and to cost around $50/setup. One of the teachers is prototyping all the lab setups at home, to make sure that they can be effectively made within budget without expensive parts or much shop time.

There are a number of consumable parts used for the labs (integrated circuits, resistors, capacitors, PC boards, wire, and so forth), but these are easily covered by standard School of Engineering lab fees.

The course requires a faculty member (simultaneously teaching the co-requisite Applied Circuits course) and a teaching assistant (for providing help in the labs and for evaluating student lab demonstrations).

8. If applicable, justify any pre-requisites or enrollment restrictions proposed for this course. For pre-requisites sponsored by other departments/programs, please provide evidence of consultation.

Students will be required to have single-variable calculus and a physics electricity and magnetism course. Both are standard prerequisites for any circuits course. Although DC circuits can be analyzed without calculus, differentiation and integration are fundamental to AC analysis. Students should have already been introduced to the ideas of capacitors and inductors.

9. Proposals for new or revised Disciplinary Communication courses will be considered within the context of the approved DC plan for the relevant major(s). If applicable, please complete and submit the new proposal form (http://reg.ucsc.edu/forms/DC_statement_form.doc or http://reg.ucsc.edu/forms/DC_statement_form.pdf) or the revisions to approved plans form (http://reg.ucsc.edu/forms/DC_approval_revision.doc or http://reg.ucsc.edu/forms/DC_approval_revision.pdf).

This course is not expected to contribute to any major’s disciplinary communication requirement.

10. If you are requesting a GE designation for the proposed course, please justify your request making reference to the attached guidelines.

No General Education code is proposed for this course, as all relevant codes will have already been satisfied by the prerequisites.

11. If this is a new course and you requesting a new GE, do you think an old GE designation(s) is also appropriate? (CEP would like to maintain as many old GE offerings as is possible for the time being.)

No General Education code is proposed for this course, as all relevant codes (old or new) will have already been satisfied by the prerequisites.


Filed under: Circuits course, Pressure gauge Tagged: Arduino, bioengineering, capacitive touch sensor, circuits, course design, ECG, EKG, electret mic, electret microphone, electrocardiogram, electrodes, electronics, multimeter, op amp, oscilloscope, phototransistor, pressure sensor, sensors, teaching, thermistor

Digital artist Julien Bayle [Interview]

Julien Bayle is a digital artist and technology developer, and his work is an excellent starting point for anyone interested in the DIY man-machine interfaces.

Back in 2008, Julien created a clone of the Monome, a control surface consisting in a matrix of leds and buttons whose functioning is defined by software.  It was called Bonome and RGB leds were used, instead of  monochromatic leds of the standard model.  Here are the instructions to build it.

Some time later, inspired by the DIY controller used by Monolake, Julien decided to build its own Protodeck to control Ableton Live.

Recently I stumbled upon his post titled “Arduino is the Power” and I discovered that Julien has started writing a book about the Arduino platform. So I thought that regular readers of the Arduino Blog would welcome an interview with this interesting guy. And here it is!

Andrea Reali: Tell us something about you.

Julien Bayle: I’m Julien Bayle from France. I’m a digital artist and technology evangelist. I’m inside computers world since my dad bought us a Commodore 64, around 1982.
I’m working with music softwares since the first sound-trackers and I began to work with visuals too with my Amiga 500, using some first POV-like softwares.
I first began by working as an IT Security Architect by day, then I quit to be only what I am today and especially to be really free to continue my travel inside art & technology.
I’m providing courses & consulting & development around open-source technology like Arduino, java/processing but also & especially with Max6 graphical programming framework which is my speciality. Max6 is really an universe itself and we’d need more than one life to discover all features. As an Ableton Certified Trainer, I’m still teaching that a bit.
All technology always provides tools to achieve art. I guess my path comes from pure technology and goes to pure art.

AR: How did you get interested in the area you’re interested in?

JB: I always thought technology was only a tool to achieve projects, artistic or not.
Progressively, I understood that pure technology could be interesting itself too and I began to learn as a maniac but without forgetting about applying theory, illustrating each bit of knowledge.
Each time I learn something, I feel ideas coming in my head, possible applications appearing in front of my eyes like “wow this totally abstract Interrupt Service Routine is tricky but it can provide THE way to make this RGB Leds matrix driven only by that CPU with few outputs”
I achieved the protodeck like that, progressively learning & making at the same time, encountering some solid walls but finally finding my way breaking them!
We all need huge motivation to make things, especially today. Indeed, all seem integrated, already made, and you have to twist your mind to understand : “Yes, I can make by myself exactly what I need !”
Applying theory, having fun, making things, helps to keep the motivation very high and helps to achieve totally crazy projects! People thought you were insane at the beginning and the same people think you are a guru, at the end.

AR: Describe one of your projects.

JB: The Musée de la Buzine in Marseille is a central point of the Mediterranean cinema. Early 2011, I worked on this project both as a software designer & an hardware developer.
The permanent exhibition is based on 7 rooms in which you can experience visuals, sounds contents.
The system is based on 24 computers and 1 server, everything being federated by a gigabit ethernet network.
There are also 7 touch screens, 10 video-projectors, 20 RFID readers, 7 arduino UNO & MEGA handling buttons and ultra-sonic sensors, and finally 2 multi channels sound systems. Yes, it is a huge installation.
Everything has been made using Max5 (also named Max/MSP before Max6)
Max/MSP is a graphical programming environment which means you can create softwares by connecting virtual boxes on your screen without typing one row of code, if you don’t like that. It is obviously totally possible to use JAVA, C++ and more inside of it.
Each system is based on the same model, in the museum. A kind of template I designed in order to provide similar features like OSC protocol communication system, RFID parsing routines for user language identification, jitter real time subtitling (subtitles on videos according to ID of RFID cards), especially.
The server is able to send command to all machines. This is a nice feature to be able to switch off all 24 computers in one click and to power on them using Wake On Lan too. Of course, everything is scheduled according to a calendar and is be automated.
Arduino takes a particularly important role in this global design.
Indeed, it adds new capabilities & skills to computers by giving them a way to feel our universe with sensors and to act on it too.
In this installation, Arduino are used on the simpler way.
They are reading buttons state. For instance, drawers contain secret switches: when you open a drawer, the switch is triggered and the reading loop circuit is opened too; the board detects that and send bytes to the computer via USB cable basically. The Max patch (= name of programs you make in Max) receives the bytes and act properly by triggering a video, a sound, both or lighting on something.
There is a nice machine installed there : a DMX / Ethernet router.
I can send special bytes over the network from my Max patch to this gear. The router then translates my messages into DMX pre-programmed sequences.
For instance, I wired an ultrasonic distance sensor, used as a presence detector. The Arduino check distance and when the distance is less than a particular value, it fires a specially byte to the computer. This one reacts by triggering a sound and a video on 2 video-projectors. It also sends another peculiar byte to the DMX Router and this one makes a very nice light sequences like fadin lights in different moody way in order to grant an immersive experience to users.

The presence of Arduino made this installation alive, by bringing computers to another level of interaction.
I enjoyed a lot in making this complex project and people seemed very satisfied by the result.

I have been asked to develop more installations like that and now I freely choose which offer to accept.

If you understood me correctly, you know I’ll choose only those with a really strong artistic matter & purpose

AR: What skills did you draw upon?

JB: This project involved a lot of different technology.
I programmed using:
– C with the Arduino IDE
– Max5, including javascript scripting and jitter openGL programming and MSP audio stuff too
I had to wire and solder a bit too, which was nice and made things more real, concrete, physical.
The main thing about this project is the fact I had to mix a lot of things together.
It was interesting to connect all these very open & efficient technologies.
Using open protocol like serial, OSC (Open Sound Control) was a very nice way to keep things simple and indeed, I wanted to keep things simple.
Designing huge projects doesn’t mean you have to raise the complexity.
Often, great & big projects are based on very simple bits.
My advice to readers: Keep it simple! Build some units, then connect them together progressively.
This is my credo when I’m teaching Arduino!

AR: When did you hear about Arduino, and when did you first start using it?

JB: I hear about Arduino as soon as I began to make my own hardwares (around 6 years ago)
It brought me into the hardware gear field.
I began by tweaking leds & buttons with the bonome, an RGB monome clone (http://julienbayle.net/bonome)
It was a nice project and I learned a lot about shift-registering, buttons matrices, LED matrices and especially RGB Leds.
Arduino is THE way to learn about electronic.
I also played a bit with MIDI & OSC protocol directly with Arduino board and I still have a couple of projects I’d like to make available a bit on the monome distribution model. These include a strange drone machine, a 8-bit synthesizer very raw and a little and led based sequencer but with a strong part including shuffling and random.
By diving in the Arduino world, you can easily learn the direct link between the code (software) and the wires (hardware)
The bootloader included in the chip provides a totally user friendly way to upload your C code from the IDE on your computer to the board.
It is useable out-of-the-box without following a 3 years University cycle !
I’ll spread the arduinoword around: it can easily make people learning about electronic and especially about making their own things.
Today we can follow the DIY way  easily because of people like Massimo Banzi, Tom Igoe and the whole community created by the Arduino Team.
They opened a road and gave people more motivation to design and build things themselves.

AR: Where can readers see your works, both past and present?

JB: I have 3 websites.
http://julienbayle.net is the main one. You can find there my blog, and all my communities connection like Soundcloud, Facebook and more.
http://protofuse.net is my music website which will be merged probably into http://julienbayle.net quite soon. Indeed, I’m known as protofuse on the IDM electronic scene.
http://designthemedia.com is my small company. I’m providing Ableton Live devices & max for live stuff.
I am currently writing a book on Arduino and this is the first official place where you see this news.
I’m writing for the very amazing publisher PACKT publishing and I’m really happy about that, enjoy writing, designing things and spreading the following words to the world as far as possible: “yes you can build your own machines without any big companies help !”

AR: What inspired you to make the thing you made?

JB: I’m both a technology-driven guy and a minimalism art admirer.

I guess you can find minimalism in everything I’m making, from the apparently totally complex stuff to the most easy one.
My work is a quest into minimalism & zen digital territories. My latest iOS application is a piece of work which can be felt like an artwork too.
I’m making a lot of ambient music and IDM music too and from the most syncopated rhythm to the most peaceful synthesize soundscape, I feel minimalism.
Artists like Autechre, Brian Eno, Pete Namlook, Aphex Twin, Arpanet, inspire me a lot.
I guess my whole design (sound design, music design, software & hardware design) is inspired by artists like them, but not only.
We definitively need more peace and more quietness in our world.
I’m just trying to find mine making my art and trying to bring my words to people too.


I wish a bright and peaceful future for Julien and I deeply thank him for the interview.


Order and topics for labs

I had a good discussion with Steve P. this afternoon about the order and purpose of the labs I’ve designed so far.  He’ll be putting together a list of EE topics we have to cover to coordinate with the labs, so that students will have enough theory to do each lab, but not be overwhelmed with theory that they don’t yet have a use for.

I’ve designed the labs mainly around the interests of bioengineering majors, but I’ve tried to keep in mind other possible students, such as Digital Arts and New Media students, who would be interested in practical sensor circuits for interfacing to art projects (particularly for inputs to Arduino microprocessors).

Lab 1: thermistor

See posts

  1. More musings on circuits course: temperature lab
  2. Temperature lab, part2
  3. Temperature lab, part 3: voltage divider

The first lab will consist of 3 parts, all involving the use of a Vishay BC Components NTCLE413E2103F520L thermistor.

First, the students would use a bench multimeter to measure the resistance of the thermistor, dunking it in various water baths (with thermometers in them to measure the temperature).  They should fit a simple curve to this data (warning: temperature needs to be on an absolute scale).

Second, they would add a series resistor to make a voltage divider. They have to choose a value to get as large and linear a voltage response as possible at some specified “most-interesting” temperature (perhaps body temperature, perhaps room temperature, perhaps DNA melting temperature).  There should probably be a pre-lab exercise where they derive the formula for maximizing . They would then measure and plot the voltage output for the same set of water baths. If they do it right, they should get a much more linear response than for their resistance measurements.

Finally, they would hook up the voltage divider to an Arduino analog input and record a time series of a water bath cooling off (perhaps adding an ice cube to warm water to get a fast temperature change), and plot temperature as a function of time.

EE concepts needed: voltage, resistance, voltage divider, notion of a transducer.

Lab skills developed: use of multimeter for measuring resistance and voltage, use of Arduino with data-acquisition program to record a time series, fitting a model to data points, simple breadboarding.

Note:  Mylène suggested that we start student familiarization with the test equipment by having them use the multimeters to measure other multimeters.  What is the resistance of a multimeter that is measuring voltage?  of one that is measuring current? what current or voltage is used for the resistance measurement?  We might want to do this first.

 Lab 2: electret microphone

See posts

  1. Oscilloscope practice lab
  2. Op-amp lab

Mylène suggested that we start oscilloscope familiarity by looking at the output of power supplies. What ripple can you see on the voltage output of a benchtop supply? of a cheap wall wart?  This requires the students to learn the difference between DC and AC input coupling for oscilloscopes.  I think that we may be able to teach what we need here without measuring the power supplies, though that is a good backup plan.

First, we would have the students measure and plot the DC current vs. voltage for the microphone.  The microphone is normally operated with a 3V drop across it, but can stand up to 10V, so they should be able to set the Agilent E3631A power supply to various values from 0V to 10V and get the voltage and current readings directly from the bench supply, which has 4-place accuracy for both voltage and current.  There is some danger of the students accidentally delivering too much voltage and frying the mic, but as long as they get the polarity right, that isn’t too big a hazard.  Ideally, they should see that the current is nearly constant as voltage is varied—nothing like a resistor.

Second, we would have them do current-to-voltage conversion with a 5v power supply to get a 2.5v DC output and hook up the output of the microphone to the input of the oscilloscope.  Input can be whistling, talking, iPod earpiece, … . They should learn the difference between AC coupled and DC coupled inputs to the scope, and how to set the horizontal and vertical scales of the scope.

Third, we would have them design and wire their own DC blocking filter (going down to about 1Hz), and confirm that it has a similar effect to the AC coupling on the scope.

Fourth, they should play sine waves from the function generator through a loudspeaker next to the mic, observe the voltage output with the scope, and measure the voltage with a multimeter, plotting output voltage as a function of frequency.  Note: the specs for the electret mic show a fairly flat response from 50Hz to 3kHz, so most of what the students will see here is the poor response of a cheap speaker at low frequencies.  Those with extra time could look at putting the speaker and mic at opposite ends of tube and seeing what difference that makes.

EE concepts: current sources, AC vs DC, DC blocking by capacitors, RC time constant, sine waves, RMS voltage, properties varying with frequency.

Lab skills: power supply, oscilloscope, function generator, RMS AC voltage measurement.

Lab 3: electrode measurements

See posts

  1. Trying to measure ionic current through small holes
  2. Conductivity of saline solution
  3. On stainless steel
  4. Better measurement of conductivity of saline solution
  5. Measuring Ag/AgCl electrodes

First, we would have the students attempt to measure the resistance of a saline solution using a pair of stainless steel electrodes and a multimeter.  This should fail, as the multimeter gradually charges the capacitance of the electrode/electrolyte interface.  For the safety of the lab equipment, we should have the beakers with salt water in a secondary containment tray at all times.

Second, the students should again use a voltage divider, with 10–100Ω load resistor, but with the function generator driving the voltage divider.  The students should measure the RMS voltage across the resistor and across the electrodes for different frequencies from 3Hz to 300kHz (the range of the AC measurements for the Agilent 34401A Multimeter).  They should plot the magnitude of the impedance of the electrodes as a function of frequency and fit an R2+(R1||C1) model to the data.  A little hand tweaking of parameters should help them understand what each parameter changes about the curve.

Third, the students should repeat the measurements and fits for different concentrations of NaCl (we’ll have to get a liter or so of each stock solution made up by one of the wet labs).  Seeing what parameters change a lot and what parameters change only slightly should help them understand the physical basis for the electrical model.

Fourth, students should make Ag/AgCl electrodes from fine silver wire. To avoid possible problems with Clorox in the lab, we’ll probably have them electroplate in NaCl solutions.  If their electrodes have an area of about 0.8 cm2 (2.5cm of 18 gauge wire with a diameter of 1.024mm), we can electroplate at the recommended current density of 1mA/cm2 (so 0.8mA) in 0.9% (0.16M) NaCl for a minute, reversing polarity occasionally to improve the chloride coat. The instructions I’ve seen vary a lot, so neither the salt concentration nor the current density seem to be particularly critical values. We could provide a constant-current supply, but we can probably get by with just having them use a bench supply and adjust the voltage manually to keep the current around 1mA, using visual feedback to terminate the process. (Some instructions just call for using a 9v battery and a whole coil of silver wire.)  According to Warner Instruments

The color of a well plated electrode will be light gray to a purplish gray. While plating, occasionally reversing the polarity for several seconds tends to deepen the chloride coating and yield a more stable electrode.

Fifth, the students should measure and plot the resistance of a pair of Ag/AgCl electrodes as a function of frequency (as with the stainless steel electrodes). We’ll have to think of an easy way for them to mount their electrodes so that they don’t move and so that the silver-copper interface is not near the salt water.

Sixth, if there is time, measuring the potential between a stainless steel electrode and an Ag/AgCl electrode.

EE concepts: impedance, series and parallel circuits, variation of parameters with frequency.

Electrochemistry concepts: At least a vague understanding of half-cell potentials. Ag → Ag+ + e-,  Ag+ + Cl- → AgCl.

Lab skills: bench power supply, function generator, multimeter, fitting functions of complex numbers, handling liquids in proximity of electronic equipment.

Lab 4: Sampling and aliasing

I don’t know the details of this lab, but Steve P. has a PC board that samples and digitizes an input with an 8-bit ADC, then reconstructs the waveform with a DAC.  He has worked out a lab for explaining and demonstrating aliasing of sampled signals using this board, a signal generator, and a dual-trace oscilloscope.  I’ll have to borrow the board and the lab handout from him to see if there is anything in the lab I’d want to tweak.

EE concepts: quantized time, quantized voltage, sampling frequency, Nyquist frequency, aliasing.

Lab skills: dual traces on oscilloscope.

Lab 5: Op amp basics

See post Op-amp lab

Use an op amp to build a simple non-inverting audio amplifier for an electret microphone, setting the gain to around 6 or 7.  Note that we are using single-power-supply op amps.

If this lab is too short, then students could feed the output of the amplifier into an analog input of the Arduino and record the waveform at the highest sampling rate they can with the software we provide (probably around 300–500 Hz).  This would again demonstrate aliasing.

EE concepts: op amp, DC bias, bias source with unity-gain amplifier, AC coupling, gain computation.

Lab skills: complicated breadboarding (enough wires to have problems with messy wiring). If we add the Arduino recording, we could get into interesting problems with buffer overrun if their sampling rate is higher than the Arduino’s USB link can handle.

Lab 6: capacitive touch sensor

See posts

  1. Capacitive sensing
  2. Capacitive sensing, part 2
  3. Capacitive sensing with op amps
  4. Capacitive sensing with op amps, continued

The students would build an op-amp oscillator (a square-wave one, not a sine wave) whose frequency is dependent on the parasitic capacitance of a touch plate, which the students can make from Al foil and plastic food wrap. Students would have to measure the frequency of the oscillator with and without the plate being touched.

We can provide a simple Arduino program that is sensitive to changes in the period of the oscillator (see example in Capacitive sensing with op amps, continued) and turns an LED on or off.

EE concepts: frequency-dependent feedback, oscillator, RC time constants, parallel capacitors.

Lab skills: more messy breadboarding.  Frequency measurement.

Lab 7: Phototransistor

See posts

  1. Phototransistor
  2. Synchronous demodulator
  3. Pulse detection with light
  4. Giving up on light-based pulse sensor
  5. Looking at bioengineering measurements courses
  6. Random thoughts on circuits labs

Since optical detection is such an important part of many biomolecular lab techniques, I really want to do something with an LED and phototransistor (or CdS cell or photodiode), but so far none of my ideas have worked out.  I have a nice Fairchild QRE1113 reflectance sensor that uses a matched 940nm wavelength LED and phototransistor, which I’ve used a tachometer for motors for the robotics club. Unfortunately, a tachometer is more appropriate for a mechatronics lab than a biengineering circuits course.

I thought that I might be able to use it to measure arterial pulses by reflection, but I don’t seem to get a signal at my heart rate (I did better with the uncomfortable ear clip).

The reflectance sensor is good for measuring finger tremor if you hold a finger close to (but not touching) the sensor.  The effect is optical, not capacitive coupling, since the signal is stronger if a non-conducting white piece of paper is held near the sensor rather than a finger.  The reflectance sensor is remarkably insensitive to ambient light, though shining a laser pointer on the sensor is easily detected.

We can easily do labs involving interrupting light beams, but there isn’t much “circuit” stuff for the simple ones and not much “bio” stuff either.  We could up the circuit content (perhaps too much) by modulating the light beam and using a synchronous demodulator to detect the beam even in the presence of high ambient light.

I still need to find something that is feasible and somehow related to bioengineering.  This needs more thought.

Lab 8: No idea

I’m still missing a lab.  I’ve not done anything with position, pressure, or volume sensing yet.  Of course, it is possible that some of the earlier labs will take longer than I think, and we’ll need to slip the schedule anyway.  The EKG lab looks pretty packed, so may be some portion of that could be foreshadowed here.  Perhaps bandpass filtering and characterizing a simple filter?  That would be useful, but rather boring.

Maybe an electronic music lab of some sort would be fun here?

Labs 9 and 10: EKG

See posts

  1. EMG and EKG works
  2. Two-stage EKG
  3. EKG recording working
  4. More thoughts on EKG
  5. EKG blinky
  6. Instrumentation amp protoboard
  7. Instrumentation amp protoboard rev2.1
  8. EKG blinky boards arrived

The electrocardiogram will be the final project for the course, and I think it will take two full lab sessions. The first lab session would consist of soldering up the instrumentation amp protoboard, checking for opens and shorts, and designing and characterizing a differential amplifier with an adjustable gain of about 100–1000 (including AC coupling to eliminate problems with DC offset saturating later stages).  The amplifier should have a bandwidth of about 0.01Hz–150Hz.

The second one would be and making a twisted-wire harness with alligator clips to attach to the EKG electrodes, connecting the amplifier to the electrodes, debugging the student-designed EKG amplifiers, and adjusting the gain.  I suspect that a few students will get a design that works in the first week, but that a lot of students will be doing a lot of unsoldering and resoldering as they find bugs in their design, hence the need for 2 weeks in the lab.

Student check out will require that they be able to blink an LED in time with their heart beat, display the EKG waveform on the oscilloscope, and record a minute of EKG signal at 200 samples/second using the Arduino, all without adjusting their board between demos.

EE concepts: biopotentials, instrumentation amplifier, common-mode signal, differential signal, twisted pair wiring, grounding to avoid common-mode signal saturating an instrumentation amplifier, Ac coupling, simple bandpass filtering.

Lab skills: soldering.

Summary

I have a pretty clear idea how I think the lab part of the course should start and how it should end, but there are a couple of weeks just before the end that are still a bit vague.  Perhaps as Steve starts aligning the EE topics with the labs he can identify some topics that need a lab exercise to clarify them.  Maybe some of my blog readers (those who haven’t deserted me during this long process of designing a course) can make some more suggestions—even repeating some old suggestions would not be a bad idea now, as I need a creative kick.


Filed under: Circuits course, Data acquisition Tagged: Arduino, bioengineering, capacitive touch sensor, circuits, course design, ECG, EKG, electret mic, electret microphone, electrocardiogram, electrodes, electronics, multimeter, op amp, oscilloscope, phototransistor, sensors, teaching, thermistor

An open robot shield for Arduino

Open Electronics‘ staff were looking for a common and standard hardware platform usable on different robots they were working on. Their goal was to find a single platform that had to provide power supply to the microcontroller, it had to provide stabilized voltage for the servos, and, finally, it had to be equipped with an obstacle detector and with an IR receiver.

Having chosen Arduino as the target core board, they developed an ad-hoc shield meeting all these requirements, whose detailed description can be found here, together with the BOM and a lot of source code.

[Via: Open Electronics]

Arduino Distributor Pre-order/Group Buy

Hi All,

read more

Wearable Fabric on the Arduino Store

We are happy to announce the first wearable kit on the Arduino Store . This kit has been made by Plug’n'Wear specifically for us. All fabrics in this kit are produced in Italy, and strongly related to a textile family business. If you want to get deeper into the story of this product have a look at Riccardo Marchesi presentation (still in Italian, soon to be traslated!) at World Wide Rome 2012.

Read over for Kit’s features

This kit features:

  1. 1x Circular Stretch Sensor Designed by Hannah Perner-Wilson, this circular knit stretch sensor works perfect when you need to detect tension in many projects.
  2. 2x Textile push button to make easy digital inputs in cloth, scarfs o bags.
  3. 2x Spools of Conductive thread, ready to be hooked over a sewing machine
  4. 2x Soft potentiometer kit will let you import analog data into your wearable project: this kit includes 1 meter of knitted conductive tape and a metal ring. Watch it in action (see video)
  5. 10x 1k ohm resistor
  6. 10x 10k ohm resistor
  7. 1x Textile perfboard is going to change the way you think of wearable circuits. You can sew or even solder components (SMD & through-hole) on this . It can be easily cut or sewn with a standard sewing machine. Washable. Size: 15 cm x 15 cm (6″ x 6″) / Pitch: 2.54 mm (0.1″)
  8. 1x Knitted Coated Copper Tape. Small conductive tape made of coated copper fine wire (112 micron). Flexible, easy to cut, sewable with a standard sewing machine, It can be easily welded ( The coating will melt and tape will be soldered). The surface of this tape has a good insulation thrughout its lenght. Resistance: 107 Ohm/m. Width: 9 mm (0.35″)
  9. 1x Analog Textile Press Button, working with a resistive principle (resistance goes down when you press it). It works as a bend sensor as well. By connecting more sensors together it is possible to make a matrix analog switch. Sensitive area 40mm x 40mm (1.57″x1.57″)
  10. 2x LilyPad LED Bright White A simple, very bright, 250mcd, white LED LilyPad

source: [arduino store]

Capacitive sensing with op amps, continued

What more can I do (or, more importantly, have the students do with the Capacitive sensing with op amps?

The circuit that I gave in that post has several parameters.  Perhaps the students should try predicting what happens when they are adjusted.

Op amp multivibrator. The first op amp is just to set up a virtual ground halfway between the power rails. The second op amp does the oscillating (at about 8.12 kHz for these components). Circuit drawn with CircuitLab, which is not capable of simulating it.

For example, what happens if Vbias is raised or lowered? What is the effect of changing each of the resistors? How can we optimize the circuit for easy, reliable detection of touches with an Arduino pulseIn() measurement?

If we pretend that the output is a rail-to-rail square wave (ignoring the slew rate limitation), analysis is pretty easy.

.

  • If the output is low, then and Vminus is higher than that, but dropping.
  • If the output is high, then and Vminus is lower than that, but rising.

If we define , we can simplify further and say that Vminus swings between two threshold voltages:   and .

The discharging curve is simply , where , so it takes to discharge to the other threshold.

The charging curve is , and so it takes . That is, .

If we want a symmetric waveform, we need to have , which in turn requires . Raising Vbias makes the low part of the output waveform shorter and the high part longer. Conversely, lowering Vbias makes the low part longer and the high part shorter.

The total period is  .  If we set Vbias to Vdd/2, then we can simplify further to .

The sum R4+R5 only affects the amount of current that the Vbias supply has to provide, but it is probably a good idea to make it fairly large, and to add a bypass capacitor to Vbias, to prevent noise coupling though the bias supply.

When using pulseIn() on the Arduino to measure the capacitance C1, we want to have a large change in the pulse duration (to avoid quantization effects from reporting the duration in μsec), which means a large value for R3. That is limited by the problem of picking up 60Hz noise if the input impedance is too high.

We can also tweak r=R5/R4 a little, to make the period a larger multiple of τ, limited by the problem of noise if we get the thresholds too close to the rails.

Since pulseIn() only measures one part of the waveform (the low part or the high part), we could also tweak the bias voltage to lengthen just that part of the waveform, for example, dropping Vbias to Vdd/4 to length the low part.  We again have to be careful not to get the threshold too close to the rails.  If we are lowering Vbias, then the threshold to watch is . If we fix as low as we’re willing to make it, then should we make Vbias low or r high?  The number we are trying to maximize is the discharge time , with the constraint that . At equality, we have to maximize , which is achieved by making r as large as possible.  Of course, that would mean raising Vbias, which would run us into trouble with noise at the other threshold.  In general, it seems like the symmetric waveform with Vbias=Vdd/2 gives us the best noise margins.

Next step: how do we either slow down the oscillator or clean up the waveform enough to get a good signal to feed into the Arduino?

I tried increasing both R1 and R5, while decreasing R4, as shown below.

Modified circuit for longer period. C1 is just the stray capacitance of the touch sensor, with no deliberately added capacitance.

This circuit oscillates with a frequency of 35.66 kHz (period of about 28 µsec )when the touch sensor is not touched, which is slow enough that the signal runs from rail to rail. Touching the sensor drops the frequency to 20kHz or less (period of 50 µsec or more). Since r=5.556, the expected period is 4.988 τ, or 0.4988 µsec/pF C1.  The period is consistent with a stray capacitance of 56 pF, increasing to over 100 pF when the sensor is touched.  There is a lot of jitter in the lower-frequency signal, probably due to some coupling of 60 Hz noise into the system. A 1nF capacitor for C1 gives a frequency of 1660Hz (602 µsec, which is more than the expected 500 µsec), 47nF gives 34.65 Hz (28.86 msec, not the expected 23.44 msec).  Why am I consistently 25% off?

The change of 20 µsec or more in the period (10 µsec or more in the half period) should be easily detectable with one pulseIn() measurement on the Arduino.  The following code seems to work fairly well, with a light touch causing the LED to flash (right on the edge of detection) and a firmer touch giving a steady reading.

// Capacitive sensor switch
// Thu Jul 12 21:36:42 PDT 2012 Kevin Karplus

// To use, connect the output of the op-amp oscillator to
// pin CAP_PIN on the Arduino.
// The code turns on the LED on pin 13 when a touch is sensed.

// The Arduino measures the width of one LOW pulse on pin CAP_PIN.
// The LED is turned on if the pulse width is more than min_pulse_usec

// pin that oscillator output connected to
#define CAP_PIN (2)

// time (in milliseconds) to wait after a change in state before
// testing input again
#define DEBOUNCE_MSEC (100)

static uint8_t was_on;	// stored state of LED, for detecting transition

static uint16_t min_pulse_usec=5;
// min pulse width (in  microseconds) for detecting a touch

void setup(void)
{
    was_on=0;
    pinMode(CAP_PIN,INPUT);
    pinMode(13, OUTPUT);
    
    // assuming that the touch sensor is not touched when resetting, 
    // find the maximum typical value for untouched sensor
    for (uint8_t i=0; i<10; i++)
    {   long pulse=pulseIn(CAP_PIN,LOW);
        if (pulse>min_pulse_usec)
	{    min_pulse_usec =pulse;
	}
    }
    min_pulse_usec += 2;	// add some room for noise
}

void loop(void)
{
    uint8_t on = pulseIn(CAP_PIN,LOW) >= min_pulse_usec;
    digitalWrite(13, on);
    if (on!=was_on)
    {   delay(DEBOUNCE_MSEC);
        was_on=on;       
    }
}


Filed under: Circuits course Tagged: Arduino, bioengineering, capacitive touch sensor, circuits, course design, op amp, sensors, teaching

Capacitive sensing with op amps

I’m not very happy with the lab exercise in Capacitive sensing.  The basic design questions are good:

  • What capacitance do we add by touching something?
  • What frequency should the oscillator run at without the touch?
  • What % change in frequency can we detect reliably? How will we do that detection?

but I’m not happy with my choice of an LM555 chip for the oscillator.  It is a fine choice for many purposes, and a good chip for students and hobbyists to learn about, but the Fairchild Semiconductor LM 555 data sheet does not do a good job of explaining how the chip works nor exactly what the logic function is for triggering the flip-flop.  As a result, students will probably end up just copying the astable circuit without really understanding it.

I think I would prefer to have them use an op-amp multi-vibrator circuit.  It can’t quite be modeled with only linear op amps, as it relies on clipping of the output to get nearly a square wave.

Op amp multivibrator. The first op amp is just to set up a virtual ground halfway between the power rails. The second op amp does the oscillating (at about 8.12 kHz for these components). Circuit drawn with CircuitLab, which is not capable of simulating it.

The op-amp multivibrator is a simple design.  When the output is high, C1 is charged until V_minus is higher than the positive input of the op amp (about 34.7% of the way from Vbias to Vout=Vdd).  Then the output goes low (taking about 6µsec, limited by the slew rate of the op amp), and the capacitor discharges until it is below the positive input (about 65.3% of the way from Vbias to Vout=0 with these values for R4 and R5). So Vminus swings from (1-0.6526) Vbias = 0.1737 Vdd to Vbias+0.6526(Vdd-Vbias)=0.8263Vdd.  The time it takes to charge or discharge should be about 
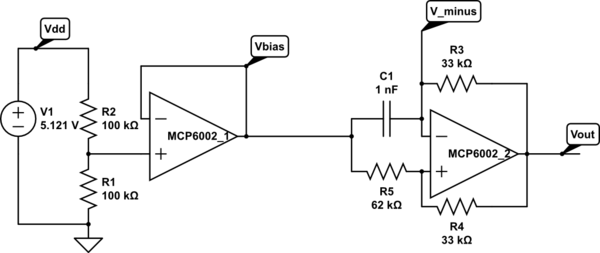
,  where the time constant τ=R3 C1.  For the values of R4 and R5 here, the charge time should be 1.560 τ, and the period 3.119 τ. With the given values of R3 and C1, this should be a period of 102.9 µsec, or a frequency of 9.7 kHz.   I’m measuring 8.1 kHz, not 9.7 kHz, but I think that the discrepancy is due to the slew rate limitations (which add about 12 µsec to the period) and possibly stray capacitance.  With C1=47 nF, the frequency is 203.6 Hz, when the calculation says it should be 206.7 Hz, well within the accuracy of the components.

Connecting the foil-and-plastic-wrap sensor to Vminus adds a little stray capacitance, dropping the frequency to 8.01 kHz. Touching the sensor drops the frequency to 7.5 kHz–7.7 kHz, adding about 5 µsec–8.5 µsec to the period, consistent with adding about 50pF – 83 pF to C1.  This is a little smaller than the 163 pF that I estimated using the parallel-plate model in Capacitive sensing, but consistent with my measurements using the LM555 circuits.

I can get a much stronger effect if I remove C1 from the circuit, and use only stray capacitance.  The period drops to about 6.2 µsec (roughly 160 kHz), but (because of the slew rate limitations of the op amp) is not full scale and is essentially a triangle wave.  Touching the sensor reduces the frequency to about 35 kHz – 45 kHZ, an increase of 16 µsec – 22 µsec in period, consistent with an additional capacitance of  155 pF – 220 pF, which is about what was predicted by the parallel plate model. I’m a little reluctant to put this signal into an Arduino board, though, as the no-touch signal spends most of its time in the non-digital region between high and low, and only barely crosses the thresholds that would allow the ATMega328 chip to detect the signal.

One interesting idea would be to take advantage of the change in amplitude of the oscillation to make an all-analog touch detector.  I’m afraid that would not be very robust, though, as an increase in the period of only 12 µsec is enough to make the oscillation full scale.


Filed under: Circuits course Tagged: Arduino, bioengineering, capacitive touch sensor, circuits, course design, LM555, op amp, sensors, teaching

Schools projects with Arduino: Flow Meter

Loccioni Group, is an italian company that sponsors every year a project internship entitled “Classe Virtuale”, dedicated to young students coming from local technical schools.

This year, “Classe Virtuale 2012″ has been composed by 27 students with different backgrounds, selected among 120 candidates. After a stating training period, during the three-weeks internship the team worked on a very nice Arduino-based project: Flow Meter.

Here you may find a brief interview we had with Daniele Caschera, one of the components of “Classe Virtuale 2012″, about Flow Meter and on how Arduino helped in its design.

Alessandro: Daniele, could you describe us what “Classe Virtuale” is, in practice?

Daniele: “Classe Virtuale”, the partnership between Loccioni Group and local technical education institutions, has began in 2001 when Mr. Loccioni decided to invest on young students, by offering training periods and stages inside his company. In 2010 the project, which occours on annual basis, expanded to three more scools and in 2012 it has reached the 12-th edition.

The goal of this collaboration is to train and educate young technicians, by serving as a bridge between school and a real employment.

A: Could you briefly describe us the “Flow Meter” project?

D: “Flow Meter” is a real flow measurer: it has been designed to measure the flow of all the students who have attended to the previous editions of “Classe Virtuale”, starting from the first edition.

First, we have designed a PHP web application usable to collect the information reagarding all the participants to the previous editions and, then, we used some Arduino boards to represent this amount of data into a visible form, by means of several LEDs.

More in details, Flow Meter can be turned on by laying the hands on it, which can be detected by means of some proximity sensors located on the surface.

Then, it begins to show the collected data, starting from the first edition of “Classe Virtuale”, by turning on a set of LEDs, arranged in three rows inside a semi-transparent, white sphere. The first row, composed by red LEDs, represents how many students are currently employed at Loccioni, while the second one, composed by blue LEDs, shows how many people work or study in Italy; the last row (again composed by red LEDs) presents how many people work or study abroad.

By leaving the hands on Flow Meter, it is possible to scroll through all the editions of “Classe Virtuale”.

Finally, four small pillars, placed at the corners of the structure, represent the four schools involved in the 2012 edition of the project: a set of LEDs is used to show how many students come from each institution per year.

A: How Arduino contributed to this Flow Meter?

D: Many of us did not know Arduino at the beginning of “Classe Virtuale 2012″. The board has been introduced us during the initial training period by some electronic engineers at Loccioni. Then, we started to find out more information about it and how to adopt it in our project on the web, on books and so on.

Arduino has been fundamental in our project, simply because it composes the “brain” of Flow Meter, by means of a set 4 Arduino Uno and an Arduino Mega, and because it is used to activate the LEDs composing its “visual” interface.


A: How do you evaluate this internship experience?

D: This experience has been very positive for us, mainly because it gave us the chance to work on a real project together with very skilled people and technicians. Moreover, since the team has been divided into small working groups (e.g., those working on mechanical parts and those working on electronics and programming), we have gained experience on topics that you typically won’t study at school. Everyone has learned a lot during “Classe Virtuale”!

This very nice project, which has been presented on July 19 (the streaming of the event will be available here), represents another example of how open-source solutions can be used as effective enabling technologies, even for educational purposes.

Great job “Classe Virtuale” and thanks for this interview!

Arduino Blog 10 Jul 14:54

Capacitive sensing, part 2

The obvious next step with the capacitive sensor is to make the sensor actually control something.  This is not essential for the circuits class—for that class it is better to have the students viewing the waveform on the oscilloscope and seeing the frequency of the output vary  as the touch varies.  But I was curious about whether the various grounds (oscilloscope, USB cable, wall wart power supply) were making a difference to the capacitive sensing, so I wanted to redo the capacitive sensor to be a fully battery-based application, with no external ground connections.

To display whether the sensor had been touched or not, I turned on or off the LED on pin 13. I used the same software detection mechanism as in the previous post, counting the number of pulses it takes to get a total time for the signal being low. Touching my laptop (to reduce the resistance to ground) no longer makes a difference in the sensitivity of the switch, now that the battery ground is separated from the laptop ground.

// Capacitive sensor switch
// Mon Jul  9 06:05:54 PDT 2012 Kevin Karplus

// To use, connect the output of the LM555 oscillator to
// pin CAP_PIN on the Arduino.
// The code turns on the LED on pin 13 when a touch is sensed.

// The Arduino measures the number and width of LOW pulses on pin 2 until
//    the sum of the pulse width exceeds TOTAL_PULSE_USEC.
// The LED is turned on if the number of pulses is less than NO_TOUCH_NUM

#define CAP_PIN (2)

#define TOTAL_PULSE_USEC (100)	// total of pulse widths (in  microseconds) before reporting
#define NO_TOUCH_NUM (50)

void setup(void)
{
    pinMode(CAP_PIN,INPUT);
    pinMode(13, OUTPUT);
}

void loop(void)
{
    uint32_t pulse_sum=0;
    uint16_t num_pulses=0;
    while (pulse_sum<TOTAL_PULSE_USEC)
    {   pulse_sum += pulseIn(CAP_PIN,LOW);
        num_pulses++;
    }
    digitalWrite(13, (num_pulses<NO_TOUCH_NUM? HIGH:LOW));
}

I had to set the threshold a bit higher than I expected, indicating that the frequency shift was not as large without all the connections to ground, but the sensor still works with a moderately firm touch. With a light touch, the LED flickers on and off, indicating that the frequency shift is near the threshold. Raising NO_TOUCH_NUM too high has the LED always on. Even raising it from 50 to 55 makes the switch too sensitive—the LED turns on when my finger is still 5mm away from contact. Perhaps the ideal setting is 52, as that detects a light touch fairly reliably, but doesn’t fire until my finger is within about 1mm of the surface.

Note: it might make more sense to leave NO_TOUCH_NUM at 50 and adjust TOTAL_PULSE_USEC down to 96, since the larger number can be adjusted more finely.

If I wanted to avoid the flicker, I would debounce the detection.  I can’t use the Arduino Bounce library for this, as the signal that needs debouncing is in software, not on a pin.  It is a trivial matter to add a delay whenever the output changes, though:

// Capacitive sensor switch
// Mon Jul  9 06:44:33 PDT 2012 Kevin Karplus

// To use, connect the output of the LM555 oscillator to
// pin CAP_PIN on the Arduino.
// The code turns on the LED on pin 13 when a touch is sensed.

// The Arduino measures the number and width of LOW pulses on pin 2 until
//    the sum of the pulse width exceeds TOTAL_PULSE_USEC.
// The LED is turned on if the number of pulses is less than NO_TOUCH_NUM.

// pin that LM555 output connected to
#define CAP_PIN (2)

// total of pulse widths (in  microseconds) before reporting
#define TOTAL_PULSE_USEC (96)

// minimum number of pulses to indicate that sensor is not touched
#define NO_TOUCH_NUM (50)

// time (in milliseconds) to wait after a change in state before
// testing input again
#define DEBOUNCE_MSEC (100)

static uint8_t was_on;

void setup(void)
{
    was_on=0;
    pinMode(CAP_PIN,INPUT);
    pinMode(13, OUTPUT);
}

void loop(void)
{
    uint32_t pulse_sum=0;
    uint16_t num_pulses=0;
    while (pulse_sum<TOTAL_PULSE_USEC)
    {   pulse_sum += pulseIn(CAP_PIN,LOW);
        num_pulses++;
    }
    uint8_t on = num_pulses<NO_TOUCH_NUM? 1:0;
    digitalWrite(13, on);
    if (on!=was_on)
    {   delay(DEBOUNCE_MSEC);
        was_on=on;
    }
}

Debouncing does not completely eliminate multiple flashes. If I hold my finger very steady just touching the sensor or my whole hand flat about 1mm away, the LED will flash on and off about 5 times a second (the speed of the flashing is determined mainly by DEBOUNCE_MSEC).

Really good code would not require fixed NO_TOUCH_NUM and TOTAL_PULSE_USEC, but would learn what values are usual for off and on states and set the thresholds to separate them reliably.  I’ve not figured out a good way to do this as unsupervised learning. It would not be very difficult to have initial settings, gather averages for on and off states, then dynamically adjust the threshold, but I don’t know how stable such threshold setting would be. I suspect that it would end up rather unreliable, and highly dependent on good initial settings.


Filed under: Circuits course Tagged: Arduino, bioengineering, capacitive touch sensor, circuits, course design, LM555, sensors, teaching