Posts with «raspberry pi» label

Making Fun: Kid’s Room Spacecraft

I built a spaceship for my four-year-old's room. It has a control panel full of interesting displays and whiz-bang space sounds. A joystick controls lights and sounds for the engine and thrusters. The payload bay has a motorized hatch and and contains a robot arm for deploying payloads like toy satellites. Headsets provide an audio link between the spacecraft and the Mission Control desk in the other son's room.

Read more on MAKE

A Tweeting Litter Box

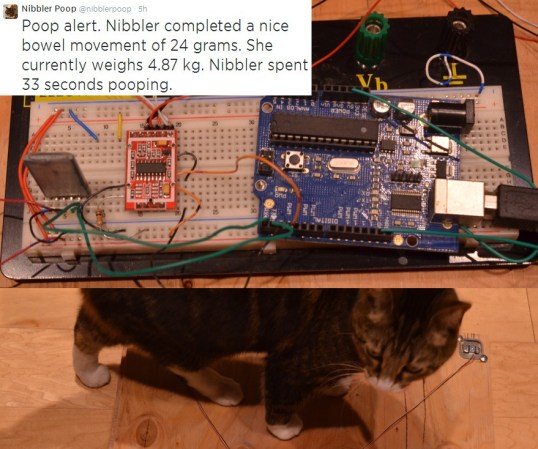
How can you not be interested in a project that uses load cells, Bluetooth, a Raspberry Pi, and Twitter. Even for those of our readers without a cat, [Scott's] tweeting litter box is worth the read.

Each aspect of this project can be re-purposed for almost any application. The inexpensive load cells, which available from eBay and other retailers, is used to sense when a cat is inside the litter box. Typically sensors like the load cell (that contain a strain gauge) this use a Wheatstone bridge, which is very important for maximizing the sensitivity of resistive sensor. The output then goes to a HX711, which is an ADC specifically built for load cells. A simple alternative would be using an instrumentation amplifier and the built-in ADC of the Arduino. Now, the magic happens. The weight reading is transmitted via an HC-06 Bluetooth module to a Raspberry Pi. Using a simple Perl script, the excreted weight, duration, and the cat’s resulting body weight is then tweeted!

Very nice work! This is a well thought out project that we could see being expanded to recognize the difference between multiple cats (or any other animal that goes inside).


Filed under: Arduino Hacks, Raspberry Pi, wireless hacks

HAL is Duct Tape for Home Automation

When it comes to home automation, there are a lot of different products out there that all do different things. Many of them are made by different companies, and they don’t often play very well together. This frustration ultimately led [Daniel] to develop his own Python based middleware solution to get these various components to work as a single cohesive system. What exactly did [Daniel] want to control?

First up was the door lock. [Daniel] lives in an apartment building, so there are actually two locks. First, a visitor must be allowed into the building by pressing a button on the intercom system in the apartment. Second, the apartment door has its own dead bolt lock that needs to be opened and closed. [Daniel] was able to control the building’s front door using just a transistor hooked up to an Arduino to simulate the press of the physical button. The original button remains in tact so [Daniel] can still easily “buzz” in a visitor.

The apartment’s dead bolt was a bit trickier. There are off-the-shelf solutions to control a dead bolt, but they are often expensive. [Daniel] built his own solution using a simple servo motor bolted to the door. The servo is controlled by the Arduino which is in turn controlled via two broken intercom buttons that already existed within the apartment. The buttons were originally used to either speak to or listen to a visitor before buzzing them into the building. They had never worked for [Daniel] so he re-purposed them for his own project. The whole DIY door locker is enclosed in a custom-made laser cut wooden box.

Click past the break for the rest of [Daniel's] story.

When it comes to lighting, [Daniel] has a couple of different brands of automated light bulbs in his apartment. One brand has bulbs that are controlled by a radio frequency signal. That brand comes with a converter box that can accept lighting commands via WiFi. It also uses a simple API that allowed [Daniel] to easily control all of the bulbs from his Python code. The second brand of light bulb did not have a simple API. After some searching around, [Daniel] found an open source project called ouimeaux. Ouimeaux is a Python library that allows you to control this particular brand of automated light bulbs. This was perfect for [Daniel] since he was already using Python in his project. With this library it was trivial for him to control the lights from his web interface.

As a proof of concept, [Daniel] also built a custom WiFi enabled power outlet using a SparkCore module. He has an entire separate post dedicated to that project.

For the brain of the system, [Daniel] chose to use a Raspberry Pi. The Pi runs a web server with a Flask based back-end system. Flask allows him to code the website in Python, which meant he could easily write a website that can interact with the various automation components. The Pi can directly communicate with all of the off-the-shelf components using the various Python libraries. For the door lock, the Pi communicates with the Arduino via pySerial. [Daniel] also used Flask OAuth to limit access to the system to only authorized users. Now whenever [Daniel] wants to turn the lights on or unlock the door for a visitor, all he has to do is press a button on a web page.

[via Reddit]


Filed under: home hacks

The Story of OpenSprinkler: an Open-Source Web-Based Sprinkler Controller

Learning Arduino inspired me to invent the OpenSprinkler.

Read more on MAKE

Hackaday Links: April 27, 2014


The HackFFM hackerspace in Frankfurt finally got their CO2 laser up and running, and the folks there were looking for something to engrave. They realized the labels on IC packages are commonly laser engraved, so they made a DIP-sized Arduino. The pins are labelled just as they would be on an Arduino, and a few SMD components dead bugged onto the pins provide all the required circuitry. Video here.

A few years ago, we heard [David Mellis] built a DIY cell phone for an MIT Media Lab thingy. Apparently it’s making the blog rounds again thanks to the Raspi cell phone we featured yesterday. Here’s the Arduino cell phone again. Honestly we’d prefer the minimalist DIY Nokia inspired version.

The Raspberry Pi is now a form factor, with the HummingBoard, a Freescale i.MX6-powered clone, being released soon. There’s another form factor compatible platform out there, the Banana Pi, and you can actually buy it now. It’s an ARM A20 dual core running at 1GHz, Gig of RAM, and Gigabit Ethernet for about $60. That SATA port is really, really cool, too.

[Richard] has been working on a solar-powered sun jar this winter and now he’s done. The design uses two small solar panels to charge up two 500F (!) supercapacitors. There’s a very cool and very small supercap charging circuit in there, and unless this thing is placed in a very dark closet, it’ll probably keep running forever. Or until something breaks.

Here’s something awesome for the synth heads out there: it’s an analog modeling synthesizer currently on Indiegogo. Three DCOs, 18dB lowpass filter, 2 envelopes and an LFO, for all that classic Moog, Oberheim, and Roland goodness. It’s also pretty cheap at $120 USD. We really don’t get enough synth and musical builds here at Hackaday, so if you’re working on something, send it in.

A glass-based PCB? Sure. Here’s [Masataka Joei] put gold and silver on a piece of glass, masked off a few decorative shapes, and sandblasted the excess electrum away. [Masataka] is using it for jewelery, but the mind races once you realize you could solder stuff to it.


Filed under: Hackaday links

Controlling a Raspberry Pi / Arduino Bot from the Internet Part 2 of 3

This is part two of a three part Series to explain how I control my BotTwo semi-Autonomous Robot from a webpage on the Internet. 

read more

Controlling a Raspberry Pi / Arduino Bot from the Internet Part 2 of 3

This is part two of a three part Series to explain how I control my BotTwo semi-Autonomous Robot from a webpage on the Internet. 

read more

Controlling a Raspberry Pi / Arduino Bot from the Internet Part 1 of 3

This is a three part Series to explain how I control my BotTwo&n

read more

Review – Freetronics 128×128 Pixel Colour OLED Module

Introduction

Time for another review, and in this instalment we have the new 128×128 Pixel OLED Module from Freetronics. It’s been a while since we’ve had a full-colour graphic display to experiment with, and this one doesn’t disappoint. Unlike other displays such as LCD, this one uses OLED – “Organic Light-Emitting Diode” technology.

OLEDs allow for a faster refresh rate, and to the naked eye has a great amount of colour contrast. Furthermore the viewing angles are excellent, you can clearly read the display from almost any angle, for example:

However they can suffer from burn-in from extended display of the same thing so that does need to be taken into account. Nevertheless they provide an inexpensive and easy-to-use method of displaying colour text, graphics and even video from a variety of development boards. Finally – there is also a microSD socket for data logging, image storage or other uses. However back to the review unit. It arrives in typical retail packaging:

and includes the OLED display itself, a nifty reusable parts tray/storage box, and two buttons. The display has a resolution of 128 x 128 pixels and has a square display area with a diagonal size of 38.1 mm. The unit itself is quite compact:

The display is easily mounted using the holes on the left and right-hand side of the display. The designers have also allowed space for an LED, current-limiting resistor and button on each side, for user input or gaming – perfect for the  included buttons. However this section of the PCB is also scored-off so you can remove them if required. Using the OLED isn’t difficult, and tutorials have been provided for both Arduino and Raspberry Pi users.

Using with Arduino

After installing the Arduino library, it’s a simple matter of running some jumper wires from the Arduino or compatible board to the display – explained in detail with the “Quickstart” guide. Normally I would would explain how to use the display myself, however in this instance a full guide has been published which explains how to display text of various colours, graphics, displaying images stored on a microSD card and more. Finally there’s some interesting demonstration sketches included with the library. For example, displaying large amounts of text:

… the variety of fonts available:

… and for those interested in monitoring changing data types, a very neat ECG-style of sketch:

… and the mandatory rotating cube from a Freetronics forum member:

Using with Raspberry Pi

For users of this popular single-board computer, there’s a great tutorial and some example videos available on the Freetronics website for your consideration, such as the following video clip playback:

Support

Along with the Arduino and Raspberry Pi tutorials, there’s also the Freetronics support forum where members have been experimenting with accelerated drivers, demonstrations and more.

Competition!

For a chance to win your own OLED display, send a postcard with your email address clearly printed on the back to:

OLED Competition, PO Box 5435 Clayton 3168 Australia. 

Cards must be received by 24/10/2013. One card will then be selected at random and the winner will be sent one Freetronics OLED Display. Prize will be delivered by Australia Post standard air mail. We’re not responsible for customs or import duties, VAT, GST, import duty, postage delays, non-delivery or whatever walls your country puts up against receiving inbound mail.

Conclusion

Compared to previous colour LCD units used in the past, OLED technology is a great improvement – and demonstrated very well with this unit. Furthermore you get the whole package – anyone call sell you a display, however Freetronics also have the support, tutorials, drivers and backup missing from other retailers. So if you need a colour display, check it out.

And for more detail, full-sized images from this article can be found on flickr. And if you’re interested in learning more about Arduino, or want to introduce someone else to the interesting world of Arduino – check out my book (now in a third printing!) “Arduino Workshop” from No Starch Press.

In the meanwhile have fun and keep checking into tronixstuff.com. Why not follow things on twitterGoogle+, subscribe  for email updates or RSS using the links on the right-hand column? And join our friendly Google Group – dedicated to the projects and related items on this website. Sign up – it’s free, helpful to each other –  and we can all learn something.

[Note – OLED display was a promotional consideration from Freetronics]

The post Review – Freetronics 128×128 Pixel Colour OLED Module appeared first on tronixstuff.

ArduPi Webcam Tankbot

Primary image

What does it do?

Web controllable mobile platform for webcam mounted on pan/tilt turret

This is my first robot project though I have been working with Microcontrollers and Embedded Linux for a little while. As of writing (3/1/13) this is still very much a work in progress, but most of the hardware construction has been completed. This robot will provide a remotely controlled, mobile platform for a pan/tilt webcam. It is based on the excellent Tamiya Tracked Chassis Kit with the Dual DC Motors connected to the Arduino Motor Shield R3 via the Screw Terminal.

Cost to build

Embedded video

Finished project

Number

Time to build

Type

tracks

URL to more information

Weight

0 grams

read more