Posts with «nano» label

An Arduino-based Cellular Automata with OLED monitor

RuntimeProject made a tutorial to create a little cellular automata on a small 126×64 OLED using Arduino Nano.

He worked on one type of cellular automata, the Game of Life by John Conway, which has a grid of cells each having 2 states True or False/on or off/alive or dead. These cells are governed by 2 simple rules:

Rule 1: A cell which is dead and is surrounded by exactly 3 alive cells, will be born

Rule 2: A cell which is alive and has either 3 or 2 alive cells will remain alive, else it dies

The Arduino-based Cellular Automata works using 2 libraries the,  Adafruit GFX library  to handle all graphics and text displayed on the OLED;
Adafruit SSD1306 library which is the driver for the OLED.

You can read more info on how to make it on his blog and download the sketch on Github.

Make your DIY smart glasses running on Arduino

Jordan Fung is a 13-year-old maker and programmer based in Hong Kong. He recently developed Arduino-based smart glasses called Pedosa Glass, which are able to activate, in this first release, a flashlight and a timer:

The Pedosa Glass is powered by a single Arduino Nano running an “operating system” developed by me.
There is a tiny FLCOS display in the front. The AV signal from the Arduino will be displayed on it. It is equipped with 3 push buttons, in which 2 of them are control buttons and one of them be the home button, also equipped with a super-bright white LED for use as a flashlight.

In the picture below you can explore the electronic scheme:


Jordan is working hard to add new applications and features to the project but in the meanwhile he shared his work on a great tutorial on Instructables.

Tricking an Ancient Protocol To Play Tunes

A lot of technological milestones were reached in 2007. The first iPhone, for example, was released that January, and New Horizons passed Jupiter later on that year. But even with all of these amazing achievements, Volvo still wasn’t putting auxiliary inputs on the stereo systems in their cars. They did have antiquated ports in their head units though, and [Kalle] went about engineering this connector to accommodate an auxiliary input.

The connector in question is an 8-pin DIN in the back, which in the days of yore (almost eight years ago) would have been used for a CD changer. Since CDs are old news now, [Kalle] made use of this feature for the hack. The first hurdle was that the CD changer isn’t selectable from the menu unless the head unit confirms that there’s something there. [Kalle] used an Arduino Nano to fool the head unit by simulating the protocol that the CD changer would have used. From there, the left and right audio pins on the same connector were used to connect the auxiliary cable.

If you have a nearly-antique Volvo like [Kalle] that doesn’t have an aux input and you want to try something like this, the source code for the Arduino is available on the project page. Of course, if you don’t have a Volvo, there are many other ways to go about hacking an auxiliary input into various other devices, like an 80s boombox or the ribbon cable on a regular CD player. Things don’t always go smoothly, though, so there are a few nonstandard options as well.


Filed under: car hacks, digital audio hacks

Listening to the sound of a 300-million-year-old disc

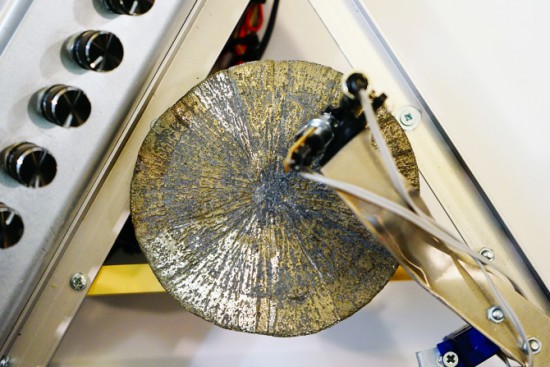
There’s a mineral called pyrite with a interesting nickname, fool’s gold, because it has a superficial resemblance to gold and it’s by far the most frequently mineral mistaken for gold. Even if it’s pretty abundant, there’s a rare form of pyrite which is crystallised in radial shape (as unusual disc spherulites), taking the shape of a disc. The amazing fact is that the only deposit where pyrites of such morphology are found is in Illinois (USA) and the discs are dated around 300 million years ago!

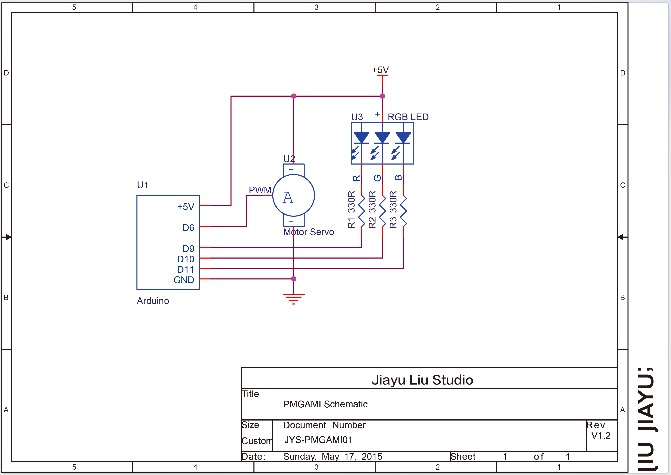
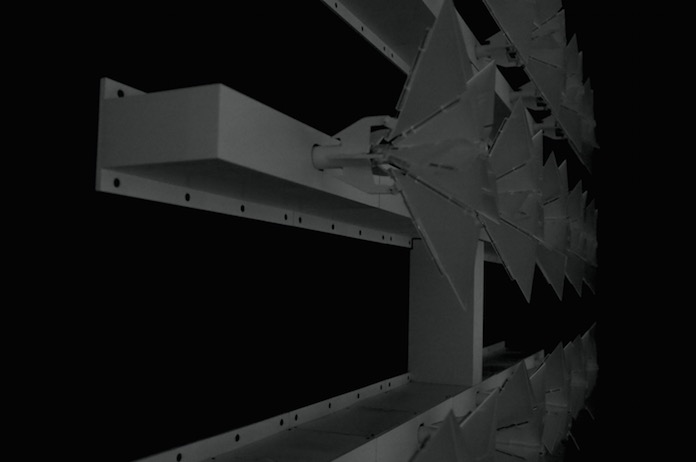
Dmitry Morozov (aka ::vtol::), a media artist living in Moscow, had the chance to use a pyrite disc and created Ra,  a sound object / synthesizer running on Arduino Nano. Ra uses laser for scanning the irregularities of the surface of the disc and further transforms this data to produce sound:

This project originated as a result of an interesting set of circumstances – a pyrite disc was given to me as a gift by a mineral seller in Boulder city (USA). Upon hearing about my works, she asked to do something with such crystal, and refused to take payment for getting it. In the same period, I was reading articles on various ways of archiving and preservation of sounds from the first, historical sources of the recorded sound – wax discs and other fragile carriers. All technologies were based on the usage of lasers. Inspired by these projects, I set out to create a self-made laser sound reader which would be able to produce sound from various uneven surfaces, using minimal resources to achive it. Thus emerged the idea to construct an instrument using the pyrite disc and a self-made laser sound reader.

The production of the object was possible thanks to the commission of the Sound Museum in St.-Petersburg which now has Ra in its collection.

Check the bill of materials and other details on Dmitry’s website. Explore other projects by Dmitry featured on Arduino Blog.

Arduino Blog 05 Oct 12:54

Visualizing air quality with interactive origami flowers

“Under the Dome – PMgami” is an installation created by designer Jiayu  Lui using Arduino Nano. Inspired by paper origami techniques, the digitally fabricated flowers move and change color according to the quality of air measured locally. The main aim of the installation is to obtain a more intuitive way to communicate pollution data and  the relationship between technology and nature.

In the gallery you can explore some other pictures and the schematic. Check the video below to see the installation in action!


On Your Phone While Driving an Electric Skateboard

Skateboards are fun, but you have to do all that pesky kicking in order to get anywhere. That’s why [Nick] decided to build his own electric skateboard. Not only is the skateboard powered with an electric motor, but the whole thing can be controlled from a smart phone.

[Nick] started out with a long board deck that he had made years ago. After cleaning it up and re-finishing it, the board was ready for some wheels. [Nick] used a kit he found online that came with the trucks, wheels, and a belt. The trucks have a motor mount welded in place already. [Nick] used a Turnigy SK3 192KV electric motor to drive the wheels. He also used a Turnigy electronic speed controller to make sure he could vary the speed of the board while riding.

Next [Nick] needed some interface between a smart phone and the motor controller. He chose to use an Arduino Nano hooked up to a Bluetooth module. The Nano was able to directly drive the motor controller, and the Bluetooth module made it easy to sync up to a mobile phone. The Android app was written using MIT’s App Inventor software. It allows for basic control over the motor speed so you can cruise in style. Check out the video below for a slide show and some demonstration clips.

It’s a popular project, and eerily similar to the one we saw a couple months back.


Filed under: Arduino Hacks

Arduino Synth Guitar Really Rocks

[Gr4yhound] has been rocking out on his recently completed synth guitar. The guitar was built mostly from scratch using an Arduino, some harvested drum pads, and some ribbon potentiometers. The video below shows that not only does it sound good, but [Gr4yhound] obviously knows how to play it.

The physical portion of the build consists of two main components. The body of the guitar is made from a chunk of pine that was routed out by [Gr4yhound’s] own home-made CNC. Three circles were routed out to make room for the harvested Yamaha drum pads, some wiring, and a joystick shield. The other main component is the guitar neck. This was actually a Squire Affinity Strat neck with the frets removed.

For the electronics, [Gr4yhound] has released a series of schematics on Imgur. Three SoftPot membrane potentiometers were added to the neck to simulate strings. This setup allows [Gr4yhound] to adjust the finger position after the note has already been started. This results in a sliding sound that you can’t easily emulate on a keyboard. The three drum pads act as touch sensors for each of the three strings. [Gr4yhound] is able to play each string simultaneously, forming harmonies.

The joystick shield allows [Gr4yhound] to add additional effects to the overall sound. In one of his demo videos you can see him using the joystick to add an effect. An Arduino Micro acts as the primary controller and transmits the musical notes as MIDI commands. [Gr4yhound] is using a commercial MIDI to USB converter in order to play the music on a computer. The converter also allows him to power the Arduino via USB, eliminating the need for batteries.

[Thanks Wybren]


Filed under: Arduino Hacks, musical hacks

Automated Tea Maker

[Pariprohus] wanted to make an interesting gift for his girlfriend. Knowing how daunting it can be to make your own tea, he decided to build a little robot to help out. His automated tea maker is quite simple, but effective.

The device runs off of an Arduino Nano. The Nano is hooked up to a servo, a piezo speaker, an LED, and a switch. When the switch is turned to the off position, the servo rotates into the “folded” position. This moves the steeping arm into a position that makes the device easier to store and transport.

When the device is turned on to the “ready” position, the arm will extend outward and stay still. This gives you time to attach the tea bag to the arm and place the mug of hot water underneath. Finally the switch can be placed into “brew” mode. In this mode, the bag is lowered into the hot water and held for approximately five minutes. Each minute the bag is raised and lowered to stir the water around.

Once the cycle completes, the Nano plays a musical tune from the piezo speaker to remind you to drink your freshly made tea. All of the parameters including the music can be modified in the Nano’s source code. All of the components are housed in a small wooden box painted white. Check out the video below to see it in action.


Filed under: Android Hacks
Hack a Day 29 Jan 03:01

Adding WiFi and SMS to an Alarm System

[Don] wanted to bring his alarm system into the modern age. He figured that making it more connected would do the trick. Specifically, he wanted his alarm system to send him an SMS message whenever the alarm was tripped.

[Don] first had to figure out a way to trigger an event when the alarm sounds. He found a screw terminal that lead to the siren. When the alarm is tripped, this screw terminal outputs 12V to enable the siren. This would be a good place to monitor for an alarm trip.

[Don] is using an Arduino nano to monitor the alarm signal. This meant that the 12V signal needed to be stepped down. He ran it through a resistor and a Zener diode to lower the voltage to something the Arduino can handle. Once the Arduino detects a signal, it uses an ESP8266 WiFi module to send an email. The address [Don] used is the email-to-SMS address which results in a text message hitting his phone over the cell network.

The Arduino also needed power. [Don] found a screw terminal on the alarm system circuit board that provided a regulated 12V output. He ran this to another power regulator board to lower the voltage to a steady 5V. This provides just the amount of juice the Arduino needs to run, and it doesn’t rely on batteries. [Don] provides a good explanation of the system in the video below.


Filed under: Android Hacks, security hacks
Hack a Day 17 Jan 00:01