Posts with «nano» label

Mouse Mis-Clicking? We Got You.

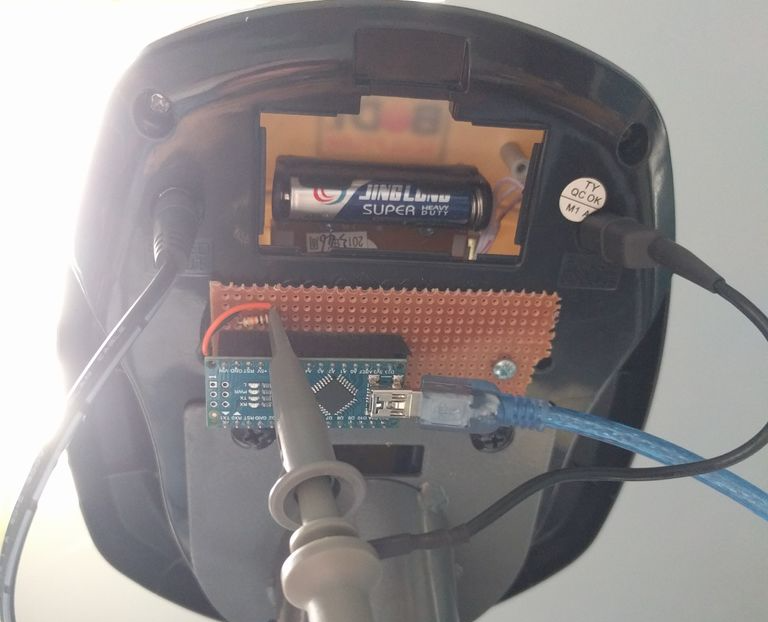
A mouse with malfunctioning buttons can be a frustrating to deal with — and usually a short leap to percussive maintenance. Standard fixes may not always last due to inferior build quality of the components, or when the microswitch won’t close at all. But, for mice that double/triple-click, will release when dragging, or mis-click on release, this Arduino-based hack may be the good medicine you’re after.

Instructables user [themoreyouknow]’s method cancels click malfunctions by latching the mouse’s controller switch trace to ‘on’ when pressed, keeping it there until the button normally closed contact closes again completely. Due to the confined spaces, you’ll want to use the smallest Arduino you can find, some insulating tape to prevent any shorts, and care to prevent damaging the wires this process adds to the mouse when you cram it all back together.

Before you take [themoreyouknow]’s guide as dogma, the are a few caveats to this hack; they are quick to point out that this won’t work on mice that share two pins between three buttons — without doing it the extra hard way, and that this might be trickier on gaming or other high-end mice, so attempt at your own peril.

Speaking of gaming mice, we recently featured a way to add some extra functionality to your mouse — cheating optional — as well as how to stash a PC inside an old Logitech model.


Filed under: hardware, how-to
Hack a Day 30 Aug 09:00
arduino  click  debounce  hardware  how-to  mouse  nano  repair  

Regulate air flow with Arduino

Blow guns can be very helpful around your workshop, but sometimes you want a subtle shot of air instead of a full blast. There are several ways to take this on, but YouTuber “MBcreates” decided on a novel method using an Arduino Nano for control.

In his setup, a stepper is used to turn a screw as a linear actuator, pushing an intermediate blow gun’s trigger at progressively more aggressive intervals. This effectively regulates the air flow going into the handheld blow gun, allowing for a more subtle burst of air when needed.

Simple is often better. So I grabbed an old blow gun and used this a valve. The Arduino Digital Air Pressure Regulator uses a NEMA 17 stepper motor to press the lever of the blow gun. A micro end switch was placed against the lever. When the Arduino Nano goes through the setup, the stepper hits the end switch, now the program knows the exact position of the stepper.

The video seen here features some very clever build techniques, and it really turned out spectacular, especially considering it was MBcreates’ first Arduino project!

Fling discs with a brushless motor and an Arduino

YouTuber “austiwawa,” apparently not satisfied with other methods of causing mayhem in his garage and backyard, has come up with an innovative disc shooter.

His homemade device uses a brushless motor controlled by an Arduino Nano and an ESC to pull a vacuum belt at high speeds. A clear plastic tube on top holds a stack of about 27 3D-printed discs. At the press of a button, they are then fed one by one onto the belt surface by another motor, which accelerates the disc to ejection velocity and out the “muzzle.” There’s also a potentiometer that allows him to adjust the fire rate.

Although it appears to work quite well, destroying items like an apple and eggs, austiwawa notes that this is only a prototype, and plans to make a fully 3D-printed version in the future. At that point, he’ll release the Arduino code and STL files, making it easy for others to duplicate!

Until then, check it out in action below!

Check the time on this large and inexpensive “Titan Clock”

When you, perhaps after being late for an important event one too many times, decide to build a wall clock, there are many DIY options from which to choose. But none may be as massive or unique as the aptly named “Titan Clock.”

To justify this particular design, hacker “ProtheanSoft” lists several of its advantages, such as its large size, energy efficiency (runs on a smartphone charger), thinness (only 18mm thick with casing), and of course, affordability.

The Titan Clock—which can be assembled for less than $50—consists of RGB LEDs, inexpensive craft materials like foamcore board, acrylic and aluminum sheets, as well as recycled components including the diffuser from a broken LCD monitor or TV to generate a uniform glow for each segment. 

ProtheanSoft’s project uses an Arduino Nano for control, along with with a DS3231 RTC module for accurate timekeeping. In this version, the Arduino is programmed to display the time and change color every hour based on a predetermined table.

Interested in creating your own? You can find more details on the build here, as well its code and a wiring diagram on GitHub.

Levitate liquids and other tiny objects with this DIY device

If you’ve ever wished you could levitate tiny drops of liquid, small solids, or insects in mid-air, new research has you covered. That’s because Asier Marzo, Adrian Barnes, and Bruce W. Drinkwater have developed a 3D-printed, Arduino Nano-controlled acoustic levitator.

Their device uses two arrays of 36 sonic transducers in a concave pattern, which face each other in order to suspend objects like Styrofoam, water, coffee and paper in between. Several items can even be trapped at the same time, and liquid is inserted into the “levitation zone” via a syringe.

The principle is similar to the vibration you feel when next to a large speaker, but in this case, the homemade levitator employs ultrasonic waves to push particles without causing any damage to humans.

Acoustic levitation has been explored in hundreds of studies for applications in pharmaceuticals, biology or biomaterials. It holds the promise of supporting innovative and ground-breaking processes. However, historically levitators have been restricted to a small number of research labs because they needed to be custom-made, carefully tuned and required high-voltage. Now, not only scientists but also students can build their own levitator at home or school to experiment and try new applications of acoustic levitation.

If you’d like to make your own, be sure to check out Marzo’s Instructables post or the team’s full paper on the experiment here.

Maker creates his own coilgun using an Arduino Nano

If you suppose that electromagnetically-propelled projectiles are strictly the purview of well-funded government research labs, think again! Using two sets of coils wrapped around custom 3D-printed base structures and an Arduino Nano for control, YouTuber “Gyro” created his own coilgun capable of propelling steel fast enough to dent a piece of wood.

When fired, a photodiode at the end of each electromagnet coil sends a signal to the Arduino. This, in turn, shuts off the coil, allowing it freely escape the barrel.

As noted in his Instructables write-up, the gun is constructed without large capacitors, which can be expensive and dangerous. Instead, two LiPo battery packs are combined to produce around 22 volts, though this and the number of coils used, could be increased to produce a more powerful device!

Build an arcade-style hoops game with Arduino and LEGO

You may be familiar with “Pop-A-Shot” at arcades and amusement parks, which allows you to shoot baskets at a hoop for fun and prizes. This Maker, apparently unsatisfied with not having one of these at home, decided to duplicate the game with the “Pop o Shop.”

In this version, an ultrasonic sensor in the hoop tells an Arduino Nano when a shot has been registered, while two 7-segment displays inside of a LEGO scoreboard show the current count, time remaining, and high score. There is also an RGB LED that turns green after every made basket and changes color with a new top score.

Incidentally, one of the displays can also spell out “POPOSHOP,” which dictated the name of the game, since there is no “T” character in the LedControl library used! For more info and code, be sure to check out the “Internet of LEGO” build log!

Make your own Operation-style board game with Arduino

Usually, when you think of doing “surgery” on electronics, it’s to replace a component, or maybe modifying an appliance into something different. In this case, an Arduino Nano powers Hurry, Doctor!, an updated version of the board game classic Operation meant as a middle school STEM exercise.

This game, of which creator “TrevorB23” gives an extensive explanation in his Instructables write-up, features a LEGO minifigure with cutouts inside that house obstructions such as a “mental block” and “funny bone.” As with the original, the objective is to remove these foreign bodies without touching the sides, constructed here with conductive aluminum foil tape in order to signal the Nano.

With its enhanced electronics, TrevorB23’s version adds a timing element to encourage “surgeons” to complete tasks faster, as well as doctor names and melodies that can be altered if so desired. Want to make your own game? You can follow along with his 31-step tutorial.

Binge-watch and burn calories with the Arduino-powered Cycflix

As entertaining as watching Netflix may be, you’re not burning a lot of calories while binging on your favorite shows. In order to do both at the same time, hacker “Roboro” modded a stationary exercise bike to stop streaming if he’s not maintaining his fitness goals.

Bicycle speed is derived from the signal that’s normally sent to the built-in display. He uses an Arduino Nano to hijack the square wave, and sends this info to the streaming computer serially via USB.

Starting the Python script and inputting some information, Firefox will start to stream Netflix and display in real-time for current workout information such as round, speed, nominal speed for this round and time to next round. If the user goes below the nominal speed for too long, Netflix will pause until the user has gotten back up to speed.

If you’d like to try this yourself, you can find an Instructables write-up with all the necessary details and check out his code on GitHub. Though designed around Netflix, Roboro notes that it can be used with other streaming services with a few changes.

Synth Bike 3.0 produces tunes with 12 Arduino Nanos

After building a bicycle that could travel across town while making music, Sam Battle now taken things in a different direction. Synth Bike 3.0, which will be on display at the Science Center Dublin until September, is set up on a training fixture so that you can pedal it indoors rain or shine. This version also features a simplified control panel on the handlebars, allowing it to be played by anyone at a tempo controlled by the rear wheel’s speed.

Battle’s YouTube channel is named “LOOK MUM NO COMPUTER” however, this apparently doesn’t count microcontrollers. Hidden in the externally clean-looking handlebar groove box is a total of 12 Arduino Nano boards, along with a maze of wiring, strip circuit boards, frequency central PCBs, a SparkFun WAV trigger, and some other electronics. There’s even built-in speakers on the sides to output the created sounds.

Be sure to check out Synth Bike 3.0’s New Atlas write-up for more info on the project.