Posts with «nano» label

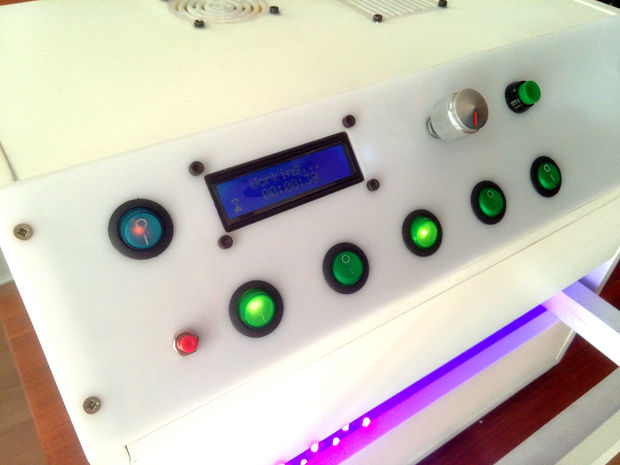
Building an 8-step keyboard sequencer with Arduino

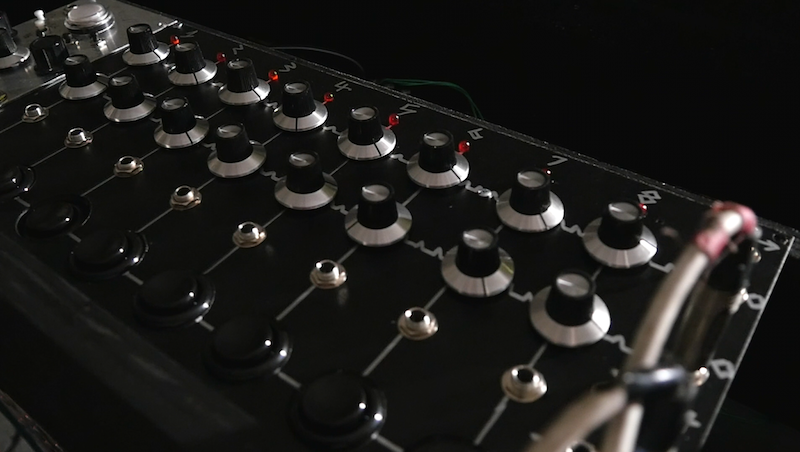
Sequencers, as YouTuber “LOOK MUM NO COMPUTER” explains, are musical devices that go through a sequence of tones one by one. While this can be done quite simply with a 4017 counter chip, if you instead substitute in an Arduino board for the counter, you can make your gadget behave normally, go backwards, or even act as a sort of keyboard using input buttons.

This particular project employs a Nano for control, giving it a conveniently small form factor to fit inside your equipment.

Since the start of building modular synths, ive always been looking for an arduino powered sequencer. but never really happy with the projects that were about. because it was still menu dives and button combinations. which is not what you wanna be messing about with! you may aswell use a computer and a mouse ha.

Be sure to check out LOOK MUM NO COMPUTER’s entire build process and a demo of the keyboard sequencer in the video below. You can also find circuit diagrams and Arduino code in the project’s write-up here.

An excellent two-sided UV exposure box

If you want to make your own custom PCBs at home, one method is to paint a circuit board blank with photosensitive material, then expose the portion you don’t want to UV light using a printed transparency. After a process of etching and stripping, the correct traces are generated.

As seen here, in order to help with the UV process, GiorgiQ decided to create his own two-sided exposure box. It uses arrays of LEDs to produce the correct light, and an Arduino Nano for control.

The box itself is constructed out of MDF, white acrylic, and drawer slides to allow for easy insertion and extraction of the PCBs. It looks like an excellent tool, and his instructions would be a great place to start if you want to build your own!

Mini Strandbeest goes electric with Arduino

Strandbeests, as originally conceived, are gigantic PVC creatures that walk across the sand under wind power. While building one is certainly an enormous undertaking, smaller models are available that let you experience this strange kinetic motion in a more approachable size. These are also normally propelled by moving air, but maker “ArduinoDeXXX” decided to take things further with a pair of DC motors and an Arduino Nano.

The project came together over five distinct iterations, starting off with the normal wind-driven version, then adding uncontrolled motors. After that, the Arduino was included for automation, and this was upgraded with an IR remote. Finally, ArduinoDeXXX integrated simple gesture sensing using an array of IR LEDs.

You can see the mini Strandbeest in action below, along with a few “bonus” improvements at the end.

This Arduino-controlled LED glove can ‘stop’ moving objects

While you might not be able to actually manipulate time, this glove by YouTuber “MadGyver” certainly makes it appear that way. His glove, shown in the video below, uses a gigantic LED controlled by an Arduino Nano to allow objects such as a fan, water falling from a shower, and a spinning top to stop, slow down, and even reverse.

The trick is that when the LED’s frequency is aligned with that of the observed moving subject, it lights it up in the same position over and over, making it appear to pause. Frequency is adjusted by rolling one’s hand via an accelerometer, or a potentiometer mounted in the base of the glove can also be used.

If you want to build your own, instructions can be found here and the Arduino code and schematics are available on GitHub.

An Arduino-controlled geodesic greenhouse and chicken coop

Danish industrial design student Mikkel Mikkelsen decided to do something a little different this spring, and constructed a self-sufficient geodesic greenhouse dome. His dome, which was planned using this online calculator, now stands roughly 13 feet tall, providing space for crops, along with an annex for chickens.

While this seems like a very “back to nature” project, he didn’t forget to include modern conveniences via an automation system that uses both an Arduino Nano and a Mega. The chickens can come and go through an automatic door, while ventilation windows on the top of the dome can be opened as needed. Even plant watering is controlled automatically.

The dome is also equipped with a GSM module that allows Mikkelsen to check on things using his phone via SMS, as well as a potentiometer for manually varying the watering levels and a speaker that is triggered upon entering the greenhouse.

Be sure to check out Mikkelsen’s elaborate Instructables write-up for more info on the build.

Make an Arduino-controlled boost gauge for your racing sim dash

If you’re really serious about car racing games, at some point you may want to upgrade your instruments from being on-screen to physically residing in your living room.

While this would appear to be an arduous task, displaying your in-game boost level on a physical gauge is actually as easy as connecting a few wires to an Arduino Nano, then using SimHub to tie everything together.

As seen in the video below around 2:45, it looks like a lot of fun! While a boost gauge by itself might not be as immersive costly sit-inside racing sims, one could see where this type of hack could lead to ever more impressive DIY accessories.

Arduino Blog 18 Oct 18:35

An Arduino Mouse Wiggler!

If, for whatever reason, you need your computer to stay awake without changing its settings, that’s easy—just remember to shake your mouse back and forth intermittently! If remembering to do that over and over seems like too much work, then here’s a simple solution: a device setup to optically wiggle your mouse using an Arduino Nano and a micro RC servo.

The 3D-printed unit sits underneath a mouse and rotates a printed grid left and right in order to trick it into thinking that you’re moving the mouse, and thus keeping the computer awake.

Place your mouse on top of the Mouse Wiggler and make sure the optical sensor on top of the wheel. Power the device up use a USB power adapter and you’re good to go.

There’s no software to install, which makes it easy to enable and disable as needed! You can find more details on the build on its Instructables page.

12-year-old maker creates his own Flappy Bird console

12-year-old Savva Osipov has grown so far up hearing tales of the old Soviet Union from his father, including about the gadgets and technology that was then available. One particular device that caught his attention is the “Nu, pogodi!” portable game that his dad saved from that time. This inspired him to build another simple handheld, a Flappy Bird console, running on an Arduino Nano.

The project’s software is based on code by Themistokle Benetatos, and he designed and 3D-printed a custom case to tie all the necessary game elements (Arduino, screen, battery, speaker, button, etc.) together.

As shown in the video below, it looks like a lot of fun. If you want to create your own, you can find more details in his write-up here!

Creating moving, wirelessly-controlled train LED displays with Arduino

In order to make his model trains stand out, David G. Bodnar has been working on the best way to integrate 8×8 displays into the cars.

Through the process he’s come up with several great techniques, including a red filter to help them “pop,” as well as wiring things in such a way that sets of LEDs can be used on either side to show the same message.

An Arduino Pro Mini and Nano are used for control, while a Bluetooth module with an Android terminal program enables him to change the text remotely.

I have used LED matrix displays for a number of different projects over the last few years.  These 8×8 LED units have a controller that allows an Arduino to talk to them sending text or graphic information that can be displayed.  These small units can be daisy-chained together to create a long, scrolling display.

While the displays are visually appealing and easy to use they might not get the amount of attention that one would hope they would generate at a train show or other public train display. With this in mind I decided to build an on-board train display using three 8×32 LED boards. Each board is mounted on a car with the three connected together to crate one long scrolling message board. To make things even more interesting and compelling to visitors the display’s message can be changed remotely with a cell phone or computer.

Whether you’re interested in enhancing model trains, or simply want to hear more about integrating LED matrix displays into your next project, you can find more details on Instructables and on his website here.

Mouse Mis-Clicking? We Got You.

A mouse with malfunctioning buttons can be a frustrating to deal with — and usually a short leap to percussive maintenance. Standard fixes may not always last due to inferior build quality of the components, or when the microswitch won’t close at all. But, for mice that double/triple-click, will release when dragging, or mis-click on release, this Arduino-based hack may be the good medicine you’re after.

Instructables user [themoreyouknow]’s method cancels click malfunctions by latching the mouse’s controller switch trace to ‘on’ when pressed, keeping it there until the button normally closed contact closes again completely. Due to the confined spaces, you’ll want to use the smallest Arduino you can find, some insulating tape to prevent any shorts, and care to prevent damaging the wires this process adds to the mouse when you cram it all back together.

Before you take [themoreyouknow]’s guide as dogma, the are a few caveats to this hack; they are quick to point out that this won’t work on mice that share two pins between three buttons — without doing it the extra hard way, and that this might be trickier on gaming or other high-end mice, so attempt at your own peril.

Speaking of gaming mice, we recently featured a way to add some extra functionality to your mouse — cheating optional — as well as how to stash a PC inside an old Logitech model.


Filed under: hardware, how-to
Hack a Day 30 Aug 09:00
arduino  click  debounce  hardware  how-to  mouse  nano  repair