Posts with «led» label

Light Painting Animations Directly From Blender

Light painting: there’s something that never gets old about waving lights around in a long exposure photo. Whilst most light paintings are single shots, some artists painstakingly create frame-by-frame animations. This is pretty hard to do when moving a light around by hand: it’s mostly guesswork, as it’s difficult to see the results of your efforts until after the photo has been taken. But what if you could make the patterns really precise? What if you could model them in 3D?

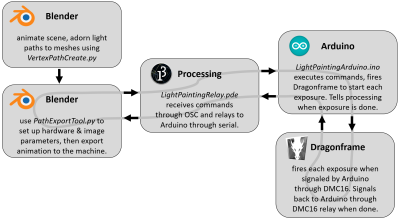
[Josh Sheldon] has done just that, by creating a process which allows animations formed in Blender to be traced out in 3D as light paintings. An animation is created in Blender then each frame is automatically exported and traced out by an RGB LED on a 3D gantry. This project is the culmination of a lot of software, electronic and mechanical work, all coming together under tight tolerances, and [Josh]’s skill really shines.

The first step was to export the animations out of Blender. Thanks to its open source nature, Python Blender add-ons were written to create light paths and convert them into an efficient sequence that could be executed by the hardware. To accommodate smooth sliding camera movements during the animation, a motion controller add-on was also written.

The gantry which carried the main LED was hand-made. We’d have been tempted to buy a 3D printer and hack it for this purpose, but [Josh] did a fantastic job on the mechanical build, gaining a solidly constructed gantry with a large range. The driver electronics were also slickly executed, with custom rack-mount units created to integrate with the DragonFrame controller used for the animation.

The video ends on a call to action: due to moving out, [Josh] was unable to continue the project but has done much of the necessary legwork. We’d love to see this project continued, and it has been documented for anyone who wishes to do so. If you want to check out more of [Josh]’s work, we’ve previously written about that time he made an automatic hole puncher for music box spools.

Thanks for the tip, [Nick].

Arduino Powered Arcade Button Lighting Effects

As if you already weren’t agonizing over whether or not you should build your own arcade cabinet, add this one to the list of compelling reasons why you should dedicate an unreasonable amount of physical space to playing games you’ve probably already got emulated on your phone. [Rodrigo] writes in to show off his project to add some flair to the lighted buttons on his arcade controller. (Google Translate)

The wiring for this project is about as easy as you’d expect: the buttons connect to the digital inputs on the Arduino, and the LEDs on the digital outputs. When the Arduino code sees the button getting pressed, it brings the corresponding LED pin high and starts a fade out timer using the SoftPWM library by [Brett Hagman].

It’s worth noting that the actual USB interface is being done with a stand-alone controller, so the Arduino here is being used purely to drive the lighting effects. The more critical reader might argue that you could do both with a single microcontroller, but [Rodrigo] was in a classic “Use what you’ve got” situation, and already had a USB controller on hand.

Of course, fancy lit arcade buttons won’t do you much good without something to put them in. Luckily we’ve covered some fantastic looking arcade cabinets to get you inspired.

Hack a Day 20 Jul 21:00

Simplifying Basic LED Effects

There was a time when having a blinking blue LED on a project was all you needed to be one of the cool kids. But now you need something more complex. LEDs should not just snap on, they should fade in and out. And blinking? Today’s hotness is breathing LEDs. If that’s the kind of project you want, you should check out [jandelgado’s] jled library.

At first glance, an Arduino library for LED control might seem superfluous, but if you are interested in nice effects, the coding for them can be a bit onerous. If you don’t mind stopping everything while you fade an LED on (or off) then sure, you just write a loop and it is a few lines of code. But if you want to have it happen while other things continue to execute, it is a little different. The library makes it very simple and it is also nicely documented.

Obviously, to create a special effect LED, you need to create a JLed object. Then you can use modifier methods on that object to get certain effects. The only overhead is that you need to call the update method on the LED periodically. Here is one of the examples from the project:

#include <jled.h>

// connect LED to pin 13 (PWM capable). LED will breathe with period of
// 2000ms and a delay of 1000ms after each period.
JLed led = JLed(13).Breathe(2000).DelayAfter(1000).Forever();

void setup() { }

void loop() {
   led.Update();
}

Pretty easy and readable. Just remember that some Arduinos can’t do PWM on pin 13, so you might have to adjust. Our only complaint is that you have to update each LED. It would be nice if the JLed constructor kept a linked list of all LED objects so you could have a class method that updates all of them with one call. In the examples, the author keeps all the LEDs in an array and steps through that. However, that would be easy to fork and add. Oh wait, we did it for you. The library does do a lot of work, including taking advantage of higher PWM resolution available on the ESP8266, for example.

The library can turn an LED on or off (including delays), blink or breathe an LED forever or for a certain number of times, or fade an LED on or off. In addition to the presets, you can provide your own brightness function if you want to do some kind of custom pattern. You can modify most actions by specifying a delay before or after, a repeat count (which can be forever) and you can also tell the library that your LED is active low, so you don’t have to mentally remember to flip everything around in your code.

Rocket science? No. But we like it. Blocking for an LED effect is bad and this makes fancy asynchronous LEDs simple. Why not use it? Recent IDEs can install it from the manage library dialog, so it takes just a second.

Really, libraries are a key to building systems simple. Why not stand on the backs of others? Some of our favorites handle SPI and proportional integral derivative (PID) control.

Hack a Day 14 Jun 00:00

Building Badges The Hard Way

What’s a hacker to do to profess his love for his dearest beloved? [Nitesh Kadyan] built his lady-love this awesome LED pendant – the LED BLE Hearty Necklace Badge.

The hardware is pretty vanilla by today’s hacker standards. An ATMega328p  does most of the heavy lifting. An HM-11 BLE module provides connection to an Android mobile app. Two 74HC595 shift registers drive 16 columns of red LEDs and a ULN2803 sinks current from the 8 rows. The power section consists of a charger for the 320mAh LiPo and an LDO for the BLE module. All the parts are SMD with the passives mostly being 0603, including the 128 LEDs.

128 LEDs soldered wrong way around

[Nitesh] didn’t get a stencil made for his first batch of boards, so all the parts were painstakingly soldered manually and not in a reflow oven. And on his first board, he ended up soldering all of the LED’s the wrong way around. Kudos to him for his doggedness and patience.

The Arduino code on the ATmega is also quite straightforward. All characters are stored as eight bytes each in program memory and occupy 8×8 pixels on the matrix. The bytes to be displayed are stored in a buffer and the columns are left shifted fast enough for the marquee text effect. The Android app is built by modifying a demo BLE app provided by Google. The firmware, Android app, and the KiCAD design files are all hosted on his Github repository.

[Nitesh] is now building a larger batch of these badges to bring them to hillhacks – the annual hacker-con for making and hacking in the Himalayas. Scheduled for later this month, you’ll have to sign up on the mailing list for details and if you’d like to snag one of these badges. To make it more interesting, [Nitesh] has added two games to the code – Tetris and Snakes. Hopefully, this will spur others to create more games for the badge, such as Pong.

Pavement Projection Provides Better Bicycle Visibility at Night

Few would question the health benefits of ditching the car in favor of a bicycle ride to work — it’s good for the body, and it can be a refreshing relief from rat race commuting. But it’s not without its perils, especially when one works late and returns after dark. Most car versus bicycle accidents occur in the early evening, and most are attributed to drivers just not seeing cyclists in the waning light of day.

To decrease his odds of becoming a statistics and increase his time on two wheels, [Dave Schneider] decided to build a better bike light. Concerned mainly with getting clipped from the rear, and having discounted the commercially available rear-mounted blinkenlights and wheel-mounted persistence of vision displays as insufficiently visible, [Dave] looked for ways to give drivers as many cues as possible. Noticing that his POV light cast a nice ground effect, he came up with a pavement projecting display using four flashlights. The red LED lights are arranged to flash onto the roadway in sequence, using the bike’s motion to sweep out a sort of POV “bumper” to guide motorists around the bike. The flashlight batteries were replaced with wooden plugs wired to the Li-ion battery pack and DC-DC converter in the saddle bag, with an Arduino tasked with the flashing duty.

The picture above shows a long exposure of the lights in action, and it looks very effective. We can’t help but think of ways to improve this: perhaps one flashlight with a servo-controlled mirror? Or variable flashing frequency based on speed? Maybe moving the pavement projection up front for a head-down display would be a nice addition too.

Parts Bin Spooky Eye Build

Halloween is a great holiday for hacks, bringing out the creativity in even the most curmudgeonly wielder of a soldering iron. [tdragger] was looking to have some good old fashioned Halloween fun, and got to thinking – putting together this great Spooky Eyes build in their attic window.

The effect itself is simple – just two glowing orange LEDs spaced the right distance apart, placed in the highest window in the house. As every young child knows, the attic is almost the spookiest room in the house, second only to the basement.

Various effects were programmed in to the Arduino running the show, like breathing and blinking effects, to give that frightful character. For maintenance and programming purposes, [tdragger] wanted to have the Arduino remotely mounted, and searched for a solution. Rather than leaning on a wireless setup or something modern and off-the-shelf, instead some old RJ11 telephone extension cables were pressed into service. These allowed the eyes to be placed in the window, allowing the Arduino to be placed in a more accessible location.

It’s a basic project, but one that has a good fun factor. Sometimes it’s good to use what you’ve got to hand, so that the buzz of enjoyment isn’t dampened by the long wait for shipping. For something bigger, check out this giant staring eyeball.

Hack a Day 20 Mar 06:00

RGB Disk Goes Interactive with Bluetooth; Shows Impressive Plastic Work

[smash_hand] had a clear goal: a big, featureless, white plastic disk with RGB LEDs concealed around its edge. So what is it? A big ornament that could glow any color or trippy mixture of colors one desires. It’s an object whose sole purpose is to be a frame for soft, glowing light patterns to admire. The disk can be controlled with a simple smartphone app that communicates over Bluetooth, allowing anyone (or in theory anything) to play with the display.

The disk is made from 1/4″ clear plastic, which [smash_hand] describes as plexiglass, but might be acrylic or polycarbonate. [smash_hands] describes some trial and error in the process of cutting the circle; it was saw-cut with some 3-in-1 oil as cutting fluid first, then the final shape cut with a bandsaw.

The saw left the edge very rough, so it was polished with glass polishing compound. This restores the optical properties required for the edge-lighting technique. The back of the disc was sanded then painted white, and the RGB LEDs spaced evenly around the edge, pointing inwards.

The physical build is almost always the difficult part in a project like this — achieving good diffusion of LEDs is a topic we talk about often. [smash_hands] did an impressive job and there are never any “hot spots” where an LED sticks out to your eye. With this taken care of, the electronics came together with much less effort. An Arduino with an HC-05 Bluetooth adapter took care of driving the LEDs and wireless communications, respectively. A wooden frame later, and the whole thing is ready to go.

[smash_hands] provides details like a wiring diagram as well as the smartphone app for anyone who is interested. There’s the Arduino program as well, but interestingly it’s only available in assembly or as a raw .hex file. A video of the disk in action is embedded below.

Making LED lighting interactive comes in many different shapes and forms, and as the disk above shows, shifting color patterns can be pleasantly relaxing.

Definitive Dog Feeding with Arduino

Some dogs have no sense of self-preservation. Given the opportunity, they will eat until they’re sick. It’s up to us humans to both feed them and remember doing it so they aren’t accidentally overfed. In a busy household with young children, the tricky part is the remembering.

[Bryan]’s family feeds their dog Chloe once a day, in the mornings. She was a rescue who spent a few years scrounging for meals on the street, so some part of her is always interested in finding food, even if she just ate. Each morning, the flurry of activity throughout the house is compounded by Chloe’s repeated requests for food, so [Bryan] got his kids involved and built a simple circuit that lets everyone know—at a glance—whether Chloe was fed.

Chloe’s kibble is kept in a touch-top wastebasket that flips open at the press of a button. [Bryan]’s dog-fed detector uses a reed switch and an Arduino clone to detect when the lid is opened. When the reed switch goes, low, the Arduino lights up an LED. The light stays on for two hours and then shuts off automatically to get ready for the next day. You don’t have to beg for a demo video, because it’s waiting for you after the break.

Since Chloe devours a bowl of food in about two minutes flat, maybe the next project for [Bryan]’s family could teach her to slow down a bit.

Stop Motion with the Time Glove

What do you get when you put an ultra-bright LED in the palm of a glove, and strobe it controlled by an accelerometer? A Time Control Glove! In creator [MadGyver]’s own words, it’s “just a stroboscope with frequency adjustment” but the effect is where all the fun is.

The Time Control Glove uses the stroboscopic effect, which many of us have seen used in timeless water drop fountains where the strobe rate makes drops appear to change speed, freeze in place, and even change direction. [MadGyver] made the entire assembly portable by putting it into a glove. An on-board accelerometer toggles the strobe in response to a shake, and the frequency is changed by twisting the glove left or right. The immediate visual feedback to the physical motions is great. The whole effect is really striking on the video, which is embedded below.

Schematics and bill of materials are available on GitHub. Brilliant work! And while we’re discussing the stroboscopic effect, find out how it can be used to tune guitar strings.

[via Arduino Blog]


Filed under: Arduino Hacks, how-to, led hacks

Super simple controller for Motorcycle LED lights

For automobiles, especially motorcycles, auxiliary lighting that augments the headlights can be quite useful, particularly when you need to drive/ride through foggy conditions and poorly lit or unlit roads and dirt tracks. Most primary lighting on vehicles still relies on tungsten filament lamps which have very poor efficiency. The availability of cheap, high-efficiency LED modules helps add additional lighting to the vehicle without adding a lot of burden on the electrical supply. If you want to add brightness control, you need to either buy a dimmer module, or roll your own. [PatH] from WhiskeyTangoHotel choose the latter route, and built a super simple LED controller for his KLR650 bike.

He chose a commonly available 18 W light bar module containing six 3 W LEDs. He then decided to build a microcontroller based dimmer to offer 33%, 50% and 100% intensities. And since more code wasn’t going to cost him anything extra, he added breathing and strobe modes. The hardware is as barebones as possible, consisting of an Arduino Nano, linear regulator, power MOSFET and control switch, with a few discretes thrown in. The handlebar mounted control switch is a generic motorcycle accessory that has two push buttons (horn, headlight) and a slide switch (turn indicators). One cycles through the various brightness modes on the pushbutton, while the slide switch activates the Strobe function. A status indicator LED is wired up to the Nano and installed on the handlebar control switch. It provides coded flashes to indicate the selected mode.

It’s a pity that the “breathing” effect is covered under a patent, at least for the next couple of years, so be careful if you plan to use that mode while on the road. And the Strobe mode — please don’t use it — like, Ever. It’s possible to induce a seizure which won’t be nice for everyone involved. Unless you are in a dire emergency and need to attract someone’s attention for help.


Filed under: led hacks
Hack a Day 09 Sep 09:00