Posts with «iot» label

Hacking Robotic Arm using Controllino and Cayenne


Description

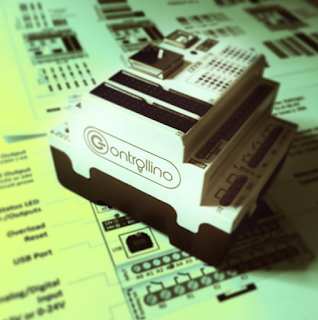
This tutorial will show you how to take over the controls of the OWI Robotic Arm with the help of an Arduino compatible, open-source PLC called the Controllino MAXI, together with Cayenne (my go-to iOT application for remote connection to my Arduino projects). The Controllino MAXI will provide the physical connections to the OWI robotic arm, and Cayenne will allow me to control the arm via my web browser or via the Cayenne app on my phone.


Arduino Libraries and IDE

  1. The Arduino IDE can be used to program the Controllino. You can dowload the Arduino IDE from here: https://www.arduino.cc/en/main/software.
  2. You will also need to read the Cayenne Ethernet library installation instructions in order to install the Cayenne Ethernet Library.
  3. The Controllino will connect to the internet via the Ethernet port onboard.
  4. You do not need the Controllino library for this project, however, if you have a Controllino, you might as well install the library. You can read the Controllino library installation instructions from their GitHub webpage here: https://github.com/CONTROLLINO-PLC/CONTROLLINO_Library.
  5. You will need to notify the Arduino IDE of the Controllino MAXI board by pasting the supplied URL into the "Additional Boards Manager URLs" in the Arduino IDE.
  6. This is located under: FILE - PREFERENCES - Additional Boards Manager URLs.
  7. The URL that you need to paste is in STEP 3 of the Controllino Library installation instructions on their GitHub page.
  8. The video at the top of this tutorial may help clarify the process.


ARDUINO CODE:

The code above is very simple, however you will need to create a dashboard of widgets from within your Cayenne account in order to control the OWI robotic Arm from your phone or via the Dashboard webpage.


Setting up Cayenne Dashboard

Once you have created your Cayenne account, you will be presented with a webpage to choose a board to connect to. Controllino is an Arduino compatible PLC, so make sure to follow these instructions for setting up the Controllino in your Cayenne Account.

  1. Select Arduino from the available list of boards.
  2. Make sure to install the necessary libraries if your have not done so already.
  3. Select Arduino MEGA from the avaliable list of Arduino boards
  4. Select Ethernet Shield W5100
  5. Copy and paste the Arduino code that pops up on screen into your Arduino IDE and upload to the Controllino.
  6. Alternatively, copy and paste the code from above, however you will need to insert your Authentication token to get it to work

After you upload the code to the Controllino, and providing it has an ethernet cable connected to the internet router (and has access to the internet), and is powered on, it will connect to your Cayenne Dashboard. You can now add widgets to the dashboard in real time to interact with the Controllino, and without uploading any more code to the open source PLC.


Adding Widgets

We need to add a number of widgets in order to activate the relays on the Controllino. The relavent digital pins that we will need to know about can be found on the Controllino website here: https://controllino.biz/downloads/.

Here is the direct link to the PINOUT file for the Controllino MAXI.

"Armed" with that knowledge, we can now create the widgets which are necessary to control the relays on the Controllino. From within the Cayenne dashboard, please follow these instructions to create a widget:

  1. Select - ADD NEW
  2. Select - DEVICE/WIDGET
  3. Select - ACTUATORS
  4. Then - RELAY from the dropdown box
  5. Select - RELAY SWITCH
  6. Give the widget a descriptive name to differentiate it from the other widgets and a name that is somewhat informative (eg. R0 - Pos)
  7. I gave the first widget the name "R0 - Pos", because it will connect to Relay R0, and that relay will be connected to the Positive (POS) terminal of the OWI robotic arm.
  8. Select the device you would like to connect to. Be aware that you can change the name of the device in the settings. If you followed this tutorial, it should have the name "Arduino MEGA", but I changed the name of the device to "Controllino" to be more accurate.
  9. We will be using a digital pin to control the relay, therefore select "Digital" as the Connectivity option
  10. For this specific widget, we will be controlling R0, which is activated by digital pin D22 on the Controllino. Therefore select "D22" from the "Pin" dropdown box.
  11. Choose a "Button" as the widget type
  12. Choose an icon from the dropdown box that makes sense to you
  13. Skip Step 1
  14. Select Step 2: Add actuator

You should now see your new widget on the dashboard. Select the widget to enable or activate that relay. If you do this, and if everything goes to plan, you will see the LED for R0 illuminate on the Controllino. You now have to add the rest of the widgets to the dashboard in order to control the rest of the relays on the Controllino.
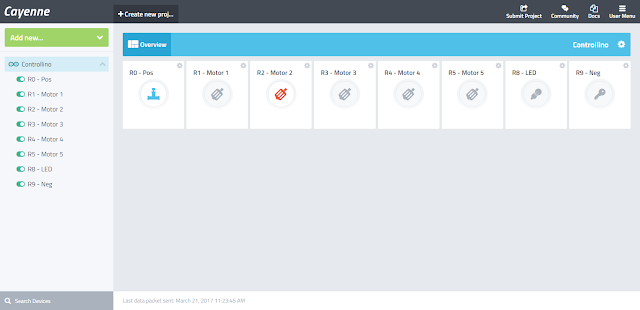


Widget Dashboard

Here is a table to show you how I setup my dashboard.
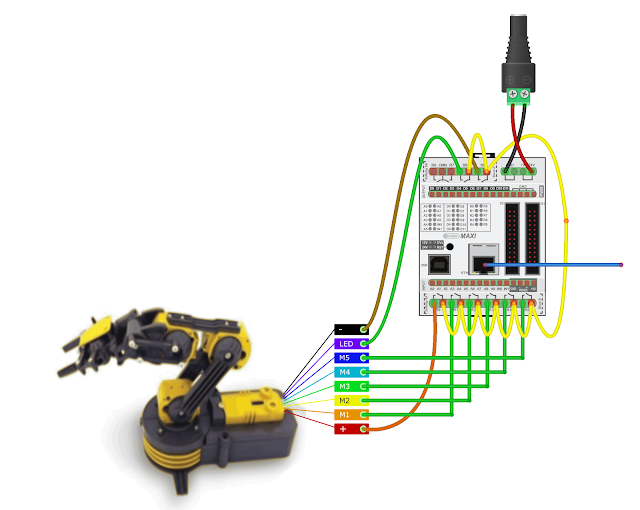


Fritzing diagram


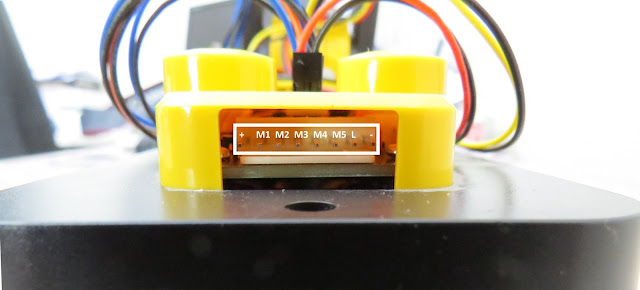
OWI Robotic Arm Pins


Normal OWI Robotic Arm Circuit

The following circuit diagram will show you how the wired control box is normally connected to the OWI Robotic arm. This is the circuit diagram of the OWI robotic arm under normal operating contidtions.


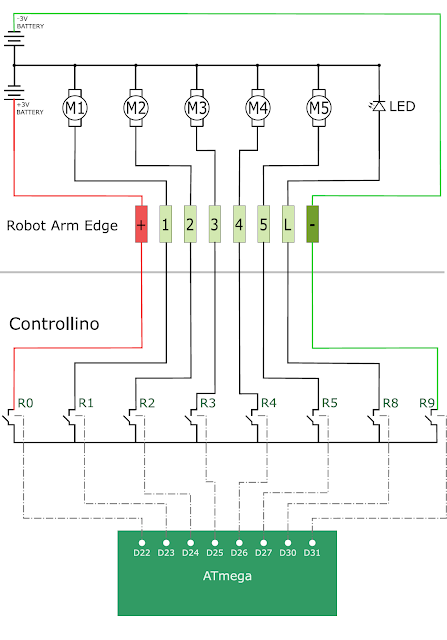
OWI Robotic Arm Circuit when connected to Controllino

The following circuit diagram will show you how the OWI Robotic Arm will be controlled by the relays of the Controllino. This is the circuit diagram of the OWI robotic arm when it is connected to the Controllino.
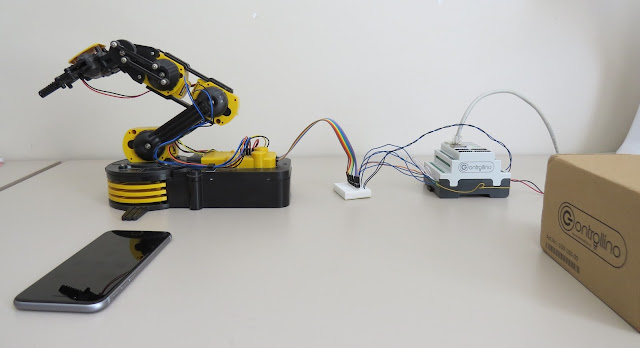


All connected

The OWI Robotic Arm is connected to a breadboard using the female-to-male jumper wires. Solid core wire is then fed through to the relay terminals of the Controllino. You could just wire it up so that the robotic arm is connected directly to the Controllino, however, I did not have the right connectors for this purpose.
The Controllino is also connected to my internet router via a normal RJ-45 ethernet cable, and is powered by a 12V DC power adapter.


Summary

Now that you have all the physical connections made, uploaded the code to the Controllino, and have created your dashboard in Cayenne, you should be able to control your OWI Robotic arm from anywhere in the world. As demonstrated in the video at the start of this tutorial, the robotic arm has quite a bit of give on each of the joints, which makes it difficult to achieve certain tasks that require an element of precision. There goes that idea of being able to perform surgery with this thing !!! At least you can get it to make you a cup of tea, and if you are patient enough, you might even get a grape once in a while.

Thank you to Controllino and Cayenne for making this tutorial possible. If you would like your product featured in my tutorials, please contact me on my contact page.


If you like this page, please do me a favour and show your appreciation :

 
Visit my ArduinoBasics Google + page.
Follow me on Twitter by looking for ScottC @ArduinoBasics.
I can also be found on Pinterest and Instagram.
Have a look at my videos on my YouTube channel.


Monitor All the Laundry Things with this Sleek IoT System

If like us you live in mortal fear of someone breaking into your house when you’re on vacation and starting a dryer fire while doing laundry, this full-featured IoT laundry room monitor is for you. And there’s a school bus. But don’t ask about the school bus.

In what [seasider1960] describes as “a classic case of scope creep,” there’s very little about laundry room goings on that escapes the notice of this nicely executed project. It started as a water sensor to prevent a repeat of a leak that resulted in some downstairs damage. But once you get going, why not go too far? [seasider1960] added current sensing to know when the washer and dryer are operating, as well as to tote up power usage. A temperature sensor watches the dryer vent and warns against the potential for the aforementioned tragedy by sounding an obnoxious local alarm — that’s where the school bus comes in. The whole system is also linked into Blynk for IoT monitoring, with an equally obnoxious alarm you can hear in the video below. Oh, and there are buttons for testing each alarm and for making an Internet note to reorder laundry supplies.

We’ve seen a spate of laundry monitoring projects lately, all of which have their relative merits. But you’ve got to like the fit and finish of [seasider1960]’s build. The stainless face plate and in-wall mount makes for a sleek, professional appearance which is fitting with the scope-creepy nature of the build.


Filed under: home hacks

Temperature logger using arduino and thingspeak

Hello Arduino lovers,

In this tutorial, we are making a temperature logger using arduino and thingspeak.
Let's start

Things required:

  1. Arduino Uno
  2. LM35
  3. Sim900 module
  4. Internet pack 
  5. Thinkspeak account


Make connections as given in the diagram. Connect Tx of GSM module to pin number 7 of arduino board and Rx of of GSM module to pin number 8 of arduino uno and ground should be common between these two.
Output of LM35 should be connected to A0 of arduino board.
Arduino Uno GSM module LM35
Pin no. 7 Tx
Pin no. 8 Rx
Pin no. A0 Output of Lm35
Download code from link below
Now, upload the code

Video:

Hope, you guys had enjoyed the video

Thanks for visiting my blog


Quick and Easy IoT Prototyping with Involt

IoT, web apps, and connected devices are all becoming increasingly popular. But, the market still resembles a wild west apothecary, and no single IoT ecosystem or architecture seems to be the one bottle of snake oil we’ll all end up using. As such, we hackers are keen to build our own devices, instead of risking being locked into an IoT system that could become obsolete at any time. But, building an IoT device and interface takes a wide range of skills, and those who are lacking skill in the dark art of programming might have trouble creating a control app for their shiny new connected-thing.

Enter Involt, which is a framework for building hardware control interfaces using HTML and CSS. The framework is built on Node-Webkit, which means the conventions should be familiar to those with a bit of web development background. Hardware interactions (on Arduinos) are handled with simple CSS classes. For example, a button might contain a CSS class which changes an Arduino pin from high to low.

Involt can take that CSS and convert it into a function, which is then sent to the Arduino via serial or Bluetooth communication. For more advanced functionality, Javascript (or really any other language) can be used to define what functions are generated — and, in turn, sent to the Arduino. But, all that is needed for the basic functionality necessary for many IoT devices (which might only need to be turned on and off, or set to a certain value) is a bit of HTML and CSS knowledge. You’ll create both the interface and the underlying hardware interactions all within an HTML layout with CSS styling and functionality.

While Involt isn’t the only framework to simplify hardware interaction (it’s not even the only Node.js based method), the simplicity is definitely laudable. For those who are just getting started with these sorts of devices, Involt can absolutely make the process faster and less painful. And, even for those who are experienced in this arena, the speed and efficiency of prototyping with Involt is sure to be useful.


Filed under: Arduino Hacks
Hack a Day 05 Feb 03:00
arduino  arduino hacks  css  html  involt  iot  node  

How to update esp8266 firmware

In this post, we are going to upload firmware to ESP8266 (ESP-01) . The firmware can be updated by both arduino as well as usb-ttl module.
ESP-01 is wifi SoC module and it has two GPIO pins i.e. GPIO0 AND GPIO2
For using ESP8266, we can use either AT commands using any terminal software/ esplorer ide (it supports lua programmming and AT commands) or we can use arduino library.
ESP8266 is a 8-pin SoC having two GPIO pins, it requires 3.3 volt and the current consumed by wifi module can't be attained through arduino. Therefore, if we are using arduino we need external 3.3 volt power supply.
Esp8266 wifi module can act as STA as well as AP or both


Things required:

1. USB-TTL module
2. Perfboard
3. Male and female berg strip
4. Female to female jumper wires
5. ESP-01
6. Nodemcu flasher
7. Firmware to be updated
8. Little bit of patience :)

Connections:

Make connections as given below:
ESP8266 side                                               USB-TTL module
Rx                                                                  Tx
Tx                                                                  Rx
CH_PD and Vcc                                           3.3 volt provided by the usb-ttl module
GND                                                              GND
GPIO0                                                           GND (while updating the firmware only)

Updating the firmware:

We had connected switch to GPIO0, by pressing the switch it GPIO0 will be grounded
In order to update the firmware, make the connections on perfboard. In this circuit, we are using two switches
one for GND and other for GPIO0.
Download Nodemcu flasher from the link below:
Download firmware from the link below:
Make settings as given in the picture. Browse the firmware file (ends with .bin)

Note: GPIO0 should be grounded while updating the firmware.
Vcc and CH_PD should be connected to 3.3 volt only

Check out the video:


Thanks for visiting this post.

In the meantime, do check my youtube channel:

Fun with electronics


Garage Door Monitor with Cayenne


Description

Using the HMC5883L magnetometer sensor of the GY-80 module from ICStation to monitor a garage door and notify when it has been opened or closed. The Cayenne service provides much of the monitoring and notifying functionality. A major feature of this project. Cayenne takes care of all of the complicated work behind the scenes, making it easy to connect your Arduino to the cloud and allow you to monitor your garage from virtually anywhere.
 
This project was created specifically to monitor a garage, but you will soon discover that this project could be used to monitor a whole host of other things. Monitor your front door, your back door, your bag, your chair, your cookie jar.
 
Monitor for peace of mind, or catch someone in the act of stealing your stuff. This project has got you covered. Let's see how:


HMC5883L DataSheet:

You can find the datasheet for the HMC5883L pretty easily by searching on the internet.
HMC5883L datasheet - Sparkfun


Arduino Libraries and IDE

Here is a link to the Arduino IDE download. The IDE is required to upload code to the Seeeduino Cloud.

You need the Cayenne Library installed in your Arduino IDE.
You can find the Cayenne library here:
Cayenne Libarary
 
There are libraries on the internet for the GY-80 module, however, it is relatively easy to use the magnetometer on this module. And therefore no libraries are required for the sensor. If you would like some more information about using the magnetometer sensor, and how to get the most out of it, then please have a look at my previous tutorial which goes into much more detail.


ARDUINO CODE:


You need to make sure to insert your OWN Cayenne token into the sketch above. You will get this token when connecting your Arduino to the Cayenne service. Watch the video for further explanation.


Fritzing diagram

Cayenne Widgets

Please make sure to watch the video to see how to connect the Seeeduino Cloud to Cayenne and how to create the Cayenne widgets. Cayenne widgets are necessary to create the dashboard on your phone or browser. They will also interact with the Arduino sketch, and will also be involved in creating the notification system. The following links will take you to the relevant part of the video:

The Master switch button is used to switch monitoring from OFF to ON (and vice versa). Therefore you can choose when to monitor the garage and when to stop monitoring. When first installing the project onto your garage door, and turning the Seeeduino Cloud on, it will automatically calibrate each sensor to a value of 1000.
 
If you experience any drift away from 1000 for whatever reason, simply press the Request calibration button, and each sensor will be recalibrated back to 1000. The x,y and z axis widgets are there so that you can see the readings coming from the magnetometer sensor. And when any of the axis variables breach the threshold away from 1000, it will trigger the Door Status widget. This is how we can tell if the door is open or closed.
 
We also use the Door Status widget to help with the notification system. When the Door status changes from "Closed" to "Open", a notification trigger will be activated, and a message will be sent via email or SMS. This notification is useful for monitoring when the door was opened. If you happen to recalibrate when the door is open. You will get a notification when the garage door closes.


Concluding comments

This project is relatively simple, and quite easy to set up. What I liked about this project was the versatility and alternate uses. You can use the same setup to monitor many different things. It is not just limited to monitoring a garage door. But being able to tell whether my garage door is opened or closed, especially after I have driven away from my house , is really cool. Now I don't have to drive all the way back home to check. Let me know if you have replicated this project, and also what kinds of things you decided to monitor with this project.

ArduWorm: A Malware for Your Arduino Yun

We’ve been waiting for this one. A worm was written for the Internet-connected Arduino Yun that gets in through a memory corruption exploit in the ATmega32u4 that’s used as the serial bridge. The paper (as PDF) is a bit technical, but if you’re interested, it’s a great read.

The crux of the hack is getting the AVR to run out of RAM, which more than a few of us have done accidentally from time to time. Here, the hackers write more and more data into memory until they end up writing into the heap, where data that’s used to control the program lives. Writing a worm for the AVR isn’t as easy as it was in the 1990’s on PCs, because a lot of the code that you’d like to run is in flash, and thus immutable. However, if you know where enough functions are located in flash, you can just use what’s there. These kind of return-oriented programming (ROP) tricks were enough for the researchers to write a worm.

In the end, the worm is persistent, can spread from Yun to Yun, and can do most everything that you’d love/hate a worm to do. In security, we all know that a chain is only as strong as its weakest link, and here the attack isn’t against the OpenWRT Linux system running on the big chip, but rather against the small AVR chip playing a support role. Because the AVR is completely trusted by the Linux system, once you’ve got that, you’ve won.

Will this amount to anything in practice? Probably not. There are tons of systems out there with much more easily accessed vulnerabilities: hard-coded passwords and poor encryption protocols. Attacking all the Yuns in the world wouldn’t be worth one’s time. It’s a very cool proof of concept, and in our opinion, that’s even better.

Thanks [Dave] for the great tip!


Filed under: Arduino Hacks, security hacks
Hack a Day 11 Nov 16:30

Temperature updation on thingspeak using sim900

Hello friends,

In this post we are going to discuss how to upload temperature on thingspeak channel using sim 900 and arduino uno. As I had already uploaded the data on thingspeak channel using sim 900 and terminal software.

Introduction:

This project is a wireless temperature logger on thingspeak channel using gsm module and arduino.
For temperature sensor, we are using lm35, that gives output in millivolt which can be easily calibrated in  terms of  °C. We have to use adc module, since it's an analog sensor. Once the raw data is converted into temperature, we can upload the data.

Now, we are ready to upload the data on thingspeak channel. Thingspeak provides api for uploading of data. Before this, we have to use activate GPRS on sim900. We also to provide APN for accessing the internet. After activating the GPRS, we have to use GET like this:

GET http://api.thingspeak.com/update?api_key=QZFXXXXXXXXXXX&field1=data

Replace this api with yours, and data is the data you want to be upload. You can upload a number of field like temperature, pressure, humidity, etc.
 

Stuff you need:

  1. SIM900A
  2. Arduino uno
  3. LM35 (it's output is in degree celsius)
  4. 12 volt adapter (for GSM module)
  5. Jumper wires
  6. Account on thingspeak


Connections:

Arduino                              GSM module
Pin no. 7     ======>         Tx
Pin no. 8     ======>         Rx
Gnd            ======>          Gnd

Output of LM35 is connected to A0 of arduino uno.


Download the code from here:


An interactive ball for your dog’s remote entertainment

Recently presented at Disrupt SF Hackathon 2016, this modified hamster ball rolls and dispenses treats while you’re away!

Creators Anthony Alayo, James Xu, and Lawrence Chang don’t like the idea of leaving doggies alone all day to fend for themselves. Although these companions will generally wait for their owners to get home, this surely gets boring. To help solve this problem, they created the DogeBall–a hamster ball equipped with advanced electronics including what looks to be an Arduino MKR1000. This allows it to roll around under remote control via an accompanying app, and can even give your pooch a treat, perhaps as a reward for not chewing up your shoes!

Say you’re at work and your dog has been alone for a while. If you have a nest cam or other home cameras setup, playing with him/her is easy. The app we created acts as a remote controller, connecting to the ball over the internet. Shoot your dog a treat, hit the speak button to talk with him, or control the ball as if you were right there beside him/her.

Sound like something you might want for your pup? You can check out the team’s Devpost article or TechCrunch’s writeup on this excellent project!

(Photos: Devpost)