Enigma machines are fascinating devices, especially for young Makers looking to explore the world of electronics. Awhile back we featured a similar project from Italy, and we’re once again amazed by the work of 14-year-old Andy Eggebraaten, who built a retro-modern gadget of his own. The project, which was for his high school’s science fair, took nine months to complete.
These electro-mechanical rotor cipher machines were developed in the early 20th century to protect commercial, diplomatic and military communication, used especially by German military intelligence during World War II.
In the video below, Andy opens the machine to show its inner workings: the unit runs on Arduino Mega along with 1,800 other parts and 500 color-coded wires. We can see that he evolved the rotors into electronic modules that plug into D-Sub sockets, and the interface is made using a 16-segment display showing the rotor position as well as an LCD screen to read the plain- and the encoded text.
It is likely that many of us will at some time have experimented with motion detectors. Our Arduinos, Raspberry Pis, Beaglebones or whatever will have been hooked up to ultrasonic or PIR boards which will have been queried for their view of what is in front of them.
[Connornishijima] has stumbled on a different way to detect motion with an Arduino, he’s polling an ADC pin with a simple length of twisted pair hooked up to it and earth, and reliably generating readings indicating when he (or his cat) is in its vicinity. He’s calling the effect “Capacitive turbulence”, and he’s open to suggestions as to its mechanism. He can only make it work on the Arduino, other boards with ADCs don’t cut it.
Frequent Hackaday featuree [Mitxela] may have also discovered something similar, and we’ve hesitated to write about it because we didn’t understand it, but now it’s becoming unavoidable.
It’s always dangerous in these situations to confidently state your opinion as “It must be…” without experimental investigation of your own. Those of us who initially scoffed at the idea of the Raspberry Pi 2 being light sensitive and later had to eat their words have particular cause to remember this. But this is an interesting effect that bears understanding. We would guess that the Arduino’s fairly high input impedance might make it sensitive to mains hum, if you did the same thing to an audio amplifier with a phono input you might well hear significant hum in the speaker as your hand approached the wire. It would be interesting to try the experiment at an off-grid cabin in the woods, in the absence of mains hum.
If you’d like to give his experiment a try, he’s posted his sketch on Pastebin. And he’s put up the video below the break demonstrating the effect in action, complete with cats.
We like to see people pushing the boundaries of what is possible with their microcontroller I/O lines, it furthers our collective knowledge as a community. We’ve seen people making TV transmitters from ESP8266s, and not so long ago a Raspberry Pi ADC port as further examples. Please, keep them coming!
Electrospinning is a fascinating process where a high voltage potential is applied between a conductive emitter nozzle and a collector screen. A polymer solution is then slowly dispensed from the nozzle. The repulsion of negative charges in the solution forces fine fibers emanate from the liquid. Those fibers are then rapidly accelerated towards the collector screen by the electric field while being stretched and thinned down to a few hundred nanometers in diameter. The large surface area of the fine fibers lets them dry during their flight towards the collector screen, where they build up to a fine, fabric-like material. We’ve noticed that electrospinning is hoped to enable fully automated manufacturing of wearable textiles in the future.
[Douglas Miller] already has experience cooking up small batches of microscopic fibers. He’s already made carbon nanotubes in his microwave. The next step is turning those nanotubes into materials and fabrics in alow-cost, open source electrospinning machine, his entry for the Hackaday Prize.
As always in fundamental research projects, a whole lot of parameters have to be tuned just right. To speed up the process of finding suitable values for the electric potential, dosing feed rate, emitter to collector plate distance, temperature, and humidity, [Douglas] build his machine with a CNC controlled vertical axis and syringe pump, that can dispense even the smallest amounts of a given solutions accurately. Temperature and humidity control will be added as the project progresses. A host software and GUI allows for easy control of all parameters and will also save and recall presets for different spinning solutions once everything has been dialed in. [Douglas] already ran a few tests, spraying saline solution from an old 3D printer nozzle, and we can soon expect first tests with polymer solutions from the better-suited syringe nozzles he installed.
To keep the build affordable and easy to reproduce for other makers, [Douglas] uses available materials and came up with a few design tricks that could also be applied to other projects. The belt-driven vertical axis is based on PVC pipes, on which a 3D-printed bushing block slides up and down, adjusting the distance between the nozzle and the collector plate. An acrylic door with a safety switch prevents the polymer spray from escaping from the spinning chamber. In the heart of the machine sits an Arduino Uno with a gShield, controlling the stepper motors and talking to the host computer. The 3D-printed syringe pump, a custom design, swings out from the side of the machine to allow for easy refilling. Submerged in mineral oil, which may have been chosen to reduce the risk of overheating and arcing, lies a half-wave series voltage multiplier, cranking up the voltage from an AC power supply to a maximum of 30 kV DC.
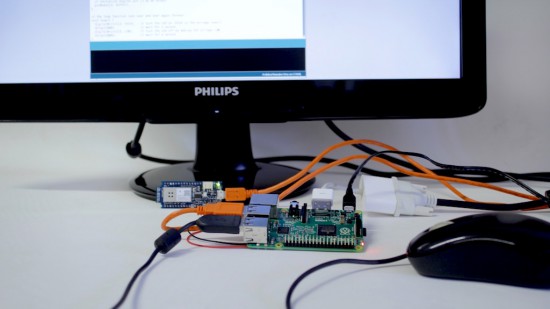
As many of you already noticed, we recently released a new “Linux ARM” version of the Arduino IDE available for download on our website together with the usual “Linux 32bit” and “Linux 64bit.”
This release enables you to run the Arduino Software (IDE) on many of the mini PC boards based on ARM6+ processors currently on the market, including Raspberry Pi, C.H.I.P., BeagleBone, UDOO… just to name a few.
The Linux ARM release has been strongly supported by our community and we would like to thank all the people that helped to make this happen: GitHub handles @CRImier, @NicoHood, @PaulStoffregen, @ShorTie8, and to everyone that patiently tested and reported problems.
If you are interested (and brave!), you can read the full story and explore the complete list of collaborators below:
Disclaimer: The release is “experimental,” meaning that it mostly works but some boards do not work or may not produce the desired result… enjoy imperfection and give us feedback on Github!
[Derryn Harvie] from the MakeHackVoid maker space hacked a $10 IR Thermometer and made it talk USB. Sounds easy? Read on.
He opened it up in the hope of finding, and tapping into, a serial bus. But he couldn’t find one, and the main controller was a COB blob – hidden under unmarked black epoxy. Normally this is a dead-end. (We’ve seen some interesting approaches to decapping epoxy blobs, and even ICs with lasers.)
But [Derryn] went his own way – intercepting the data going from the micro-controller to the LCD display, and reverse engineering it using another microcontroller. He scraped off the solder mask over the tracks leading to the LCD display, and used an oscilloscope to identify the common drive lines. He then used a function generator to excite each of the LCD common lines and the segments lines to build a complete matrix identifying all the combinations that drove the segments. With all the information decoded, wires were soldered so he could hook up an Arduino, and the cut tracks repaired.
Since the LCD was a multiplexed display, the bias voltages were at four levels. Luckily, he could extract most of the LCD information by reading just eight of the segment drive lines, using up all of the analog inputs on the Arduino. Perhaps a different microcontroller with more ADC inputs would have allowed him to display more LCD functions. Well, he can always upgrade his upgrade later. If you have a similar hack to implement, then [Derryn]’s code could be useful to get started.
Thanks, [csirac2] for sending us this tip from MakeHackVoid.
Give some mundane, old gear to an artist with a liking for technology, and he can turn it into a mesmerizing piece of art. [dmitry] created “red, an optic-sound electronic object” which uses simple light sources and optical elements to create an audio-visual performance installation. The project was the result of his collaboration with the Prometheus Special Design Bureau in Kazan, Russia. The inspiration for this project was Crystall, a reconstruction of an earlier project dating back to 1966. The idea behind “red” was to recreate the ideas and concepts from the 60’s ~ 80’s using modern solutions and materials.
The main part of the art installation consists of a ruby red crystal glass and a large piece of flexible Fresnel lens, positioned in front of a bright LED light source. The light source, the crystal and the Fresnel lens all move linearly, constantly changing the optical properties of the system. A pair of servos flexes and distorts the Fresnel lens while another one flips the crystal glass. A lot of recycled materials were used for the actuators – CD-ROM drive, an old scanner mechanism and old electric motors. Its got a Raspberry-Pi running Pure Data and Python scripts, with an Arduino connected to the sensors and actuators. The sensors define the position of various mechanical elements in relation to the range of their movement. There’s a couple of big speakers, which means there’s a beefy amplifier thrown in too. The sounds are correlated to the movement of the various elements, the intensity of the light and probably the color. There’s two mechanical paddle levers hanging in there, if you folks want to hazard some guesses on what they do.
Servos are extremely versatile actuators used in a large number of applications which need controlled mechanical movement. The usual way of driving them is by using a PWM output from a micro-controller. But if you’re building a robot or a drone which requires a large number of servos, then it makes sense to add smarts directly to the servo.
[Alvaro Ferrán Cifuentes] did just that by building IntelliServo – an add on board which makes regular servos smart by giving them enhanced capabilities as found in high-end versions. His approach is different compared to other takes on this theme. The IntelliServo is designed to replace the electronics in any regular servo and is not limited to any particular make or type. Once upgraded, it’s possible to read the servos position, temperature and current consumption. This allows interesting uses, such as controlling one servo by moving another one, or detecting collision or stalling by monitoring the servo current. Multiple servos can be daisy-chained and controlled over I²C from a micro-controller, or over USB directly from a computer. Each board features an LPC11U24 32-bit Cortex-M0 micro-controller, a DRV8837 motor driver, a TMP36 temperature sensor and a PCA9508 I²C repeater.
The project is open source and the Github repository contains the board design, Arduino library and examples, servo firmware and mechanical parts as well as use instructions. It’s a modular design which allows using either an external controller or running it directly via the on-board micro-USB socket. Check out the videos after the break to see the IntelliServo in action.
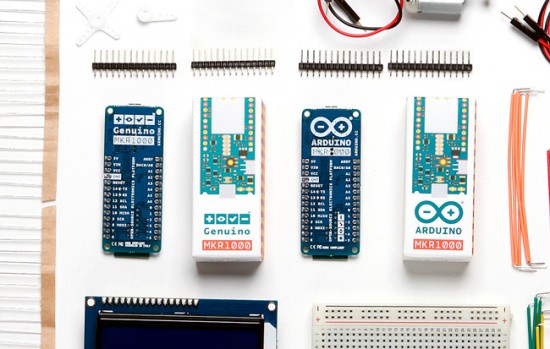
We are happy to announce Arduino MKR1000 and Genuino MKR1000 are now available in our stores at the price of 34,99$/30,99€ (+VAT)!
MKR1000 is the protagonist of World’s largest Arduino Maker Challenge and was shipped exceptionally to 1000 winners of the contest. Now, this powerful board which combines the functionality of the Zero and the WiFi Shield, is available to all makers wanting to design IoT projects with minimal previous experience in networking.
We are sharing some documentation so you can learn more about the features of this new board:
What happens when you give a former Navy weapons engineer some development boards and ask him to build “something cool”? What happens when you give a kid finger paints? [Seb] obviously built an IoT Nerf Turret Gun controlled via a team communication app.
The weapon was a Nerf Stampede which was hacked so it could be fired electronically. The safety switch was bypassed and a relay provided the firing signal. The electronics stack consists of an Intel Galileo, a motor shield and a relay shield. The turret assembly was built using off the shelf structural parts from Actobotics. Stepper motors provide motion to the turret. The fun begins with how the software is implemented. An iBeacon network detects where people sit at in the office. So when you type in the name of your target in a messaging app, it knows where they’re sitting, aims at them, and pops a nerf dart at them.
The lessons learned are what makes such projects worth their while. For example, USB is a standard. And the standard says that USB cables be not more than 1.8 m long. [Seb] was reminded of this when his electronics worked on his workbench, but refused to work when placed in-situ and connected via a 3m long cable – the serial link just wouldn’t work.
Mounting the gun such that it was nicely balanced was another challenge. Eventually, he had to use a couple of AA cells taped to the front of the gun to get it right. This could be useful though, since he plans to replace the dead weights with a sighting camera. One last hack was to zip tie heat sinks to the motor drivers, and he had a good reason to do that. Read more about it in his blog. And check out the video as someone takes aim and shoots a target via SLACK, the team messaging application.


