Posts with «hardware» label

Testing riders’ clothing with Arduino

Worse for Wear is a clothing company  for women who ride motorcycles. The fascinating clothing they produce is very fashionable, comfortable, and needs to protect riders from impact and abrasion if they have an accident. Jackets and trousers have knee and hip pads  included to protect the rider when sliding many meters across asphalt. That’s why the fabric must be strong and abrasion resistant because if the fabric wears away too quickly, the rider’s skin will be exposed and injured.

To choose the perfect fabric, Scott and Laura, co-founders of the company, created an Impact Abrasion Resistance Testing Machine running on Arduino Uno to perform tests on different materials like knit fabrics, woven fabrics, and leather, to see how long it takes before the material is sanded completely through. I interviewed them to learn more about it!

- What is the impact abrasion resistance testing machine and how does it work?

When selecting fabric to use in our clothes, we have to make sure that it is strong and abrasion resistant. We use the impact abrasion resistance test machine to determine which fabrics will withstand abrasion (scraping and sliding) the best. It is important to us to test the fabrics ourselves and not rely solely on the claims of fabric manufacturers.

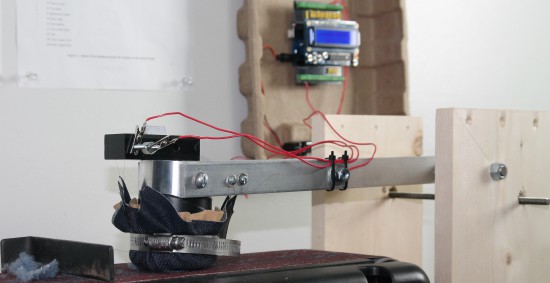
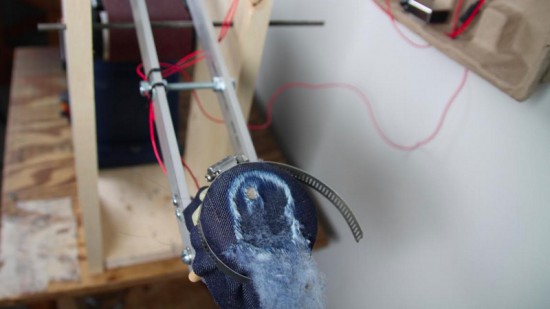
The machine has a weighted arm, like a hammer, suspended above an abrasive belt sander. A sample of the fabric that we want to test is wrapped around the head of the hammer and then dropped onto the moving sanding belt. An Arduino Uno is used to record the amount of time it takes to sand through the fabric sample.

Check the video below to see how it works:

- Why did you decide to use Arduino?

We have used Lilypad Arduino and Arduino Uno before to prototype some e-textile projects, so it was easy for us to get started on this one with our previous experience. The large number of accessory boards available made it simple to add an informational display and user interface to the machine. In just a few hours, we were able to very quickly create a machine to compare the abrasion resistance of a variety of fabric samples. The simplicity of working with Arduino was a very good choice for us, because our real business is creating clothing, not building test machines!

- What does Arduino control in the machine? 

An Arduino Uno is used to record the amount of time it takes to sand through the fabric sample. The method we use is based on European Union standards for motorcycle safety gear testing. To measure the fabric’s abrasion time, we use two thin copper wires (magnet wire). One wire is placed inside and another outside of the fabric sample before everything is wrapped around the head of the hammer. Each wire is then connected to ground on one end and an to input pin on the Arduino on the other end. The pins are in INPUT_PULLUP mode so a current runs through them. The LCD display on the Arduino tells us when both wires are connected properly.

Then, we start the belt sander and drop the hammer onto the spinning sanding belt. The outer wire breaks very quickly, breaking the connection to that pin [ digitalRead(outerWireIn) == HIGH ]. At this point, the Arduino records the start time. When the fabric wears through – usually within a couple of seconds – the inner wire is exposed to the sanding belt and quickly breaks. That marks the end time, which the Arduino records and displays on the LCD shield. A single type of fabric must be tested at least five times in order to make sure our recorded times are accurate.

Explore the details and download the code on Worse for Wear blog.

Farmbot and why documentation’s vital to open source projects

Farmbot is the first open source cnc farming machine with the aim to create an open and accessible technology aiding everyone to grow food and to grow food for everyone. It runs on open source hardware like Arduino Mega 2560 and  involves a community of contributors on the wiki and forum where you can find documentation, schematics, assembly guides, troubleshooting tips and many more on all currently supported and old FarmBots.

Documentation has been a key element of the project since the beginning and Farmbot founder, Rory Aronson at the 2015 Hackaday SuperConference, gave a talk about why great documentation is the key to building a community of hackers who continue to build upon open source technologies:


Arduino Blog 16 Dec 21:32

Watch a fin-propelled underwater robot prototype

The robotic prototype swimming under water propelled by fins, it was developed at the Control Systems and Robotics Laboratory of the Technological Educational Institute of Crete, in Heraklion (Greece) and it’s controlled by an Arduino Mega:

Each fin is comprised of three individually actuated fin rays, which are interconnected by an elastic membrane. An on-board microcontroller generates the rays’ motion pattern that result in the fins’ undulations, through which propulsion is obtained. The prototype, which is fully untethered and energetically autonomous, also integrates an IMU/AHRS unit for navigation purposes, a wireless communication module, and an on-board video camera. The video contains footage from experiments conducted in a laboratory test tank to investigate closed loop motion control strategies, as well as footage from sea trials.

the Arduino runs a custom-developed real time firmware that implements two Central Pattern Generator (CPG) networks to generate the undulatory motion profile for the robot’s fins. The robot  contains a  7.4V lipo battery powering also a Bluetooth module for wireless communication and a video camera to record footage of the missions.


Explore tangible interfaces with a wooden sequencer

During the Physical Computing and Creative Coding course at School of Form a team composed by Ernest Warzocha, Jakub Wilczewski, Maciej Zelaznowski worked on a project starting from the keyword “the aesthetics of interaction”. With the help of their lecturers – Wies?aw Bartkowski and Krzysztof Golinski – they decided to rethink about typical button-like interface of audio sequencer and design a unique tangible interface for it.

The Wooden Sequencer runs on Arduino Uno and works by using familiarity of real objects and manipulating them similarly to the idea of Durell Bishop’s Marble Answering Machine:

Instead of regular buttons we created wooden discs (4×8 circles) that placed in holes generate audio sequence. Each line corresponds to different instrument and columns are responsible for time when sample is played. To know in which point at timeline our sequence plays there is hidden LED on top of each column that blink through wood and informs user which one is currently played.

To create good-looking round shapes of table we used CNC router at our university. After the milling process we connected all electronics with table and sensors for each hole. The core of our project is Arduino UNO with multiplexers and MP3 module. With rendered samples and build-in speakers our project doesn’t require computer plugged in.

Important and somehow unique in our sequencer is usage of IR reflective sensors to change played instrument sample. To decide which sample we want to play sensor recognizes different grayscale color and intensity of the reflected light at bottom of our discs – actually everything placed on table can generate sound. Creating grayscale-based controller is experimental way to interact with device. Furthermore, using grayscale palette might be great idea for MIDI instrument. For this project we used two colors to show the concept. It’s possible to add more but it’s more sensitive to non-constant background light.

Take a look at the video below and explore more pictures on Behance:

Make your DIY smart glasses running on Arduino

Jordan Fung is a 13-year-old maker and programmer based in Hong Kong. He recently developed Arduino-based smart glasses called Pedosa Glass, which are able to activate, in this first release, a flashlight and a timer:

The Pedosa Glass is powered by a single Arduino Nano running an “operating system” developed by me.
There is a tiny FLCOS display in the front. The AV signal from the Arduino will be displayed on it. It is equipped with 3 push buttons, in which 2 of them are control buttons and one of them be the home button, also equipped with a super-bright white LED for use as a flashlight.

In the picture below you can explore the electronic scheme:


Jordan is working hard to add new applications and features to the project but in the meanwhile he shared his work on a great tutorial on Instructables.

Arduino WiFi Shield 101 is now available in the US store!

We are excited to announce Arduino Wifi Shield 101 developed with Atmel is now available for purchase on the Arduino Store US (49.90$).

Arduino WiFi Shield 101 is a powerful IoT shield with crypto-authentication that connects your Arduino or Genuino board to the internet wirelessly. Connecting it to a WiFi network is simple, no further configuration in addition to the SSID and the password are required. The WiFI library allows you to write sketches which connect to the internet using the shield.

The shield is based on the Atmel SmartConnect-WINC1500 module, compliant with the IEEE 802.11 b/g/n standard. The WINC1500 module provided is a network controller capable of both TCP and UDP protocols.  The main feature is an hardware encryption/decryption security protocol provided by the ATECC508A CryptoAuthentication chip that is an ultra secure method to provide key agreement for encryption/decryption, specifically designed for the IoT market.

Last year, Massimo Banzi introduced the shield:

“In this increasingly connected world, the Arduino Wi-Fi Shield 101 will help drive more inventions in the IoT market. Expanding our portfolio of Arduino extensions, this new shield can flawlessly connect to any modern Arduino board giving our community more options for connectivity, along with added security elements to their creative projects.”

The WiFi Shield 101 is the first Arduino product fully supporting SSL and all the communication between your board and our secured server. With the power of the Arduino Zero and the WiFi Shield 101 it is possible to make secure IoT applications simply and just using the Arduino Language.

A working example and instructions on how to get started are available on Arduino Cloud, a work-in-progress project that gives you access to a pre-configured MQTT server for your IoT sketches using only your Arduino account. More examples and features will be available in the next months.

Feel like knowing more about the shield? Explore the  Getting Started guide.

Building a giant Iron Man suit you can actually wear!

If you are a fan of cosplay, props and hand built creations you can’t miss the work of  James Bruton. Based in Uk he’s got a personal project YouTube channel with a new video every week describing his work in details. At the end of June he posted the 34th “episode” of the project started nearly a year ago about  building an Iron Man Hulkbuster giant suit you can actually wear!

In the video below you can follow how he’s sorting out the arm mechatronics for the elbow, hand and cuff weapon with some 3D printing with Lulzbot and controlling the interaction with  Arduino Uno (electronic part starting around minute 10):

Explore the playlist of the project for other cool videos.

Solenoid drum machine and bass running on Arduino


Arduino user named Muiota shared with us an experimental DIY music project running on Arduino Uno and  solenoids.

Take a look at the video to hear how it sounds:

Watch Makezine’s interview with Massimo Banzi and Eric Pan

According to Make, the biggest news coming out of Maker Faire Shenzhen, outside the size and intensity of the event itself, was the partnership involving our team at Arduino and SeeedStudio.  Massimo Banzi during his talk presented Arduino boards using the new sister brand Genuino which will be made in China by Seeedstudio.

Dale Dougherty was in Shenzhen with them and did this video interview and article:

Arduino and Seeedstudio announce partnership in Shenzhen

Today, June 20th, 2015, Massimo Banzi, Co-founder of Arduino, and Eric Pan, founder and CEO of Seeedstudio announced at Maker Faire Shenzhen 2015 a strategic partnership between Arduino LLC and Seeedstudio.

Seeedstudio will manufacture and distribute Arduino LLC products using the new Genuino brand in China and other Asian markets.

The new Genuino name certifies the authenticity of boards, in line with the open hardware and open source philosophy that has always characterized Arduino. Genuino is Arduino LLC new sister-brand created by co-founders Massimo Banzi, David Cuartielles, Tom Igoe and David Mellis for markets outside of the USA.

“We are very excited to partner with SeeedStudio to manufacture our products in China. We’ve known and appreciated Seeed for years, we share the same values and I think they are one of the most forward looking companies in China” said Massimo Banzi.

And he also explained about Genuino: “Arduino is very popular in China but the brand is used heavily without permission. Genuino allows the market to clearly identify which products are contributing to the Open Source Hardware process. With Genuino, the Arduino.cc community will easily be able to recognize the partners who are contributing to support the development of the platform.”

Eric Pan, founder of Seeedstudio, explained: “Arduino is becoming a global language of making, we are proud to help provide Genuino branded localized products to carry on the conversation in China. Here we already have a huge Arduino user base and growing, it’s time to get us involved deeper with global ecosystem. “

Genuino-branded products will be sold on Seeed’s store on Taobao and soon on http://www.genuino.cc.

The partnership between Arduino LLC and Seeedstudio is a bold new step of a global development plan by Arduino LLC. Arduino LLC has recently launched the Genuino brand and is already working with market-leading, innovative manufacturers/distributors in Asia, Europe, South America, Canada and Africa.