If you are a regular Hackaday reader, you’ve probably seen plenty of ESP8266 projects. After all, the inexpensive device is a workhorse for putting a project on WiFi, and it works well. There is a processor onboard, but, most often, the onboard CPU runs a stock firmware that exposes an AT command set or Lua or even BASIC. That means most projects have a separate CPU and that CPU is often–surprise–an Arduino.
It isn’t a big leap of logic to imagine an Arduino with an integrated WiFi subsystem. That’s the idea behind the MKR1000. But the real question you have to ask is: is it better to use an integrated component or just put an Arduino and ESP8266 together?
[Andreas Spiess] not only asked the question, but he answered it in a YouTube video (see below). He examines several factors on the MKR1000, the Arduino Due and Uno, and several other common boards. The examination covers performance, features, and power consumption.
We’ve covered a slew of ESP8266 projects. We’ve also seen at least two MKR1000 projects, one for an automotive project and the other controls a shower.
Residential-grade commercial alarm systems are good at a few things but terrible at others, like keeping pace with telephone technology. So what to do when a switch to VOIP renders your alarm system unable to call in reinforcements? Why not strip out the old system and roll your own value-added alarm and home automation system?
Generally, the hardest part about installing an alarm system is running the wires to connect sensors to the main panel, so [Bill Dudley] wisely chose to leverage the existing wiring and just upgrade the panel. And what an upgrade it is. [Bill]’s BOM reads like a catalog page from SparkFun or Adafruit – Arduino MEGA 2560, Ethernet shield, a sound board, stereo amplifier, X10 interface, and a host of relays, transformers, and converters. [Bill] is serious about redundancy, too – there’s an ESP8266 to back up the wired Ethernet, and a DS3231 RTC to keep the time just in case NTP goes down. The case is a bit crowded, but when closed up it’s nicely presentable, and the functionality can’t be beat.
Rehabilitating old alarm systems is a popular project that we’ve covered plenty of times, like this Arduino upgrade for a DSC 1550 panel. But we like the way [Bill] really went the extra mile to build add value to his system.
Lots of people get a pet and then hack solutions that help them care for their new friend, like an automatic door to provide access to the great outdoors. Then again, some people build the pet door first and then build the pets to test it.
It’s actually not quite as weird as it sounds. [Amir Avni] and his wife attended a recent GeekCon and entered the GeekCon Pets event. GeekCon is a cooperative rather than competitive hackathon that encourages useless builds as a means to foster community and to just have some fun. [Amir] and his wife wanted to build a full-featured automatic pet door, and succeeded – with NFC and an ESP8266, the stepper-powered door worked exactly as planned. But without any actual animal companions to test the system, they had to hack up a few volunteers. They came up with a 3D-printed dog and cat perched atop wireless cars, and with NFC tags dangling from their collars, the door was able to differentiate between the wandering ersatz animals. The video below the break shows the adorable plastic pals in action.
It’s clear from all the pet doors and automatic waterers and feeders we’ve seen that hackers love their pets, but we’re pretty sure this is the first time the pet itself was replaced by a robot. That’s fine for the test environment, but we’d recommend the real thing for production.
[nebulous] has a lot of problems with his kitchen cabinets. Aside from a noted lack of micro-controllers, he was especially suspicious of the dark spaces under them. Anything could be hiding there.
The core of the project is a $10 Arduino-compatible esp8266 board from digistump. The board is powered by the five volt regulator of an L298N motor driver module hooked to a power-supply. All this controls a set-of LED strips adhered to the underside of the cabinets with the traditionally bad adhesive strips with which they come standard. We can predict an hour spent bent awkwardly cursing at them, a hot-glue gun in one hand, in [nebulous]’s future. The whole set-up is housed in a SparkFun cardboard box above the microwave. You can barely tell it’s not a commercial product.
We’re not certain if we like a future where even our cabinetry has an IP address. However, this is a good weekend project that could make all our cabinetry brighter, safer, and more connected.
App development is not fun for everyone, and sometimes you just want to control a device from your phone with minimal work. Blynk appears to be a fairly put-together library for not only hooking up any Arduino or esp8266 to a phone through WiFi, but also through the net if desired.
Install the app onto your iPhone or Android device. Install the libraries on your computer. Next, modify your Arduino source to either pass direct control of a pin to Blynk, or connect Blynk to a virtual pin inside your code for more advanced control. If you want to go the easy route, create an account, log into the app, and drag and drop the interface you’d like. If the idea of letting some corporation host your Arduino project sends shivers down your spine, there is also an option to host your own server. (Editorial snark: Yes, it requires a server. That’s the cost of “simplicity”.)
There have been a few times where we’ve wished we could add app control to our projects, but installing all the libraries and learning a new language just to see a button on a screen didn’t seem worth it. This is a great solution. Have any of you had experience using it?
This simple WiFi serial port monitor would have saved us a lot of trouble. We can’t count how many times where being hooked into an Arduino with USB just to get the serial out has nearly been more trouble than it’s worth. Times where we sat cross-legged on the floor and could choose comfort or accidentally shifting the set-up and ruining everything, but not both.
[Frenky]’s set-up is simple and clever. The Ardunio’s serial out is hooked to an ESP8266. The Arduino spams serial out to the ESP8266 in its usual way. The ESP8266 then pipes all that out to a simple JavaScript webpage. Connect to the ESP8266’s IP with any device in your house, and get a live stream of all the serial data. Neat.
As simple as this technique is, we can see ourselves making a neat little box with TX, RX, GND, and VCC screw terminals to free us from the nightmare of tethering on concrete floors just for a simple test. Video after the break.
For a few cents more than the ESP12F you get it with a programmer daughter board, a RGB led, a button and a photoresistor. This is ideal for small robot with networking abilities. Can be programmed with Arduino IDE as a NodeMCU v1.0 .
There’s a new documentary series on Al Jazeera called Rebel Geeks that looks at the people who make the stuff everyone uses. The latest 25-minute part of the series is with [Massimo], chief of the arduino.cc camp. Upcoming episodes include Twitter co-creator [Evan Henshaw-Plath] and people in the Madrid government who are trying to build a direct democracy for the city on the Internet.
Despite being a WiFi device, the ESP8266 is surprisingly great at being an Internet of Thing. The only problem is the range. No worries; you can use the ESP as a WiFi repeater that will get you about 0.5km further for each additional repeater node. Power is of course required, but you can stuff everything inside a cell phone charger.
I’ve said it before and I’ll say it again: the most common use for the Raspberry Pi is a vintage console emulator. Now there’s a Kickstarter for a dedicated tabletop Raspi emulation case that actually looks good.
Pogo pins are the go-to solution for putting firmware on hundreds of boards. These tiny spring-loaded pins give you a programming rig that’s easy to attach and detach without any soldering whatsoever. [Tom] needed to program a few dozen boards in a short amount of time, didn’t have any pogo pins, and didn’t want to solder a header to each board. The solution? Pull the pins out of a female header. It works in a pinch, but you probably want a better solution for a more permanent setup.
Half of building a PCB is getting parts and pinouts right. [Josef] is working on a tool to at least semi-automate the importing of pinout tables from datasheets into KiCad. This is a very, very hard problem, and if it’s half right half the time, that’s a tremendous accomplishment.
In August of 2014, something new started showing up in the markets of Shenzen, the hi-tech area of China where the majority of the world’s electronics components are made. This is the ESP8266, a WiFi SoC (System on a Chip) that can connect to 802.11b/g/n networks on the 2.4GHz band. It can be addressed with SPI or a serial connection, and has an AT command set that makes it behave rather like an old-style modem. Basically, it has everything you would need to connect a device to a WiFi network, with the ESP8266 chip itself handling the complicated business of finding, joining and transmitting/receiving over a WiFi network.
That’s nothing particularly new in itself: WiFi connection devices like the TI CC3000 have been around for longer, and do much the same thing. The difference was the price. While the TI solution costs about $10 if you buy several thousand of them, the ESP8266 costs less than $7 for an individual board that can plug straight into an Arduino or similar. Buy the chip in bulk, and you can get it for less than $2.
The ESP8266 is more than just a WiFi dongle, though: it is a fully fledged computer in itself, with a megabyte of flash memory and a 32-bit processor that uses a RISC architecture. This can run applications, turning the ESP8266 into a standalone module that can collect and send data over the Internet. And it can do this while drawing a reasonably low amount of power: while receiving data, it typically uses just 60mA, and sending data over an 802.11n connection uses just 145mA. That means you can drive it from a small battery or other small power source, and it will keep running for a long time.
It wasn’t an easy ship to write applications for in the early days, though: it was poorly documented and required a dedicated toolchain to work with. This made it more of a challenge than many hackers were comfortable with. That changed earlier this year, though, when the Arduino IDE (Integrated Development Environment) was ported to the chip. This meant that you could use the much easier to write Arduino functions and libraries to write code for the chip, bringing it within reach of even the most casual hacker.
A decapped ESP8266, with area of interest marked by Reddit user swimmerdude. The big area on the right is memory
Why Is the ESP8266 Important?
The ESP8266 almost achieves the holy trifecta of electronics: cheap, powerful and easy to work with. Before this, if you wanted to add a wireless connection to a project, you had to use more power-hungry devices like USB WiFi dongles, or squish everything into a serial connection and use a wireless serial link. Either way added to the complexity of the project: you either needed a system that supported USB and had WiFI OS support, or you had to put up with the limitations of wireless serial links, which typically offer very limited bandwidth. The advent of WiFi SoCs removed these limitations because the SoC did the heavy lifting, and WiFi offered much more bandwidth. And the ESP8266 did this all at a very low cost: do some digging on eBay and you can get an ESP8266 board for less than $2. So, it is no surprise that we are starting to see the ESP8266 showing up in commercial products.
How Can I Use the ESP8266?
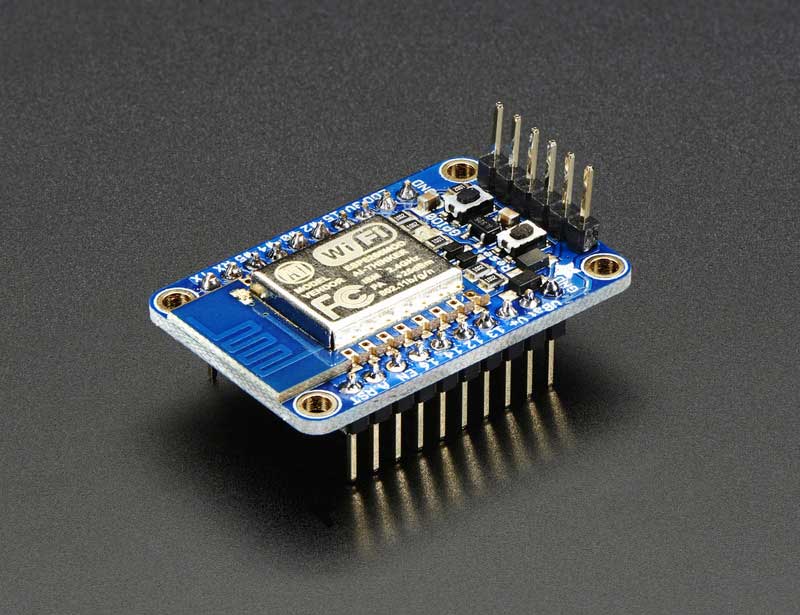
With the popularity of the ESP8266 for adding WiFi to projects, it is no surprise that there are a lot of options for trying it out. On the hardware side, ESP8266 development boards are available from a number of places, including Seeedstudio, Sparkfun and Olimex. Adafruit also has a nice ESP8266 board that breaks out all of the signals for easy breadboard use, and adds a 3.3V output, so it can drive an external device. It is also FCC approved, which is important if you are looking to sell or use the devices you build commercially. Some users have also been building their own development boards, which add features such as LCD displays and buttons.
The Adafruit Huzzah ESP8266 dev board
On the software side, the easiest way to get into the ESP8266 is to use the Arduino compatible mode. This involves loading custom firmware that turns the chip into a mid-range Arduino board, which makes for much easier programming. The people behind this project have produced a list of supported ESP8266 boards: buying one of these will make the installation process easier, as they have noted which data lines in the Arduino SDK correspond to the physical pins on the board. These boards also provide easy access to the reset lines that you have to use to install the Arduino compatible firmware.
The third option is to flash NodeMCU to the ESP8266 module. This turns it into a Lua interpreter. Scripting can be done in real-time to prototype your program, then flashed to the EEPROM to make your program persistent and remove the need for a serial connection.
Beginners will be comfortable with both the Arduino and NodeMCU approaches, but experienced users should be able to wade straight in and start writing code for this cheap, powerful and fairly easy to use chip.
Digistump has recently announced a partnership with Particle over cloud infrastructure that may well be a signal that the diasporan expansion in microcontroller market may be coming to an end.