Posts with «control» label

Jumper: Arduino controlled animation

In this project, I have connected an Arduino to my computer and used a photoresistor to control an animation on the screen. Other sensors could have been used, but I chose a photoresistor because it feels like magic!!

The photoresistor responds to changes in ambient light as my hand moves up and down. The Arduino sends the reading to a Processing sketch on the computer via a Serial command (through the USB cable). The processing sketch interprets the signal from the Arduino and selects the appropriate picture to display.

I took a series of screenshots from the following YouTube video: http://www.youtube.com/watch?v=h6nE8m74kDg  And after borrowing a bit of code from these sites (1,2), the project was born.
This idea is not new, nor my own. There are many people who have done this project before, but I thought to blog about how I have done it, just for fun.

The Project Movie


Components Required


  • Arduino Uno (and associated software), and USB cable
  • Photoresistor or Photocell
  • 10K resistor
  • Wires to put it all together
  • Processing IDE from http://processing.org
  • Computer/laptop


The Arduino Sketch


The Arduino Code:

You can download the Arduino IDE from this site.
 1
2
3
4
5
6
7
8
9
10
11
12
13
14
15
16
17
18
19
20
21
22
23
24
25
26
27
28
29
30
31
32
33
34
35
36
37
38
39
40
41
42
43
44
45
46
47
48
49
/* Jumper: Using an Arduino to animate:
Written by ScottC on 02/06/2012 */

int photoRPin = 0;
int minLight;
int maxLight;
int lightLevel;
int adjustedLightLevel;
int oldLightLevel;

void setup() {
Serial.begin(9600);

//Setup the starting light level limits
lightLevel=analogRead(photoRPin);
minLight=lightLevel-10;
maxLight=lightLevel;
oldLightLevel=lightLevel;
}

void loop(){
lightLevel=analogRead(photoRPin);
delay(10);

//auto-adjust the minimum and maximum limits in real time
if(minLight>lightLevel){
minLight=lightLevel;
}
if(maxLight<lightLevel){
maxLight=lightLevel;
}

//Map the light level to produce a result between 1 and 28.
adjustedLightLevel = map(lightLevel, (minLight+20), (maxLight-20), 1, 28);
adjustedLightLevel = constrain (adjustedLightLevel, 1,28);

/*Only send a new value to the Serial Port if the
adjustedLightLevel value changes.*/
if(oldLightLevel==adjustedLightLevel){
//do nothing if the old value and the new value are the same.
}else{
//Update the oldLightLevel value for the next round
oldLightLevel=adjustedLightLevel;

/*Send the adjusted Light level result
to Serial port (processing)*/
Serial.println(adjustedLightLevel);
}
}

The code above was formatted using this site.


The Processing Code:

You can download the Processing IDE from this site.

 1
2
3
4
5
6
7
8
9
10
11
12
13
14
15
16
17
18
19
20
21
22
23
24
25
26
27
28
29
30
31
32
33
34
35
36
37
38
39
40
41
42
43
44
45
46
47
48
49
50
51
52
53
54
55
56
57
58
59
60
61
62
63
64
65
66
67
68
69
70
71
72
73
74
75
76
77
/* Jumper: Using an Arduino to animate
Written by ScottC on 02/06/2012

Source code derived from :
http://processing.org/learning/topics/sequential.html
http://processing.org/discourse/beta/num_1267080062.html

Pictures captured from:
http://www.youtube.com/watch?v=h6nE8m74kDg

======================================================= */

import processing.serial.*;
Serial myPort;
String sensorReading="";

// Create the array that will hold the images
PImage[] movieImage = new PImage[29];

/* The frame variable is used to control which
image is displayed */
int frame = 1;


/* Setup the size of the window. Initialise serial communication with Arduino
and pre-load the images to be displayed later on. This is done only once.
I am using COM6 on my computer, you may need replace this value with your
active COM port being used by the Arduino.*/

void setup(){
size(700,600);

myPort = new Serial(this, "COM6", 9600);
myPort.bufferUntil('\n');

for(int i=0;i<28;i++){
movieImage[i] = loadImage("Jumper" + (i+1) + ".jpg");
}
}


// The draw function controls the animation sequence.

void draw(){

//this draws the relevant image to the window
image(movieImage[frame-1],0,0,width,height);
}

void serialEvent (Serial myPort){
sensorReading = myPort.readStringUntil('\n');
if(sensorReading != null){
sensorReading=trim(sensorReading);
if (sensorReading.length()<2){
frame = integerFromChar(sensorReading.charAt(0));
}else{
frame = integerFromChar(sensorReading.charAt(0))*10;
frame += integerFromChar(sensorReading.charAt(1));
}
}
}


/* This function used to convert the character received from the
serial port (Arduino), and converts it to a number */

int integerFromChar(char myChar) {
if (myChar < '0' || myChar > '9') {
return -1;
}else{
return myChar - '0';
}
}

The code above was formatted using this site.


The pictures 

Captured from this YouTube Video: http://www.youtube.com/watch?v=h6nE8m74kDg


Doodle Bot

Primary image

What does it do?

Draws nonsensical pictures

Having one of those days where your too lazy to do anything? Have a robot doodle for you while you sit back in your favorite chair. This is a very simple drawing robot that was actually started by one of our student engineers. I just made the base plate bigger so I could add a third servo to raise and lower the pen.

My base plate is laser cut acrylic but it could easily have been a small food container, CD or a piece of wood. Just use some double sided tape or hotglue to hold it all together.

Cost to build

Embedded video

Finished project

Complete

Number

Time to build

Type

URL to more information

Weight

read more

Mouse Controlling Arduino LEDs


Use a mouse to control LEDs attached to an Arduino. This project uses the processing language to transmit the mouse coordinates to the Arduino, which then uses this information to turn on some LEDs. Please see the video below to see it in action.


Components Required for this project:

  • Arduino UNO
  • Breadboard
  • 9 LEDs
  • 9 x 330 ohm resistors
  • Wires to connect the circuit
  • USB connection cable: to connect the computer to the Arduino
  • A computer: to run the processing sketch, and to compile / upload the Arduino sketch
  • Processing Program installed on computer
  • Arduino Program installed on the computer

Arduino Sketch


This was made using Fritzing.

Arduino Code

You can download the Arduino IDE from this site.

 1
2
3
4
5
6
7
8
9
10
11
12
13
14
15
16
17
18
19
20
21
22
23
24
25
26
27
28
29
30
31
32
33
34
35
36
37
38
39
40
41
42
/* This program was created by ScottC on 9/5/2012 to receive serial 
signals from a computer to turn on/off 1-9 LEDs */

void setup() {
// initialize the digital pins as an output.
pinMode(2, OUTPUT);
pinMode(3, OUTPUT);
pinMode(4, OUTPUT);
pinMode(5, OUTPUT);
pinMode(6, OUTPUT);
pinMode(7, OUTPUT);
pinMode(8, OUTPUT);
pinMode(9, OUTPUT);
pinMode(10, OUTPUT);
// Turn the Serial Protocol ON
Serial.begin(9600);
}

void loop() {
byte byteRead;

/* check if data has been sent from the computer: */
if (Serial.available()) {

/* read the most recent byte */
byteRead = Serial.read();
//You have to subtract '0' from the read Byte to convert from text to a number.
byteRead=byteRead-'0';

//Turn off all LEDS
for(int i=2; i<11; i++){
digitalWrite(i, LOW);
}

if(byteRead>0){
//Turn on the relevant LEDs
for(int i=1; i<(byteRead+1); i++){
digitalWrite(i+1, HIGH);
}
}
}
}

The code above was formatted using this site.


Processing Code

You can download the Processing IDE from this site.

 1
2
3
4
5
6
7
8
9
10
11
12
13
14
15
16
17
18
19
20
21
22
23
24
25
26
27
28
29
30
31
32
33
34
35
36
37
38
39
40
41
42
43
44
45
46
47
48
49
50
51
52
53
54
//Created by ScottC on 12/05/2012 to send mouse coordinates to Arduino

import processing.serial.*;

// Global variables
int new_sX, old_sX;
int nX, nY;
Serial myPort;

// Setup the Processing Canvas
void setup(){
size( 800, 400 );
strokeWeight( 10 );

//Open the serial port for communication with the Arduino
//Make sure the COM port is correct
myPort = new Serial(this, "COM6", 9600);
myPort.bufferUntil('\n');
}

// Draw the Window on the computer screen
void draw(){

// Fill canvas grey
background( 100 );

// Set the stroke colour to white
stroke(255);

// Draw a circle at the mouse location
ellipse( nX, nY, 10, 10 );

//Draw Line from the top of the page to the bottom of the page
//in line with the mouse.
line(nX,0,nX,height);
}


// Get the new mouse location and send it to the arduino
void mouseMoved(){
nX = mouseX;
nY = mouseY;

//map the mouse x coordinates to the LEDs on the Arduino.
new_sX=(int)map(nX,0,800,0,10);

if(new_sX==old_sX){
//do nothing
} else {
//only send values to the Arduino when the new X coordinates are different.
old_sX = new_sX;
myPort.write(""+new_sX);
}
}

The code above was formatted using this site.

Droplet and StackAR bring physical interface to virtual experiences, communicate through light (hands-on)

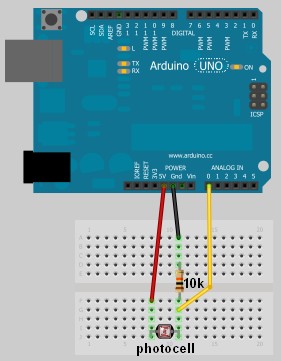
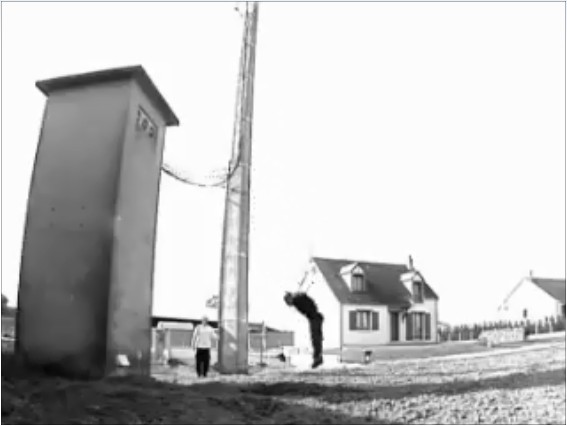
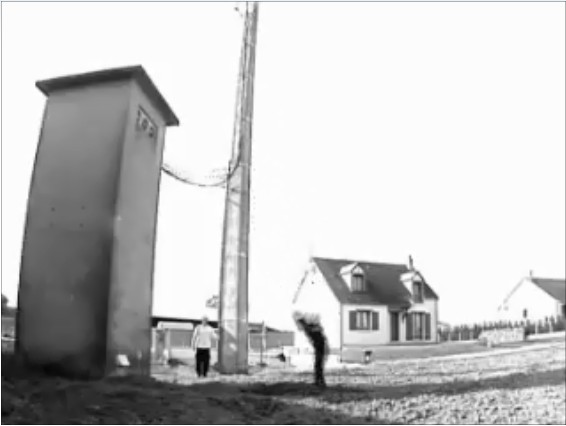
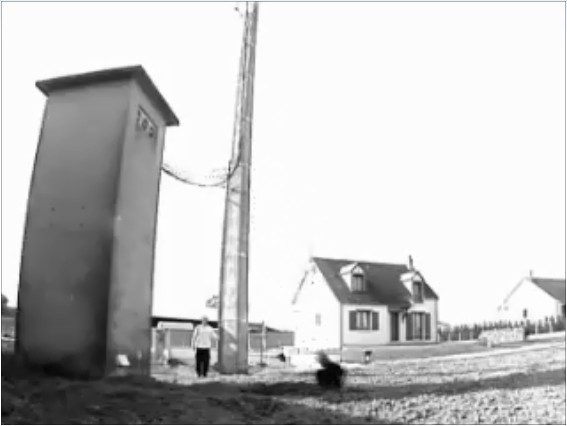
Light-based communication seems to wind throughout the MIT Media Lab -- it is a universal language, after all, since many devices output light, be it with a dedicated LED or a standard LCD, and have the capacity to view and interpret it. One such device, coined Droplet, essentially redirects light from one source to another, while also serving as a physical interface for tablet-based tasks. Rob Hemsley, a research assistant at the Media Lab, was on hand to demonstrate two of his projects. Droplet is a compact self-contained module with an integrated RGB LED, a photodiode and a CR1216 lithium coin battery -- which provides roughly one day of power in the gadget's current early prototype status. Today's demo used a computer-connected HDTV and a capacitive-touch-enabled tablet. Using the TV to pull up a custom Google Calendar module, Hemsley held the Droplet up to a defined area on the display, which then output a series of colors, transmitting data to the module. Then, that data was pushed to a tablet after placing the Droplet on the display, pulling up the same calendar appointment and providing a physical interface for adjusting the date and time, which is retained in the cloud and the module itself, which also outputs pulsing light as it counts down to the appointment time.

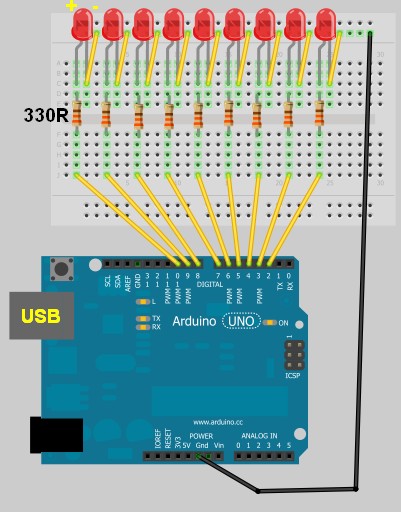
StackAR, the second project, functions in much the same way, but instead of outputting a countdown indicator, it displays schematics for a LilyPad Arduino when placed on the tablet, identifying connectors based on a pre-selected program. The capacitive display can recognize orientation, letting you drop the controller in any position throughout the surface, then outputting a map to match. Like the Droplet, StackAR can also recognize light input, even letting you program the Arduino directly from the tablet by outputting light, effectively simplifying the interface creation process even further. You can also add software control to the board, which will work in conjunction with the hardware, bringing universal control interfaces to the otherwise space-limited Arduino. Both projects appear to have incredible potential, but they're clearly not ready for production just yet. For now, you can get a better feel for Droplet and StackAR in our hands-on video just past the break.

Continue reading Droplet and StackAR bring physical interface to virtual experiences, communicate through light (hands-on)

Droplet and StackAR bring physical interface to virtual experiences, communicate through light (hands-on) originally appeared on Engadget on Tue, 24 Apr 2012 15:03:00 EST. Please see our terms for use of feeds.

Permalink | Email this | Comments

n/a