Posts with «cnc» label

Make a mini CNC drawing machine

For an easy plotter design that you can build with only simple hand tools, be sure to check out this tiny project from Mr Innovative. The machine features a pair of stepper and lead screw assemblies to maneuver a pen in an X/Y plane, along with a clever string and servo setup to handle retraction.

An Arduino Nano and two L293D ICs mounted to a custom PCB are used to control the device, though a breadboard could certainly substitute for the PCB in a pinch. Drawings are translated into the proper format via Inkscape and Processing. 

More details on the miniature machine, including code, can be found in Mr Innovative’s write-up.

Two CD-ROM drives combined into fledging drawbot

Even if you don’t have access to fancy tools like a 3D printer or CNC router, that doesn’t mean you can’t make something interesting. James, using only a “hot glue gun, some scissors, and a screwdriver,” was able to construct a rudimentary drawing robot that marks paper with a sharpie.

2 CD drives were creatively modified to form X, Y, and Z axes, letting him lower his writing instrument and draw. An Arduino Uno along with an Adafruit Motor Shield forms the controls for the device, and the structure is built out of LEGO bricks. 

As of now it’s described as more of an “Etch A Sketch type thing,” but it looks like a great starting point for more advanced drawbots in the future! Code for the build is available on GitHub.

Soundproofing A CNC Mill Conversion

The Proxxon MF70 is a nice desktop sized milling machine with a lot of useful add-on accessories available for it, making it very desirable for a hacker to have one in his or her home workshop. But its 20000 rpm spindle can cause quite the racket and invite red-faced neighbors. Also, how do you use a milling machine in your home-workshop without covering the whole area in metal chips and sawdust? To solve these issues, [Tim Lebacq] is working on Soundproofing his CNC mill conversion.

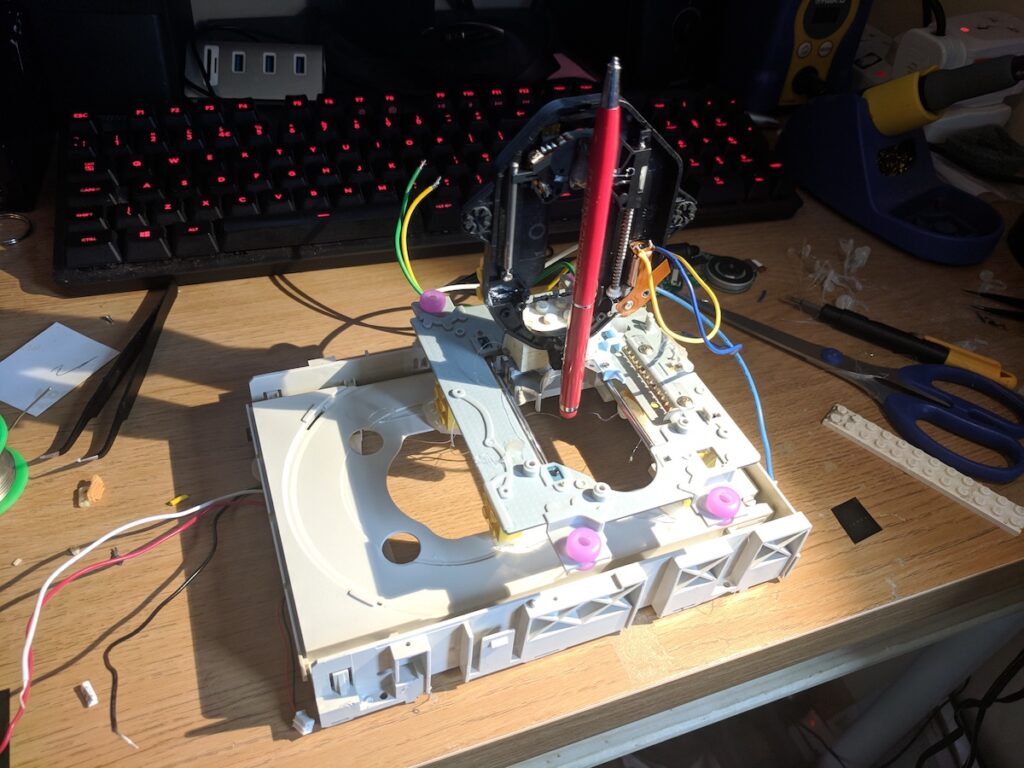
To meet his soundproof goal, he obviously had to first convert the manual MF70 to a CNC version. This is fairly straightforward and has been done on this, and similar machines, in many different ways over the years. [Tim] stuck with using the tried-and-tested controller solution consisting of a Raspberry Pi, an Arduino Uno and a grbl shield sandwich, with stepper motor drivers for the three NEMA17 motors. The electronics are housed inside the reclaimed metal box of an old power supply. Since the Proxxon MF70 is already designed to accept a CNC conversion package, mounting the motors and limit switches is pretty straightforward making it easy for [Tim] to make the upgrade.

Soundproofing the box is where he faced unknown territory. The box itself is made from wooden frames lined with particle board. A pair of drawer slides with bolt-action locks is used for the front door which opens vertically up. He’s also thrown in some RGB strips controlled via the Raspberry-Pi for ambient lighting and status indications. But making it soundproof had him experimenting with various materials and techniques. Eventually, he settled on a lining of foam sheets topped up with a layer of — “bubble wrap” ! It seems the uneven surface of the bubble wrap is quite effective in reducing sound – at least to his ears. Time, and neighbours, will tell.

Maybe high density “acoustic foam” sheets would be more effective (the ones similar to “egg crate” style foam sheets, only more dense)? Cleaning the inside of the box could be a big challenge when using such acoustic foam, though. What would be your choice of material for building such a sound proof box? Let us know in the comments below. Going back many years, we’ve posted about this “Portable CNC Mill” and a “Mill to CNC Conversion” for the Proxxon MF70. Seems like a popular machine among hackers.

Vintage Sewing Machine to Computerized Embroidery Machine

It is February of 2018. Do you remember what you were doing in December of 2012? If you’re [juppiter], you were starting your CNC Embroidery Machine which would not be completed for more than half of a decade. Results speak for themselves, but this may be the last time we see a first-generation Raspberry Pi without calling it retro.

The heart of the build is a vintage Borletti sewing machine, and if you like machinery porn, you’re going to enjoy the video after the break. The brains of the machine are an Arduino UNO filled with GRBL goodness and the Pi which is running CherryPy. For muscles, there are three Postep25 stepper drivers and corresponding NEMA 17 stepper motors.

The first two axes are for an X-Y table responsible for moving the fabric through the machine. The third axis is the flywheel. The rigidity of the fabric frame comes from its brass construction which may have been soldered at the kitchen table and supervised by a big orange cat. A rigid frame is the first ingredient in reliable results, but belt tension can’t be understated. His belt tensioning trick may not be new to you, but it was new to some of us. Italian translation may be necessary.

The skills brought together for this build were vast. There was structural soldering, part machining, a microcontroller, and motion control. The first time we heard from [juppiter] was December 2012, and it was the result of a Portable CNC Mill which likely had some influence on this creation. Between then, he also shared his quarter-gobbling arcade cabinet with us.

Optical Tach Addresses the Need for Spindle Speed Control

With CNC machines, getting the best results depends on knowing how fast your tool is moving relative to the workpiece. But entry-level CNC routers don’t often include a spindle tachometer, forcing the operator to basically guess at the speed. This DIY optical spindle tach aims to fix that, and has a few nice construction tips to boot.

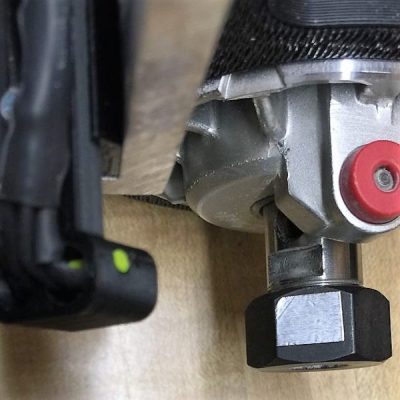
The CNC router in question is the popular Sienci, and the 3D-printed brackets for the photodiode and LED are somewhat specific for that machine. But [tmbarbour] has included STL files in his exhaustively detailed write-up, so modifying them to fit another machine should be easy. The sensor hangs down just far enough to watch a reflector on one of the flats of the collet nut; we’d worry about the reflector surviving tool changes, but it’s just a piece of shiny tape that’s easily replaced.  The sensor feeds into a DIO pin on a Nano, and a small OLED display shows a digital readout along with an analog gauge. The display update speed is decent — not too laggy. Impressive build overall, and we like the idea of using a piece of PLA filament as a rivet to hold the diodes into the sensor arm.

Want to measure machine speed but don’t have a 3D printer? No worries — a 2D-printed color-shifting tach can work too.

Hack a Day 28 Jan 09:01

Man-in-the-Middle Jog Pendant: Two Parts Make Easier Dev Work

In a project, repetitive tasks that break the flow of development work are incredibly tiresome and even simple automation can make a world of difference. [Simon Merrett] ran into exactly this while testing different stepper motors in a strain-wave gear project. The system that drives the motor accepts G-Code, but he got fed up with the overhead needed just to make a stepper rotate for a bit on demand. His solution? A grbl man-in-the-middle jog pendant that consists of not much more than a rotary encoder and an Arduino Nano. The unit dutifully passes through any commands received from a host controller, but if the encoder knob is turned it sends custom G-Code allowing [Simon] to dial in a bit acceleration-controlled motor rotation on demand. A brief demo video is below, which gives an idea of how much easier it is to focus on the nuts-and-bolts end of hardware when some simple motor movement is just a knob twist away.

[Simon]’s jog pendant moves a single motor which is exactly what he needs to ease development of his 3D printed strain-wave gear using a timing belt, but it could be programmed with any G-Code at all. Speaking of DIY jog pendants for CNC machines, don’t forget this wireless one made from an Atari 2600 joystick that jogs a plasma cutter in X and Y, and zeroes it with a push of the button.


Filed under: Arduino Hacks, cnc hacks

12-Foot Guitar Takes The Stage

Musical festivals are fun and exciting. They are an opportunity for people to perform and show-off their art. The Boulevardia event held this June in Kansas City was one such event, where one of the interactive exhibits was a 12-foot guitar that could be played. [Chris Riebschlager] shares his experience making this instrument which was intended to welcome the visitors at the event.

The heart of this beautiful installation is a Bare Conductive board which is used to detect a touch on the strings. This information is sent over serial communication to a Raspberry Pi which then selects corresponding WAV files to be played. Additional arcade buttons enable the selection of playable chords from A through G, both major and minor and also give the option to put the guitar in either clean or dirty mode.

The simplicity of construction is amazing. The capacitive touch board is programmed using the Arduino IDE and the code is available as a Gist. The Raspberry Pi runs a Python script which makes the system behave like an actual guitar i.e. touching and holding the strings silences it while releasing the strings produces the relevant sound. The notes being played were exported guitar notes from Garage Band for better consistency.

The physical construction is composed of MDF and steel with the body and neck of the guitar milled on a CNC machine. Paint, finishing and custom decals give the finished project a rocking appearance. Check out the videos below for the fabrication process along with photos of the finished design.

This project is a great example of art enabled by technology and if you love guitars, then go ahead and check out Brian May’s Handmade Guitar.


Filed under: musical hacks

Robot Draws Using Robust CNC

While initially developed for use in large factory processes, computer numeric control (CNC) machines have slowly made their way out of the factory and into the hands of virtually anyone who wants one. The versatility that these machines have in automating and manipulating a wide range of tools while at the same time maintaining a high degree of accuracy and repeatability is invaluable in any setting. As an illustration of how accessible CNC has become, [Arnab]’s drawing robot uses widely available tools and a CNC implementation virtually anyone could build on their own.

Based on an Arudino UNO and a special CNC-oriented shield, the drawing robot is able to execute G code for its artistic creations. The robot is capable of drawing on most flat surfaces, and can use almost any writing implement that will fit on the arm, from pencils to pens to brushes. Since the software and hardware are both open source, this makes for an ideal platform on which to build any other CNC machines as well.

In fact, CNC is used extensively in almost everything now, and are so common that it’s not unheard of to see things like 3D printers converted to CNC machines or CNC machines turned into 3D printers. The standards used are very well-known and adopted, so there’s almost no reason not to have a CNC machine of some sort lying around in a shop or hackerspace. There are even some art-based machines like this one that go much further beyond CNC itself, too.


Filed under: robots hacks
Hack a Day 22 Jun 00:00
arduino  art  cnc  drawing  g-code  robot  robots hacks  

Arduino Uno-driven plotter uses rulers for arms

When you see a plastic ruler, you wouldn’t normally assume it was destined to become part of a CNC plotter. Maker “lingib,” however, realized their potential to be combined to form plotter arms, in this case actuated by two stepper motors.

The resulting build can expand and contract the resulting shape, allowing a pen at the end point of the two sets of rulers to move back and forth across a piece of paper. Necessary spaces in the plot are provided by a micro servo that can lift the pen/ruler off of the writing surface.

The device is powered by an Arduino Uno, which controls the two NEMA 17 stepper motors via a pair of EasyDriver Modules. You can find more details about how to create one of these, including code and how the geometry behind it works, on its Instructables page.

CNC Machine Boasts Big Bed, Impressive Power from Off-the-Shelf Parts

A lot of homebrew CNC machines end up being glorified plotters with a router attached that are good for little more than milling soft materials like wood and plastic. So if you have a burning need to mill harder materials like aluminum and mild steel quickly and quietly, set your sights higher and build a large bed CNC machine with off-the-shelf components.

With a budget of 2000 €, [SörenS7] was not as constrained as a lot of the lower end CNC builds we’ve seen, which almost always rely on 3D-printed parts or even materials sourced from the trash can. And while we certainly applaud every CNC build, this one shows that affordable and easily sourced mechatronics can result in a bolt-up build of considerable capability. [SörenS7]’s BOM for this machine is 100% catalog shopping, from the aluminum extrusion bed and gantry to the linear bearings and recirculating-ball lead screws. The working area is a generous 900 x 400 x 120mm, the steppers are beefy NEMA23s, and the spindle is a 3-kW VFD unit for plenty of power. The video below shows the machine’s impressive performance dry cutting aluminum.

All told, [SörenS7] came in 500 € under budget, which is a tempting price point for a machine this big and capable.


Filed under: cnc hacks
Hack a Day 15 May 12:00
arduino  cnc  cnc hacks  extrusion  gantry  gerbl  steppers  vfd