Posts with «cnc» label

Pint-Sized, Low-Cost CNC Machine

A little MDF, a little plywood, some bits of threaded rod – put it all together and you’ve got this low-cost desktop CNC build using very few parts you’d need to go farther afield than the local home center to procure.

We’ve seen lots of e-waste and dumpster diving CNC builds here before; what’s appealing here is not only the low price tag of the build but also its approachability. As the short videos below show, [Thimo Voorwinden] does an admirable job of using the tools and materials he has on hand. We also appreciate the modularity of the build – the X- and Y-axis carriages are nearly identical and could be interchanged to alter the dimensions of the work area, or even replaced with a larger carriage if needed. The Z-axis is a little different from the usual low-end CNC build in that it doesn’t use a Dremel or other small rotary tool but rather mounts the handpiece of a flexible shaft rotary tool. Keeping the motor off the machine allows for more torque, less vibration, and reduced dead load.

The end result is a desktop CNC for about €200 with a work area large enough to fabricate small wooden and plastic parts, or to mill foam blocks for use as casting molds. It looks like [Thimo] has more in store for his little CNC machine, and we’re looking forward to seeing what improvements he can come up with.

[ via r/CNC]


Filed under: cnc hacks
Hack a Day 17 Feb 00:00

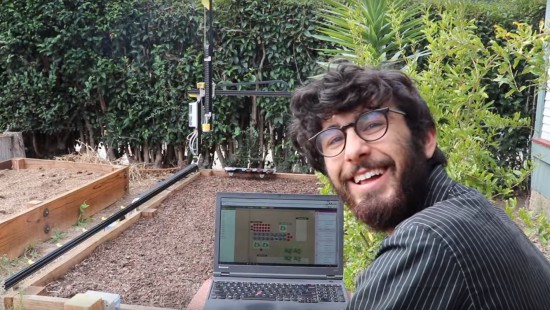
Add Robotic Farming to Your Backyard with Farmbot Genesis

Growing your own food is a fun hobby and generally as rewarding as people say it is. However, it does have its quirks and it definitely equires quite the time input. That’s why it was so satisfying to watch Farmbot push a weed underground. Take that!

Farmbot is a project that has been going on for a few years now, it was a semifinalist in the Hackaday Prize 2014, and that development time shows in the project documented on their website. The robot can plant, water, analyze, and weed a garden filled with arbitrarily chosen plant life. It’s low power and low maintenance. On top of that, every single bit is documented on their website. It’s really well done and thorough. They are gearing up to sell kits, but if you want it now; just do it yourself.

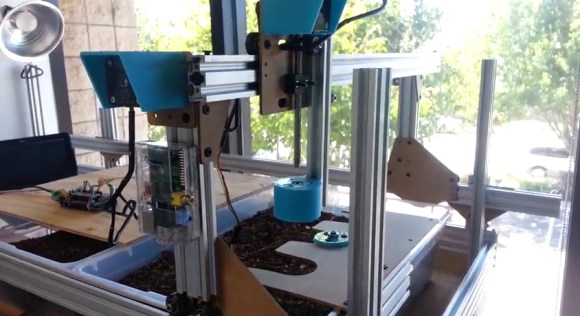
The bot itself is exactly what you’d expect if you were to pick out the cheapest most accessible way to build a robot: aluminum extrusions, plate metal, and 3D printer parts make up the frame. The brain is a Raspberry Pi hooked to its regular companion, an Arduino. On top of all this is a fairly comprehensive software stack.

The user can lay out the garden graphically. They can get as macro or micro as they’d like about the routines the robot uses. The robot will happily come to life in intervals and manage a garden. They hope that by selling kits they’ll interest a whole slew of hackers who can contribute back to the problem of small scale robotic farming.


Filed under: cnc hacks, green hacks

Cardboard And Paperclip CNC Plotter Destined For Self-Replication

Last November, after [HomoFaciens]’ garbage-can CNC build, we laid down the gauntlet – build a working CNC from cardboard and paperclips. And now, not only does OP deliver with a working CNC plotter, he also plans to develop it into a self-replicating machine.

To be honest, we made the challenge with tongue firmly planted in cheek. After all, how could corrugated cardboard ever make a sufficiently stiff structure for the frame of a CNC machine? [HomoFaciens] worked around this by using the much less compliant chipboard – probably closest to what we’d call matboard here in the States. His templates for the machine are extremely well thought-out; the main frame is a torsion box design, and the ways and slides are intricate affairs. Non-cardboard parts include threaded rod for the lead screws, servos modified for continuous rotation, an Arduino, and the aforementioned paperclips, which find use in the user interface, limit switches, and in the extremely clever encoders for each axis. The video below shows highlights of the build and the results.

True, the machine can only move a pen about, and the precision is nothing to brag about. But it works, and it’s perfectly capable of teaching all the basics of CNC builds to a beginner, which is a key design goal. And it’s well-positioned to move to the next level and become a machine that can replicate itself. We’ll be watching this one very closely.

The HackadayPrize2016 is Sponsored by:

Filed under: cnc hacks, The Hackaday Prize

Laser PCB Exposer Built From CD-ROM Drives

[Neumi] has built a CNC Laser using CD-ROM drives as the X and Y motion platforms. The small 405nm laser can engrave light materials like wood and foam. The coolest use demonstrated in the video is exposing pre-coated photo-resist PCBs.

With $61 US Dollars (55 Euro) for the Arduino, stepper drivers, and a laser in the project, [Nuemi] got a pretty capable machine after adding a few parts from the junk bin. He wanted to avoid using existing software in order to learn the concepts behind a laser engraver. In the end, he has a working software package which can send raster scans to an Arduino mega. The mega then controls the sync between the stepper and laser firings. The code is available on GitHub.

The machine can do a 30x30mm PCB in 10 minutes. It’s not about to set a record, but it’s cool and not at all bad for the price. You can see the failed PCBs lined up in the video from the initial tuning, but the final one produced a board very equivalent to the toner transfer method. Video after the break.


Filed under: Arduino Hacks, cnc hacks
Hack a Day 15 Mar 06:00

Farmbot and why documentation’s vital to open source projects

Farmbot is the first open source cnc farming machine with the aim to create an open and accessible technology aiding everyone to grow food and to grow food for everyone. It runs on open source hardware like Arduino Mega 2560 and  involves a community of contributors on the wiki and forum where you can find documentation, schematics, assembly guides, troubleshooting tips and many more on all currently supported and old FarmBots.

Documentation has been a key element of the project since the beginning and Farmbot founder, Rory Aronson at the 2015 Hackaday SuperConference, gave a talk about why great documentation is the key to building a community of hackers who continue to build upon open source technologies:


Arduino Blog 16 Dec 21:32

Explore tangible interfaces with a wooden sequencer

During the Physical Computing and Creative Coding course at School of Form a team composed by Ernest Warzocha, Jakub Wilczewski, Maciej Zelaznowski worked on a project starting from the keyword “the aesthetics of interaction”. With the help of their lecturers – Wies?aw Bartkowski and Krzysztof Golinski – they decided to rethink about typical button-like interface of audio sequencer and design a unique tangible interface for it.

The Wooden Sequencer runs on Arduino Uno and works by using familiarity of real objects and manipulating them similarly to the idea of Durell Bishop’s Marble Answering Machine:

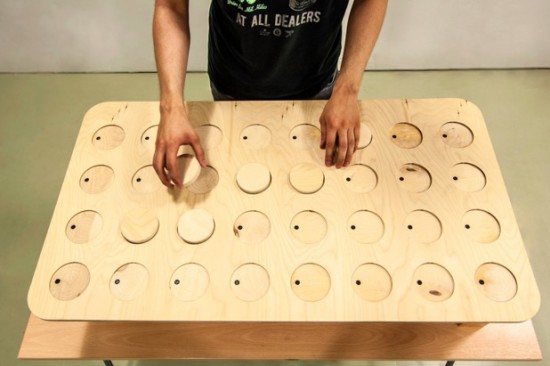
Instead of regular buttons we created wooden discs (4×8 circles) that placed in holes generate audio sequence. Each line corresponds to different instrument and columns are responsible for time when sample is played. To know in which point at timeline our sequence plays there is hidden LED on top of each column that blink through wood and informs user which one is currently played.

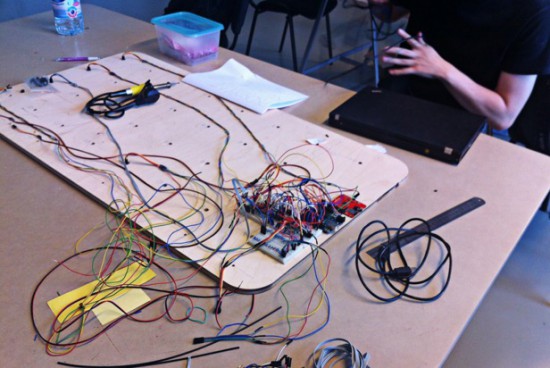
To create good-looking round shapes of table we used CNC router at our university. After the milling process we connected all electronics with table and sensors for each hole. The core of our project is Arduino UNO with multiplexers and MP3 module. With rendered samples and build-in speakers our project doesn’t require computer plugged in.

Important and somehow unique in our sequencer is usage of IR reflective sensors to change played instrument sample. To decide which sample we want to play sensor recognizes different grayscale color and intensity of the reflected light at bottom of our discs – actually everything placed on table can generate sound. Creating grayscale-based controller is experimental way to interact with device. Furthermore, using grayscale palette might be great idea for MIDI instrument. For this project we used two colors to show the concept. It’s possible to add more but it’s more sensitive to non-constant background light.

Take a look at the video below and explore more pictures on Behance:

THP Semifinalist: Farmbot

The FarmBot team has been pretty busy with their CNC Farming and Gathering machine. The idea is to automate the farming process with precise deployment of tools: plows, seed injection, watering, sensors, etc. An Arduino with an added RAMPS handles the movement, and a Raspi provides internet connectivity. Their prototype has already experienced four major iterations: the first revision addressed bigger issues such as frame/track stability and simplification of parts. Now they’re locking down the specifics on internet-of-things integration and coding for advanced movement functions.

The most recent upgrade provides a significant improvement by overhauling the implementation of the tools. Originally, the team envisioned a single, multi-function tool head design that carried everything around all the time. Problem is, the tool that’s in-use probably works best if it’s lower than the others, and piling them all onto one piece spells trouble. The solution? a universal tool mounting system, of course. You can see them testing their design in a video after the break.

If the FarmBot progress isn’t impressive enough—and admittedly we’d have called project lead [Rory Aronson] crazy for attempting to pull this off…but he did it—the FarmBot crew started and successfully funded an entire sub-project through Kickstarter. OpenFarm is an open-source database set to become the go-to wiki for all things farming and gardening. It’s the result of [Rory] encountering an overwhelming amount of generic, poorly written advice on plant growing, so he just crowdsourced a solution. You know, no sweat.


The project featured in this post is a semifinalist in The Hackaday Prize.


Filed under: Crowd Funding, The Hackaday Prize

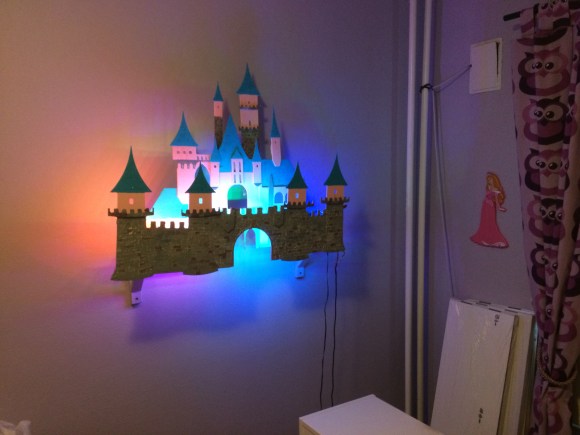
Baby’s Room Gets a Palace with this CNC Castle Decoration

[Vegard] and his wife were expecting a baby girl, and decided to build a castle for their new daughter. As a prototyping geek with his own CNC machine in his apartment, he decided to take to Google Sketchup to design this well-crafted castle decoration for his daughter’s room.

The first challenge was figuring out what the castle would look like. [Vegard] had never been to Disney Land or World, and so had never actually seen any of the fairy-tale castles in real life. After experimenting with some paper versions, he settled on a design which incorporates multiple layers and can house lights within them.

The next step was to cut the final version on the CNC machine, then sand and paint the parts. After figuring out a way to mount the castle to the wall, some LEDs were added for effect, driven by an Arduino. The final version looks pretty good!

Hacking your kids’ room is great fun, and you get to keep making new stuff to remain age appropriate. We bet [Vegard] can’t wait until she’s old enough to enjoy a marble-run that wraps the entire room. In the mean time he can work on a classic robot stroller.


Filed under: cnc hacks
Hack a Day 01 Sep 03:01
arduino  baby  cnc  cnc hacks  

The Rabbit H1 is a Stationary Mouse Replacement

[Dave] has some big plans to build himself a 1980′s style computer. Most of the time, large-scale projects can be made easier by breaking them down into their smaller components. [Dave] decided to start his project by designing and constructing a custom controller for his future computer. He calls it the Rabbit H1.

[Dave] was inspired by the HOTAS throttle control system, which is commonly used in aviation. The basic idea behind HOTAS is that the pilot has a bunch of controls built right into the throttle stick. This way, the pilot doesn’t ever have to remove his hand from the throttle. [Dave] took this basic concept and ran with it.

He first designed a simple controller shape in OpenSCAD and printed it out on his 3D printer. He tested it out in his hand and realized that it didn’t feel quite right. The second try was more narrow at the top, resulting in a triangular shape. [Dave] then found the most comfortable position for his fingers and marked the piece with a marker. Finally, he measured out all of the markings and transferred them into OpenSCAD to perfect his design.

[Dave] had some fun with OpenSCAD, designing various hinges and plywood inlays for all of the buttons. Lucky for [Dave], both the 3D printer software as well as the CNC router software accept STL files. This meant that he was able to design both parts together in one program and use the output for both machines.

With the physical controller out of the way, it was time to work on the electronics. [Dave] bought a couple of joysticks from Adafruit, as well as a couple of push buttons. One of the joysticks controls the mouse cursor. The other joystick controls scrolling vertically and horizontally, and includes a push button for left-click. The two buttons are used for middle and right-click. All of these inputs are read by a Teensy Arduino. The Teensy is compact and easily capable of emulating a USB mouse, which makes it perfect for this job.

[Dave] has published his designs on Thingiverse if you would like to try to build one of these yourself.


Filed under: Arduino Hacks

Network Enabled ShapeOko CNC Uses Raspberry Pi and Alamode

Kevin Osborn was tired of worrying about getting dust from his ShapeOko CNC mill into his computer. Using a Raspberry Pi and an AlaMode shield he can now send G-Code to the machine over his wireless network, leaving his computer clean and available for other tasks. According to Kevin, "this is of the simplest and most rewarding applications of AlaMode."

Read the full article on MAKE