Posts with «cnc hacks» label

DIY Wire Bender Gets Wires All Bent Into Shape

It’s been a while since we’ve shown a DIY wire bending machine, and [How To Mechatronics] has come up with an elegant design with easy construction through the use of 3D-printed parts which handle most of the inherent complexity. This one also has a Z-axis so that you can produce 3D wire shapes. And as with all wire bending machines, it’s fun to watch it in action, which you can do in the video below along with seeing the step-by-step construction.

One nice feature is that he’s included a limit switch for automatically positioning the Z-axis when you first turn it on. It also uses a single 12 volt supply for all the motors, and the Arduino that acts as the brains. The 5 volts for the one servo motor is converted from 12 using an LM7805 voltage regulator. He’s also done a nice job packaging the Arduino, stepper motor driver boards, and the discrete components all onto a single custom surface mount PCB.

Wire straightener and feeder

The bender isn’t without some issues though, such as that there’s no automatic method for giving it bending instructions. You can write code for the steps into an Arduino sketch, which is really just a lot of copy and paste, and he’s also provided a manual mode. In manual mode, you give it simple commands from a serial terminal. However, it would be only one step more to get those same commands from a file, or perhaps even convert from G-code or some other format.

Another issue is that the wire straightener puts too much tension on the wire, preventing the feeder from being able to pull the wire along. One solution is to feed it pre-straightened wire, not too much to ask for since it’s really the bending we’re after. But fixing this problem outright could be as simple as changing two parts. For the feeder, the wire is pulled between copper pipe and a flat steel bearing, and we can’t help wondering whether perhaps replacing them with a knurled cylinder and a grooved one would work as the people at [PENSA] did with their DIWire which we wrote about back in 2012. Sadly, the blog entries we linked to no longer work but a search shows that their instructable is still up if you want to check out their feeder parts.

As for the applications, we can think of sculpting, fractal antennas, tracks for marble machines, and really anything which could use a wireframe for its structure. Ideas anyone?

Hack a Day 15 Oct 06:00

Soundproofing A CNC Mill Conversion

The Proxxon MF70 is a nice desktop sized milling machine with a lot of useful add-on accessories available for it, making it very desirable for a hacker to have one in his or her home workshop. But its 20000 rpm spindle can cause quite the racket and invite red-faced neighbors. Also, how do you use a milling machine in your home-workshop without covering the whole area in metal chips and sawdust? To solve these issues, [Tim Lebacq] is working on Soundproofing his CNC mill conversion.

To meet his soundproof goal, he obviously had to first convert the manual MF70 to a CNC version. This is fairly straightforward and has been done on this, and similar machines, in many different ways over the years. [Tim] stuck with using the tried-and-tested controller solution consisting of a Raspberry Pi, an Arduino Uno and a grbl shield sandwich, with stepper motor drivers for the three NEMA17 motors. The electronics are housed inside the reclaimed metal box of an old power supply. Since the Proxxon MF70 is already designed to accept a CNC conversion package, mounting the motors and limit switches is pretty straightforward making it easy for [Tim] to make the upgrade.

Soundproofing the box is where he faced unknown territory. The box itself is made from wooden frames lined with particle board. A pair of drawer slides with bolt-action locks is used for the front door which opens vertically up. He’s also thrown in some RGB strips controlled via the Raspberry-Pi for ambient lighting and status indications. But making it soundproof had him experimenting with various materials and techniques. Eventually, he settled on a lining of foam sheets topped up with a layer of — “bubble wrap” ! It seems the uneven surface of the bubble wrap is quite effective in reducing sound – at least to his ears. Time, and neighbours, will tell.

Maybe high density “acoustic foam” sheets would be more effective (the ones similar to “egg crate” style foam sheets, only more dense)? Cleaning the inside of the box could be a big challenge when using such acoustic foam, though. What would be your choice of material for building such a sound proof box? Let us know in the comments below. Going back many years, we’ve posted about this “Portable CNC Mill” and a “Mill to CNC Conversion” for the Proxxon MF70. Seems like a popular machine among hackers.

Optical Tach Addresses the Need for Spindle Speed Control

With CNC machines, getting the best results depends on knowing how fast your tool is moving relative to the workpiece. But entry-level CNC routers don’t often include a spindle tachometer, forcing the operator to basically guess at the speed. This DIY optical spindle tach aims to fix that, and has a few nice construction tips to boot.

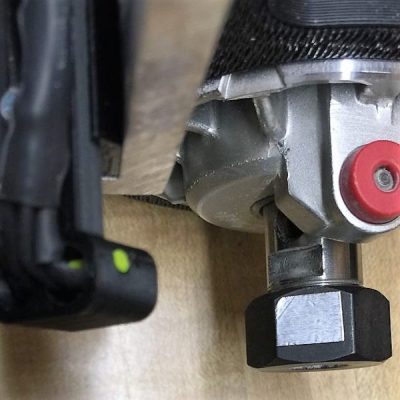
The CNC router in question is the popular Sienci, and the 3D-printed brackets for the photodiode and LED are somewhat specific for that machine. But [tmbarbour] has included STL files in his exhaustively detailed write-up, so modifying them to fit another machine should be easy. The sensor hangs down just far enough to watch a reflector on one of the flats of the collet nut; we’d worry about the reflector surviving tool changes, but it’s just a piece of shiny tape that’s easily replaced.  The sensor feeds into a DIO pin on a Nano, and a small OLED display shows a digital readout along with an analog gauge. The display update speed is decent — not too laggy. Impressive build overall, and we like the idea of using a piece of PLA filament as a rivet to hold the diodes into the sensor arm.

Want to measure machine speed but don’t have a 3D printer? No worries — a 2D-printed color-shifting tach can work too.

Hack a Day 28 Jan 09:01

Man-in-the-Middle Jog Pendant: Two Parts Make Easier Dev Work

In a project, repetitive tasks that break the flow of development work are incredibly tiresome and even simple automation can make a world of difference. [Simon Merrett] ran into exactly this while testing different stepper motors in a strain-wave gear project. The system that drives the motor accepts G-Code, but he got fed up with the overhead needed just to make a stepper rotate for a bit on demand. His solution? A grbl man-in-the-middle jog pendant that consists of not much more than a rotary encoder and an Arduino Nano. The unit dutifully passes through any commands received from a host controller, but if the encoder knob is turned it sends custom G-Code allowing [Simon] to dial in a bit acceleration-controlled motor rotation on demand. A brief demo video is below, which gives an idea of how much easier it is to focus on the nuts-and-bolts end of hardware when some simple motor movement is just a knob twist away.

[Simon]’s jog pendant moves a single motor which is exactly what he needs to ease development of his 3D printed strain-wave gear using a timing belt, but it could be programmed with any G-Code at all. Speaking of DIY jog pendants for CNC machines, don’t forget this wireless one made from an Atari 2600 joystick that jogs a plasma cutter in X and Y, and zeroes it with a push of the button.


Filed under: Arduino Hacks, cnc hacks

Make a Plotter Out of Rulers

Instructables user [lingib] made a clever and inexpensive pen arm plotter that uses plastic rulers for arms. An inspiring sight for anyone without a bunch of robot parts lying around,

The electronics are straightforward, with an Arduino UNO and a pair of Easy Drivers to control NEMA17 stepper motors connected to robot wheels, which serve as hubs for the rulers. At the end of the arms, an SG90 micro servo raises and lowers the pen as commanded, shoving the whole pen assembly off the paper with its horn—an elegant solution to an age-old drawbot problem. He even wrote wrote a custom Processing program that allows him to control the plotter from his desktop

[lingib]’s experimented with different kinds of drawing machines, including a drum plotter (video after the break), a V-plotter, as well as a rolling drawbot.

You’ll find tons of Hackaday posts about all types of drawing machines, including vintage plotters, plotters for making circuit boards, and even one built out of cardboard.

…the aforementioned drum plotter…

[Thanks, Setvir]


Filed under: cnc hacks
Hack a Day 17 Jun 00:00

CNC Machine Boasts Big Bed, Impressive Power from Off-the-Shelf Parts

A lot of homebrew CNC machines end up being glorified plotters with a router attached that are good for little more than milling soft materials like wood and plastic. So if you have a burning need to mill harder materials like aluminum and mild steel quickly and quietly, set your sights higher and build a large bed CNC machine with off-the-shelf components.

With a budget of 2000 €, [SörenS7] was not as constrained as a lot of the lower end CNC builds we’ve seen, which almost always rely on 3D-printed parts or even materials sourced from the trash can. And while we certainly applaud every CNC build, this one shows that affordable and easily sourced mechatronics can result in a bolt-up build of considerable capability. [SörenS7]’s BOM for this machine is 100% catalog shopping, from the aluminum extrusion bed and gantry to the linear bearings and recirculating-ball lead screws. The working area is a generous 900 x 400 x 120mm, the steppers are beefy NEMA23s, and the spindle is a 3-kW VFD unit for plenty of power. The video below shows the machine’s impressive performance dry cutting aluminum.

All told, [SörenS7] came in 500 € under budget, which is a tempting price point for a machine this big and capable.


Filed under: cnc hacks
Hack a Day 15 May 12:00
arduino  cnc  cnc hacks  extrusion  gantry  gerbl  steppers  vfd  

Pint-Sized, Low-Cost CNC Machine

A little MDF, a little plywood, some bits of threaded rod – put it all together and you’ve got this low-cost desktop CNC build using very few parts you’d need to go farther afield than the local home center to procure.

We’ve seen lots of e-waste and dumpster diving CNC builds here before; what’s appealing here is not only the low price tag of the build but also its approachability. As the short videos below show, [Thimo Voorwinden] does an admirable job of using the tools and materials he has on hand. We also appreciate the modularity of the build – the X- and Y-axis carriages are nearly identical and could be interchanged to alter the dimensions of the work area, or even replaced with a larger carriage if needed. The Z-axis is a little different from the usual low-end CNC build in that it doesn’t use a Dremel or other small rotary tool but rather mounts the handpiece of a flexible shaft rotary tool. Keeping the motor off the machine allows for more torque, less vibration, and reduced dead load.

The end result is a desktop CNC for about €200 with a work area large enough to fabricate small wooden and plastic parts, or to mill foam blocks for use as casting molds. It looks like [Thimo] has more in store for his little CNC machine, and we’re looking forward to seeing what improvements he can come up with.

[ via r/CNC]


Filed under: cnc hacks
Hack a Day 17 Feb 00:00

Add Robotic Farming to Your Backyard with Farmbot Genesis

Growing your own food is a fun hobby and generally as rewarding as people say it is. However, it does have its quirks and it definitely equires quite the time input. That’s why it was so satisfying to watch Farmbot push a weed underground. Take that!

Farmbot is a project that has been going on for a few years now, it was a semifinalist in the Hackaday Prize 2014, and that development time shows in the project documented on their website. The robot can plant, water, analyze, and weed a garden filled with arbitrarily chosen plant life. It’s low power and low maintenance. On top of that, every single bit is documented on their website. It’s really well done and thorough. They are gearing up to sell kits, but if you want it now; just do it yourself.

The bot itself is exactly what you’d expect if you were to pick out the cheapest most accessible way to build a robot: aluminum extrusions, plate metal, and 3D printer parts make up the frame. The brain is a Raspberry Pi hooked to its regular companion, an Arduino. On top of all this is a fairly comprehensive software stack.

The user can lay out the garden graphically. They can get as macro or micro as they’d like about the routines the robot uses. The robot will happily come to life in intervals and manage a garden. They hope that by selling kits they’ll interest a whole slew of hackers who can contribute back to the problem of small scale robotic farming.


Filed under: cnc hacks, green hacks

Star Track: A Lesson in Positional Astronomy With Lasers

[gocivici] threatened us with a tutorial on positional astronomy when we started reading his tutorial on a Arduino Powered Star Pointer and he delivered. We’d pick him to help us take the One Ring to Mordor; we’d never get lost and his threat-delivery-rate makes him less likely to pull a Boromir.

As we mentioned he starts off with a really succinct and well written tutorial on celestial coordinates that antiquity would have killed to have. If we were writing a bit of code to do our own positional astronomy system, this is the tab we’d have open. Incidentally, that’s exactly what he encourages those who have followed the tutorial to do.

The star pointer itself is a high powered green laser pointer (battery powered), 3D printed parts, and an amalgam of fourteen dollars of Chinese tech cruft. The project uses two Arduino clones to process serial commands and manage two 28byj-48 stepper motors. The 2nd Arduino clone was purely to supplement the digital pins of the first; we paused a bit at that, but then we realized that import arduinos have gotten so cheap they probably are more affordable than an I2C breakout board or stepper driver these days. The body was designed with a mixture of Tinkercad and something we’d not heard of, OpenJsCAD.

Once it’s all assembled and tested the only thing left to do is go outside with your contraption. After making sure that you’ve followed all the local regulations for not pointing lasers at airplanes, point the laser at the north star. After that you can plug in any star coordinate and the laser will swing towards it and track its location in the sky. Pretty cool.


Filed under: Arduino Hacks, cnc hacks, news, solar hacks

FR4 Machine Shield Is A CNC Milling Machine From FR4 PCB

The people behind the PocketNC heard you like CNC PCB mills, so they milled you a PCB mill out of PCB. They announced their surprising new open source hardware product, a pocket sized 3-axis CNC machine entirely made out of FR4 PCB material, aptly named “FR4 Machine Shield”, at this year’s Bay Area Maker Faire.

We know the concept from quadcopters, little robots, and generally things that are small enough to make use of their PCBs as a structural component. But an entire CNC machine, soldered together from a few dozen PCBs certainly takes it to the next level.

There is no doubt that 2mm thick fiber reinforced epoxy can be surprisingly rigid, although the Achilles heel of this method might be the solder joints. However, it looks like all load bearing, mechanical connections of the machine are supported by tightly interlocking “dovetail”-joints, which may help protecting all the solder connections from the strain hardening effects of continuous stress and spindle vibrations.

As you might expect, most of the wiring is embedded into the FR4 frame construction, and to squeeze the maximum value out of the PCB material, the motor driver boards interface via card edge connectors with the (currently Arduino based) controller board. In addition to the milling head, which features a brushless DC motor and a tool coupler, the team wants to develop heads for circuit printing, microscopy, pneumatic pick and place, hot air reflow, and 3D printing.

With all those cost-driven design choices, from the one-step manufacturing process of the frame and wiring to the dismissal of screws and nuts from the frame assembly, the “FR4 Machine Shield” could indeed become one of the cheapest CNC machine kits on the market. The team targets an introduction price of $400 during a Kickstarter campaign in June 2016. Can they deliver? [Gerrit] check Pocket NC out at the Faire and ended up raving about how they run their business.

Enjoy their teaser video below!


Filed under: cnc hacks