Posts with «classic hacks» label

C64 Keyboard Emulation Over Serial

There’s a lot of reasons you might want to emulate the keyboard on your Commodore 64. The ravages of time and dust may have put the original keyboard out of order, or perhaps you need to type in a long program and don’t fancy pecking away with the less-than-stellar feedback of the standard keys. [podstawek] has come up with the solution: a Commodore 64 keyboard emulator that works over serial.

It’s a simple concept, but one that works well. A Python script accepts incoming keypresses or pre-typed text, then converts them into a 6-bit binary code, which is sent to an Arduino over the serial connection. The Arduino uses the 6-bit code as addresses for an MT8808 crosspoint switch.

MT8808 Functional Diagram from Datasheet

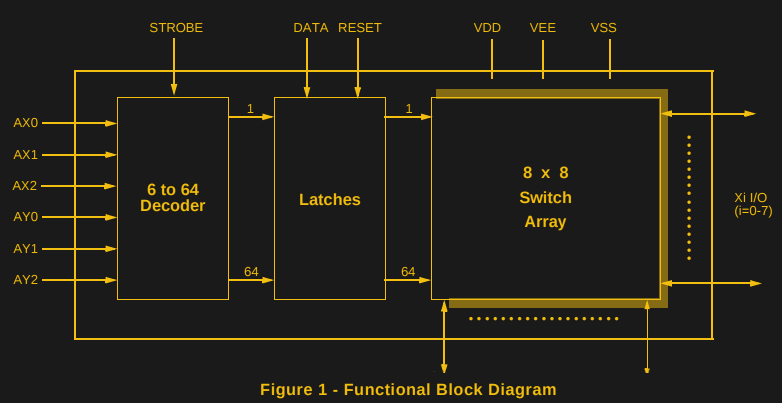
The MT8808 is essentially an 8×8 matrix of controllable switches, which acts as the perfect tool to interface with the C64’s 8×8 keyboard matrix. Hardware wise, this behaves as if someone were actually pressing the keys on the real keyboard. It’s just replacing the original key switches with an electronic version controlled by the Arduino.

[podstawek] already has the setup working on Mac, and it should work on Linux and Windows too. There’s a little more to do yet – modifying the script to allow complex macros and to enable keys to be held – so check out the Github if you want to poke around in the source. Overall it’s a tidy, useful hack to replace the stock keyboard.

The C64 remains a popular platform for hacking — it’s even had a Twitter client since 2009.


Filed under: classic hacks, computer hacks

Rotary Cell Phone: Blast from a Past that Never Was

The 1970s called and they want their rotary dial cell phone back.

Looking for all the world like something assembled from the Radio Shack parts department – remember when Radio Shack sold parts? – [Mr_Volt]’s build is a celebration of the look and feel of a hobbyist build from way back when. Looking a little like a homebrew DynaTAC 8000X, the brushed aluminum and 3D-printed ABS case sports an unusual front panel feature – a working rotary dial. Smaller than even the Trimline phone’s rotating finger stop dial and best operated with a stylus, the dial translates rotary action to DTMF tones for the Feather FONA board inside. Far from a one-trick pony, the phone sports memory dialing, SMS messaging, and even an FM receiver. But most impressive and mysterious is the dial mechanism, visible through a window in the wood-grain back. Did [Mr_Volt] fabricate those gears and the governor? We’d love to hear the backstory on that.

This isn’t the first rotary cell phone hybrid we’ve featured, of course. There was this GSM addition to an old rotary phone and this cell phone that lets you slam the receiver down. But for our money a rotary dial cell phone built from the ground up wins the retro cool prize of the bunch.

[via r/Arduino]


Filed under: Arduino Hacks, classic hacks

Primer on Servos Hits All the Basics

Servos are pretty basic fare for the seasoned hacker. But everyone has to start somewhere, and there’s sure to be someone who’ll benefit from this primer on servo internals. Who knows – maybe even the old hands will pick up something from a fresh perspective.

[GreatScott!] has been building a comprehensive library of basic electronics videos over the last few years that covers everything from using a multimeter to programming an Arduino. The last two installments delve into the electromechanical realm with a treatment of stepper motors along with the servo video below. He covers the essentials of the modern RC-type servo in a clear and engaging style that makes it easy for the newbie to understand how a PWM signal can translate into positional changes over a 180° sweep. He shows how to control a servo directly with an Arduino, with bonus points for including a simple 555-based controller circuit too. A quick look at the mods needed to convert any servo to continuous rotation wraps up the video.

If [GreatScott!]’s video whets your appetite for more, be sure to check out [Richard Baguley]’s deeper dive into servos. And when you’re ready to put your new-found knowledge into practice, maybe a nice project would be to convert a hobby servo into a linear actuator.


Filed under: classic hacks, misc hacks

Arcade Cabinet Build Takes Quarters, Dispenses Fun

Building an arcade cabinet seems to be a rite of passage for many hackers and woodworkers. Not that there is anything wrong with that: as this series of posts from [Alessandro] at boxedcnc shows, there is an art to doing it well.

His final build is impressive, with quality buttons, a genuine-looking banner, and even a coin slot so he can charge people to play. His build log covers both the carpentry and electronic aspects of the build, from cutting the panels to his own code for running the coin acceptor that takes your quarter (or, as he is in Italy, Euro coins) and triggers the game to play.

To extract money from his family, he used the Sparkfun COM-1719 coin acceptor, which can be programmed to send different pulses for different coins, connected to an Arduino which is also connected to the joystick and buttons. The Arduino emulates a USB keyboard and is connected to an old PC running MAME with the Attract Mode front end. It’s a quality build, down to the Bubble Bobble banner, and the coin slot means that it might even make some money back eventually.


Filed under: Arduino Hacks, classic hacks

Staring at the Sun: Erasing an EPROM

Flash memory is the king today. Our microcontrollers have it embedded on the die. Phones, tablets, and computers run from flash. If you need re-writable long term storage, flash is the way to go. It hasn’t always been this way though. Only a few years ago EPROM was the only show in town. EPROM typically is burned out-of-circuit in a programming fixture. When the time comes to erase the EPROM, just pop it under an ultraviolet (UV) bulb for 30 minutes, and you’re ready to go again. The EPROM’s quartz window allows UV light to strike the silicon die, erasing the memory.

The problem arises when you want to use an EPROM for long term storage. EPROM erasers weren’t the only way to blank a chip. The sun will do it in a matter of weeks. Even flourescent light will do it — though it could take years.

[TechEkspert] wanted to learn about the nature of erasing an EPROM with the sun, so he got out an old EPROM and started hacking. (translated link) [TechEkspert] programmed the EPROM with a known pattern of ones and zeros. A pair of 74HC4040 counters would address the entire 32 KB memory of the EPROM. An Arduino Mini read the data out, storing it in an SD card. A bit of python code translated the data to PNG files, which were then combined to render a video.

The whole setup was placed on the roof in full sun. Then the waiting began. Nothing much happened for two weeks. Then some bits started to flicker. This means that sometimes they would read as a 0, and other times a 1. The sun was starting to destroy the stored data. Right at the 3 week mark, all the remaining data quickly started to disappear. In the end the entire chip was erased.

While [TechEkspert’s] chip could be re-programmed, that’s not always the case with EEPROM and flash. Check out this EEPROM killer which calculated how many cycles it took to destroy the electronically erasable storage in an Atmel ATmega328.


Filed under: classic hacks
Hack a Day 14 Sep 12:01

Complex, Beautiful Device is Limited to Text-speak and Cat Pictures (WTF, LOL)

Beautifully documented, modular, and completely open-source, this split flap display project by [JON-A-TRON] uses 3D printing, laser cutting and engraving, and parts anyone can find online to make a device that looks as sharp as it is brilliantly designed. Also, it appears to be a commentary on our modern culture since this beautifully engineered, highly complex device is limited to communicating via three-letter combos and cat pictures (or cat video, if you hold the button down!) As [JON-A-TRON] puts it, “Why use high-resolution, multi-functional devices when you can get back to your industrial revolution roots?” Video is embedded below.

The only limitation is that the device has no way of knowing the state of individual displays, so it’s unable to spell out specific messages – an operator simply holds a button to scroll through letters, and stops when the correct letter is displayed. For a similar project that has serious control hardware (but none of the cheeky commentary) check out this scratch-built alphanumeric split flap display.

[via Adafruit Blog]


Filed under: classic hacks

A Slide Viewer Makes An Excellent Case For An OLED Project

Sometimes when browsing the websites of our global hackspace community you notice a project that’s attractive not necessarily because of what it does or its technology but because of its presentation. So it is with the subject of this article, [Kris] needed a house temperature monitor and found a 1960s slide viewer made an excellent choice for its housing.

The monitor itself is a fairly straightforward Arduino build using a couple of DS18B20 1-wire temperature sensors and a real-time-clock module and displaying their readings on a small OLED screen. Its code can be found on this mailing list thread if you are interested. The display presented a problem as it needed to be reasonably large, yet fairly dim so it could be read at night without being bright enough to interrupt sleep.

A variety of projection techniques were tried, involving lenses from a projection clock, a magnifying glass, and a Google Cardboard clone. Sadly none of these lenses had the required focal length. Eventually the slide viewer was chosen because it was pointed out that the OLED screen was about the same size as a photographic slide.

Slide viewers are part of the familiar ephemera of the analog era that most people over 60 may still have taking up drawer space somewhere but may well be completely alien to anyone under about 30. They were a magnification system packaged up into a console usually styled to look something like a small portable TV of the day, and different models had built-in battery lights, or collected ambient light with a mirror. The screen was usually a large rectangular lens about 100mm(4″) diagonal.

[Kris]’s Vistarama slide viewer came via eBay. It’s not the smallest of viewers, other models folded their light paths with mirrors, however the extra space meant that the Arduino fit easily. The OLED was placed where the slide would go, and its display appeared at just the right magnification and brightness. Job done, and looking rather stylish!

We’ve not featured a slide viewer before here at Hackaday, though we did recently feature a similar hack on an Ikea toy projector. We have however featured more than one digital conversion on a classic slide projector using LCD screens in place of the slide.

Via Robots and Dinosaurs makerspace, Sydney.


Filed under: Arduino Hacks, classic hacks, clock hacks

How Does a Buck Converter Work Anyway?

[Great Scott] should win an award for quickest explanation of a buck converter. Clocking in at five and a half minutes, the video clearly shows the operating principles behind the device.

It starts off with the question, what should you do if you want to drop a voltage? Many of us know that we can dim and brighten an LED using the PWM on an Arduino, but a closer inspection with an oscilloscope still shows 5V peaks that would be dangerous to a 3.3V circuit. He then adds an inductor and diode, this keeps the current from dropping too fast, but the PWM just isn’t switching fast enough to keep the coil energized.

A small modification to the Arduino’s code, and the PWM frequency is now in the kHz range. The voltage looks pretty good on the oscilloscope, but a filter cap gets it to look nice and smooth. Lastly, he shows how when the load changes the voltage out looks different. To fix this a voltage divider feeds back the information to the Arduino, letting it change the PWM duty to match the load.

In the last minute of the video he shows how to hook up off-the-shelf switching regulators, whose support components are now completely demystified as the basic principles are understood. Video after the break.


Filed under: classic hacks, parts

Pong In Real Life, Mechanical Pong

[Daniel Perdomo] and two of his friends have been working on a mechanical version of Pong for the past two years. We can safely say that the final result is beautiful. It’s quite ethereal to watch the pixe–cube move back and forth on the surface.

[Daniel] has worked in computer graphics for advertising for more than 20 years. However, he notes that neither he nor his friends had any experience in mechanics or electronics when they began. Thankfully, the internet (and, presumably, sites like Hackaday) provided them with the information needed.

The pong paddles and and pixel (ball?) sit onto of a glass surface. The moving parts are constrained to the mechanics with magnets. Underneath is a construction not unlike an Etch A Sketch for moving the ball while the paddles are just on a rail with a belt. The whole assembly is made from V-groove extrusion.

Our favorite part of the build is the scroll wheel for moving the paddle back and forth. For a nice smooth movement with some mass behind it, what’s better than a hard-drive platter? They printed out an encoder wheel pattern and glued it to the surface. The electronics are all hand-made. The brains appear to be some of the larger Arduinos. The 8-bit segments, rainbow LEDs, etc were build using strips glued in place with what looks like copper foil tape connecting buses. This is definitely a labor of love.

It really must be seen to be understood. The movement is smooth, and our brains almost want to remove a dimension when watching it. As for the next steps? They are hoping to spin it up into an arcade machine business, and are looking for people with money and experience to help them take it from a one-off prototype to a product. Video after the break.


Filed under: classic hacks, Virtual Reality

A Modern But Classic Enigma Machine

Hacking has always brought more good to the world than not hacking. The successful efforts of the Allies during World War II in deciphering the Enigma machine output still reminds us of that. Today, the machine is a classic example of cryptography and bare-metal computing.

We have covered quite a few DIY Enigma machines in the past, yet 14 years old [Andy] really impressed us with his high school science fair project, a scratch built, retro-modern Enigma machine.

As close as you can get: Andy’s modern enigma machine (left) next to an original from the Worldwar II (right, image source)

With its wooden enclosure, keyboard, interchangeable rotors, and plugboard, his build resembles an original Worldwar II enigma machine down to the letter. However, when looking closer, you’ll find that the rotors are implemented as electronic modules that plug into D-Sub sockets on the machine. Also, there is a 16 segment display that displays the rotor position as well as an LCD screen that lets you comfortably read the plain- and ciphertext. On the inside, you’ll find an Arduino Mega along with 1,800 other parts and 500 wires, and of course, this modern version has a backspace key.

It took [Andy] over 9 months to put all this together, and he now finds himself among the winners of the State Science & Engineering Fair (SSEF), who will be sent to Intel as representatives of their states. Given his experience in field-capable computing, we’re sure [Andy] can help Intel reconquering mobile. Enjoy the video!

Thanks to [Arduino Enigma] for the tip!


Filed under: classic hacks