Posts with «classic hacks» label

RFID Unlock Your PC, Because You’re 1337

Ever wanted to feel like one of those movie hackers from the late 90s? Yes, your basement’s full of overclocked Linux rigs and you’ve made sure all your terminal windows are set to green text on a black background, but that’s not always enough. What you need is an RFID tag that unlocks your PC when you touch the reader with your RFID cardOnly then may you resume blasting away at your many keyboards in your valiant attempts to hack the mainframe.

[Luke] brings us this build, having wanted an easier way to log in quickly without foregoing basic security. Seeing as an RC522 RFID reader was already on hand, this became the basis for the project. The reader is laced up with a Sparkfun Pro Micro Arduino clone, with both devices serendipitously running on 3.3V, obviating the need for any level shifters. Code is simple, based on the existing Arduino RC522 library. Upon a successful scan of the correct tag, the Arduino acts as a HID keyboard and types the user’s password into the computer along with a carriage return, unlocking the machine. Simple!

Overall, it’s a tidy build that achieves what [Luke] set out to do. It’s something that could be readily replicated with a handful of parts and a day’s work. If you’re interested in the underlying specifics, we’ve discussed turning Arduinos into USB keyboards before.

Hack a Day 18 Mar 06:00

Debunking Moon Landing Denial with an Arduino and Science

It’s sad that nearly half a century after the achievements of the Apollo program we’re still arguing with a certain subset of people who insist it never happened. Poring through the historical record looking for evidence that proves the missions couldn’t possibly have occurred has become a sad little cottage industry, and debunking the deniers is a distasteful but necessary ongoing effort.

One particularly desperate denier theory holds that fully spacesuited astronauts could never have exited the tiny hatch of the Lunar Excursion Module (LEM). [AstronomyLive] fought back at this tendentious claim in a clever way — with a DIY LIDAR scanner to measure Apollo artifacts in museums. The hardware is straightforward, with a Garmin LIDAR-Lite V3 scanner mounted on a couple of servos to make a quick pan-tilt head. The rig has a decidedly compliant look to it, with the sensor flopping around a bit as the servos move. But for the purpose, it seems perfectly fine.

[AstronomyLive] took the scanner to two separate museum exhibits, one to scan a LEM hatch and one to scan the suit Gene Cernan, the last man to stand on the Moon so far, wore while training for Apollo 17. With the LEM flying from the rafters, the scanner was somewhat stretching its abilities, so the point clouds he captured were a little on the low-res side. But in the end, a virtual Cernan was able to transition through the virtual LEM hatch, as expected.

Sadly, such evidence will only ever be convincing to those who need no convincing; the willfully ignorant will always find ways to justify their position. So let’s just celebrate the achievements of Apollo.

Circuit Bent Casio SK-1 gets an Arduino Brain

The Casio SK-1 keyboard is fairly well-known in the “circuit bending” scene, where its simple internals lend themselves to modifications and tweaks to adjust the device’s output in all sorts of interesting ways. But creating music via circuit bending the SK-1 can be tedious, as it boils down to fiddling with the internals blindly until it sounds cool. [Nick Price] wanted to do something a bit more scientific, and decided to try replacing his SK-1’s ROM with an Arduino so he could take complete control it.

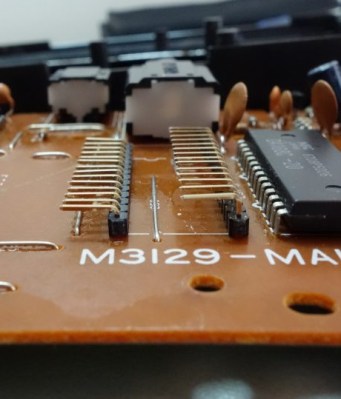
Replacing the ROM chip with header pins.

That’s the idea, anyway. Right now he’s gotten as far as dumping the ROM and getting the Arduino hooked up in place of it. Unfortunately the resulting sound conjures up mental images of a 56K modem being cooked in a microwave. Clearly [Nick] still has some work ahead of him.

For now though, the progress is fascinating enough. He was able to pull the original NEC 23C256 chip out of the keyboard and read its contents using an Arduino and some code he cooked up, and he’s even put the dump online for any other SK-1 hackers out there. He then wrote some new code for the Arduino to spit data from the ROM dump back to the keyboard when requested. In theory, it should sound the same as before, but with the added ability to “forge” the data going back to the keyboard to make new sounds.

The result is what you hear in the video linked after the break. Not exactly what [Nick] had in mind. After some snooping with the logic analyzer, he believes the issue is that the Arduino can’t respond as fast as the original NEC chip did. He’s now got an NVRAM chip on order to replace the original NEC chip; the idea is that he can still use the Arduino to reprogram the NVRAM chip when he wants to play around with the sound.

We’ve covered some pretty fancy circuit bent instruments here in the past, but if you’re looking for something a bit easier to get your feet wet we ran a start-to-finish guide back in the Ye Olden Days of 2011 which should be helpful.

Build Your Own Wave Tank

Wave tanks are cool, but it’s likely you don’t have one sitting on your coffee table at home. They’re more likely something you’ve seen in a documentary about oil tankers or icebergs. That need no longer be the case – you can build yourself a wave generator at home!

This build comes to use from [TVMiller] who started by creating a small tank out of acrylic sheet. Servo-actuated paddles are then placed in the tank to generate the periodic motion in the water. Two servos are controlled by an Arduino, allowing a variety of simple and more complex waves to be created in the tank. [TVMiller] has graciously provided the code for the project on Hackaday.io. We’d love to see more detail behind the tank build itself, too – like how the edges were sealed, and how the paddles are hinged.

A wave machine might not be the first thing that comes to mind when doing science at home, but with today’s hardware, it’s remarkable how simple it is to create one. Bonus points if you scale this up to the pool in your backyard – make sure to hit the tip line when you do.


Filed under: classic hacks
Hack a Day 11 Oct 00:00

RetroModem for the Commodore 64

Retrocomputers are fun, but ultimately limited in capability compared to modern hardware. One popular pursuit to rectify this is the connection of early home computers to the Internet. To that end, [que] built the Retromodem for the Commodore 64.

The build starts with a case from an Intel 14.4 modem. A little fast for the Commodore 64 era, but anachronism is charming when done tastefully. Inside is an Arduino with an ethernet module to handle the heavy lifting of carrying packets to the outside world.  [que] took the time to wire up status LEDs for the proper vintage look, which really adds something to the project. They switch on and off to indicate the various settings on the modem – it’s great to see in the video below the break the “HS” LED light up when the baud rate is changed to a higher speed.

The project implements most of the Hayes command set, so you can interface with it over a serial terminal just like it’s 1983. [que] doesn’t go into too many details of how it’s all put together, but for the experienced code warrior it’s a project that could be whipped up in a weekend or two. For a more modern take, perhaps you’d like to hook your C64 up over Wifi instead?


Filed under: classic hacks, computer hacks

KIM-1 to COSMAC Elf Conversion — Sort Of

In the mid-1970s, if you had your own computer, you probably built it. If you had a lot of money and considerable building skill, you could make an Altair 8800 for about $395 — better than the $650 to have it built. However, cheaper alternatives were not far behind.

In 1976, Popular Electronics published plans for a computer called the COSMAC Elf which you could build for under $100, and much less if you had a good junk box. The design was simple enough that you could build it on a piece of perf board or using wire wrap. We featured the online archive of the entire Popular Electronics collection, but hit up page 33 of this PDF if you want to jump right to the article that started it all. The COSMAC Elf is a great little machine built around a 40-pin RCA 1802 processor, and for many was the first computer they owned. I lost my original 1802 computer in a storm and my recent rebuild in another completely different kind of storm. But there is a way to reclaim those glory days without starting from scratch.  I’m going to repurpose another retro-computing recreation; the KIM-1.

I’ll admit it, Rewiring a real KIM-1 to take an 1802 CPU would be difficult and unnecessary and that’s not what this article is about. However, I did have a KIM UNO — [Oscar’s] respin of the classic computer using an Arduino mini pro. Looking at the keyboard, it occurred to me that the Arduino could just as easily simulate an 1802 as it could a 6502. Heck, that’s only two digits different, right?

The result is pretty pleasing. A “real” Elf had 8 toggle switches, but there were several variations that did have keypads, so it isn’t that far off. Most Elf computers had 256 bytes of memory (without an upgrade) but the 1802 UNO (as I’m calling it) has 1K. There’s also a host of other features, including a ROM and a monitor for loading and debugging programs that doesn’t require any space in the emulated 1802.

Repurpose
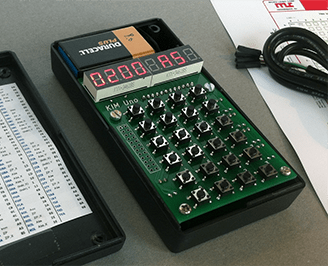
The KIM UNO has 24 switches. There are 16 for the hex digits, of course. The top two rows mimic functions from the original KIM-1. A real Elf had a way to input a byte (usually 8 toggle switches), a load switch, a run switch, a memory protect switch, and a push button wired to a CPU pin. That means the hardware has more than enough switches.

On the display side, a normal Elf had a single-byte hex display although some clones had more. There was also the Q LED that a program could light or extinguish. The KIM UNO hardware has many 7-segment displays so it is possible to put those digits to use like an Elf clone. There isn’t an LED, however, except for the Arduino’s built in LED which is not normally visible in operation. However, the digital displays have decimal points and they are connected to the Arduino. So if you don’t mind using those, you have plenty of LEDs, too.

The hardware is open source and easy to duplicate. [Oscar] sometimes has kits as well and they are very inexpensive (about $20).

The KIM UNO software is open source, so I started there. I first stripped all the code out of the main file other than the parts that drove the display and the keyboard, then built up everything need to suppot 1802 emulation. You can find all the code in my 1802UNO GitHub repository.

Inside the 1802

The 1802 instruction set is very regular and quite simple. Most instructions use the top 4 bits as an op code and the bottom 4 bits to select one of sixteen 16-bit registers. So 0x12 increments register 2 and 0x15 increments register 5. There are only a handful of op codes that don’t follow this pattern. There’s also an 8-bit accumulator called “D” (not to be confused with register D).

One unique feature in the 1802 architecture is the program counter. There isn’t one. Well, more precisely, there are up to 16. Any of the registers can be the program counter and a subroutine call can be as simple as switching the program counter. Unfortunately, that isn’t very reentrant (or good for recursion). If you want a proper subroutine call, you had to code it yourself. RCA provided the “standard call and return technique” that had the unfortunate downside of destroying the accumulator.

With so few instructions, the emulator turns out to be a few switch statements and some pretty simple code. Although it is made to run with the KIM UNO hardware, like the KIM UNO, you should be able to use it with just about any Arduino via the serial port. It isn’t quite as fun as having the real hardware, but it is simpler.

Unreal

The emulator is reasonably accurate except it doesn’t simulate interrupts (since there is no source of them). However, it doesn’t faithfully reproduce the 1802’s load mode which used DMA. Instead, load mode is just completely custom code that enters data into memory. It does not simulate the cycle and register manipulations that go on in a real 1802 using DMA in load mode.

In addition to loading a program with the ersatz load mode, you can also move RAM back and forth to EEPROM or a PC via the serial port.

Serial and Push Buttons

The serial port is just the usual Arduino serial port set for 9600 baud. By default, the serial input will mimic the hardware keys. However, you can use the pipe character (‘|’) to shift the serial port into terminal mode. Then the 1802 code can read data from the serial port. You lose the front panel functions and there’s no way to go back until you cycle the power unless you make the 1802 code release the port.

A few of the push buttons have special functions if you hold them down for more than one second. For example, the AD button writes the EEPROM data into RAM. This is useful for storing a self-contained demo, for example.

You can find a summary of the keyboard and serial commands on the GitHub site. The serial port can do things you can’t do from the front panel, like set a trace mode, dump the CPU registers, and more.

Building
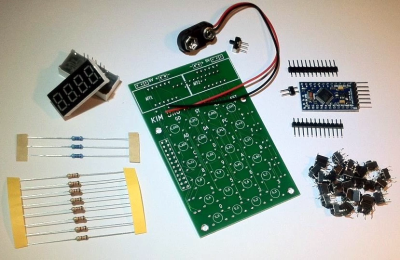
The hardware doesn’t require any changes to the stock KIM UNO kit. There’s a lot to solder and once you solder the displays on, it would be hard to get the Arduino back off the board.

You could probably build the software using the Arduino IDE, but I used Platform IO. That lets me use the editor of my choice, but you ought to be able to get the code to work in the IDE, as well. There is enough memory to make the RAM slightly bigger, but I didn’t do it. Since one way to save and load the RAM is to EEPROM, I didn’t want the RAM to be larger than the EEPROM. In addition, the RAM “maps” like a real Elf (that is, RAM at location 0x0 also appears at 0x4000, 0x8000, etc). This would be more difficult if you added a little bit more than 1K of RAM.

There are a few other options at the top of 1802config.h. You can select how often the screen and keyboard refresh. Higher values are slower to refresh but faster to execute code. You can change the I/O ports associated with the keyboard, displays, and serial port. You can also change the serial escape character.

Examples

There are some examples provided that blink the LEDs and manipulate the serial port. If you look around, there’s a lot of 1802 code on the web. However, be aware that most 1802s don’t have a hardware UART. They emulate serial ports using the Q output and one of the EF inputs. That’s fine for a real device even though it takes lots of code, but for this virtual device, it isn’t practical. You’ll need to rip out any code that does serial I/O and replace it with single I/O instructions.

If you have a binary file (or a format you can convert to binary) I have a converter written in C included on GitHub. You can compile it on nearly any platform and use it to convert. It always assumes address. If that’s not right, you can always open the output in a text editor and adjust.

In addition, there are three ROMs included that you can try. By default, there is a simple high-low game. There are also two monitors, one for use with the built-in keyboard and another for use with a serial port. To select a ROM, edit 1802rom.h and change the comments so the ROM you want is not commented and the others are.

Practical?

Emulators are fun, but as the song goes, there’s nothing like the real thing. If that’s not authentic enough for you, it is possible to build a very authentic looking Elf, even today. The reason real 1802s are still around is they had several desirable characteristics, namely low power consumption and resistance to radiation.

The Arduino simulation has neither of those features. However, it is a fun retrocomputing toy, inexpensive, and a great learning tool. The CPU is simple enough to program directly in machine code and the portability is better than most other old school computers.

If you want to learn more about the 1802 there are several sites dedicated to it and a very helpful Yahoo group. One site has a very prolific software author, but most of the code won’t fit in the 1802 UNO’s 1K RAM. Maybe a version with more memory is in the future.


Filed under: Arduino Hacks, classic hacks, computer hacks, Hackaday Columns

Look at me with your Special Animatronic Eyes

Animatronics for movies is often about making something that works and is reliable in the short term. It doesn’t have to be pretty, it doesn’t have to last forever. [Corporate Sellout]  shows us the minimalist approach to building animatronics with this pair of special eyes.  These eyes move in both the pan and tilt. Usually, that means a gimbal style mount. Not in this case. The mechanical assembly consists of with popsicle sticks, ping-pong balls, film canisters and dental floss.

The frame for the eyes is made of simple popsicle sticks hot glued together. The eyes themselves are simple ping-pong balls. Arduino powered servos control the movement. The servos are connected to dental floss in a cable arrangement known as a pull-pull system. As each servo moves, one side of the arm pulls on a cable, while the other provides enough slack for the ping-pong ball to move.

Mounting the ping-pong balls is the genius part of this build. They simply sit in the open end of a couple of film canisters. the tension from the dental floss holds everything together. We’re sure it was a finicky setup to build, but once working, it’s reliable. Only a glue joint failure or stretch in the dental floss could cause issues.

There are plenty of approaches to Animatronic eyes. Check out the eyes in this Stargate Horus helmet, which just won our Sci-Fi contest. More recently we saw Gawkerbot, which uses a CD-ROM drive to provide motion for a creepy robot’s eyes.


Filed under: classic hacks, robots hacks

Raiders of the Lost OS: Reclaiming A Piece of Polish IT History

In today’s digital era, we almost take for granted that all our information is saved and backed up, be it on our local drives or in the cloud — whether automatically, manually, or via some other service.  For information from decades past, that isn’t always the case, and recovery can be a dicey process.  Despite the tricky challenges, the team at [Museo dell’Informatica Funzionante] and [mera400.pl], as well as researchers and scientists from various museums, institutions, and more all came together in the attempt to recover the Polish CROOK operating system believed to be stored on five magnetic tapes.

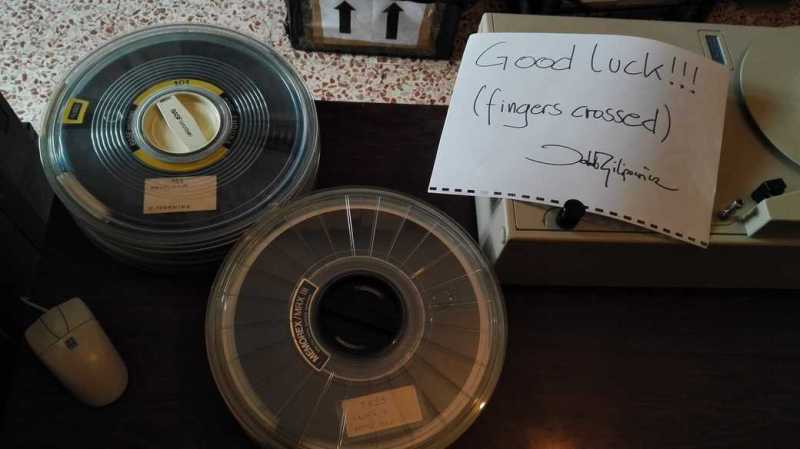
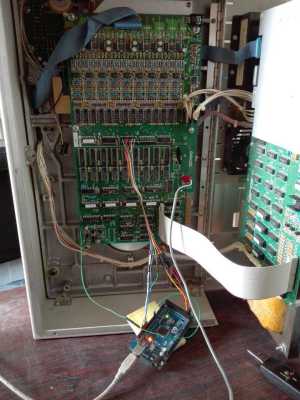
Originally stored at the Warsaw Museum of Technology, the tapes were ideally preserved, but — despite some preliminary test prep — the museum’s tape reader kept hanging at the 800 BPI NRZI encoded header, even though the rest of the tape was 1600 BPI phase encoding. Some head scratching later, the team decided to crack open their Qualstar 1052 tape reader and attempt to read the data directly off the circuits themselves!!

Using an Arduino Mega as a sampling device and the tape in test mode, the team were able to read the tapes, but the header remained inscrutable and accompanied by errors in the rest of the data. Promising nonetheless!

Switching gears, the decision was made to use a logic analyzer to read the tapes and use software to decode the data. While they waited for their new analyzer to ship, one of the team members, [Jacob Filipowicz] harnessed the power of Python to write a program called Nine Track Labs (pictured below) which would allow them to read any kind of magnetic tape, at any speed, BPI, and writing standard. Armed with the software and analyzer, the team was able to successfully recover the data from the tapes in its entirety without errors!

Among the data recovered, there were numerous versions of the CROOK operating system — allowing them to reproduce the OS’s development process, as well as hundreds of other files containing programs and tools hitherto believed to be lost. There was also a backup of a ‘live’ MERA-400 system with a binary CROOK-3 OS, ready to run in emulation. All things considered, the techno-archeological tour-de-force was a smashing success.

If — in your more modern travels — you need to recover an audio recording gone awry, know that you can retrieve that data with a hex editor.


Filed under: classic hacks, computer hacks

MicroVox Puts the 80’s Back into Your Computer’s Voice

[Monta Elkins] got it in his mind that he wanted to try out an old-style speech synthesizer with the SC-01 (or SC-01A) chip, one that uses phonemes to produce speech. After searching online he found a MicroVox text-to-speech synthesizer from the 1980s based around the chip, and after putting together a makeshift serial cable, he connected it up to an Arduino Uno and tried it out. It has that 8-bit artificial voice that many of us remember fondly and is fairly understandable.

The SC-01, and then the SC-01A, were made by Votrax International, Inc. In addition to the MicroVox, the SC-01 and SC-01A were used in the Heath Hero robot, the VS-100 synthesizer add-on for TRS-80s, various arcade games such as Qbert and Krull, and in a variety of other products. Its input determines which phonemes to play and where it shines is in producing good transitions between them to come up with decent speech, much better than you’d get if you just play the phonemes one after the other.

The MicroVox has a 25-pin RS-232 serial port as well as a parallel port and a speaker jack. In addition to the SC-01A, it has a 6502 under the hood. [Monta] was lucky to also receive the manual, and what a manual it is! In addition to a list of the supported phonemes and words, it also contains the schematics, parts list and details for the serial port which alone would make for fun reading. We really liked the taped-in note seen in this screenshot. It has a hand-written noted that says “Factory Corrected 10/18/82”.

Following along with [Monta] in the video below, he finds the serial port’s input buffer chip datasheet online and verifies the voltage levels. Next he opens up the case and uses dips switches to set baud rate, data bits, parity, stop bits and so on. After hooking up the speakers, putting together a makeshift cable for RX, TX and ground, and writing a little Arduino code, he sends it text and out comes the speech.

The SP-01 wasn’t the only speech chip from the 1980s we’ve come across. [Marquis de Geek] used the SP0256 to make what he calls a homemade Stephen Hawking. And Votrax themselves had their own speech box, the Type ‘N Talk which [Jan] used to give voice to old text adventure games with an Android phone and VIC-20. The sound from this one really is remarkable, sounding pretty much the same as modern-day Siri.


Filed under: classic hacks

C64 Keyboard Emulation Over Serial

There’s a lot of reasons you might want to emulate the keyboard on your Commodore 64. The ravages of time and dust may have put the original keyboard out of order, or perhaps you need to type in a long program and don’t fancy pecking away with the less-than-stellar feedback of the standard keys. [podstawek] has come up with the solution: a Commodore 64 keyboard emulator that works over serial.

It’s a simple concept, but one that works well. A Python script accepts incoming keypresses or pre-typed text, then converts them into a 6-bit binary code, which is sent to an Arduino over the serial connection. The Arduino uses the 6-bit code as addresses for an MT8808 crosspoint switch.

MT8808 Functional Diagram from Datasheet

The MT8808 is essentially an 8×8 matrix of controllable switches, which acts as the perfect tool to interface with the C64’s 8×8 keyboard matrix. Hardware wise, this behaves as if someone were actually pressing the keys on the real keyboard. It’s just replacing the original key switches with an electronic version controlled by the Arduino.

[podstawek] already has the setup working on Mac, and it should work on Linux and Windows too. There’s a little more to do yet – modifying the script to allow complex macros and to enable keys to be held – so check out the Github if you want to poke around in the source. Overall it’s a tidy, useful hack to replace the stock keyboard.

The C64 remains a popular platform for hacking — it’s even had a Twitter client since 2009.


Filed under: classic hacks, computer hacks