Posts with «classic hacks» label

Control Your Web Browser Like It’s 1969

Imagine for a moment that you’ve been tasked with developing a device for interfacing with a global network of interconnected devices. Would you purposely design a spring-loaded dial that can do nothing but switch a single set of contacts on and off from 1 to 10 times? What kind of crazy world would we have to live in where something like that was the pinnacle of technology?

Obviously, such a world once existed, and now that we’ve rolled the calendar ahead a half-century or so, both our networks and our interfaces have gotten more complex, if arguably better. But [Jan Derogee] thinks a step backward is on order, and so he built this rotary phone web browser. The idea is simple: pick up the handset and dial the IP address of the server you want to connect to. DNS? Bah, who needs it?

Of course there is the teensy issue that most websites can’t be directly accessed via IP address anymore, but fear not – [Jan] has an incredibly obfuscated solution to that. It relies on the fact that many numbers sound like common phrases when sounded out in Chinese, so there end up being a lot of websites that have number-based URLs. He provides an example using the number 517, which sounds a bit like “I want to eat,” to access the Chinese website of McDonald’s. How the number seven sounding like both “eat” and “wife” is resolved is left as an exercise to the reader.

And here we thought [Jan]’s rotary number pad was of questionable value. Still, we appreciate this build, and putting old phones back into service in any capacity is always appreciated.

Hack a Day 24 Jul 06:00
arduino  classic hacks  dial  dns  hid  homophone  ip  phone hacks  pulse  rotary  url  usb  

A Doom-esque Port To The ATmega328

Doom holds a special place as one of the biggest games of the 1990s, as well as being one of the foundational blocks of the FPS genre. Long before 3D accelerators hit the market, iD Software’s hit was being played on computers worldwide, and later spread to all manner of other platforms. [David Ruiz] decided to build a cutdown version for everyone’s favourite, the ATmega328.

Due to the limited resources available, it’s not a direct port of Doom. [David] instead took some sprites and map data from the original game, and built a raycasting engine similar to that of Wolfenstein 3D. Despite the limited memory and CPU cycles, the basic game can run at between 8-11 FPS. There are fancy dithering tricks to help improve the sense of depth, a simplified enemy AI, and even a custom text library for generating the UI.

It’s a great example of what can be done with a seemingly underpowered part. We’ve seen similar work before, with Star Fox replicated on the Arduboy. A hacker’s ingenuity truly knows no bounds.


Hack a Day 29 Jun 12:00

Arduino Shield Makes Driving Nixies Easy

Nixie tubes are adored by hackers across the world for their warm glow that recalls an age of bitter nuclear standoffs and endless proxy wars. However, they’re not the easiest thing to drive, requiring high voltages that can scare microcontrollers senseless. Thankfully, it’s possible to score an Arduino shield that does the heavy lifting for you.

The HV supply is the heart of any Nixie driver.

The shield uses HV5812 drivers to handle the high-voltage side of things, a part more typically used to drive vacuum fluorescent displays. There’s also a DHT22 for temperature and humidity measurements, and a DS3231 real time clock. It’s designed to work with IN-12 and IN-15 tubes, with the part selection depending on whether you’re going for a clock build or a combined thermometer/hygrometer. There’s also an enclosure option available, consisting of two-tone laser etched parts that snap together to give a rather sleek finished look.

For those looking to spin up their own, code is available on Github and schematics are also available. You’ll have to create your own PCB of course, but there are guides that can help you along that path. If you’re looking to whip up a quick Nixie project to get your feet wet, this might just be what you need to get started. Of course, you can always go straight to hard mode, and attempt a functional Nixie watch. Video after the break.

Slot

Driving a Controllerless LCD With the Humble Arduino Uno

These days, you could be forgiven for thinking driving an LCD from a microcontroller is easy. Cheap displays have proliferated, ready to go on breakout boards with controllers already baked in. Load up the right libraries and you’re up and running in a matter of minutes. However, turn your attention to trying to drive a random LCD you’ve yanked out of a piece of old equipment, and suddenly things get harder. [Ivan Kostoski] was in just such a position and decided to get down to work.

[Ivan]’s LCD was a 320×240 STN device salvaged from an old tape library. The display featured no onboard controller, and the original driver wasn’t easily repurposed. Instead, [Ivan] decided to drive it directly from an Arduino Uno.

This is easier said than done. There are stringent timing requirements that push the limits of the 8-bit platform, let alone the need for a negative voltage to drive the screen and further hardware to drive the backlight. These are all tackled in turn, with [Ivan] sharing his tips to get the most flexibility out of the display. Graphics and text modes are discussed, along with optimizations that could be possible through the varied use of available RAM and flash.

The code is available on Github. If you need inspiration for your own controllerless LCD driver. [Ben Heck] has done similar work too, using FPGA grunt to get the job done.

State Of The Art Big Mouth Alexa Bass

Hackers seem intent on making sure the world doesn’t forget that, for a brief shining moment, everyone thought Big Mouth Billy Bass was a pretty neat idea. Every so often we see a project that takes this classic piece of home decor and manages to shoehorn in some new features or capabilities, and with the rise of voice controlled home automation products from the likes of Amazon and Google, they’ve found a new ingredient du jour when preparing stuffed bass.

[Ben Eagan] has recently completed his entry into the Pantheon of animatronic fish projects, and while we’ll stop short of saying the world needed another Alexa-enabled fish on the wall, we’ve got to admit that he’s done a slick job of it. Rather than trying to convince Billy’s original electronics to play nice with others, he decided to just rip it all out and start from scratch. The end result is arguably one of the most capable Billy Bass updates we’ve come across, if you’re willing to consider flapping around on the wall an actual capability in the first place.

The build process is well detailed in the write-up, and [Ben] provides many pictures so the reader can easily follow along with the modification. The short version of the story is that he cuts out the original control board and wires the three motors up to an Arduino Motor Driver Shield, and when combined with the appropriate code, this gives him full control over Billy’s mouth and body movements. This saved him the trouble of figuring out how to interface with the original electronics, which is probably for the better since they looked rather crusty anyway.

From there, he just needed to give the fish something to get excited about. [Ben] decided to connect the 3.5 mm audio jack of an second generation Echo Dot to one of the analog pins of the Arduino, and wrote some code that can tell him if Amazon’s illuminated hockey puck is currently yammering on about something or not. He even added a LM386 audio amplifier module in there to help drive Billy’s original speaker, since that will now be the audio output of the Dot.

A decade ago we saw Billy reading out Tweets, and last year we presented a different take on adding an Alexa “brain” to everyone’s favorite battery powered fish. What will Billy be up to in 2029? We’re almost too scared to think about it.

A Turntable For Model Railroads

Way back when, before diesel-electric locomotives were a thing, trains weren’t really able to go backwards too well. Also it’s sometimes necessary to turn carriages around in a small space. For that, the railway turntable was invented. If you want to implement one on a model layout, this project from DIY & Digital Railworld is for you.

The project is at an early stage – thus far, laying out how to set up an Arduino Uno using a potentiometer to control the speed of a stepper motor, which rotates the turntable. The turntable itself is a 3D printed part sourced from Thingiverse, designed to suit the specific stepper motor used.

This has the easy part sorted – rotating a piece of track through 360 degrees to orient a train properly. However, there’s significant work ahead. Power needs to be hooked up to the rails, and a system for accurately aligning the turntable with outgoing tracks needs to be devised. This is particularly relevant for N-gauge setups, where tolerances are everything.

We’d love to know how you’d tackle the various issues to build a working model turntable in the comments. We’ve seen some serious model railroad builds before around these parts. Video after the break.


Racing the Beam and Dropping Some Beats

The heart of the Atari 2600 wasn’t the 6502 (or the 6507 for the pedants), it was the TIA chip. This is the chip responsible for drawing graphics on the display, racing the beam, and extremely limited support for sound generation. We haven’t seen many attempts of using the Atari 2600 for chiptunes, but that doesn’t mean it can’t be done. [John Sutley]’s Syndrum, a take on an Atari 2600 drum machine is nearly a work of art. It’s a custom cartridge for the wood-paneled Atari, and an impressive input device that turns this classic console into a beat machine

Did the Atari 2600 ever come with a drum machine cartridge? Maybe. Probably not. [John] originally built this project to experiment with the TIA chip, but found it was less tonal than a kazoo. That struck ‘Atari synthesizer’ off the list and replaced it with an ‘Atari drum machine’. There are two key parts of the build here, the first being a repurposed Asteroids cartridge that had the PROM replaced with a ZIF socket. This allows [John] to easily burn new code to an EEPROM, stuff it in the socket, and run it on the Atari. All the code was developed with batari Basic, a BASIC-inspired language that spits out .bin files for the Atari.

But running code on the Atari is just one half of this build. To do a drum machine, you somehow need to tell the Atari when to play each sound. Given the lack of expansion capabilities for the Atari, [John] turned to the controller port. The Syndrum uses Arduino Nano to bridge the DE9 controller connector to a MIDI port. Yes, it’s real MIDI, on a machine that could probably never do MIDI natively (although we’d love to see someone try).

Need a video of this mind-blowing hack in action? Here you go:

Poetry is the Fruit of this Loom

We’d wager that most people reading these words have never used a loom before. Nor have most of you churned butter, or ridden in a horse-drawn wagon. Despite these things being state of the art technology at one point, today the average person is only dimly aware of their existence. In the developed world, life has moved on. We don’t make our own clothes or grow our own crops. We consume, but the where and how of production has become nebulous to us.

[David Heisserer] and his wife [Danielle Everine], believe this modern separation between consumption and production is a mistake. How can we appreciate where our clothing comes from, much less the people who make it, without understanding the domestic labor that was once required to produce even a simple garment? In an effort to educate the public on textile production in a fun and meaningful way, they’ve created a poetry printing loom called Meme Weaver.

The Meme Weaver will be cranking out words of woolen wisdom at the Northern Spark Festival taking place June 15th and 16th in downtown Minneapolis. If any Hackaday readers in the area get a chance to check out the machine, we’d love to hear about it in the comments. Take photos! Just don’t blame us if you have a sudden urge to make all of your clothing afterwards.

Equal parts Guitar Hero and Little House on the Prairie, the Meme Weaver merely instructs the user on how to weave the fabric, it doesn’t do it for them. Lights and sounds provided by an Arduino Mega and Adafruit FX board indicate which levers to pull, with the end goal being the creation of a two-inch wide strip of hand-woven fabric that contains a poem or quote. The act of weaving the fabric by hand combined with the personalized nature of the text is intended to create a meaningful link between the finished product and the labor used to create it.

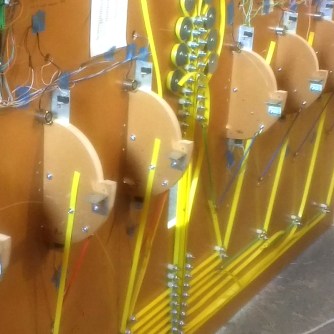
But how does it work? The operation of the machine seems mysterious to modern eyes, which arguably reinforces the point [David] and [Danielle] are trying to make in the first place. The levers on the front are moving heddles on the opposite side of the machine, which control the path the yarn takes through the loom.

By raising and lowering the white yarn, it’s possible to print text in what is essentially an ultra-low-resolution dot matrix. When the heddle levers are locked into place (thanks to electromagnets triggered by microswitches), the user then passes the shuttle through the loom, and finally pulls the lever that tightens up the completed line with what’s known as the beater. If that seems complex to your modern mind, imagine trying to explain an Arduino to somebody in the 1800’s.

If all this talk of weaving has caught your interest, you could always 3D print yourself a loom of your own. Then when you get tired of doing it by hand, you can upgrade to a Raspberry Pi powered version and start the whole cycle over again.

Reviving an Electron Microscope with Arduino

We don’t know about you, but when our friends ask us if we want to help them fix something, they’re usually talking about their computer, phone, or car. So far it’s never been about helping them rebuild an old electron microscope. But that’s exactly the request [Benjamin Blundell] got when a friend from a local hackerspace asked if he could take a look at a vintage Cambridge Stereoscan 200 they had found abandoned in a shed. Clearly we’re hanging out with the wrong group of people.

As you might imagine, the microscope was in desperate need of some love after spending time in considerably less than ideal conditions. While some of the hackerspace members started tackling the hardware side of the machine, [Benjamin] was tasked with finding a way to recover the contents of the scope’s ROM. While he’s still working on verification, the dumps he’s made so far of the various ROMs living inside the Stereoscan 200 have been promising and he believes he’s on the right track.

The microscope uses a mix of Texas Instruments 25L32 and 2516 chips, which [Benjamin] had to carefully pry out after making sure to document everything so he knew what went where. A few of the chips weren’t keen on being pulled from their home of 30-odd years, so there were a few broken pins, but on the whole the operation was a success.

Each chip was placed in a breadboard and wired up to an Arduino Mega, as it has enough digital pins to connect without needing a shift register. With the wiring fairly straightforward, [Benjamin] just needed to write up some code to read the contents of the chip, which he has graciously provided anyone else who might be working on a similar project. At this point he hasn’t found anything identifiable in his ROM dumps to prove that they’ve been made successfully, all he really knows right now is that he has something. At least it’s a start.

More and more of these older electron microscopes are getting a second lease on life thanks to dedicated hackers in their home labs. Makes you wonder if there’s ever going to be a piece of hardware the hacker community won’t bend to their will.