Posts with «lm386» label

State Of The Art Big Mouth Alexa Bass

Hackers seem intent on making sure the world doesn’t forget that, for a brief shining moment, everyone thought Big Mouth Billy Bass was a pretty neat idea. Every so often we see a project that takes this classic piece of home decor and manages to shoehorn in some new features or capabilities, and with the rise of voice controlled home automation products from the likes of Amazon and Google, they’ve found a new ingredient du jour when preparing stuffed bass.
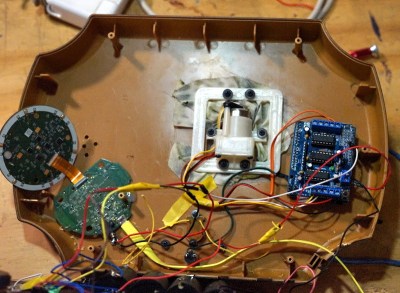
[Ben Eagan] has recently completed his entry into the Pantheon of animatronic fish projects, and while we’ll stop short of saying the world needed another Alexa-enabled fish on the wall, we’ve got to admit that he’s done a slick job of it. Rather than trying to convince Billy’s original electronics to play nice with others, he decided to just rip it all out and start from scratch. The end result is arguably one of the most capable Billy Bass updates we’ve come across, if you’re willing to consider flapping around on the wall an actual capability in the first place.

The build process is well detailed in the write-up, and [Ben] provides many pictures so the reader can easily follow along with the modification. The short version of the story is that he cuts out the original control board and wires the three motors up to an Arduino Motor Driver Shield, and when combined with the appropriate code, this gives him full control over Billy’s mouth and body movements. This saved him the trouble of figuring out how to interface with the original electronics, which is probably for the better since they looked rather crusty anyway.

From there, he just needed to give the fish something to get excited about. [Ben] decided to connect the 3.5 mm audio jack of an second generation Echo Dot to one of the analog pins of the Arduino, and wrote some code that can tell him if Amazon’s illuminated hockey puck is currently yammering on about something or not. He even added a LM386 audio amplifier module in there to help drive Billy’s original speaker, since that will now be the audio output of the Dot.

A decade ago we saw Billy reading out Tweets, and last year we presented a different take on adding an Alexa “brain” to everyone’s favorite battery powered fish. What will Billy be up to in 2029? We’re almost too scared to think about it.

Dead Simple Ultrasonic Data Communication

Some of the best hacks are the ones which seem perfectly obvious in hindsight; a solution to the problem that’s so elegant, you wonder how it never occurred to you before. Of course we also love the hacks that are so complex your eyes start to water, but it’s nice to have a balance. This one, sent in by [Eduardo Zola] is definitely in the former group.

In the video after the break, [Eduardo] demonstrates his extremely simple setup for using ultrasonic transducers for one-way data communication. Powered by a pair of Arduinos and using transducers salvaged from the extremely popular HC-SR04 module, there’s a good chance a lot of readers can recreate this one on their own bench with what they’ve got lying around. In this example he’s sending strings of text from one computer to another, but with a little imagination this can be used for all sorts of projects.

For the transmitter, the ultrasonic transducer is simply tied to one of the digital pins on the Arduino. The receiver is a bit more complex, requiring a LM386 amplifier and LM393 comparator to create a clean signal for the second Arduino to read.

But how does it work? Looking through the source code for the transmitter and receiver, we can see it’s about as basic as it gets. The transmitter Arduino breaks down a given string into individual characters, and then further converts the ASCII to eight binary bits. These bits are sent out as tones, and are picked up on the receiving end. Once the receiver has collected a decent chunk of tones, it works through them and turns the binary values back into ASCII characters which get dumped over serial. It’s slow, but it’s simple.

If you’re looking for something a bit more robust, check out this guide on using GNU Radio with ultrasonics.

Retro-fit old radio with Arduino and FM module

“You can’t put new wine in old bottles” – so the saying goes. But you would if you’re a hacker stuck with a radio built in 2005, which looked like it was put together using technology from 1975. [Marcus Jenkins] did just that, pulling out the innards from his old radio and converting it to an Arduino FM radio.

His cheap, mains powered radio was pretty bad at tuning. It had trouble locating stations, and tended to drift. One look at the insides, and it was obvious that it was not well engineered at all, so any attempts at fixing it would be pointless. Instead, he drew up a simple schematic that used an Arduino Nano, an FM radio module based on the TEA5767, and an audio amplifier based on the LM386.

A single button on the Arduino helps cycle through a range of preset frequencies stored in memory. The Arduino connects to the FM radio module over I2C. The existing antenna was connected to the TEA5767 module. The radio module outputs stereo audio, but [Marcus] was content with using just a mono channel, as it would be used in his workshop. The audio amplifier is pretty straightforward, based on a typical application found in the data sheet. He put it all together on proto-board, although soldering the FM radio module was a bit tricky. The Arduino code is quite simple, and available for download (zip file).

He retained the original tuning knob, which is no longer functional. The AM-FM selector knob was fitted with a micro-switch connected to the Arduino for selecting the preset stations. Almost everything inside was held together with what [Marcus] calls “hot-snot” glue. The whole exercise cost him a few Euros, and parts scavenged from his parts bin. A good radio could probably be had for a few Euros from a yard sale and much less effort, but that wouldn’t be as cool as this.

Go deeper and explore how FM signals are modulated and demodulated for playback.


Filed under: radio hacks