Posts with «bluetooth» label

Presenting the Internet of Trash Cans !

This was gonna happen – sooner or later. [matthewhallberg] built a “Smart” trash can that is connected to the Internet and can be controlled by its own Android App. We’re not sure if the world needs it, but he wanted one and so built it. He started it out on a serious note, but quickly realized the fun part of this build – check out his funny Infomercial style video after the break.
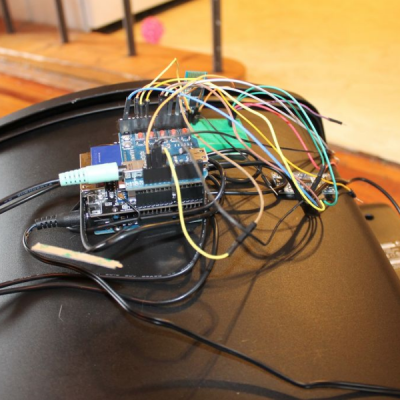
The build itself is uncomplicated and can be replicated with ease. A servo motor helps flip the lid open and close. This is triggered by an ultrasonic ping sensor, which responds when someone waves a hand in front of the trash can. A second ping sensor helps inform the user when it is full and needs to be emptied. A Leonardo with the Idunio Yun shield helps connect the trash can to the internet. An mp3 shield connected to a set of powered computer speakers adds voice capability to the trash can, allowing it to play back pre-recorded sound clips. Finally, a Bluetooth module lets him connect it to an Android phone and the companion app controls the trash can remotely.

For the IoT side of things, [matthewhallberg] uses a Temboo account to send an email to the user when the trash can is full. The Arduino sketch, a header file to configure the Temboo account, and the Android application can all be downloaded from his blog. If this project inspires you, try building this awesome Robotic trash can which catches anything that you throw near it  or read the barcodes off the trash being thrown out and update the grocery list.


Filed under: Arduino Hacks, home hacks, internet hacks

This Car Lets You Fistbump to Unlock

In the dark ages, you had to use a key to lock and unlock your car doors. Just about every car now has a remote control on the key that lets you unlock or lock with the push of a button. But many modern cars don’t even need that. They sense the key on your person and usually use a button to do the lock or unlock function. That button does nothing if the key isn’t nearby.

[Pierre Charlier] wanted that easy locking and unlocking, so he refitted his car with a Keyduino to allow entry with an NFC ring. What results is a very cool fistbump which convinces your car to unlock the door.

Keyduinio is [Pierre’s] NFC-enabled project, but you can also use a more conventional Arduino with an NFC and relay shield. The demo also works with a smartphone if you’re not one for wearing an NFC ring. Going this round, he even shows how to make it work with Bluetooth Low Energy (BLE).

In the video below, you can see how he removed the car’s internal lock switch and modified the wire harness to take the connection to the Arduino. He’s also included all the code. About the only tricky part is doing the actual wiring in your car and finding a suitable source of power. That varies from car to car, so it isn’t easy to give specific instructions.

Opening doors of one kind or another is a popular project theme. While [Pierre’s] project might open the door on a coupe, we’ve seen another project that works on a coop.


Filed under: Arduino Hacks, car hacks, wireless hacks

Watch a fin-propelled underwater robot prototype

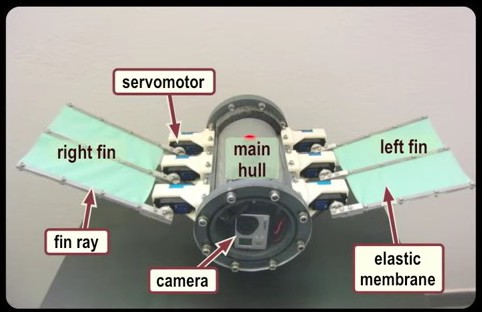
The robotic prototype swimming under water propelled by fins, it was developed at the Control Systems and Robotics Laboratory of the Technological Educational Institute of Crete, in Heraklion (Greece) and it’s controlled by an Arduino Mega:

Each fin is comprised of three individually actuated fin rays, which are interconnected by an elastic membrane. An on-board microcontroller generates the rays’ motion pattern that result in the fins’ undulations, through which propulsion is obtained. The prototype, which is fully untethered and energetically autonomous, also integrates an IMU/AHRS unit for navigation purposes, a wireless communication module, and an on-board video camera. The video contains footage from experiments conducted in a laboratory test tank to investigate closed loop motion control strategies, as well as footage from sea trials.

the Arduino runs a custom-developed real time firmware that implements two Central Pattern Generator (CPG) networks to generate the undulatory motion profile for the robot’s fins. The robot  contains a  7.4V lipo battery powering also a Bluetooth module for wireless communication and a video camera to record footage of the missions.


New Project: Build Your Own Android-Powered Self Driving R/C Car

Learn how a team of students created the first Google Android-based autonomous R/C car, able to detect lanes, avoid obstacles, self-park, and more.

Read more on MAKE

The post Build Your Own Android-Powered Self Driving R/C Car appeared first on Make: DIY Projects, How-Tos, Electronics, Crafts and Ideas for Makers.

First Look: Bean+ Microcontroller Adds Greater Range, Better Battery, and More

Today Punch Through Design launched a Kickstarter campaign for their new Bluetooth LE Arduino-compatible microcontroller board the Bean+.

Read more on MAKE

The post First Look: Bean+ Microcontroller Adds Greater Range, Better Battery, and More appeared first on Make: DIY Projects, How-Tos, Electronics, Crafts and Ideas for Makers.

Controlling a Robot with a Wearable Lego Exosuit

Using a combination of Lego bricks and other electronics, Danny built a robot that is controlled wirelessly by a wearable Lego "exosuit."

Read more on MAKE

The post Controlling a Robot with a Wearable Lego Exosuit appeared first on Make: DIY Projects, How-Tos, Electronics, Crafts and Ideas for Makers.

Self-Driving R/C Car Parks Itself Just Like a Lexus

Self-driving cars are in the news almost daily, but they are not exactly in my automotive budget for this decade. Today, that has changed. While this car might be smaller and not capable of giving me a ride, it’s still autonomous and, best of all, it is a project that I […]

Read more on MAKE

The post Self-Driving R/C Car Parks Itself Just Like a Lexus appeared first on Make: DIY Projects, How-Tos, Electronics, Crafts and Ideas for Makers.

LED Shirt Lights Up When You’re Bombarded by Bluetooth

As more and more of our technology becomes automatic, wireless, invisible, and connected, it simultaneously has a greater potential to slip from our immediate attention. Matt Martin, a Masters student at Auckland University of Technology in New Zealand, is most interested in how technology affects us. He designed “Wearable Beacon,” […]

Read more on MAKE

The post LED Shirt Lights Up When You’re Bombarded by Bluetooth appeared first on Make: DIY Projects, How-Tos, Electronics, Crafts and Ideas for Makers.

On Your Phone While Driving an Electric Skateboard

Skateboards are fun, but you have to do all that pesky kicking in order to get anywhere. That’s why [Nick] decided to build his own electric skateboard. Not only is the skateboard powered with an electric motor, but the whole thing can be controlled from a smart phone.

[Nick] started out with a long board deck that he had made years ago. After cleaning it up and re-finishing it, the board was ready for some wheels. [Nick] used a kit he found online that came with the trucks, wheels, and a belt. The trucks have a motor mount welded in place already. [Nick] used a Turnigy SK3 192KV electric motor to drive the wheels. He also used a Turnigy electronic speed controller to make sure he could vary the speed of the board while riding.

Next [Nick] needed some interface between a smart phone and the motor controller. He chose to use an Arduino Nano hooked up to a Bluetooth module. The Nano was able to directly drive the motor controller, and the Bluetooth module made it easy to sync up to a mobile phone. The Android app was written using MIT’s App Inventor software. It allows for basic control over the motor speed so you can cruise in style. Check out the video below for a slide show and some demonstration clips.

It’s a popular project, and eerily similar to the one we saw a couple months back.


Filed under: Arduino Hacks

Modding WiFiChron with GPS or Bluetooth

The latest revision of WiFiChron has an XBee socket (beside the ESP8266 8-pin socket), which allows the addition of a few individual features:
  1. GPS-based time synchronization, by using the GPSBee;
  2. displaying messages sent from a Bluetooth device, by using the BTBee/BLEBee;
  3. displaying data acquired from an XBee/ZigBee network of sensors (not implemented yet);


Things did not go smoothly, without some drama though. Naively (I always seem to forget that there is a difference between theory and practice), I designed the XBee/ESP to connect to the serial port, with the expectation that once the development (including testing with debug statements to the serial monitor) is done, I will just plug in the serial module (either XBee of ESP8266) and things will work properly. Well, I had to re-consider this approach once again. Luckily, I had two pins left available (D7 and D17), which I could use for software serial. I re-wired those to the XBee/ESP and used the hardware serial for console communication. Until the next board revision, anyone wanting to follow will need to re-route a couple of traces manually, as shown in the photos below (cuts are red-circled).


A few details on my implementation of the GPS time sync (so that one doesn't need to look at the code to figure it out):
  • user can set a timezone (stored in eeprom, default is -1); there is no (easy) way to determine if the timezone was set or not, since -1 (eeprom byte being 255) is a valid value;
  • estimate the timezone from the longitude, assuming that a every 15 degrees is an hour difference;
  • a difference between GPS estimated timezone and the user-set timezone of more than 2 hours would mean that the time is way off and the user did not set the timezone; in this case, blink the display; a difference of 2 hours or less would be acceptable (for many reasons, including summer-time, or variations from the "15-degrees-longitude-per-hour" approximation);
  • in any case, the minutes and seconds are set from the GPS data;
  • date and day are not set/synchronized at all (currently);
  • the GPS sync is scheduled to happen every 10 hours (and also after a reset);
  • a successful sync is indicated by an up arrow at the end of the scrolling date (e.g. March 29, 2015 ^).
I will publish the code as soon as I have a chance to polish it (and also test it with BTBee).

Wise time with Arduino 29 Mar 18:44
bluetooth  hdsp  xbee