Ask MAKE: Physical Computing Taxonomy
 I hear a lot words -- embedded system, microcontroller, system on a chip, computer on a chip -- used somewhat interchangeably. What are the differences, if any? And where do Arduino and Raspberry Pi fit?

 I hear a lot words -- embedded system, microcontroller, system on a chip, computer on a chip -- used somewhat interchangeably. What are the differences, if any? And where do Arduino and Raspberry Pi fit?
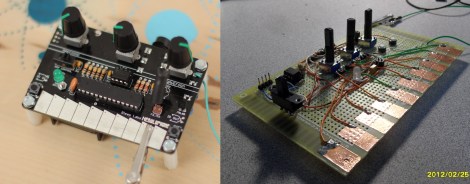
It’s about right time to release one more “remix” for one of my blog, published almost a year ago. I haven’t got much comments, not many as I was expecting, on a topic. There are some reasons, that would explain this phenomenon, but I would better to start outlining what I did in new release, and some of you who tried old version would be impressed by progress I’ve made!
Basic structure was left almost intact. Essential parts of the project: Filtering 2D and Cross-Correlation are the same, so please read my old post, if you come across this one w/o seen it first. What differs is “preprocessing”, before we get to the filtering stage. In first, I ported a code on Leonardo board. The easiness of connecting electret mic to Leonardo, just didn’t give me a choice! I played already with Leonardo ADC – electret mic’s in my previous post, and would assure you, that this guys were designed to work as a team. Uno followers have to solder a pre-amplifier, not big deal, the same time not really interesting. Code would run on Uno, except Timer and ADC settings, which you could always “copy/paste” from the old version. Feel free, be my guest.
Analog front-end is absolutely the same as I used in Sound Localization project. You would need only one mic here, just reduce the number of electrical components down.
Sampling subroutine based on Timer 4, and arduino Leonardo internal PGA set to gain x40. There are a comments in the code, so you could adjust gain up or down depends on the sensitivity of mic you have.
Windowing LUT is slightly modified Hamming/Hann cosine function, I’d say my table is an “intermediate” version of both mention inventors.
FFT is my best achievements of this year, RADIX-4. Compare to old code, about 3x faster. This is why I was able to increase FFT_SIZE up to 128, still having plenty of time. Magnitude calculation is based on approximation, very fast, because no square root extraction required. Accuracy, in the worst case scenario ~95%, which is more than enough in this project.
I changed Non-Linear compression algorithm, as now there are more Bins – 64 to pack in 16 Bands. Math is simple, and hope doesn’t need an extensive comments. Packing is necessary due memory limits, 1 sec password in current configuration (16 bands with sampling rate 4 kHz) occupied 1 kByte, full size of EEPROM on Leonardo or Uno boards.
Command Line Interface is preserved. Here is the instructions, how to set everything up and running.
And here how spectrogram looks like in LibreOffice, test phrase “Front right”, (OS Linux Ubuntu, 12.04):


Instructions.
Get your microphone wired / connected? All checked at least a couple times with multimeter, voltages looks o’k? Good, now you are ready to start! ( Don’t forget to upload a sketch to your arduino / Leonardo -);
1. X. First of all, open serial monitor window, and check boadrate.
Should be 115200. Next, type “x” and Enter. Get some response? Does
it look like a table? Excellent, data you are looking at is “raw”
sampling data. Probably, just noise, acoustical or electrical.

2. F. Second test, type “f” - Enter. Again, arduino would print out
a table. This time data represent “processed” by FFT analog signal.
Each bin corresponds to frequency range 32 Hz. If you have a signal
generator , it's right time to do a detailed check up microphone,
wiring, and software. If don't have, you can use your computer's
sound card and some program, there are plenty of them available
on-line free of charge. Connect generator to PC USB speackers, and
run a single tone, anything in audible range 16 – 2000 Hz. Check
again using “f” command, if arduino registers a signal, and it's in
right bin. Due “windowing” function, even pure single tone would
show up at least in 2-3 neighboring bins. Amplitude depends on
sensitivity of the mic, and volume of the sound. Sending “x” you can
confirm, that there is no “clipping” too many “– 511” or “+511”.

3. S. Next, if all goes well till this step, you probably already
notice, that whenever a mic picking-up a sound – yellow on-board LED
lights up. Now, it's better shutdown your TV, iPad, radio.
Make your environment as quite as possible. Try to say something
with your own voice, and see if led lighting up when you start
talking, and than after ~1 sec it goes off. Repeat a few times,
adjusting a volume and / or distance to the mic, so led goes “on/off”
reliable. Send “s” command when led is off. Don't worry, it should
be no report on screen, till you say a word. Procedure is simple,
send “s” - say something. After you talk, and get a printing, look
carefully. Your objective, is get a “spectrogram” which consist of
a few spots / blobs of digits, randomly distributed all over the
“surface”. Repeat a few times with one word, than try another one
and so on. With short words, very likely reporting data would be
concentrated at the top ( you may need to scroll up to see the
beginning), if this is a case, better to choose longer words or talk
in slower tempo. Just remember, there are three dimension, time,
frequency and volume. You can use a signal generator here again,
spectrogram should looks like a vertical line, may be 2 - 3 parallel
lines on low frequencies test tones.
 Changing a frequency, you can even get some curves. What is
important, the must be no negative numbers. If you see them –
"overloading" happens, Decrease a volume. Dynamic range is limited
by 127, more close you can get to this value w/o negatives,
the better. And last dimension is a frequency. For man, it would
be a little bit hard to “detach” a spectrogram from the left border.
It's true for everyone, who is not opera singer, me no exceptions....

4. R and G. After you practice enough, and received Manny nice
looking spectrograms, it's time to check with arduino, if it's
agree with you / thinks similar. Send “r” - recording, and say
a word you've get your best spectrum with. Wait a few seconds,
writing to EEPROM takes time. Now send a “g” and say the same word.
In the same manner, tonality and volume. See on the outputs, what
is the cross-correlation factor you received. More than 50% - very
good for beginning. Less – try again a few more times sending “g” and
repeating same word, maybe slightly varying pronunciation. Try to
reach best recognition, “crack” your own password code!
( note: Negatives number on “G” reports-form must be present.)
If no luck try another password code. Now you know the drill:
S – repeat, repeat, repeat....., R, G – repeat, repeat, repeat.....
(joke). Can't get good match? Try your computer's test sounds,
beeps, horns, clicks, barks – whatever your OS has. It doesn't have
to be shorter than 1 sec, but only 1 second in the beginning
would be stored / compared. My computer is able to repeat the same
sound track (speakers test - "front right") with enormously high
cross-factor 99 % ! I'm not a computer, my best short 86 % so far...

5. P. This command is simply reading the content of the EEPROM,
so you always can verify, what you stored last time.
Editing / formatting this data you can store a table in the arduino
FLASH memory using PROGMEM. About 10 – 15 commands. Of course,
storing data in external SD card or EEPROM, could greatly increase
the “vocabulary”, the same time design of fast cross-correlation
algorithm with multiple “pattern”s would be another brain teasing
puzzle -);.
Have fun!
Link to arduino sketch, VOR (VOice Recognition).


We all know the Arduino as a versatile electronics prototyping tool, but it is often lacking in applications that require higher amperage. In response to this, a team of designers and programmers created Heatit, an open-source board in its final stages of design based on Arduino that also has the capability to deliver eight outputs at 12v and 500mA each. Output pins can also be combined for even higher amperages.

This means that with Heatit you can control materials and devices such as thermochromic ink and paint, conductive thread, muscle wire, laser diodes, and solenoids. It also has standard 5V I/Os enabling it to use a variety of sensors, switches, etc. The slim design and use of through-holes also make it ideal for wearable applications.


Judging from the video (found after the break) the Nebulophone is one of the best sounding DIY synthesizers we’ve seen. Especially when you consider the simplicity of the hardware design. It uses an AVR chip and an OpAmp. The rest of the parts are just a few handfuls of inexpensive components.
The device was developed by Bleep Labs, and they sell the synthesizer kit seen on the left. But since it’s an open source project you can follow their design to fabricate your own, which is what [BlinkyBlinky] did with his offering seen to the right.
An ATmega328 drives the device, which is the chip often used in the Arduino Duemilanove. The keyboard is a set of traces hooked to the microcontroller. These are tinned pads on the kit PCB, but the DIY version simply uses some adhesive copper foil with a jumper wire soldered to it. The keys are played with a probe that makes the electrical connection, a common practice on these stylophone type designs. Chances are you have everything on hand to make this happen so keep it in mind for that next cold winter weekend that’s making everyone a bit stir crazy.

[Thanks Wybren]


I`m using a pair of thumbstick for a RC controller, this joystick have 4 pin, searching on internet I found that they are not pots they are hall effect sensor


any advice or suggestion to connect it to my arduino?

If a seemingly infinitely programmable mini computer like the Raspberry Pi is just too... limiting, we've got good news: the Gertboard extender has started shipping. The $48 companion board reaching customers' doorsteps converts analog to digital and back for Raspberry Pi fans developing home automation, robotics and just about anything else that needs a translation between the computing world and less intelligent objects. The one catch, as you'd sometimes expect from a homebrew project, is the need for some assembly -- you'll have to solder together Gert van Loo's Arduino-controlled invention on your own. We imagine the DIY crowd won't mind, though, as long as they can find the fast-selling Gertboard in the first place.
[Image credit: Stuart Green, Flickr]
Filed under: Misc
Gertboard extender for Raspberry Pi ships to advanced tinkerers originally appeared on Engadget on Wed, 17 Oct 2012 03:58:00 EST. Please see our terms for use of feeds.
Permalink | Email this | Commentshi folks, I am trying to build an autonomous car by attaching my arduino uno r3 to my rc car. Please pardon me if there are certain stuff I don't understand as my electronics knowledge has long vaporised since my education days and im starting from zero again.
In particular, i'm using this guide http://www.instructables.com/id/Autonomous-Control-of-RC-Car-Using-Arduino/?ALLSTEPS as my RC car is also using a RX-2B chip.

Sure, Red Bull may have gotten a lot of attention by sponsoring Felix Baumgartner's space dive, but it's not the only beverage-maker that has made some great accomplishments possible. The Prague-based brewery Staropramen was a sponsor at the recent Webstock 2012 conference, where the folks from Robofun Create showed off this so-called Beer Keyboard built with the brewer's backing. As you can see, it's more beer than keyboard, with 40 cans of Staropramen serving as "keys" that just need to be gently pressed to input a letter. To make that actually work, Robofun paired an Arduino board with some capacitive controllers for the base, and connected that to a Raspberry Pi that linked the keyboard to the TV. Unconfirmed reports suggest that the keyboard has since gone missing. Head on past the break for a video.
Continue reading Beer Keyboard combines Arduino and Raspberry Pi... and beer
Filed under: Peripherals
Beer Keyboard combines Arduino and Raspberry Pi... and beer originally appeared on Engadget on Tue, 16 Oct 2012 20:36:00 EST. Please see our terms for use of feeds.
Permalink | Email this | CommentsI was invited to speak at Tijuana Innovadora, a regional conference/expo. Mark Hatch of TechShop, Jason Short, an industrial designer by day and Drone programmer by night, as well as David Cuartielles of the Arduino team came as well to speak on an open source hardware panel. I must say that crossing the border into Mexico on foot the night before was an unexpected highlight of the trip. (The line leading in the opposite direction was unimaginably long.)

Our host for the event was Guillermo Montoya of Udrones.com, a Mexican company that is owned by 3D Robotics, which is run by Jordi Munoz and Chris Anderson. 3D Robotics is the business side of DIY Drones and sells the arduPilot controller along with planes and quad copters. It has a design and engineering center in San Diego and now does most of its manufacturing is in Tijuana, with plans to move all of it there eventually.
In the evening, after a tasty dinner at a Tijuana cervicheria, we visited the small manufacturing facility of Udrones on the outskirts Guillermo said they had been in the new facility for six months, after starting in his apartment. An electrical engineer, Guillermo is a childhood friend of Jordi Munoz, who is also from Tijuana and talked his friend into starting up this facility. They manufacture ArduPilot boards, cut body parts out on two CNC machines, and then assemble and test the quadcopters and ship them internationally.

The team of Udrones.com (from left to right, above) is Jesus Cain, Manuel Arriaga, Jose Guillermo Romero, Oscar Nunez, and Raul Montoya. Not shown is Lissana Lozano, who helped us find our way around the conference and the city. Raul and Jesus are also students at the university. They said it takes them about a half-hour to assemble a quadcopter.


Jason Short checks out a special black ArduPilot board.

One of the questions that Guillermo asked me was why there weren’t more signs of the maker movement in Spanish-speaking countries, particularly in Central and South America. He noted that there had not been a mini Maker Faire in those regions. There aren’t many hacker spaces either, although at World Maker Faire in NYC I met Tiburcio de la Carcova who had opened a makerspace in Santiago, Chile. I don’t have a good answer for Guillermo. David Cuartielles, who is Spanish, thought that the delays in translating technical information into Spanish is largely responsible. (MAKE is not published in a Spanish edition.) I would like to think that the example of Guillermo and his team might inspire others to see what’s possible.


