Posts with «arduino» label

DIY Oculus Rift Tutorial

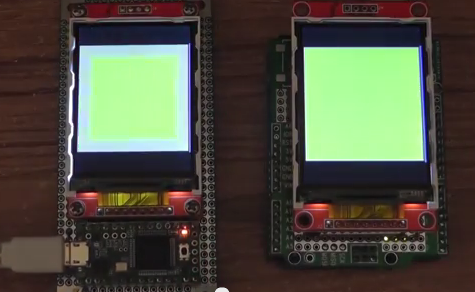
There are lots of reasons that someone might want a head-mounted display. Camera operators and radio-controlled vehicle enthusiasts typically like these because they keep the sun off of their screen while working outdoors. Aside from those practical purposes, strapping a high-definition display to your head is just cool. Add some motion […]

Read more on MAKE

Spicing Up the Night with a Little Arduino Code

“Less pants, more science” is the tagline for this company called Orgasmatronics that put up a tutorial showing how to hack a vibrator. No engineering experience required for this. All that’s needed is a sex toy, an Arduino Uno, a battery pack, and some handheld cutters to sleekly strip down the wires. A little tweaking and screwdriving later and just about any vibrator can be hacked and programmed. This gives the option to surprise a lover with some custom code as alternating and gyrating vibrations can be sent through the motor terminals switching up the standard LED flasher script into something more sexy. Sounds very kinky, while at the same time, very geeky to us. Experimenting between the sheets is guaranteed.

Check out the video after the break for a full tutorial. In it, a porn star transitions into a programmer in a quick few minutes. The video is hackerspace safe, but definitely not work safe. So you might want to wait until you get home, depending on where you are:


Filed under: handhelds hacks

TFT LCDs Hit Warp Speed with Teensy 3.1

[Paul Stoffregen], known as father of the Teensy, has leveraged the Teensy 3.1’s hardware to obtain some serious speed gains with SPI driven TFT LCDs. Low cost serial TFT LCDs have become commonplace these days. Many of us have used Adafruit’s TFT LCD library  to drive these displays on an Arduino. The Adafruit library gives us a simple API to work with these LCDs, and saves us from having to learn the intricacies of various driver chips.

[Paul] has turbocharged the library by using hardware available on Teensy 3.1’s 32 Freescale Kinetis K20 microcontroller. The first bump is raw speed. The Arduino’s ATmega328 can drive the SPI bus at 8MHz, while the Teensy’s Kinetis can ramp things up to 24MHz.

Speed isn’t everything though. [Paul] also used the Freescale’s 4 level FIFO to buffer transfers. By using a “Write first, then block until the FIFO isn’t full” algorithm, [Paul] ensured that new data always gets to the LCD as fast as possible.

Another huge bump was SPI chip select. The Kinetis can drive up to 5 SPI chip select pins from hardware. The ATmega328 doesn’t support chip selects. so they must be implemented with GPIO pins, which takes even more time.

The final result is rather impressive. Click past the break to see the ATmega based Arduno race against the Kinetis K20 powered Teensy 3.1.

Paul’s library is open source and available on Github.


Filed under: Microcontrollers
Hack a Day 18 Aug 18:00
arduino  lcd  microcontrollers  paul  pjrc  spi  teensy  teensy 3.1  tft  

Play the DIY arpeggiator with infrared detectors and Arduino Mega

After spending some time on Arduino Forum and finding the right solutions for his project’s sketch, Connor Hubeny shared with us the infraHarp: an Arduino-powered eight-tone arpeggiator made with infrared emitters and detectors, Sparkfun’s Musical Instrument Shield, and an Arduino Mega 2560:

The InfraHarp was my first Arduino project. At first the project seemed daunting since I had no previous experience in programming and electrical engineering. Yet after spending some time with the Arduino I realized that electronics work very much the same, and by learning a few core components you are really right on the doorstep of exploring any technology you have the faintest interest in.

The InfraHarp can play in the keys of A, B, C, D, E, F, G in major, minor melodic and harmonic scales, with two octave choices. Listen to it in the video below:


The project requires basic soldering skills and Connor shared all the info and the sketch on this page.

How To: Play Music Using Floppy Drives

We’ve seen these videos pop up all over the internet over the past few years. We’ve even shared a few on Make’s blog. The most prolific poster of these videos showing floppy drives playing music is youtube user MrSolidSnake745. He’s got this down to an exact process and seems to […]

Read more on MAKE

MAKE » Arduino 18 Aug 17:01

The Hackaday Antiduino Browser Plugin

Hackaday – and the projects featured on Hackaday – get a lot of flak in the comments section simply for mentioning an Arduino. The Arduino complainers are, of course, completely wrong; everyone here is trying to make something, not make something in the most obscure possible way.

The Arduino is a legitimate tool, but still there are those among us who despise anything ending in ~duino. This browser plugin is for them. It’s a Chrome extension that selectively replaces or removes Arduino content from Hackaday depending on the user’s preference.

There are three settings to the plugin: See No Evil replaces images of Arduinos with serious business. Hear No Evil removes all occurrences of the word ‘Arduino’ and replaces them with something of your choosing. Speak No Evil removes all posts in the Arduino Hacks category.The last option also removes the ability to comment on any post in the Arduino Hacks category, so obviously the quality of the comments here will drastically increase by tomorrow.

You can grab the plugin on the gits. It’s Chrome only, but if someone wants to port it to Firefox, we’ll gladly put up another post.

There you go, Internet. You’re free now, and the biggest problem in your life has now been solved. Go give [SickSad] a virtual pat on the back, or tell him he could have done the same thing with a 555. Either of those are pretty much the same thing at this point.


Filed under: internet hacks

Voice Controlled RGB LED Lamp

[Saurabh] wanted a quick project to demonstrate how easy it can be to build devices that are voice controlled. His latest Instructable does just that using an Arduino and Visual Basic .Net.

[Saurabh] decided to build a voice controlled lamp. He knew he wanted it to change colors as well as be energy-efficient. It also had to be easy to control. The obvious choice was to use an RGB LED. The LED on its own wouldn’t be very interesting. He needed something to diffuse the light, like a lampshade. [Saurabh] decided to start with an empty glass jar. He filled the jar with gel wax, which provides a nice surface to diffuse the light.

The RGB LED was mounted underneath the jar’s screw-on cover. [Saurabh] soldered a 220 ohm current limiting resistor to each of the three anodes of the LED. A hole was drilled in the cap so he’d have a place to run the wires. The LED was then hooked up to an Arduino Leonardo.

The Arduino sketch has several built-in functions to set all of the colors, and also fade. [Saurabh] then wrote a control interface using Visual Basic .Net. The interface allows you to directly manipulate the lamp, but it also has built-in voice recognition functionality. This allows [Saurabh] to use his voice to change the color of the lamp, turn it off, or initiate a fading routing. You can watch a video demonstration of the voice controls below.


Filed under: Arduino Hacks, led hacks

LEGO and Arduino meet Han Solo

This full-size replica blaster from Star Wars, most iconically used by Han Solo and Princess Leia, has everything. Flashing LEDs, blaster noises, LEGO, and yes, even an Arduino. Not bad for [Baron von Brunk]‘s first project to use an Arduino!

The blaster was based on electronics and LEGO that were lying around and was intended for use for Star Wars Day 2014. (May the Fourth be with you.) “Lying around” in this sense might be a bit of an understatement for [Baron von Brunk], as the design of the blaster required the use of the LEGO Digital Designer and 400 blocks, some of which are quite rare.

The electronics for the project are tied to a moving trigger mechanism (also made from LEGO). The trigger mechanism hits a momentary pushbutton which tells the Arduino to activate the LEDs and a separate 555 timer and sound recording/playback device which handles the classic blaster sounds. The whole thing is powered by a 9V battery and housed in the front of the blaster, and all of the code (and the LEGO schematics) are available on the project’s site.

This is quite an impressive replica, and the craftsmanship that went into the build shows, especially in the LEGO parts. We think Han Solo would indeed be proud! If you’re ready to go even further with Star Wars and LEGO, you might want to check out this barrel organ that plays the Star Wars theme.


Filed under: toy hacks
Hack a Day 17 Aug 09:00

3D Printed Bracelet Illuminates On The Beat

Maker Michael Barretta created an LED bracelet that is responsive to sound by combining the technology of light organs and Adafruit’s GEMMA microcontroller. The result is groovy.

Read more on MAKE

MAKE » Arduino 15 Aug 23:01

The Amazing EMF Conference Badge

Conference badges can be boring, some can be cool and make nice souvenirs, then there are those that might actually be a reason to go to a conference or event in itself. The TiLDA MKe badge from the upcoming EMF 2014 event looks like it will be one of the […]

Read more on MAKE

MAKE » Arduino 15 Aug 19:01