Posts with «arduino» label
Creative Technologies in the Classroom goes to Ecuador

We are happy to announce that Creative Technologies in the Classroom has been successfully implemented in Ecuador since the fall of 2014 in 40 different places along the country, to more than 600 participants and thanks to the Telefonica Foundation Ecuador.
Creative Technologies in the Classroom (CTC) is a collection of experiments aimed at transforming the way technology is taught in schools around the world for participants going from 10 to 18 years old. These experiments introduce basic concepts in programming, electronics, and mechanics and consists of four phases:
- Teacher Training (1 week)
- Themed Modules (4 modules)
- Student Projects (9 weeks)
- Technology Fair
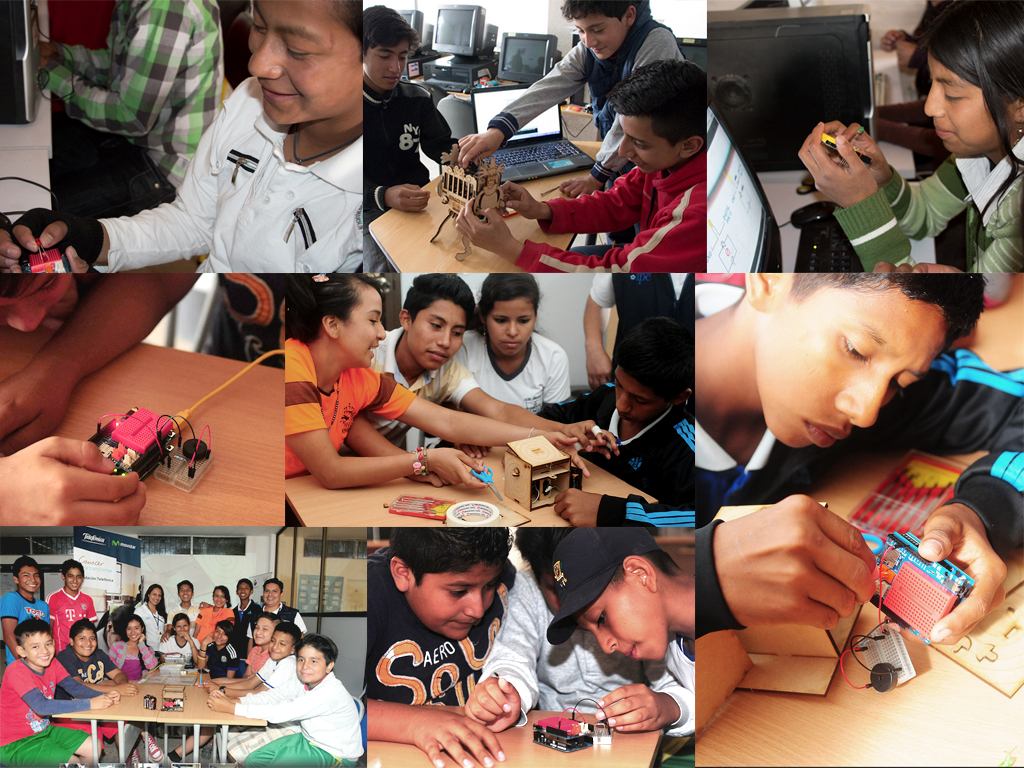
CTC Ecuador has also been implemented within the Pro Niño Project that helps employed children to attend to educational activities and learn about technology. This aims to open an opportunity for them to study at the technical universities in the area (many of them also support the project). The teachers for CTC/Pro Niño are social workers instead of regular school teachers. Here are some pictures of the program in El Oro and the South of Quito.
Some CTC Ecuador projects were also presented at an exhibition in Cuenca about society, art and technology hosted by Telefonica Movistar Ecuador.
(The news was originally posted on Arduino Verkstad blog)
Advanced Not-Reading Technology
Yesterday, there was a Hackaday post for a Kickstarter campaign. Because we force everyone to read every Hackaday post, there were some complaints and suggestions that we flag posts about Kickstarter campaigns. The most obvious solution to this problem of forcing people to read what they don’t want to read would be a UserScript or browser extension that automatically removes posts with objectionable tags.
It took 12 hours for [Daniel Ward] to lift you up to salvation, ending the inexorable toil you have all suffered under the thumb of idiotic and incompetent Hackaday editors.
[Daniel] wrote a UserScript for GreaseMonkey or TamperMonkey that looks at the tags for each and every Hackaday post. If a tag matches, “crowd-funding”, “crowdfunding”, or “kickstarter”, the post is removed from your browser.
It’s an astonishing advancement in state of the art, “not reading what you don’t want to read” technology. Bards and troubadours will sing of this day for years. Philosophers and theologians are citing this as evidence of something they’re calling, ‘free will.’ We don’t know who [Will] is, but at least he’s free now.
If that’s not enough, [RoGeorge] came up with an astonishing twist on this life-changing technology. By adding, ‘Arduino’ to the blacklisted tags, all posts tagged ‘Arduino’ are also removed. This can, of course, be extended to any tag. Imagine; a world where you don’t have to read what you don’t want to read. A futuristic utopia. Astounding.
Filed under: Crowd Funding
High Speed SSD1306 Library
[Lewin] wrote in to tell us about a high speed library for Arduino Due that he helped develop which allows interfacing OLED displays that use the SSD1306 display controller, using DMA routines for faster display refresh time.
Typically, displays such as the Monochrome 1.3″ 128×64 OLED graphic display , are interfaced with an Arduino board via the SPI or I2C bus. The Adafruit_SSD1306 library written by [Limor Fried] makes it simple to use these displays with a variety of Arduinos, using either software or hardware SPI. With standard settings using hardware SPI, calls to display() take about 2ms on the Due.
[Lewin] wanted to make it faster, and the SAM3X8E on the Due seemed like it could deliver. He first did a search to find out if this was already done, but came up blank. He did find [Marek Buriak]’s library for ILI9341-based TFT screens. [Marek] used code from [William Greiman], who developed SD card libraries for the Arduino. [William] had taken advantage of the SAM3X8E’s DMA capabilities to enable faster SD card transfers, and [Marek] then adapted this code to allow faster writes to ILI9341-based screens. All [Lewin] had to do was to find the code that sent a buffer out over SPI using DMA in Marek’s code, and adapt that to the Adafruit library for the SSD1306.
There is a caveat though: using this library will likely cause trouble if you are also using SPI to interface to other hardware, since the regular SPI.h library will no longer work in tandem with [Lewin]’s library. He offers some tips on how to overcome these issues, and would welcome any feedback or testing to help improve the code. The speed improvement is substantial. Up to 4 times quicker using standard SPI clock, or 8 times if you increase SPI clock speed. The code is available on his Github repo.
Filed under: Arduino Hacks
Making Space Accessible to Students with U of M Satellite

The U of M Satellite project started in 2010 as a student group at the University of Manitoba with the goal of building a nano satellite (10 x 10 x 34 cm) and make space accessible to the public. We got in touch with Ahmed Byagowi, co-founder of the project, who teaches robotics in the same university. Ahmed told us that U of M Satellite became soon very popular, in fact more than 300 students joined the group. In the first iteration the satellite’s goal was studying a micro animal (about 1 mm) called tardigrades and see its behaviour in space. The second iteration started in 2012, the same year of the launch of the Arduino Due and that’s why they designed everything based on it.
We had a nice talk with Ahmed and asked a bit more about the project.
Why is space so important for research, and why it would be cool if more people could have access to it?
Space research is important because it challenges us to solve problems and find solutions which can translate to everyday life here on Earth. The products of space research and space technology are all around us today. From the ballpoint pen, all the way to GPS, special composite materials, special surgical equipment and satellite communication.
For a while, only government and military had access to space. However, over the past decade there has been a rapid increase in commercial and public access to space. Private companies can take risks that the government and military can not, which leads to even bolder and newer technologies being developed.
For the general public, there are many creative and dynamic thinkers in the world who may not be able to share their ideas through a government agency or company. Public access to space allows more people to innovate on their own terms, and with 7 billion people on this planet, surely there are a great deal of innovation to be found.
With more people involved in researching space technologies, even more ideas can reach fruition, which can hopefully lead to technologies that will benefit life here on Earth even more.
There are other open source projects going to space (i.e. Ardusat), how’s U of M Student Satellite different or similar to others?
Ardusat is using Arduino as its payload (in fact, 16 of them) to run certain experiments in space and its main controller system is based on other processors and software. On the other hand, UMSATS’ satellite is going to be based on the Arduino Due architecture (the main controller) aided by the Arduino Zero and Arduino Uno’s design for payload and other controllers such as attitude determination and control system (ADCS) and power management as well as onboard image processing.
In which way open source is making exploration of space possible?
Open source makes things more accessible and helps a community work together to solve problems. If more open source platforms become available that can aid in space exploration, people can focus their efforts more on the next big problem using tools already developed, instead of resolving the same problems over and over again (reinventing the wheel). Plus, learning from watching other people’s work is a great way to learn things and apparently for some people like me or Massimo, this is best way to learn programming (based on Massimo’s TED talk).
Could you give us a bit more details on how you are using Arduino DUE ?
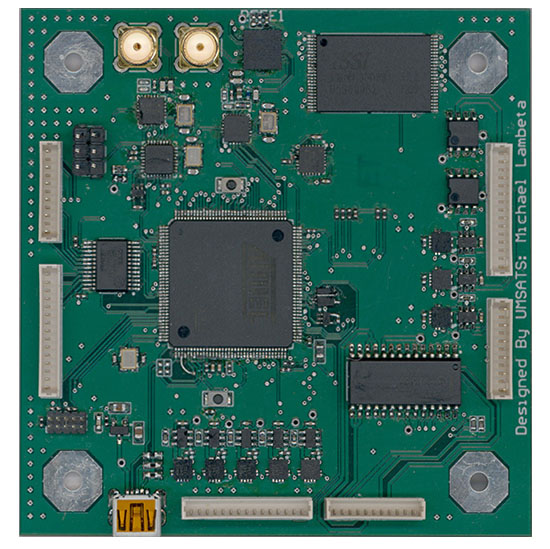
Our main Command and Data Handling (CDH) controller is based on the SAM3X8E and we are using Arduino Due’s bootloader and IDE for the software development. We added some more software layers as well as a scheduler and we aim to open source the entire software and hardware as soon as possible. In the picture of our motherboard below, you can clearly see the SAM3X8E and on the top right, there is a SMD version of the ATMEGA328P running and Arduino Uno core and acts as the beacon transmitter. This board encompasses the CDH, ADCS, Power and Communication of 2 meter and 70 cm bands (144.390MHz and 435MHz ham radio bands).
A famous quote of Massimo’s Banzi says: “You don’t need anyone’s permission to make something great” and in your TED talk you start saying “You can make big things using small tools”, what’s the relations between the two?
There is no formula for greatness. We live in a time where anything is truly possible, and the way to achieve your goals is numerous. Nobody said we couldn’t do something big with our small satellite, and we didn’t ask if we could either. Instead, we try to do big things with small tools that are accessible to us.
Arduino IDE 1.6.3 released and available for download
A new version of the Arduino IDE (1.6.3) is available at the download page!
The Arduino IDE 1.6.3 is a bug fix release: after having released 1.6.2 with new libraries and cores managers, we received lots of useful feedback and fixed a handful of bugs.
In particular:
- Fixed some impolite crashes on some Linux distributions
- Bundled AVR core files are back into hardware folder
- Fixed “https” links not working on Windows and Mac
- Added new Arduino Language color highlight
- Introduced a way to help old cores to work with newer IDEs without having to upgrade their code
- Advise of duplicate libraries after compiling. Thanks @PaulStoffregen
As usual, the complete list of fixes and credits is available here.
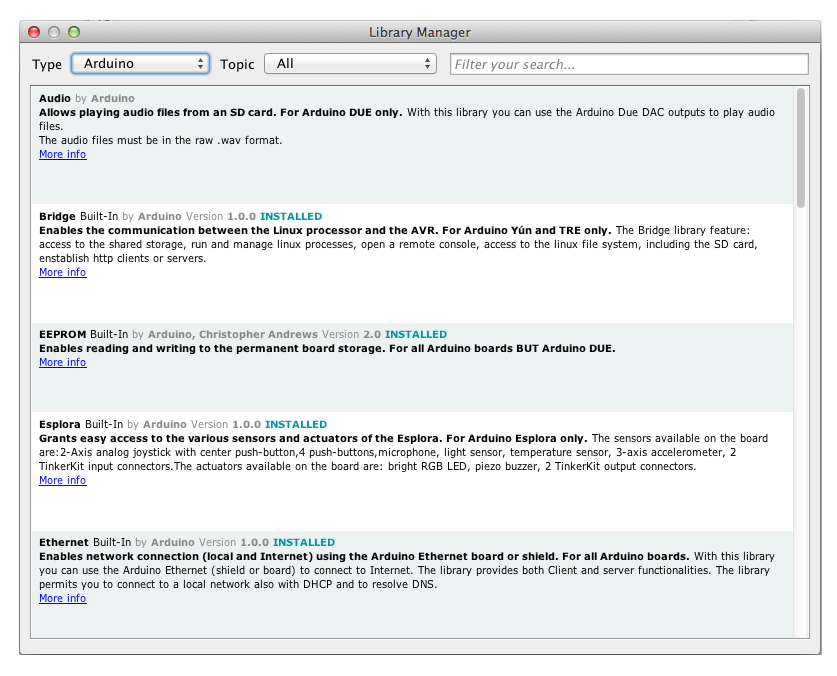
Don’t forget to check out the Library Manager: at the time of writing, 144 libraries are listed, thanks to the contributions of Paul Stoffregen and Adafruit.
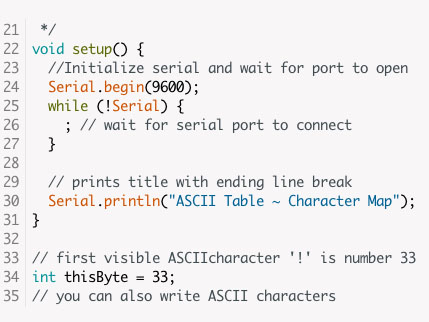
Just a quick note on the Arduino Language color coding, we assigned different colors to the three Language categories listed in the Arduino Reference. Structure keywords are green, variables are teal, while functions stays orange. We did a lot of user testing on these new color highlights, and it is helpful for beginners to have a bit more of a visual cue when starting to write code.
Don’t forget to report any issue you find, either on Github or on the Arduino forum: your help is very much appreciated. It doesn’t matter if you are not a tech specialist: every feedback adds value.
Happy hacking!
Temperature, Altitude, Pressure Display
During a recent trip to Bhutan, [electronut] wished for a device that would show the temperature and altitude at the various places he visited in the Kingdom. Back home after his trip, he built this simple Temperature, Altitude and Pressure Display Device using a few off the shelf parts.
Following a brief search, he zeroed in on the BMP 180 sensor which can measure temperature and pressure, and which is available in a break-out board format from many sources. He calculates altitude based on pressure. The main parts are an Arduino Pro Mini clone, a BMP180 sensor and a Nokia 5110 LCD module. A standard 9V battery supplies juice to the device. A push button interface allows him to read the current parameters when pressed, thus conserving battery life.
Standard libraries allow him to interface the LCD and sensor easily to the Arduino. He wrapped it all up by enclosing the hardware in a custom laser cut acrylic box. The result is bigger than he would like it to be, so maybe the next iteration would use a custom PCB and a LiPo battery to shrink it in size. While at it, we think it would be nice to add a RTC and some sort of logging capability to the device so it can store data for future analysis. The schematic, code and enclosure drawing are available via his Github repository.
Filed under: Arduino Hacks
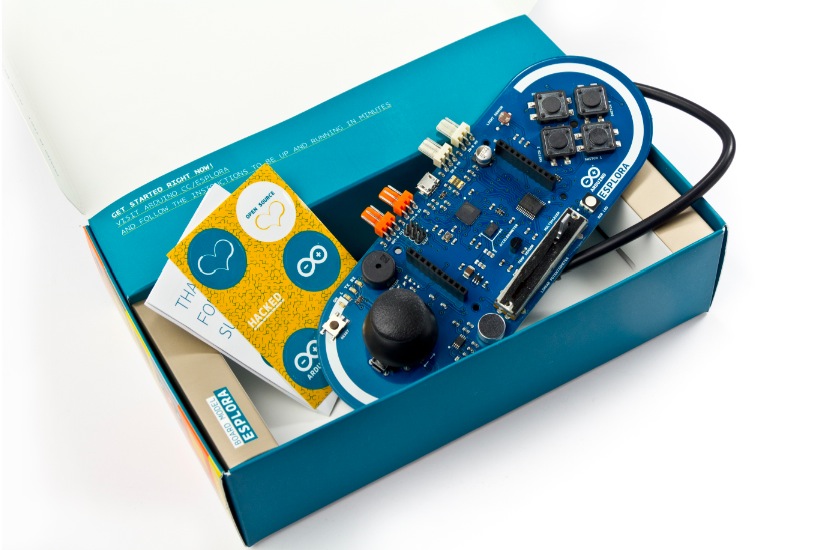
Using Arduino Esplora with graphical programming languages

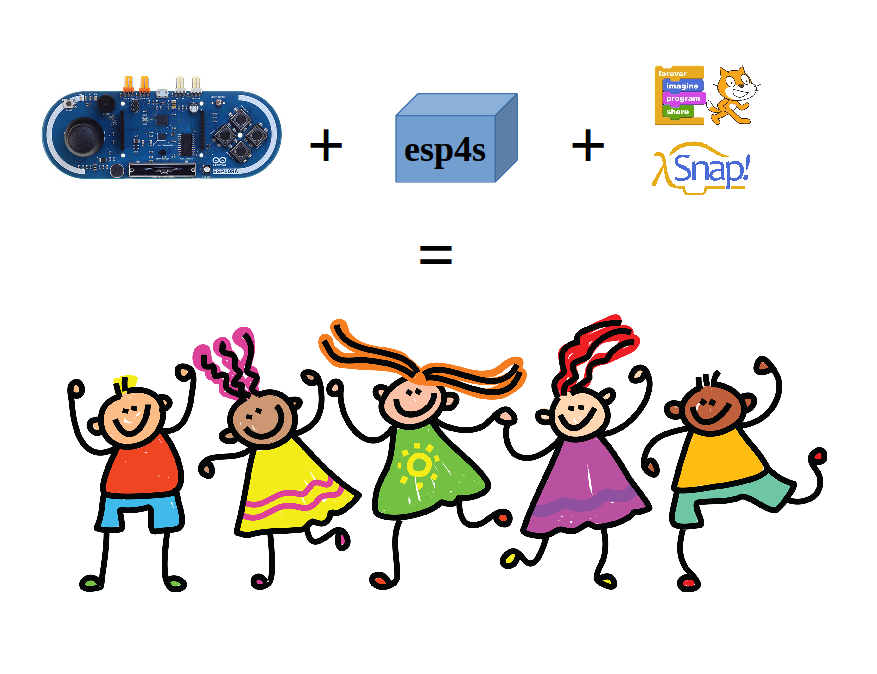
Alan Yorinks shared on Arduino Community on Gplus a physical computing environment he created to make it easier for 10 and 11 year old’s to start playing. He picked up an Arduino Esplora, and wrote some software so that it could be controlled from the Scratch and Snap! graphical programming languages. According to Alan, the Arduino Esplora has on-board integrated sensors, actuators and make it a perfect match for the graphical programming languages that the kids love to use.
By combining an Arduino Esplora microcontroller with the esp4s library and either the Scratch or Snap! programming languages, that first line of code can be written in minutes!
Take a look at his documentation on Github.

Chinese Whispers For Arduino
The game of Chinese Whispers or Telephone involves telling one person a sentence, having that person tell another person the same sentence, and continuing on until purple monkey dishwasher. For this year’s Arduino Day, [Mastro] was hanging out at Crunchlab with a bunch of Arduinos. What do you do with a bunch of Arduinos? Telephone with software serial.
The setup for this game is extremely simple – have one Arduino act as the master, listening for bits on the (hardware) serial port. This Arduino then sends those bits down a chain of Arduinos over the software serial port until it finally loops around to the master. The result is displayed in a terminal.
With only about a dozen Arduinos in this game of Telephone, [Mastro] did get a few transmission errors. That’s slightly surprising, as the code is only running at 1200 bps, but the point of this game isn’t to be completely accurate.
Filed under: Arduino Hacks
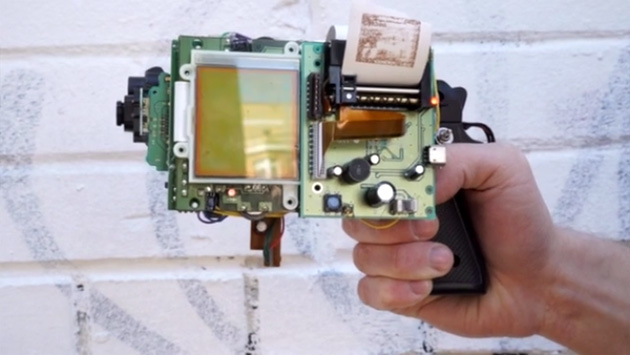
Game Boy camera gun prints when you shoot
If you had a spare Game Boy Camera and the printer to match, what would you do with them? If you're media artist Dmitry Morozov, you'd make a one-of-a-kind firearm. His GBG-8 gun uses Nintendo's photographic peripherals and an Arduino board to shoot photos (almost literally) and print them on the spot -- effectively, it's a low-resolution Polaroid cam with a trigger. We can't imagine that this would go down well with security officials, but it could be a blast if you want to capture 8-bit memories with more flair than the original Game Boy gear allows. Let's just hope that Morozov offers some instructions so that his picture pistol is easy to reproduce at home.
Filed under: Misc, Gaming, Peripherals, Nintendo
Via: Geek
Source: Vtol