Once in a while, South East Asia countries such as Singapore and Malaysia suffers from the haze, a fire-related large-scale air pollution problem that occurs regularly. Especially during dry season there are some persisting forest fires in Indonesia that spread to other countries nearby.
In 2015 the haze hit Singapore quite badly, causing schools to close down for one day. That’s why during Hyper Haze Hackathon taking place in Singapore, Tian Lye Teo and Ethan Lee Yong Sheng worked on and presented a low-cost solution based on Arduino Uno to tackle difficulty to communicate haze rising to illiterate elderly in the nation and won second prize !
Here’s how the two creators described the project:
The main problem we are trying to address is to help the elderly who are living alone in Singapore during the haze period. There are several factors that make this a suitable source of information for them. While the PSI* reading are widespread, they might not be accessible to these elders (no cellphone, TV, radio) or they do not understand the mainstream languages used by our medium (Chinese, English etc).
Furthermore, the PSI reading comes with 2 sets of readings (3hr and 24 hrs) and it is confusing to them what need to be done when PSI reached a certain number (“200 already? so what? aiyo… looks clear lei”).
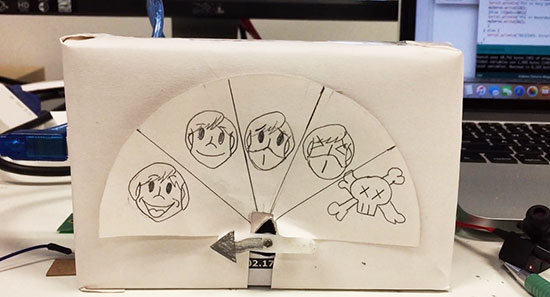
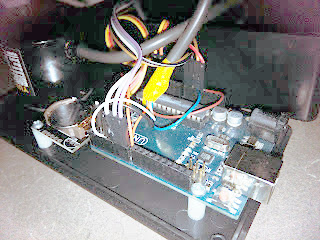
The solution we came up with is this inexpensive Arduino device that fetch current PSI reading from a server. With the reading, the device will point at one of the five indicators that ranges from don’t need to “wear mask” to “die die cannot go out’.
The device actually cost about 20 dollars to build and implementation is ideally done at home. However, we understand that elders would not pay for this (“20 dollars?! I can eat 5 days meals with this”). We are hoping we can get in touch with some organisation(perhaps the govt) to install this at either the lift lobby at every floor or at the ground floor. We believe that even at its current stage, it is still very useful for the elders.
The ideal grand plan we had for this is to be able to link this to the pioneer generation card and from there, dispense a mask for the elder so that they can travel safe (something we felt the govt might help)
Please help spread this by sharing it and hopefully someone can help us achieve this little wish of two guys trying to give back to the pioneer generation who helped built the nation
*PSI (Pollutant Standards Index) is an index to provide understandable information about daily levels of air quality and it’s the indicator used in Singapore to show how bad the haze is. The monitoring stations measure concentration levels of particulate matter (PM10), fine particulate matter (PM2.5), sulphur dioxide (SO2), nitrogen dioxide (NO2), ozone (O3), and carbon monoxide (CO). All of them determine the level of PSI.
For over ten years, Arduino has held onto its popularity as “that small dev-board aimed to get both artists and electronics enthusiasts excited about physical computing.” Along the way, it’s found a corner in college courses, one-off burning man rigs, and countless projects that have landed here. Without a doubt, the Arduino has a cushy home among hobbyists, but it also lives elsewhere. Arduino lives in engineering design labs as consumer products move from feature iterations into user testing. It’s in the chem labs when scientists need to get some sensor data into their pc in a pinch. Despite the frowns we’ll see when someone blinks an LED with an Arduino and puts it into a project box, Arduino is here to stay. I thought I’d dig a little bit deeper into why both artists and engineers keep revisiting this board so much.
Arduino, do we actually love to hate it?
It’s not unusual for the seasoned engineers to cast some glares towards the latest Arduino-based cat-feeding Kickstarter, shamelessly hiding the actual Arduino board inside that 3D-printed enclosure. Hasty? Sure. Crude, or unpolished? Certainly. Worth selling? Well, that depends on the standards of the consumer. Nevertheless, those exact same critical engineers might also be kicking around ideas for their next Burning Man Persistence-of-Vision LED display–and guess what? It’s got an Arduino for brains! What may seem like hypocrisy is actually perfectly reasonable. In both cases, each designer is using Arduino for what it does best: abstracting away the gritty details so that designs can happen quickly. How? The magic (or not) of hardware abstraction.
Meet HAL, the Hardware-Abstraction Layer
In a world where “we just want to get things blinking,” Arduino has a few nifty out-of-the-box features that get us up-and-running quickly. Sure, development tools are cross-platform. Sure, programming happens over a convenient usb interface. None of these features, however, can rival Arduino’s greatest strength, the Hardware Abstraction Layer (HAL).
A HAL is nothing new in the embedded world, but simply having one can make a world of difference, one that can enable both the artist and the embedded engineer to achieve the same end goal of both quickly and programmatically interacting with the physical world through a microcontroller. In Arduino, the HAL is nothing more than the collection of classes and function calls that overlay on top of the C++ programming language and, in a sense, “turn it into the Arduino programming language” (I know, there is no Arduino Language). If you’re curious as to how these functions are implemented, take a peek at the AVR directory in Arduino’s source code.
With a hardware abstraction layer, we don’t need to know the details about how our program’s function calls translate to various peripherals available on the Uno’s ATMEGA328p chip. We don’t need to know how data was received when Serial.available() is true. We don’t “need to know” if Wire.begin() is using 7-bit addressing or 10-bit addressing for slave devices. The copious amounts of setup needed to make these high-level calls possible is already taken care of for us through the HAL. The result? We save time reading the chip’s datasheet, writing helper functions to enable chip features, and learning about unique characteristics and quirks of our microcontroller if we’re just trying to perform some simple interaction with the physical world.
Cross-Platform Compatibility
Teensy 3.2 keeps form factor but adds on-chip hardware features compared to 3.1
There are some cases where the HAL starts to break down. Maybe the microcontroller doesn’t have the necessary hardware to simultaneously drive 16 servos while polling a serial port and decoding serial data. In some cases, we can solve this issue by switching Arduino platforms. Maybe we actually do need three serial ports instead of one (Teensy 3.2). Maybe we do need pulse-width-modulation (PWM) capability on every pin (Due). Because of the hardware abstraction layer, the rest of the source code can remain mostly unchanged although we may be switching chip architectures and even compilers in the process! Of course, in an environment where developing code for the target platform does matter, it doesn’t make sense to go to such efforts to write the general-purpose code that we see in Arduino, or even use Arduino in the first place if it doesn’t have the necessary features needed for the target end-goal. Nevertheless, for producing an end-to-end solution where “the outcome matters but the road to getting there does not,” writing Arduino code saves time if the target hardware needs to change before getting to that end goal.
HAL’s drawbacks
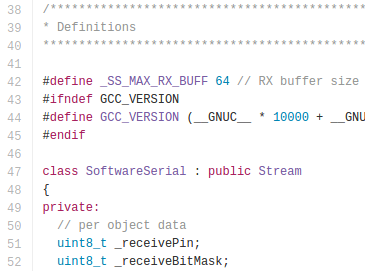
Of course, there’s also a price to pay for such nice things like speedy development-time using the HAL, and sometimes switching platforms won’t fix the problem. First off, reading the Arduino programming language documentation doesn’t tell us anything about the limitations of the hardware it’s running on. What happens, let’s say, if the Serial data keeps arriving but we don’t read it with Serial.read() until hundreds of bytes have been sent across? What happens if we do need to talk to an I2C device that mandates 10-bit addressing? Without reading the original source code, we don’t know the answers to these questions. Second, if we choose to use the functions given to us through the HAL, we’re limited by their implementation, that is, of course, unless we want to change the source code of the core libraries. It turns out that the Serial class implements a 64-byte ring buffer to hold onto the most recently received serial data. Is 64 bytes big enough for our application? Unless we change the core library source code, we’ll have to use their implementation.
Both of the limitations above involve understanding how the original HAL works and than changing it by changing the Arduino core library source code. Despite that freedom, most people don’t customize it! This odd fact is a testament to how well the core libraries were written to suit the needs of their target audience (artists) and, hence, Arduino garnered a large audience of users.
Pros of Bare-Metalspeak
digitalWrite takes a whopping 52-55 cycles to change pin direction! [image source]Are there benefits to invoking the hardware directly? Absolutely. A few curious inquirers before us have measured the max pin-toggling frequency with digitalWrite to be on the order of ~100 KHz while manipulating the hardware directly results in a pin-toggling frequency of about 2 MHz, about 20 times faster. That said, is invoking the hardware directly worth it? Depends, but in many cases where tight timing isn’t a big deal and where the goal of a functional end-to-end system matters more than “how we got there,” then probably not! Of course, there are cases when tight timing does matter and an Arduino won’t make the cut, but in that case, it’s a job for the embedded engineer.
Use the HAL, Luke!
To achieve an end-to-end solution where the process of “how we got there” matters not, Arduino shines for many simple scenarios. Keep in mind that while the HAL keeps us from knowing too many details about our microcontroller that we’d otherwise find in the datasheet, I don’t proclaim that everyone throw out their datasheets from here on out. I am, however, a proponent of “knowing no more than you need to know to get the job done well.” If I’m trying to log some sensor data to a PC, and I discover I’ll be saving a few days reading a datasheet and configuring an SPI port because someone already wrote SPI.begin(), I’ll take an Arduino, please.
If you’ve rolled up your sleeves and pulled out an Arduino as your first option at work, we’d love to hear what uses you’ve come up with beyond the occasional side-project. Let us know in the comments below.
An ambitious maker has built a partly 3D-printed railgun that can fire aluminum or graphite projectiles at over 250 meters per second (560 mph). No, this isn't Quake, but it's no janky, all-plastic gun, either. The "handheld" weapon houses six capacitors that weigh 20 pounds and deliver over 1,800 joules of energy per shot. And it indeed works just like a full-sized railgun, using parallel electrodes to fire an "armature" bullet. The creator, David Wirth, added an Arduino Uno R3 to monitor charging levels, temperature and other factors, and tweaked the rails after he noticed "plasma damage."
YouTube user "Xtamared" built a partly 3D-printed railgun that can fire aluminum or graphite projectiles at over 250 meters per second (560 mph). No, this isn't Quake, and it's no janky, all-plastic weapon, either. The "handheld" weapon houses six capacitors that weigh 20 pounds and deliver over 3,000 kilojoules of energy per shot. And it indeed works just like a full-sized railgun, using parallel electrodes to fire an "armature" bullet. The creator used an Arduino Uno R3 to monitor charging levels, temperature and other factors, and had to modify the rails after he noticed "plasma damage."
An ambitious maker has built a partly 3D-printed railgun that can fire aluminum or graphite projectiles at over 250 meters per second (560 mph). No, this isn't Quake, but it's no janky, all-plastic gun, either. The "handheld" weapon houses six capacitors that weigh 20 pounds and deliver over 1,800 joules of energy per shot. And it indeed works just like a full-sized railgun, using parallel electrodes to fire an "armature" bullet. The creator, David Wirth, added an Arduino Uno R3 to monitor charging levels, temperature and other factors, and tweaked the rails after he noticed "plasma damage."
A lot of hacker projects start with education in mind. The Raspberry Pi, for example, started with the goal of making an affordable classroom computer. The Shrimp is a UK-based bare-bones Arduino targeted at schools. We recently saw an effort to make a 3D printed robotic platform aimed at African STEM education: The Azibot.
Azibot has 3D printed treads, a simple gripper arm, and uses an Arduino combined with Scratch. Their web site has the instructions on how to put together the parts and promises to have the custom part of the software available for download soon.
We’d bet most Hackaday readers won’t need the software, anyway. The robot clearly uses RC servos for the drive and the little arm at the front, so controlling it directly from the Arduino ought to be easy enough. If you don’t want to roll your own, Senegal-based Azibot is taking preorders for kits for $99. We were a little surprised you couldn’t kick in a little more when you ordered to subsidize other kits for schools in need.
We talked about another low-cost school aimed project, the Shrimp, If you think the needy schools won’t have 3D printers, maybe this 3D printer could come to the rescue.
You have to admit [Dylan Rush’s] clock is a real swinger. Literally. You’ve seen the desk novelties where an arm with leds mounted on it sweeps out a message? [Dylan] did the same thing to make a clock but instead of drawing numbers, he actually draws an analog clock face. Y’know one of those round things with arms?
Behind the clock is an Arduino driving a MAX7219 LED controller. Using the MAX7219 was a challenge because it expects a grid of LEDs while the clock needs a linear array. [Dylan] used a line of individual LEDs wired to match what the controller wanted. A rotary encoder tells the processor the position of the arm so the Arduino sketch can determine which LEDs should be lit to show the time and clock face.
What’s even more amazing is [Dylan] created this before clocks became infamous.
There are certain topics that cause people to have knee-jerk reactions: Try asking a crowd which Star Trek was best or–around here–take a stance for or against the Arduino and you’ll see what we mean. Certainly people polarize quickly when you talk about a 3D printed gun. However, if anyone can sneak [xtamared’s] 3D printed rail gun through airport security, then some guards will have to be fired. It looks like a cool prop from a bad movie, but (as you can see in the videos below) it can project a conductive slug into a decidedly low-tech target.
There aren’t many build details, although you can deduce a few things from the pictures and the captions. At the rear of the gun is a paintball tank that gets the slug moving before it hits the rails which further accelerate the projectile. The electric part is Arduino-based and the very prominent capacitors at the front end can deliver 1800 joules of energy (and add 20 pounds of weight to the gun).
It looks like a lot of the gun is printed in PLA, but the electronics case is ABS (doubtlessly to avoid exposing PLA to the heat sink attached to the 1500V rectifier). The paintball tank’s pressure gets the slug moving to 100 meters/second before it hits the rails. In early testing, a PLA part and a steel bolt broke, so the items got replaced with polycarbonate and nylon. Apparently, parts of the injector are polypropylene.
The rails themselves are made for replacement, since each shot damages them a bit. They are constructed of garolite (fiberglass and resin composite sort of like PCB material) and wrapped in carbon fiber. That’s one of the things that impressed us–this is a highly multimedia build with different materials used to do different jobs, digital and high voltage electronics, and pneumatics.
We’ve covered a lot of rail guns over the years and we’ve looked at robot-mounted coil guns, too. If you want something more portable, check out this tiny rail gun (although the Geocities cache for the article is dead, but there are others).
This concept to make a humanoid head, that speaks like a human, chooses phrases randomly. As (it) speaks , it moves head, eyeballs and eyebrows randomly in an emulation of a human. This can be useful for lonely people who cannot have a pet at home.
This is the basic idea..Later it is possible to develope it further to talk longer durations, and even tell short stories stored on an SD card.


 It’s not unusual for the seasoned engineers to cast some glares towards the latest Arduino-based cat-feeding Kickstarter, shamelessly hiding the actual Arduino board inside that 3D-printed enclosure. Hasty? Sure. Crude, or unpolished? Certainly. Worth selling? Well, that depends on the standards of the consumer. Nevertheless, those exact same critical engineers might also be kicking around ideas for their next Burning Man Persistence-of-Vision LED display–and guess what? It’s got an Arduino for brains! What may seem like hypocrisy is actually perfectly reasonable. In both cases, each designer is using Arduino for what it does best: abstracting away the gritty details so that designs can happen quickly. How? The magic (or not) of hardware abstraction.
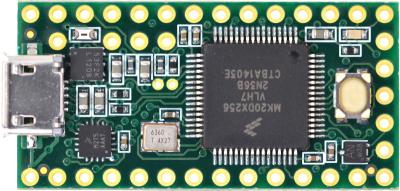
 Of course, there’s also a price to pay for such nice things like speedy development-time using the HAL, and sometimes switching platforms won’t fix the problem. First off, reading the Arduino programming language documentation doesn’t tell us anything about the limitations of the hardware it’s running on. What happens, let’s say, if the Serial data keeps arriving but we don’t read it with Serial.read() until hundreds of bytes have been sent across? What happens if we do need to talk to an I2C device that mandates 10-bit addressing? Without reading the original source code, we don’t know the answers to these questions. Second, if we choose to use the functions given to us through the HAL, we’re limited by their implementation, that is, of course, unless we want to change the source code of the core libraries. It turns out that the Serial class implements a 64-byte ring buffer to hold onto the most recently received serial data. Is 64 bytes big enough for our application? Unless we change the core library source code, we’ll have to use their implementation.
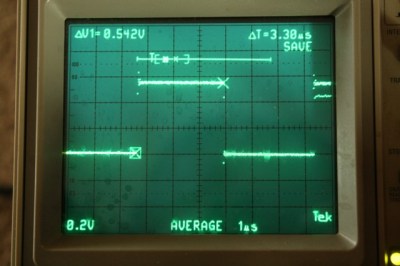


 Behind the clock is an Arduino driving a MAX7219 LED controller. Using the MAX7219 was a challenge because it expects a grid of LEDs while the clock needs a linear array. [Dylan] used a line of individual LEDs wired to match what the controller wanted. A rotary encoder tells the processor the position of the arm so the Arduino sketch can determine which LEDs should be lit to show the time and clock face.


