Posts with «arduino» label

Swimming Pool Dance Floor Enlightened With Leds

In a well documented blog entry, [Loren Bufanu] presents a project that lit up a glass dance floor covering a swimming pool with RGB strips. We mentioned a video of his project in a Hackaday links but didn’t have any background information. Now we do.

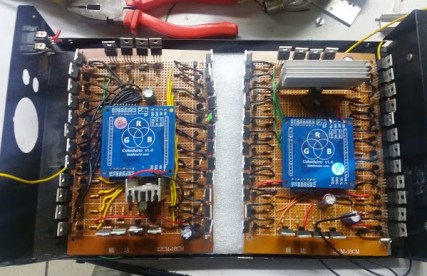
The project took around 450 meters of RGB strips controlled by two Rainbowduinos and driven by sixty-four power Mosfets, sixty-four bipolar transistors, and a few other components. Running just the white LEDs draws 8 amps of power.

The Rainbowduino is an ATmega328 Arduino compatible board with two MY9221 controllers. Each  controller handles 12 channels of Adaptive Pulse Density Modulation. In other words, it makes the LEDs flash nicely. [Loren] used the Rainbowduino instead of some alternatives because multiple R’duinos can coordinate their activities over I2C.

The software part of the project did not work as well as the hardware. The light patterns were supposed to follow the music being played. A PC software package intended to drive the R’duinos produced just a muddy mess. Some kludges, including screen captures (!), driven by a batch file tamed the unruliness.

It’s been awhile, but a similar disco dance floor, built by [Chris Williamson] but not over a pool, previously caught our attention. [Chris] is a principle in Terror Tech that recently got a mention on Sparkfun.

The video after the break fortunately does not make a big splash, but is still electrifying.


Filed under: Arduino Hacks, led hacks

Roomba, I Command Thee: Use Raspberry Pi for Voice Control

Take advantage of these open source resources to set up voice control with Raspberry Pi and bark orders at your home appliances.

Read more on MAKE

The post Roomba, I Command Thee: Use Raspberry Pi for Voice Control appeared first on Make: DIY Projects, How-Tos, Electronics, Crafts and Ideas for Makers.

Build an Arduino-Powered Candy Vending Machine

With some simple programming and a few basic parts, you can rig up a candy vending machine that slides sweets toward you at the push of a button.

Read more on MAKE

The post Build an Arduino-Powered Candy Vending Machine appeared first on Make: DIY Projects, How-Tos, Electronics, Crafts and Ideas for Makers.

Progress Report: Secretive Club Designing, 3D Printing a Full-Size BB-8

A BB-8 Builders Club has created plans for creating your own 3D printable full-size BB-8 droid.

Read more on MAKE

The post Progress Report: Secretive Club Designing, 3D Printing a Full-Size BB-8 appeared first on Make: DIY Projects, How-Tos, Electronics, Crafts and Ideas for Makers.

Leap Motion Wirelessly Controlling a Prosthetic Hand With an Arduino

The Leap Motion controller is a rather impressive little sensor bar that is capable of generating a massive 3D point cloud and recognizing hands and fingers to allow for gesture control based computing. It’s been out for a few years now but we haven’t seen many hackers playing with it. [Anwaarullah] has messed around with it before, but when it came time to submit something for India’s first Maker Faire, he decided to try doing an actual project with it.

Checking out the latest Leap Motion SDK, [Anwaarullah] realized many improvements had been made and he’d have to rewrite some of his original code to reflect the changes. This time around he’s opted to use the ESP8266 WiFi module instead of a Bluetooth one. He printed off a Raptor hand (from the wonderful folks at e-NABLE) and hooked it up with some RC servos to give him a nice robotic hand to control.

The actual code being sent to the Arduino is pretty simple. The Leap Motion SDK does all the complex stuff, and in the end, just sends a serial command of how many fingers it sees to the Arduino in order to control the hand.

For more info about the project, you can check out his original foray into Leap Motion Arduino control here. And for more examples of Leap Motion controlled things using Arduinos, why not control a cute animatronic desk lamp?


Filed under: 3d Printer hacks, Arduino Hacks

Choreograph a Music and Light Display for the Holiday

Trick-or-treaters are bound to get a thrill when you make this choreographed music and light display that plays each time your gate is opened.

Read more on MAKE

The post Choreograph a Music and Light Display for the Holiday appeared first on Make: DIY Projects, How-Tos, Electronics, Crafts and Ideas for Makers.

Thanks to all 100k participants: Maker Faire Rome 2015 was great

Last weekend we were in Rome to take part to the third edition of Maker Faire Rome. With more than 100.000 participants, the event confirmed itself as the biggest Maker Faire outside of US. We thank you all for visiting our booth and express your support to Arduino.cc community.

On Saturday we had a special announcement to make, Intel and Massimo Banzi were on the main stage presenting the collaboration on the Arduino 101 and Genuino 101:

During the three days makers, designers, kids and parents, and many more visited the Genuino Booth and the Maker Store to see the new Arduino’s sister brand Genuino boards, explore the interactive installations and chat with the Arduino team:

Massimo Banzi met  many fans and took part to a lot of selfies :

Explore the gallery of all pictures on Arduino account on Flickr. And see you at Maker Faire Rome 2016!

Arduino.cc Expands European Manufacturing

Maker Faire Rome is over, and that means it’s time for the Arduino media blitz. Arduino has already had a big announcement this week with the introduction of the Arduino / Genuino 101 board powered by the Intel Curie module. Team .cc hasn’t forgotten all their Atmel-powered boards though. The latest news is that Arduinos will be manufactured in Germany by Watterott Electronics (.de, Google Translate).

Right now, Arduino.cc boards are manufactured in China by Seeed, and in the US by Adafruit and Sparkfun. Watterott Electronics is one of the premier hobby electronics distributors in Germany.

Boards made by Watterott will carry the Genuino mark; Arduino.cc seems to anticipate a loss in the Arduino vs. Arduino trademark dispute outside the US. All boards produced under license from Arduino.cc sold outside the US will carry the Genuino trademark, whereas boards produced for the US market will carry the Arduino trademark. Interestingly, this Arduino vs. Arduino split began with a former manufacturer, with a maelstrom of pettiness stemming from that trademark dispute. In any case, the licensing for boards manufactured by Watterott is most assuredly worked out by now. The new manufacturing partner guarantees a greater supply of Arduinos for all.


Filed under: Arduino Hacks, news

Laser Rangefinder Brought to Life With Arduino

Range finders are amazing tools for doing pretty much anything involving distance calculations. Want to blink some lights when people are nearby? There’s a rangefinder for that. Need to tell how far away the next peak of a mountain range is? There’s a rangefinder for that. But if you’re new to range finders and want one that’s hackable and configurable, look no further than the SF02/F rangefinder with the Arduino shield, and [Laser Developer]’s dive into what this pair can do.

Once the rangefinder and shield have been paired is when the magic really starts to happen. Using USB, the Arduino can instantly report a huge amount of raw data coming from the rangefinder. From there, [Laser Developer] shows us how to put the device into a “settings” mode which expands the capabilities of the rangefinder even more. The data can be dumped into a graph, for example, which can show trends between distance, laser strength, and many other data sets. [Laser Developer] goes one step further and demonstrates how to use this to calculate the speed of light, but from there pretty much anything else is possible as well.

And while you can just buy a rangefinder off the shelf, they are fairly limiting in their features and can cost exponentially more. This is a great start into using a tool like this, especially if you need specific data or have a unique application. But, if laser range finding isn’t for you or if this project is too expensive, maybe this $5 ultrasonic rangefinder will work better for your application.


Filed under: Arduino Hacks
Hack a Day 22 Oct 03:00

We Talk to the Mystery Maker Behind the 3D Printed Railgun

Make: talks to the man behind the homemade, portable railgun that the net has gone nuts over.

Read more on MAKE

The post We Talk to the Mystery Maker Behind the 3D Printed Railgun appeared first on Make: DIY Projects, How-Tos, Electronics, Crafts and Ideas for Makers.