Learning What Sounds Are Made of Using Sound Blocks
 This Arduino-based learning tool shows you how sounds are constructed
The post Learning What Sounds Are Made of Using Sound Blocks appeared first on Make: DIY Projects and Ideas for Makers.


This Arduino-based learning tool shows you how sounds are constructed
The post Learning What Sounds Are Made of Using Sound Blocks appeared first on Make: DIY Projects and Ideas for Makers.
Just got back from SXSW, where Ava (http://letsmakerobots.com/node/45195) and Annabelle, a mobile version using Ana's brain ( http://letsmakerobots.com/node/37264) built by some fellow LMR people in Texas (Lukeyes, and others), were on a panel and did standup and improv bits. Fun stuff for everybody.
 A custom keyboard could be right at your fingertips, so why are you still using that basic keyboard that came with your computer?
The post 8 Crazy Keyboards That Will Trick Out Your Typing appeared first on Make: DIY Projects and Ideas for Makers.
This was gonna happen – sooner or later. [matthewhallberg] built a “Smart” trash can that is connected to the Internet and can be controlled by its own Android App. We’re not sure if the world needs it, but he wanted one and so built it. He started it out on a serious note, but quickly realized the fun part of this build – check out his funny Infomercial style video after the break.
 The build itself is uncomplicated and can be replicated with ease. A servo motor helps flip the lid open and close. This is triggered by an ultrasonic ping sensor, which responds when someone waves a hand in front of the trash can. A second ping sensor helps inform the user when it is full and needs to be emptied. A Leonardo with the Idunio Yun shield helps connect the trash can to the internet. An mp3 shield connected to a set of powered computer speakers adds voice capability to the trash can, allowing it to play back pre-recorded sound clips. Finally, a Bluetooth module lets him connect it to an Android phone and the companion app controls the trash can remotely.
For the IoT side of things, [matthewhallberg] uses a Temboo account to send an email to the user when the trash can is full. The Arduino sketch, a header file to configure the Temboo account, and the Android application can all be downloaded from his blog. If this project inspires you, try building this awesome Robotic trash can which catches anything that you throw near it or read the barcodes off the trash being thrown out and update the grocery list.


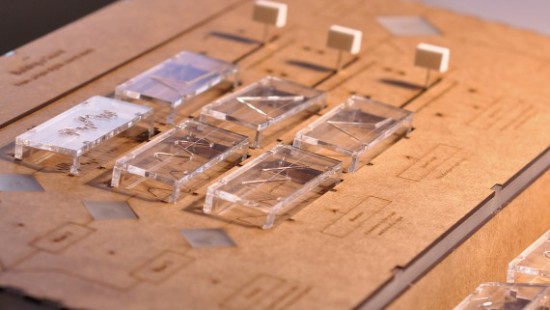
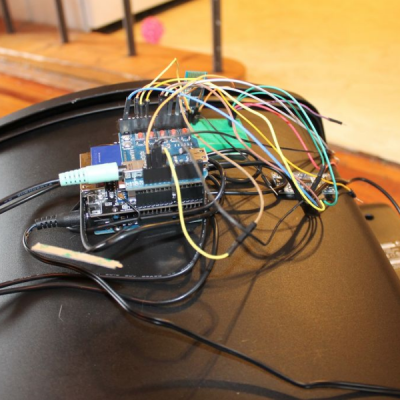
Sound Blocks is a tool to teach children and adults what sound is made of. The project was shortlisted in the Expression category of the IXDA Interaction Awards and it was developed by John Ferreira, Alejandra Molina, Andreas Refsgaard at the CIID using Arduino.
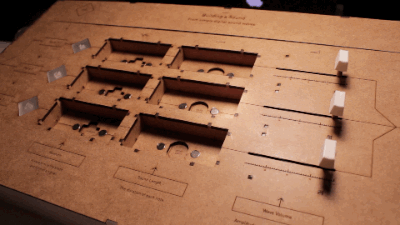
The device allows people to learn how, with a few parameters, it’s possible to create new sounds and, also, imitate real world sounds. Users can control waveform, sound decay or wave length and volume of three channels, all mixed together:
Sound blocks first and foremost was created as a tool to experiment with sound, it is playful and engaging.
Watch the video interview to discover more about the project and hear some noise:
Join us for the Arduino Day event organized by our team at the Jacobs Institute on the campus of the University of California, Berkeley with the participation of Massimo Banzi, David Mellis and Tom Igoe.
We are seeking volunteers to assist us during the event. We are going to have free workshops, talks by the founders, and art and tech displays.
We are looking for volunteer assistance during the event e.g. staffing information tables and displays, bringing a project to demo, helping during workshops, picking up coffee & lunch, and providing technical assistance. This is not a paid gig, but to show our appreciation that you are spending your time with us, Arduino has prepared a small gift for you.
We welcome all levels of skills and curiosity. More important than your technical skills are your people skills. Please provide us with basic information about yourself and your interests. Use the appropriate form depending on whether you have volunteered with us in the past:
First time volunteers? Please fill out this form. If you have volunteered for Arduino before, please contact us at arduinovolunteer [at] gmail.com.
We also have two paid positions: one for a two-person video camera crew and the other for a photographer. To apply, please fill out this form.
When: April 2nd, 2016
Location: University of California Berkeley at Jacobs Institute – 2530 Ridge Rd, Berkeley, CA 94709
Website: http://jacobsinstitute.berkeley.edu/
Arduino Day website: https://day.arduino.cc
Staff: Judy A. Castro (Event Manager), Michael Shiloh (Educator)
[Neumi] has built a CNC Laser using CD-ROM drives as the X and Y motion platforms. The small 405nm laser can engrave light materials like wood and foam. The coolest use demonstrated in the video is exposing pre-coated photo-resist PCBs.
With $61 US Dollars (55 Euro) for the Arduino, stepper drivers, and a laser in the project, [Nuemi] got a pretty capable machine after adding a few parts from the junk bin. He wanted to avoid using existing software in order to learn the concepts behind a laser engraver. In the end, he has a working software package which can send raster scans to an Arduino mega. The mega then controls the sync between the stepper and laser firings. The code is available on GitHub.
The machine can do a 30x30mm PCB in 10 minutes. It’s not about to set a record, but it’s cool and not at all bad for the price. You can see the failed PCBs lined up in the video from the initial tuning, but the final one produced a board very equivalent to the toner transfer method. Video after the break.


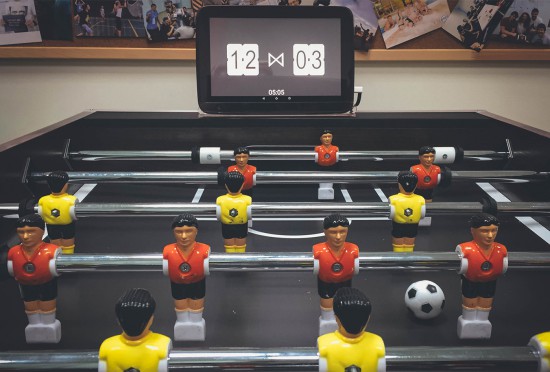
Thinkers and makers at Handsome created an automated Foosball Scoreboard using an Android tablet and Arduino Mega 2560:
the Arduino is responsible only for detecting a) a goal scored and b) the gate in which it was scored. After a goal is detected the Arduino sends this data to Android tablet.
You can explore the details of the project on this blog, the sketch on Github, and watch the video below:
Bicycle riders can never be too visible: the more visible you are, the less chance there is someone will hit you. That’s the idea behind the Arduibag, a neat open-source project from [Michaël D’Auria] and [Stéphane De Graeve]. The project combines a joystick that mounts on the handlebars with a dot matrix LED display in a backpack. By moving the joystick, the user can indicate things such as that they are turning, stopping, say thank you or show a hazard triangle to warn of an accident.
The whole project is built from simple components, such as an Adafruit LED matrix and a Bluno (an Arduino-compatible board with built-in Bluetooth 4.0) combined with a big battery that drives the LED matrix. This connects to the joystick, which is in a 3D printed case that clips onto the handlebars for easy use. It looks like a fairly simple build, with the larger components being mounted on a board that fits into the backpack and holds everything in place. You then add a clear plastic cover to part of the backpack over the LED matrix, and you are ready to hit the road, hopefully without actually hitting the road.
Like any good project, [Michaël] and [Stéphane] aren’t finished with it yet: they are also looking for ways to improve it. In particular, they want to reduce the number of batteries, as there is currently a large battery that drives the display and another smaller one that drives the Arduino.


 |
| Block diagram of IR remote based home automation |
