Posts with «arduino» label

Retrofit your old appliances with new controls

Unfortunately, home appliances aren’t a one-size-fits-all sort of thing. What works for some may not always work so well for others. With this in mind, Raf Ramakers and the Autodesk Research team have developed a system that will enable you to retrofit your everyday devices with new controls that better suit your needs. RetroFab provides even the most non-tech-savvy users with a design and fabrication environment through which they can easily repurpose their existing physical interfaces with the help of 3D scanning, printing and basic electronics.

We present RetroFab, an end-to-end design and fabrication environment that allows non-experts to retrofit physical interfaces. Our approach allows for changing the layout and behavior of physical interfaces. Unlike customizing software interfaces, physical interfaces are often challenging to adapt because of their rigidity. With RetroFab, a new physical interface is designed that serves as a proxy interface for the legacy controls that are now operated using actuators. RetroFab makes this concept of retrofitting devices available to non-experts by automatically generating an enclosure structure from an annotated 3D scan. This enclosure structure holds together actuators, sensors as well as components for the redesigned interface. To allow retrofitting a wide variety of legacy devices, the RetroFab design tool comes with a toolkit of 12 components.

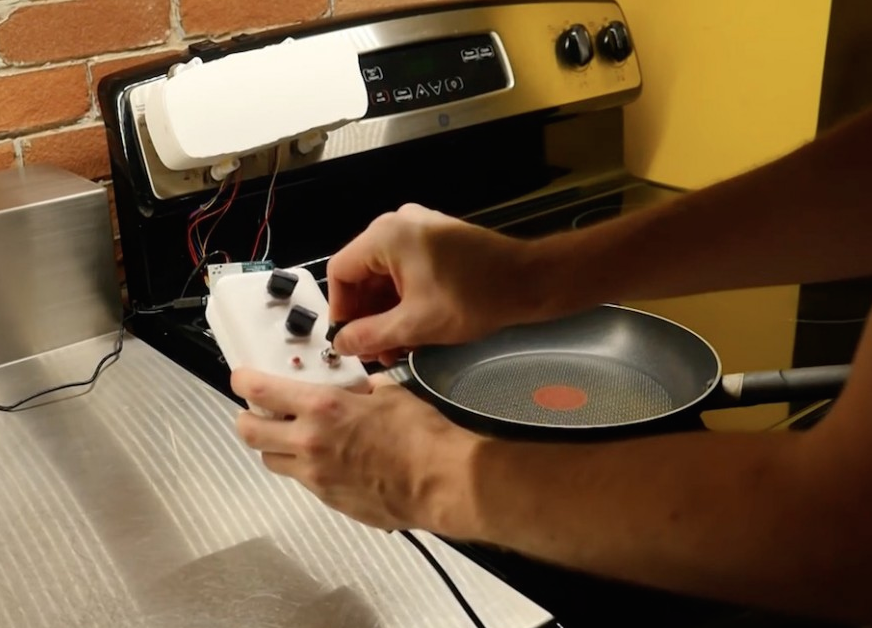
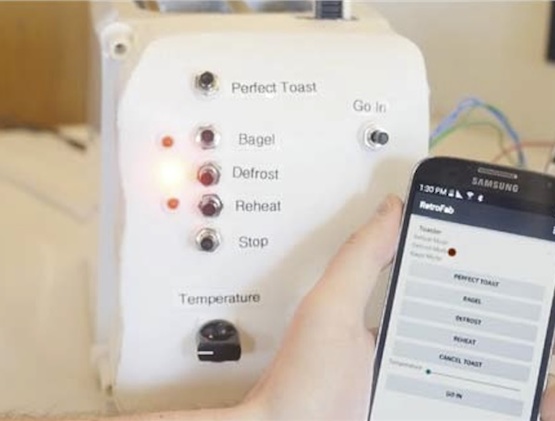
After loading the 3D scan, you can highlight and select the device’s controls on the model. The system then creates a 3D-printable rendering and offers redesign suggestions. From there, RetroFab automatically generates a housing that fits over the original interface and holds a series of actuators, motors, LEDs and other components, which are all connected to an Arduino.

The individual Arduino microcontrollers that control the enclosure structures run a generic firmware that handles the GPIO pins as well as the wireless communication. Even for retrofitted devices that do not intercommunicate, user input and sensor data from the retrofitted interface is first transmitted from the Arduino microcontroller to the central PC. This module then decides to turn on specific RetroFab actuators and sensors, controlled by the same or a different Arduino microcontroller. This approach makes it possible to change the behavior and interconnect retrofitted devices even after the design and fabrication is completed.

Using its accompanying mobile app, RetroFab also lets you easily interconnect and remotely control your gadgets — whether it’s setting the time on a retrofitted alarm clock or turning off a light switch right from your phone. You can read all about the project in its paper here, or watch the video below.

Build a Behemoth Cold Brew Coffee Drip Tower

You can buy large cold-brew towers, but they’re very expensive, aimed at coffee shops. Instead you can make your own automated tower that uses arduino.

Read more on MAKE

The post Build a Behemoth Cold Brew Coffee Drip Tower appeared first on Make: DIY Projects and Ideas for Makers.

This weeks ’s Instagram winner hails from Indonesia!

Genuino Day 2016 in Indonesia was organized by the local community, who submitted this winning photo of the group on Instagram. For sharing the pic below, they’ll be receiving a Genuino MKR1000 and a Genuino Mug!

There’s still time to participate in this giveaway, which runs until May 26th. Here’s how:

– Follow our official Arduino.cc account on Instagram

– Share your images on your account on Instagram using hashtag #ArduinoD16 and #GenuinoD16 and mention us with the tag @Arduino.cc

– Every Thursday, from April 7th to May 26th, we are going to choose one of your pics (posted starting April 2nd) and announce the winner of an Arduino or a Genuino MKR1000 and one of our t-shirt or mug  on the blog. That’s a total of of eight lucky people! Easy enough, right?

Remember to also share cool photos relating to your favorite Arduino and Genuino moments in your community beyond Arduino and Genuino Day.
Show us your local activities!

5 robotic bartenders to celebrate Cinco de Mayo

Someday not too far in the future, the idea of having to catch the attention of a bartender or preparing your own drinks at home may be a thing of the past. In celebration of Cinco de Mayo, we’ve compiled a list of of five Arduino robotic mixologists that’ll help whip you up a margarita or daiquiri with just the press of a button.

RumBot

The RumBot is equipped with a set of five reflective optical sensors, each represented by a different drink. Whenever a cup is placed on one of these sensors, the machine is triggered and a pre-programmed recipe begins dispensing the beverage of choice into your mug in as little as three seconds. Drink selection is handled by an Arduino Uno, which communicates with an all-in-one servo motor. This moves the nozzle into place, and then controls the on-time of five pumps to begin pouring the cocktail. RumBot’s frame is comprised of wood and several 3D-printed plastic parts, while a strength knob also lets you configure the amount of alcohol content.

The Inebriator

The Inebriator‘s design is fairly simply, with upside-down bottles lined up in a row and optics providing set measures. The user places their glass on a pedestal and selects their drink of choice on its accompanying display. The pedestal then moves along collecting the right spirits as it goes thanks to motors pushing the glass upwards at the appropriate moments. Finally it adds the mixers, connected as and when needed by nitrogen-pressurized tubes to deliver the final touches to the cocktails from a cooler located out of sight. The bot is driven by an Arduino Mega and includes a total of 132 LEDs that change colors each time a new ingredient is added. For some extra effects, the drink tray is surrounded by an Arduino Nano-powered LED ring.

Social Drink Machine

Unlike some other robotic bartenders, the Social Drink Machine uses a Facebook app and Twitter bot to prepare your drink. To get going, you first scan the QR code displayed alongside the device with their mobile phone or sends a tweet to @socialdrinkbot. This will pull up an app, which allows you to select which type of concoction you’d like. You’ll then receive another QR code on your phone that must be shown to the machine’s camera. Set your glass on its holding tray, and the Arduino-powered bot will take care of the rest.

Data Cocktail

Data Cocktail is an innovative gadget that whips up cocktails based on Twitter activity. The bot, which runs on Arduino Due and Arduino Pro Mini, works by scouring the web for the five latest posts mentioning keywords that are linked to available ingredients, each represented by differently colored bulbs. (The system will accept either words, hashtags and mentions.) These messages are then used to define the composition of the drink and fill the glass accordingly. The result is an original, crowdsourced mixture whose recipe can be printed out.

Drinkmo

Drinkmo is an automated device that works by rotating a long leadscrew to moves the mixing glass from bottle to bottle. The entire setup is comprised of aluminum extrusion, making it completely expandable. Along the top are gravity fed shot dispensers, which are controlled by 12VDC car lock actuators. The chaser station works differently, though. The chaser bottles are actually pressurized by a paintball gun tank and dispensed using four solenoid valves. Then one valve is actuated, it opens, allowing the pressure to push fluid through the solenoid. The entire system is based on a Raspberry Pi running Raspbian, Tkinter for the GUI and an Arduino Uno for motor control.

Play some tunes on a 13-note MIDI laser harp

Nowadays, it seems like instruments come in all different shapes and sizes. Take Jon Bumstead’s an electronic harp, for example, that plays music by blocking laser beams — similar to how a musician would pluck a stick on the real thing.

The project consists of a laser diode, an Arduino, a galvo, several mirrors to reflect the beams, 13 photoresistors and a couple 3D-printed components for the mounts. The harp’s large frame is made up of three wooden parts that can be folded with a few hinges and held in place with 18 bolts, while the electronics are secured in a box with the galvo mounted at the top.

This laser harp has thirteen strings. To generate these strings, a laser beam is moved to thirteen different position (for thirteen different strings/notes) by moving a mirror galvanometer. The mirror galvanometer, or galvo for short, is a mirror that can quickly move to different positions depending on a control voltage that is sent to it. At the end of each laser beam is a photoresistor that is used to detect if a beam is blocked. When this is detected, a note is played. I also needed the laser beam to be turned off when moving positions so that it appeared as though there were thirteen distinct positions and not a continuous sheet of light.

To generate these signals, I used an Arduino. One of the greatest challenges of the project was creating  an analog output that was fast enough to move the galvo (and laser beam) so that it appeared like there were really thirteen different beams and not a single beam being moved to different positions. I constructed a 4-bit R2R digital to analog converter (DAC). The digital output of pins 8-11 incremented thirteen times (for the thirteen positions), and the DAC generated an analog voltage ranging from 0 to 4V. I then amplified this signal  and ran it through a differential amplifier to get an analog voltage from around -7 to 7 volts for the galvo. The laser diode was synchronized with the galvo using the Arduino.

According to the Maker, the harp can be programmed to direct the beam to any position at any speed. And not only can you put on your very own laser show, but you can control the type of MIDI signal being created as well.

This laser harp is really a MIDI controller (i.e. it does not have its own sound engine). You can select whatever type of MIDI signal you desire. I chose to select middle C to the C one octave higher in frequency. Another MIDI instrument or reader (I used by Macbook Pro and Garageband) must then be used to actually create audio signals that could be played through speakers.

You can see it action in the video below!

Prevent forest fires with the Birdhouse Alarm

The northern part of Spain, which is full of villages, vegetation and wildlife, is prone to wildfires. In fact, nearly 40% of the land was burnt back in 2015. Unfortunately, whenever a fire breaks out in a remote area, it often goes unnoticed or reached before damage occurs. With these instances becoming more common, insurance company Generali decided to find a better solution for early detection.

Their answer to the problem? Birdhouse Alarms. Each wooden (recycled, of course) birdhouse features an Arduino, a solar panel, a rechargeable battery, a smoke sensor and a 3G network connection, enabling it to send a geolocated signal to local authorities in the event of a fire.

The prototypes, which were designed by Ogilvy & Mather, are currently being tested.

Arduino Blog 04 May 14:21

Submit or import your project on Project Hub

The Arduino Project Hub (powered by Hackster.io) is a community dedicated to discovering how fun and rewarding tinkering with electronics and software can be, so any project made with Arduino and Genuino boards is welcome! Each day, the Arduino Team will select some of the best tutorials and highlight them on our social channels.

The Arduino Project Hub is also a great place to keep your latest projects and easily share them with your friends, students and the rest of the community!

If you have tutorials and articles on other platforms, we’ve got some good news! There is a cool import function so you can just paste the link and we’ll take care of the transfer. When you click on ‘New Project’ you will be presented with two options, create a tutorial from scratch or import one via URL.

Read this tutorial to learn more.

3rd Arm Accessorised !!

Let's Make Robots 03 May 16:33
arduino  

Not Even Hamsters Are Safe From The Internet Of Things

The internet of things is this strange marketing buzzword that seems to escape from the aether and infect our toasters and refrigerators. Now even a hamster is not safe.

[Mifulapirus]’s hamster, Ham, was living a pleasant hamster life. Then his owner heard about another hamster named Sushi, whose running wheel stats were broadcasted to the internet. Not to be left behind, Ham’s wheel was soon upgraded. Now Ham is burdened by the same social pressures our exercise apps try to encourage us to use. No, we are most certainly not going to tell our friends about two fourteen minute miles with a twenty minute coffee break in the middle, MapMyRun, we are not.

The feat of techno enslavement for the little hamster was accomplished with a custom board, an esp8266, and an arduino as described in the instructable. The arduino can be left out of the project now that the libraries have been ported to the esp8266. A hall effect sensor detects when the 3D printed hamster wheel is spinning.

If you’d like to check in on Ham, the little guy is alive and well, and the twitter is here. It looks like it’s been upgraded since the original article was posted. Now it shows when Ham is awake and running around the cage doing hamster errands.


Filed under: Arduino Hacks
Hack a Day 03 May 16:30

Transform an Ikea Side Table into a Music Visualizer

Use some LEDs to upgrade a $10 Ikea side table into a centerpiece that bumps and jives to the beat of your tunes. Get your freq on!

Read more on MAKE

The post Transform an Ikea Side Table into a Music Visualizer appeared first on Make: DIY Projects and Ideas for Makers.