Posts with «arduino» label

Brasilia Espresso Machine PID Upgrade Brews Prefect Cup of Energy

Coffee, making and hacking addictions are just bound to get out of control. So did [Rhys Goodwin’s] coffee maker hack. What started as a little restoration project of a second-hand coffee machine resulted in a complete upgrade to state of the art coffee brewing technology.

The Brasilia Lady comes with a 300 ml brass boiler, a pump and four buttons for power, coffee, hot water and steam. A 3-way AC solenoid valve, wired directly to the buttons, selects one of the three functions, while a temperamental bimetal switch keeps the boiler roughly between almost there and way too hot.

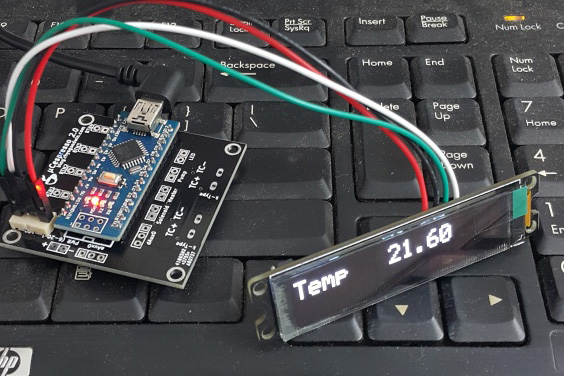
To reduce the temperature swing, [Rhys] decided to add a PID control loop, and on the way, an OLED display, too. He designed a little shield for the Arduino Nano, that interfaces with the present hardware through solid state relays. Two thermocouples measure the temperature of the boiler and group head while a thermal cut-off fuse protects the machine from overheating in case of a malfunction.

Also, the Lady’s makeup received a complete overhaul, starting with a fresh powder coating. A sealed enclosure along with a polished top panel for the OLED display were machined from aluminum. [Rhys] also added an external water tank that is connected to the machine through shiny, custom lathed tube fittings. Before the water enters the boiler, it passes through a custom preheater, to avoid cold water from entering the boiler directly. Not only does the result look fantastic, it also offers a lot more control over the temperature and the amount of water extracted, resulting in a perfect brew every time. Enjoy [Rhys’s] video where he explains his build:

Thanks to [Pirate14] for the tip!


Filed under: cooking hacks, home hacks

Venduino Serves Snacks, Shows Vending is Tricky Business

Seems like just about every hackerspace eventually ends up with an old vending machine that gets hacked and modded to serve up parts, tools, and consumables. But why don’t more hackerspaces build their own vending machines from scratch? Because as [Ryan Bates] found out, building a DIY vending machine isn’t as easy as it looks.

[Ryan]’s “Venduino” has a lot of hackerspace standard components – laser-cut birch plywood case, Parallax continuous rotation servos, an LCD screen from an old Nokia phone, and of course an Arduino. The design is simple, but the devil is in the details. The machine makes no attempt to validate the coins going into it, the product augurs are not quite optimized to dispense reliably, and the whole machine can be cleaned out of product with a few quick shakes. Granted, [Ryan] isn’t trying to build a reliable money-making machine, but his travails only underscore the quality engineering behind modern vending machines. It might not seem like it when your Cheetos are dangling from the end of an auger, but think about how many successful transactions the real things process in an environment with a lot of variables.

Of course, every failure mode is just something to improve in the next version, but as it is this is still a neat project with some great ideas. If you’re more interested in the workings of commercial machines, check out our posts on listening in on vending machine comms or a Tweeting vending machine.

[via r/arduino]


Filed under: Arduino Hacks, misc hacks
Hack a Day 02 Jul 21:01

Hacking a rotary phone with an Arduino and a GSM shield

While cleaning out his closet, Instructables user “Acmecorporation”  discovered an old rotary telephone. Instead of tossing it away, the Maker decided to give the old-school device some modern-day technology using an Arduino Pro Mini and a SIM900 GSM shield.

Acmecorporation is able to use the aptly named TOWA Phone (There Once Was A Telephone) to make and receive calls, send single DMTF tones, and even program numbers on speed dial. Aside from its classic bell ringer, there’s an RGB LED that indicates GSM status: red for offline, green for online, and blue for an incoming call.

The Maker briefly explains how it works:

To make a phone call you have to pick up the handset and dial the number, that’s all. Terminate call hanging up the handset.

When phone is ringing, pick up the handset to answer. Terminate it hanging up.

If you call to a support center or an office, usually you have to dial numbers to connect a specific department. You can do this because TOWA sends single DMTF tones.

Inside the Arduino script, you can add your favorite telephone numbers and combine it with a specific integer number. For example, I’ve stored my favorites combined with numbers from 1 to 8. So when I pick up the handset and dial 1, it starts a call to my wife. When I dial 2 or 3, it calls one of my sons, and so on.

Although Acmecorporation didn’t design TOWA for everyday use, it has become a permanent fixture on his desk. Do you have a rotary phone lying around? Time to brush off the dust and rig your own!

Grab things with an Arduino robotic gripper

Sam Baumgarten and his friend have developed a pretty rad robotic gripper with the help of Arduino and 3D printing. The gripper itself consists of three large hobby servos joined to the fingers with a linkage. The underactuated fingers have a force sensor under each contact point, while the control glove is equipped with tiny vibrating motors at the fingertips. This, of course, provides haptic feedback to ensure that the user doesn’t crush anything–the greater the pressure, the stronger the motors vibrate.

The gripper is mounted to a handle with abrasive tape–the same kind found on staircases and skateboards. The tape is also used on each finger for optimal gripping. A box at the base of the pole houses all of the electronics, which include an Arduino Pro Mini for controlling the addressable LEDs on top, another Arduino for handling the communication and fingers, and a battery for power.

Aside from the vibration motors, the glove features flexible resistors on the back of the fingers, an LED strip for visualization, a breakout board for measuring the resistance from the flex sensors, a battery, an Arduino Uno for processing, and an XBee module for transmitting the signals to the Arduino in the gripper.

If you think this sounds awesome, wait until you see it in action. Baumgartnen has shared a demo of the project, along with a detailed breakdown of his build. Kudos to Hackaday for finding this incredible piece of work!

Crush Cans Effortlessly with an Arduino-Powered Arm

Use an Arduino and an H-bridge motor circuit to build an automatic can crusher

Read more on MAKE

The post Crush Cans Effortlessly with an Arduino-Powered Arm appeared first on Make: DIY Projects and Ideas for Makers.

Intel releases an improved version of the Arduino 101 core!

A few weeks ago, an announcement was posted on the Arduino Forum mentioning new improvements on the software side of the Arduino/Genuino 101. With this release, the board–which was developed in collaboration with Intel–is reaching its full potential, with not only better code generation but unlocking useful features to make your sketches even more interactive as well.

You can easily upgrade the core using the Arduino IDE’s Board Manager (pictured below), while Arduino Create users will be automatically updated, so no action is required–the cool thing about the cloud!

In more detail:

  • The GCC compiler has been updated to support hardware extensions to the ARC EM core in the Intel® Curie™ module. This provides significant improvements in floating point operations, bit shifting, and other operations to enhance Sketch performance.
  • The Arduino/Genuino 101 platform offers 2MB Flash storage onboard, which is now enabled for user sketches.
  • An experimental driver has been implemented to enable the I2S interface via the CurieI2S library. Connecting the I2S bus to an external DAC (digital to analog converter) allows users to play high-quality music (HiFi).

Other improvements and bug fixes:

  • Motion Sensor: Several sample sketches, like MotionDetection, have been implemented to demonstrate the application of the IMU data
  • Bluetooth LE: Several new examples for BLE peripheral library added
  • IMU: Correct motion detection setting implemented
  • Library CurieTimerOne APIs are now compatible with the TimerOne library

For comprehensive release notes refer to the Intel Open Source Technology Center on GitHub.

A giant, Arduino-powered scrolling LED sign costs $15/foot

If you’ve ever wanted your own Times Square-like zipper, albeit a little smaller, you’re in luck. That’s because Josh Levine has created a giant scrolling LED display costing around $15 per foot, which consists of an Arduino Uno, a power supply, and seven programmable NeoPixel strips. The Maker also used a few pieces of plywood with a couple of aluminum angles glued to the top and bottom to enhance its sturdiness and appearance.

Equipped with 2,688 RGB pixels, the 12-foot-long sign is capable of showing text at 80 frames per second. Aside from basic scrolling messages, other features include a countdown timer with lookup-based gamma correction, column-by-column color control, custom fonts, sprite graphics with animation, and more.

The build is so simple, that you should be able to figure it out from looking at the pictures. Stick the strips to something, add some power, connect the Arduino data out pins to the strips’ data in pins.

The secret sauce is in the software. You can read about the parallel processing technique used here.

Bigger is better, right? Levine chose this size for his ticker only because it was the longest thing that could make it down his staircase–plus 400-pixels-long gives a refresh rate of 80 frames per second, which is just fast enough for nice animations. That being said, the Maker does note that he’d love to one day build a 100-foot-long sign “if you could find him a long enough surface to mount it on.” Until then, you can see it in action below and read all about the project on its page.

Venduino is a DIY Arduino vending machine

Ryan Bates has built a miniaturized vending machine from scratch using an Arduino Uno, four continuous rotation servos, and a Nokia 5110 LCD. The device, dubbed “Venduino,” includes four input buttons to make a selection, an LED indicator, and a 12V light strips to illuminate the inside of the cabinet. Whether it’s candies, toiletries, game cartridges, or miscellaneous items you’re looking to dispense, the possibilities are endless. Simply insert a coin, choose a product, and repeat.

Sound like something you’d like in your dorm room or cubicle? Bates has shared his code and schematics, and provided a detailed breakdown of his build below.

Deadpool’s Disembodied Head Shares a Catchphrase When It Holds Your Gear

Julia needed a place to rest her cool, new headphones when she wasn't using them, so her dad made a quipping Deadpool head.

Read more on MAKE

The post Deadpool’s Disembodied Head Shares a Catchphrase When It Holds Your Gear appeared first on Make: DIY Projects and Ideas for Makers.

David Cuartielles and New Ways of Making in EU

Earlier today, Arduino co-founder David Cuartielles participated in DSI4EU’s policy workshop entitled “Shaping the Future of Digital Social Innovation in Europe,” which gathered digital social innovators and policy makers to inspire and connect with different networks. During the workshop, Cuartielles and other leaders demonstrated clear examples of digital social innovation throughout Europe, along with some best practices and hands-on tips.

How is Digital Social Innovation (DSI) connected with Maker Culture, you ask? DSI is a type of collaborative innovation in which users and communities collaborate with digital technologies to co-create knowledge and solutions for a wide range of social needs at a scale that was unimaginable before the rise of the Internet. The organizations and projects identified and mapped by DSI4EU can be grouped within six broad domains and projects like Arduino are empowering people to develop New Ways of Making thanks to open hardware and educational programs!

DSI4EU is a support action in the H2020 Collective Awareness Platforms program. The initiative will grow and scale the current Digital Social Innovation network of projects, organizations, and individuals bringing together social entrepreneurs, hackers, communities, and academics working on key DSI fields such as the Maker Movement, the collaborative economy, open democracy and digital rights. It’s fostering digital innovations for social good, helping communities share data, collaborate to solve societal problems, and scale their initiatives focusing on open and distributed technologies and new sustainable business models. Finally, it’s representing the building blocks for a new participatory innovation model for Europe, a more decentralised web and an inclusive and sustainable society, including a radical approach to scaling, extending and connecting the DSI network in Europe.